


Likes
Comments
Share


@kauilmayel1996
Follow
So nice
Pero me faltó la maya
Looking good
No sé ni que crecí pero es bastante hermosa


Likes
10
Share


@LittleManGrow
Follow
Some bad news... Had pollen sac explode in the tent (two actually). I'm going to finish the grow, might lose some yield and have some seeds but better then nothing. I new this might happen from the sacs I found earlier in the grow. I did mist the tent down to minimize the pollen spread hopefully not to many flowers compromised.


Likes
9
Share


@4k2ofarmer
Follow
Las dos primeras fotos son empezando la semana dos y la siguiente acabándola,
una pasada el tirón que han pegado , va todo viento en popa
y vamos a llenar esta carpa de 1,2 con 16 macetas de 5,5litros.
hay dejo un videito :)
Likes
4
Share


@Growstopher
Follow
Fastbuds seeds
LSD-25 auto #2
Only using spring water for first week and spraying with foop mist every night.
Going to be using foop nutrients with Humboldts secret cal/mag and nectar for the gods ph up and down.
Here we go!

Likes
25
Share

@BettyFlores
Follow
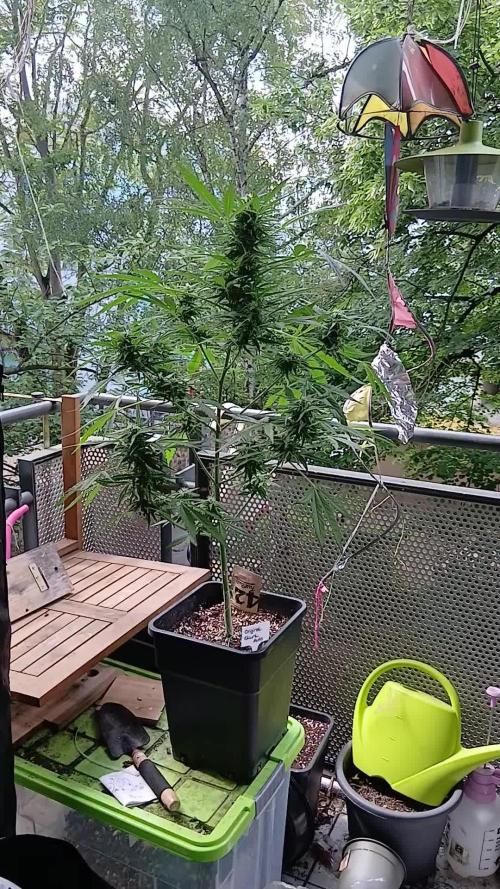
14.05.2026 Trotz der wirklich niedrigen Temperaturen (wir haben hier fast Wintereinbruch und das Mitte Mai 😅), macht sich die Original Skunk von FastBuds wirklich prima! Nicht mehr lang und ich werde sie ernten können. Vorausgesetzt es kommt nichts dazwischen wie Sturm, Hagel und eisige Temperaturen. Sie riecht mittlerweile sehr stark und man kann sie im Ambiente wahrnehmen 😅. Ich freue mich auf die baldige Ernte.
Happy growing 🌸💜
Likes
22
Share


@Knert
Follow
D29: Pistils are clearly showing now. She's looking really good and vigorous. I did notice a (very) small number of brown pistils. Might be from being a little bit careless while doing LST and toching it with the iron wire, could that be? Or could there something else going on? Speaking of LST, from now on I'm going to let the main cola grow upward again. I kept her really low to give the lower branches enough space, and I think that's the case now. I also tucked away most of the fan leaves that were blocking the light of certain tops. I think I'm going to plant her out in full ground by the end of the week. Temperatures are supposed to be 20+°C then. Any thoughts about that?
D31: I decided to let it stay in its current pot, in order not to stress the roots right before flowering. She still keeps on growing every day, still at a surprisingly high pace. Also, I'm tucking away the fan leaves and other leave that are blocking the sunlight from the tops. Tomorrow it's watering time again, right before the start of week 6. Since I'm only watering her after the soil is almost dried out, I'm probably not watering her for another 5-6 days. My question now is what fertilisers I should be adding. There's already 60g of granular 6-3-3 fertiliser in it (added over the past two weeks), so I won't be adding any more of that anymore. I have phosphorous grains (6-16-0), and potassium grains (2-0-20) and I'm wondering if I should already add those potassium grains or just stick with phosphorous grains this time and add potassium grains next watering when it's (probably by then) just started flowering. Any advice?

Likes
8
Share


@Kirsten
Follow
26.12.24:
I have noticed light stress on my plants. I had moved the lights further away and increased the light intensity to 70%. Unfortunately that created some issues. Namely severe palour of the leaves.
To try and rectify the situation, I've dimmed the lights to about 30%, staying at the same distance, about 30 inches away. I measured the par levels, after I did this. They should a reading of anywhere between 40 and 150, at the canopy of the plants. They are all different sizes. This seems to have improved the colouring on all plants.
After this evenings watering, I will monitor recovery and increase lighting intensity again slowly. I am also using the light cycle of 21/3, so the plants have many hours more light to absorb, than for example 12/12 or 18/6.
I am pleased with the progress, considering all of my mistakes!
29.12.24:
So I finally gave LST a shot, it's probably a bit too late, however I really want to get the most of the triploid pheno, and I went a little crazy and LST'd all plants except 2, as they're too small.
I did that late last night, this afternoon I was amazed to see the plants turn their leaves back to the light source. I'm glad I overcame my fear of trying it. I'm very excited to see them adapt and progress! 😁 there are videos above with before and after of my LST process.
Thanks for checking out my diary 🍃 ✌️
Likes
244
Share


@DogDoctorOfficial
Follow
And she is alone in her house, her sisters left the place and wen do their stuff in different places living this one just for her hihi and i fell like she did like the idea since all the others are autos and moving to fast for her, true being said after they leave she woke up a beast inside her and start growing way faster hihii
Man she is a beauty of the goods, so freaky from day one and i fell she will be a freak the all time , and a beautiful one hehe lets see, for now she is growing amazing and cute af, no changes on anything keeping it all the same as last week, did notice the RH was running low so increase that as you guys can see in the time lapse trailer i mede just for fun, this is a little project i have going on and the idea is a full video in the end with a complete from seed to harvest one , lets see how it all goes <3 <3 <3
For naw that is it, lets see how this week goes hehehe but have a felling she will evolve so much lets see , i am defiantly noticing an increase on her grown <3 <3 <3
And with the week coming to an end i look at her and fell the need to transplant her to a slightly bigger pot and by doing this i was able to had some mycorrhizae to help boost her roots and with that it all, she did great this week cant wait for the next one to go and to see how will this beauty of nature grow in her own freaky funky way, something i am just loving the world so far <3 <3 <3
She keeps growing and i think faster now but lets keep the eye out and we will find that out very soon hihihi <3 <3 <3
Just amazing , every day i see notorious changes on her , very exiting hihihihi
As always thank you all for stoping by , for the love and for it all, i fell blessed to have you all with me for one more love journey, and a different one form the rest i did so far <3 <3 <3
#aptus #aptusplanttech #aptusgang #aptusfamily #aptustrueplantscience #inbalancewithnature #trueplantscience #dogdoctorofficial #growerslove
With true love comes happiness , Always believe in your self and always do things expecting
nothing and with an open heart , be a giver and the universe will give back to you in ways you could not even imagine so <3 <3 <3
<3 <3 <3 Growers love to you all <3 <3 <3


Likes
22
Share


@Chumpkilla
Follow
8/25/23 - Day 73 - Another week down. We did a water change today. The buds are getting fatter and WAAAAAAY smellier. I have had a couple of times now where I lost a battle to the Skunk BOSS. I have had to reach in to move some buds around because they are too close to the light on some bud sites. You can see one of the buds up top, it has some white to it, I think that's due to being too close to the light. But once I move the buds around, I smell EXACTLY like a skunk. The smell is crazy strong. It's taking several full showers and it's still all over my fingers. Gloves will be an ABSOLUTE must when just reach in for a second.
8/28/23 - Day 76 - The buds are starting to grow even more, that the buds are growing buds out of them. That sounds weird but it's the only way to describe it. It looks like Romanesco. The buds are getting more dank, fatter, and more crystals are forming.
8/29/23 - Day 77 -I did some trimming today. I push some of the buds down and really got my arms in there today. All of the buds have gained so much mass to them when I squeeze them, they are really dense. I left a time laps video of me doing some late trimming, I was noticing some of the cannabis leaves were taking some of the light from the buds.
8/31/23 - Day 79 - The trichomes are still see-through and crystal clear. IM looking for a glossy-type look. My guess is still two/three weeks out.
If you are looking for this experience, check out https://www.getleaf.co/

Likes
3
Share


@Dzgn777
Follow
..уже появились янтарные трихомы...Дело близитса к харву))) интересно сколько получитса сухого?...

Likes
119
Share


@PEAKYPLANTERS
Follow
Ok ,let's GOOO!
These buds are eager to gain weight and develop under this phenomenal light and seem to enjoy excellent health thanks to these excellent nutrients😋🤗🤗🤗
Likes
90
Share


@DreamIT
Follow
🍊🏵️ Red Mandarine x9 SoG X ViparSpectra XS1000🍊🏵️
🏵️8.6 ...
🏵️9.6 Last day before harvest, yeah !!!!! It is really gorgeous !!!
🏵️10.6 ...
🏵️11.6 ...
🏵️12.6 ...
🏵️13.6 ...
🏵️14.6 Latest photos of the plants still in pots, they are already hanging ready to be cleaned
_________________________________________________________________________________________
❓ Are you new to the world of the cultivation and don't know where to safely buy your seeds?
😮From SweetSeeds you can find award-winning, sweet, fast, fragrant, beautiful, and delicious genetics !!!
✅http: //bit.ly/SweetSeeds_
______________________________________________
👀 Are you looking for a good lamp to start with? 👀
🌞Viparspectra has something more than the others, take a look at their site.
⏩ Use "GDVIP" for an extra discount or "ViparDreamIT" for an extra 5 %% discount
👀 Search for it on Amazon
✅Amazon US: https://amzn.to/30xSTVq
✅Amazon Canada: https://amzn.to/38udUVe
✅Viparspectra UE: bit.ly/ViparspectraUE
👀 Watch my ViparSpectra XS1000 unboxing on YouTube, leave a like and write to the channel 🦄
✅http://bit.ly/UnboxingViparSpectraDreamIT
______________________________________________
📷🥇 Follow the best photos on Instagram 🥇📷
https://www.instagram.com/dreamit420/
🔻🔻Leave a comment with your opinion if you pass by here🔻🔻
🤟🦄💚 Thank you and enjoy the growth 💚🦄🤟

Likes
13
Share


@Oyziphar
Follow
This week wasn't as bad as last week 😊 Nights were cold 😰, but not to much rain 😿 and a few hours of sun 😍
Temperatures in the greenhouse were medium : during the day 20°C 💀; min temp 3.5°C ; max temp 31,7°C 😤
Cookies Gelato has turned completely purple 👍👍👍
I defoliated the plants 😙 and had to remove budrot (especially in the Cookies Gelatoes)😨
I took the prettiest Cookies Gelato outside for a photo session in my garden 😍
Probably these will be the last pictures of the plans, before harvesting ! 👍😄
Likes
5
Share


@Xabii
Follow
49 Days!
Lost a day of timelapse footage, found a temporary fix tho, should not happen again.
The plant stretched a little and is full on on flower.
This will most likely end up as a single big bloop of bud again, sadly did not stretch as much as I liked it to be.
Overall a good week.
Spoiler: added lights to the bottom to get more light inside the plant at the first day of week 8, more on that next week.
Values are average of the day.
DATE - EC(us/cm)
20250705 1373
20250706 1362
20250707 1346
20250708 1378
20250709 1333
20250710 1331
20250711 1353
DATE - PH
20250705 5.67
20250706 5.67
20250707 5.90
20250708 5.95
20250709 6.17
20250710 6.15
20250711 6.13
DATE - ORP (mV)
20250705 -8
20250706 62
20250707 19
20250708 43
20250709 21
20250710 -1
20250711 -4
DATE - °C - RH% (Tent Temp/RH)
20250705 24.8 46
20250706 25.1 55
20250707 24.7 59
20250708 23.8 52
20250709 24.2 56
20250710 24.8 52
20250711 24.1 60
DATE - °C (Reservoir)
20250705 22.1
20250706 22.7
20250707 22.5
20250708 21.4
20250709 21.8
20250710 22.3
20250711 22.4
DATE - CF
20250705 13.73
20250706 13.62
20250707 13.46
20250708 13.78
20250709 13.33
20250710 13.31
20250711 13.53




Likes
10
Share


@GReeNiNjaHashashiN
Follow
This week was fun making videos for all 👀 eyes to see hopefully you enjoyed them as much as I like making them...
Likes
15
Share


@NokEternal
Follow
Entering the 9th week things are going Splendidly, I had to adjust the lights up a bit as NLA#1, Suffered a little bit of what looks to be Light Burn, Other than that, The Girls are filling out nicely, and the aroma is kicking in good. I also decided too go ahead and start using Fox Farm Bembe, which to my understanding is a Molasses backed with Microbes for the Root Zone, That and I've Heard it's a natural sweetener as well. Thanks everyone thus far for the views and likes, One Love...

Likes
75
Share

@DogDoctorOfficial
Follow
Week 3 Veg Report: Growth, Innovation, and Transition Unveiled!
Hello, my green-thumbed comrades! Week 3 with our Panty Punch Auto has been an absolute whirlwind of growth, innovation, and exciting developments. Let's dive into the vibrant tapestry of green wonders that unfolded during this time, enriched by both our plant's progress and the exciting sponsorship from TrolMaster.
Week 3 has been a testament to the resilience and vigor of our Panty Punch Auto. The marvels of her growth never cease to amaze, with each day unveiling new heights of green glory. So astounding has her progress been that I felt compelled to elevate her journey by moving her to her final fabric pot.
In a bold move, I opted for a 50 L fabric pot, though using only 25 L of soil. The idea? To observe how her roots would influence her growth. Into this soil, I pre-mixed a special concoction: Aptus Holland all-in-one pellets, substrate buffer powder, and micromix soil. This super soil recipe is a testament to the meticulous care I've put into ensuring our plant's nourishment. Upon transplanting, her roots were impeccable. I even took the extra step of applying Aptus Holland Mycor Mix to further enhance her transition.
Exciting news! TrolMaster has graciously joined as a sponsor of this diary, infusing our journey with cutting-edge technology. They've sent us their Tent X Controller, a marvel of modern horticulture. This device offers precise environmental control, managing factors like temperature, humidity, and CO2 levels. It's a game-changer in optimizing our growing conditions. I can't wait to share the unboxing video and assembly process in the upcoming weeks!
To Seedstockers, Aptus Holland, Grow Diaries, TrolMaster, and the entire green community, your unwavering support fuels this journey of growth and discovery. Together, we celebrate the wonders of nature and the boundless possibilities of innovation.
Here's to the Panty Punch Auto, to growth, innovation, and the vibrant green community that propels us forward!
Genetics - Panty Punch Auto - https://seedstockers.com/
Plant nutrition - Aptus Holland - https://aptus-holland.com
LED Photons - Lumatek - https://lumatek-lighting.com
Controls - Trol Master - https://www.trolmaster.eu/
Watering - myself
Love and attention - Me, myself and i
As always thank you all for stopping by, for the love and for it all , this journey of mine wold just not be the same without you guys, the love and support is very much appreciated and i fell honored and blessed with you all in my life, With true love comes happiness. Always believe in your self and always do things expecting nothing and with an open heart , be a giver and the universe will give back to you in ways you could not even imagine so
More info, the ocasional give-away and exclusive updates from all my adventures can be found - links in the profile description
Friendly reminder all you see here is pure research and for educational purposes only
Growers Love To you All 💚 💚 💚
