


Likes
10
Share


@NoName123
Follow
Forced harvest @ day 53, nanners explotion! She s not full ready yet but I don't want seeds in my buds! I ll update after drying, I expect 50 grams final (final outcome 37g). So, I learned it s not a good idea growing bag seeds, but at the end the outcome is good enough if I thinking about the troubles I had! @ the end I discovered that growing Mary it s sooo easy, more than my flowers in balcony ahahahah, and it s absolutely possible with micro space/budget. My enviroment is a grow box 40x40x120cm with 2 China led cob lights very cheap! You can do this only learning from guides on the web and discovering other diaries in this beautiful site! I hope my diary will helpful for all the guys who, like me, looking to manage the hermie problems! So I already start my new cicle, Wappa and Bruce Banner #3 (this time no bag seeds!) stay tuned!


Likes
2
Share


@LittleBigTrees
Follow
Feeding max recomended strength H&G soil A&B and they are loving it. Buds are swelling now and trichomes are more visable .
This plant is growing fast .

Likes
4
Share

@Ensign420
Follow
|»» LOG DISCLAIMER: Not intended as a grow guide. Grow log entries are usually posted 3 weeks later and are for my learning reference. ««|
Introduction - Week 26 Summary -
Ensign's log, stardate 17608.3,
Wow what a week!
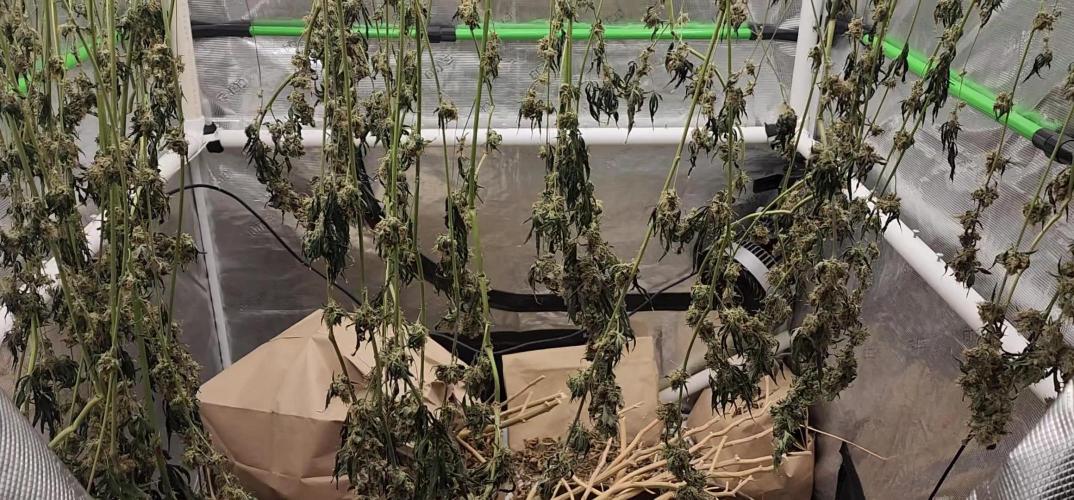
Drying is always pretty simple and been checking daily. Buds are drying nicely and terps are smelling pretty dank!!
Most of the week has been in the veg tent with tissue culture! Mixed another batch of establishment media and took proper explant cuttings. Also super-cropped the mothers to even out the canopy.
Ahh yea! Getting hyped for trim day next week!
Next week will also be the last week for this grow log, but am already planning out the next cycle.
Anyways! Onwards to next week!
[START OF WEEK 26]
==========================================================
---------- [ 4x4 MAIN TENT ] ----------
Heady OG BX1 #1 [Round4 ~Wk19] - WEEK 26 - Dry Wk1
----------- [ 3x3 VEG TENT ] ------------
TKO - WEEK 09 - Full Veg
Gorilla Goat #1 - WEEK 05 - Full Veg
Heady OG BX1 - WEEK 09 - Full Veg
Garlic Budder OG#1 - WEEK 05 - Full Veg
10/13/25 → 10/19/25
This Week's Estimated Goals
----------------------------------------------------------------------------------------------
DLI: ~0 mol/m²/d
PPFD: ~0 μmol/m²/s
VPD: ~1.5 kPa
This Week's Meter Readings & Averages
----------------------------------------------------------------------------------------------
Light On/Off: 00:00 - 00:00 | Wattage: ~000.0W [LV00]
Distance From Canopy: ~00”
DLI: ~0.00 mol/m²/d
PPFD: ~0 μmol/m²/s
VPD: ~1.17 kPa
Soil %: [47.4, 34.1, 35.0, 55.7, 43.7, 43.6, 44.0, 43.3]
==========================================================
Day 01 - Monday - 10/13/25 - Total Days: 183
-----------------------------------
Daily Averages ~[+01:00]
- Temps: 78.8°F [26.0°C]
- Humidity: 64.4%
- VPD: 1.19 kPa
- Soil %: [49, 34, 35, 57, 44, 44, 44, 42]
-----------------------------------
- [22:05]: Night check on the 4x4 tent.
--- Ca-Caw!! Looking great!
--- Heady OG BX1 #1 is drying along and no signs of mold. Also airflow and RH is stable and within the 60-70% range.
--- Getting stoked! Trim day is 9 days away!
- [22:09]: Checked the Ecowitt soil moisture sensor data:
------------------ [ 4x4 MAIN TENT ] ---------------
------ 48% - [CH01 FT » G30 - Heady OG BX1 #1]
------ 35% - [CH02 FB » G30 - Heady OG BX1 #1]
------ 35% - [CH03 BT » G20 - TKO]
------ 56% - [CH04 BB » G20 - TKO]
------------------ [ 3x3 VEG TENT ] ----------------
------ 46% - [CH05 BL » GR7 - TKO]
------ 40% - [CH06 BR » GR7 - Gorilla Goat #1]
------ 40% - [CH07 FL » GR7 - Heady OG BX1 #1]
------ 40% - [CH08 FR » GR7 - Garlic Budder OG#1]
--------- Veg: 38% - 45% | Flower: 45% - 55%
--------- General: 30% [Dry] «| 45 - 60% [Moist] |» 70% [Wet]
- [22:18]: Checked the 3x3 veg tent.
--- Looking healthy in the veg garden!
--- All of the vegging mothers are looking great and the canopy is starting to even out.
--- Also clones look healthy and no need to water yet.
--- The stems, err, I mean, explants, don’t show any signs of contamination.
--- Staying positive, glad the growth media is sterile and the overall procedure was successful.
--- Anyways! Plan to create more establishment media and cut proper explants soon!
- [22:21]: Checked the humidifiers.
--- Tanks are still full and no leaks found.
Day 02 - Tuesday - 10/14/25 - Total Days: 184
-----------------------------------
Daily Averages ~[+01:00]
- Temps: 76.9°F [24.9°C]
- Humidity: 64.8%
- VPD: 1.11 kPa
- Soil %: [46, 34, 35, 56, 43, 43, 44, 43]
-----------------------------------
- [21:44]: Night check on the 4x4 tent.
--- Looking good in the dry tent!
--- Heady OG is drying along and humidity levels look great!
--- Nothing to do but maintain and wait to trim in 8 days!
- [21:55]: Checked the Ecowitt soil moisture sensor data:
------------------ [ 4x4 MAIN TENT ] ---------------
------ 45% - [CH01 FT » G30 - Heady OG BX1 #1]
------ 34% - [CH02 FB » G30 - Heady OG BX1 #1]
------ 35% - [CH03 BT » G20 - TKO]
------ 56% - [CH04 BB » G20 - TKO]
------------------ [ 3x3 VEG TENT ] ----------------
------ 41% - [CH05 BL » GR7 - TKO]
------ 40% - [CH06 BR » GR7 - Gorilla Goat #1]
------ 47% - [CH07 FL » GR7 - Heady OG BX1 #1]
------ 46% - [CH08 FR » GR7 - Garlic Budder OG#1]
--------- Veg: 38% - 45% | Flower: 45% - 55%
--------- General: 30% [Dry] «| 45 - 60% [Moist] |» 70% [Wet]
- [21:59]: Checked the 3x3 veg tent.
--- Looking healthy and growth is raging!
--- All mothers are looking beautiful!
--- Clones are getting taller and looking healthy!
--- Gorilla Goat #2 needs watering. Let’s go Ensign!
- [22:03]: Here is the starting initial watering range:
------ Gorilla Goat #2 » 255.4g → 300.3g and was last watered 4 days ago.
--------- General Solo Range: [Dry] «| [Initial Cup Weight] + ~55-100g |» [Wet]
--- Took the starting weight before watering,
------ Gorilla Goat #2 » 230.8g
--- While on a scale,
--- Gently misted her straw mulch with RO water.
--- Tried to keep the top growth dry.
--- Misted 5-10 sprays. Waited a few seconds, then misted again.
--- Made sure to reference the watering weights.
--- Repeated this process until the cup weighted at least 300g.
--- There was no runoff.
- [22:23]: Took the saturated weight after watering,
------ Gorilla Goat #2 » 345.7g
--- Marked the watering date on the side of the cup. Also marked the saturated weight on the back.
--- Placed her back into the tent.
--- Decided to train and super-crop both clones.
--- Bent the taller branches to lower the canopy.
- [22:38]: Checked the humidifiers.
--- Tanks are still full and no leaks found.
--- Onwards Ensign!
Day 03 - Wednesday - 10/15/25 - Total Days: 185
-----------------------------------
Daily Averages ~[+01:00]
- Temps: 75.6°F [24.2°C]
- Humidity: 63.8%
- VPD: 1.09 kPa
- Soil %: [48, 34, 35, 56, 44, 43, 44, 42]
-----------------------------------
- [+01:33]: Quick night check on the 4x4 tent.
--- Looking great in the dry tent!
--- Also starting to smell dank!
--- 7 more days until the big trim!
- [+01:37]: Checked the 3x3 veg tent.
--- Veg garden is healthy and growth is green!
--- Both the Heady OG BX1 #1 and TKO mothers will need another topping soon.
--- Clones in the propagation tray also look great and no need to water.
--- The explant media is still looking sterile with no signs of contamination.
--- Easy night in the garden. Nice!
- [+01:40]: Checked the humidifiers.
--- Tanks are still full and no leaks found.
--- Okay! Tomorrow plan to dive back into tissue culture and prep more growth media.
--- Onwards Ensign!
Day 04 - Thursday - 10/16/25 - Total Days: 186
-----------------------------------
Daily Averages ~[+01:00]
- Temps: 74.6°F [23.7°C]
- Humidity: 62.2%
- VPD: 1.11 kPa
- Soil %: [46, 34, 35, 56, 43, 44, 44, 45]
-----------------------------------
- [11:41]: Alright! Back to tissue culture and time to start another batch of establishment media!
--- Took the plant growth regulators out of cold-storage (my fridge).
------ [ » SMOKES A BOWL « ]
--- While the products warmed up, gathered the necessary supplies and setup my workstations.
--- Currently, focusing on:
------ PHASE 01 » ESTABLISHMENT
--------- » DAY 01 » MEDIA - PART 01 - Mixing the growth media
--------- » DAY 01 » MEDIA - PART 02 - Sterilization of media and tools [via autoclaving]
--- Going to use the same establishment formula, but doubling the yield.
--- Also using RO water instead of distilled water.
--- Here's the establishment media formula:
--- [» VER.0001 |» INITIAL TROPICAL PLANTS FORMULA |» 0.5L (500mL) RO WATER «]
------ MS [Muashige & Skoog]
--------- » 2.22g
------ Sucrose [Cane Sugar]
--------- » 15g
------ BAP [6-Benzlaminopurine | Cytokinin]
--------- » 0.5mg » 0.5mL » 500μL
------ IBA [Indole-3-Butyric Acid | Auxin]
--------- » 0.05mg » 0.05mL » 50μL
------ AGAR [Jelling Agent]
--------- » 3.5g
------ PH [Potential Hydrogen]
--------- » 5.7
--- [» 1mg/mL CONCENTRATION ratio | 1mg = 1mL | 1mL = 1000μL «]
- [12:59]: Time to prep the growth media!
--- Made sure to turn OFF the lung-room's oscillating fan.
--- Filled a measuring cup with 400mL of RO water.
--- Dropped a clean magnetic mixing bar into the measuring cup.
- [13:05]: Placed the measuring cup on the magnetic stirrer.
--- Turned the unit ON and have the unit on LOW.
- [13:11]: Using a precision scale (sensitive to 0.01g) along with a micro-pipette (1000μL capacity along with tips) and disposable (100mL) weigh boats,
------ Added 2.22g of MS [Muashige & Skoog]
------ Added 15g of Sucrose [Cane Sugar]
------ Added 500μL of BAP [6-Benzlaminopurine | Cytokinin]
------ Added 50μL of IBA [Indole-3-Butyric Acid | Auxin]
------ Added 3.5g of AGAR [Jelling Agent]
------ Then filled the measuring cup to the 500mL line before covering the top with plastic wrap.
--- Alright!
- [13:46]: Let the media mix on the magnetic stirrer for a bit.
--- Have the unit set to LOW with a steady vortex.
------ [ » ~20 MINUTES LATER « ]
- [14:09]: Okay! Time to pH the establishment media!
--- Gently removed the bottom cap of the AC Infinity PH Meter PRO [AC-PHM7]. Placed the cap in the storage case for later. Covered the top with plastic wrap (KCL solution still inside the cap).
--- Swirled the probe in a cup of RO water to rinse off the storage solution.
--- Shook the excess water out and wiped the unit with a clean paper towel making sure all mineral buildup was removed (kept away from the very tip of the probe).
--- Temporarily placed the meter back into the cup of RO water.
--- Removed the plastic wrap of the establishment media.
- [14:13]: Using the AC Infinity PH Meter PRO [AC-PHM7],
--- Took the establishment media's initial pH reading.
--- The pH was at 5.14
--- Using the micro pipette,
------ Added pH Up solution.
--- Made sure to let the media solution mix for a bit before checking for pH readings.
- [14:21]: Adjusted the media's pH until it stabilized to 5.58
--- For this batch, tried to go for a range of 5.4 to 5.8 pH.
--- Also glad that I did not need to add PH down.
- [14:43]: Poured the pH'd establishment media into separate polypropylene containers.
--- Made sure to re-mix the media solution between container fillings.
--- Ended up splitting the media solution into 12 containers.
------ 8x » 125mL Polypropylene Bottles [with screw cap lids]
------ 4x » 236mL (0.5pt) Glass Mason Jars [with polypropylene jamming lids]
--- Have the lids of all vessels loosely on and set each aside for later autoclaving.
--- Also filled 12 empty polypropylene bottles with RO water and placed the lids on loosely (4 bottles are re-used).
- [14:58]: Prepped the tools for sterilization.
--- Took a new 5.25in x 10in sterilization pouch and added the following tools:
------ 3x stainless steel forceps
------ 3x stainless steel scissors
--- Before placing into the pouch, wiped each tool with a paper towel sprayed with 70% isopropyl alcohol.
--- Sealed the bag and marked the date.
--- Time to autoclave everything in the pressure cooker!
--- Filled a Presto 23qt-Pressure Cooker with 12 cups of RO water.
- [15:06]: Added a few aluminum foil balls to the bottom of the pressure cooker.
--- Placed the first rack on top of the foil.
--- Made sure the rack was level and stable resting above the water.
--- Gently placed the containers of media into the pressure cooker and onto the first rack. Lids are still loose.
--- Made sure to give space for each container and kept them away from the sides of the pressure cooker.
--- Placed a second pressure cooker rack on top of the containers of media.
--- Placed the containers of RO water onto the second rack. Lids are still loose.
--- Placed the third rack on top of the containers of water.
- [15:16]: Lastly, placed the sterilization bag of tools on top of the third rack.
--- Took the pressure cooker lid and made sure the release vent was clear of debris before placing it on.
--- Sealed and secured the lid.
--- Pressure vessel has been sealed!
--- Alright! Time to sterilize!
--- While keeping the vessel level and straight up, moved the sealed pressure cooker to the kitchen for heating.
- [15:23]: Placed the pressure cooker onto a butane-gas stove.
--- Turned the stove ON and set it to HIGH.
------ [ » ~20 MINUTES LATER « ]
--- Once steam was venting out of the release vent,
--- Placed the metal rocker onto the vent.
--- Shortly afterwards, the pressure top-lock sprung up to indicate the vessel was under pressure.
--- Then the pressure gauge started to rise.
------ [ » ~10 MINUTES LATER « ]
--- At 15psi, the metal rocker started to rock!
- [15:56]: Turned down the stove down to LOW.
--- Set a timer for 15 minutes and began monitoring the pressure gauge.
--- Maintained the 15psi by making minor adjustments to the stove.
------ [ » ~15 MINUTES LATER « ]
- [16:12]: Turned the stove completely OFF and waited until the pressure cooker's top-lock dropped down which indicated that pressure levels were safe to open.
------ [ » ~40 MINUTES LATER « ]
--- Once the pressure cooker was at safe levels (0psi) and the top-lock was down,
- [16:48]: Moved the pressure cooker into the lung room.
--- The pressure cooker was still quite hot so was careful to keep the vessel straight up and level during transport.
--- Used towels for insulation.
--- Rested the hot pressure cooker onto a stack of 5-gallon buckets covered with layers of towels and folded paper bags.
--- Gently opened the pressure cooker and set the lid aside.
- [16:57]: While wearing nylon gloves, sprayed my hands with 70% isopropyl alcohol.
--- Gently removed the bag of sterile tools placed it onto a Pyrex dish.
--- Removed the top rack and set it aside.
--- Then one container at a time,
--- Gently tightened and secured the lids of each bottle of sterile water before placing onto the Pyrex dish.
--- Removed the middle rack and set it aside.
--- Then one container at a time,
--- Gently tightened and secured the lids of each bottle and jar of sterile media before placing onto the Pyrex dish.
--- Throughout the entire process, kept the gloves on and sprayed my hands regularly with 70% isopropyl alcohol.
--- Decided to store all the bottles in the Pyrex dish.
- [17:16]: Have the dish resting on a shelf in the lung room. The jars of media are set right next to the Pyrex dish on a towel.
--- To prevent dust, covered everything with towels.
--- Done for now and will check on the growth media tomorrow.
--- If all goes well, should be taking new explant cuttings in a couple days!
- [17:39]: Night check on the 3x3 veg tent.
--- Looking beautiful and healthy in the veg garden!
--- All moms are getting bushy and getting pretty close to the grow light.
--- Since I plan to take explant cuttings soon, not going to top or train quite yet.
--- Clones also looking healthy and seem unaffected by the super-cropping. Nice!
- [17:57]: Checked the Ecowitt soil moisture sensor data:
------------------ [ 4x4 MAIN TENT ] ---------------
------ 45% - [CH01 FT » G30 - Heady OG BX1 #1]
------ 34% - [CH02 FB » G30 - Heady OG BX1 #1]
------ 35% - [CH03 BT » G20 - TKO]
------ 55% - [CH04 BB » G20 - TKO]
------------------ [ 3x3 VEG TENT ] ----------------
------ 43% - [CH05 BL » GR7 - TKO]
------ 45% - [CH06 BR » GR7 - Gorilla Goat #1]
------ 42% - [CH07 FL » GR7 - Heady OG BX1 #1]
------ 44% - [CH08 FR » GR7 - Garlic Budder OG#1]
--------- Veg: 38% - 45% | Flower: 45% - 55%
--------- General: 30% [Dry] «| 45 - 60% [Moist] |» 70% [Wet]
- [17:59]: Checked the 4x4 main tent.
--- Ca-Caw!! I got Headies!
--- Wow! Heady OG BX1 #1 is drying along beautifully and she is smelling dank!
--- Also no signs of mold and RH levels look stable!
--- 6 more days until the big trim!
- [18:11]: Checked the humidifiers.
--- Tanks are still full and no leaks found.
--- Wow what a day!
--- Still gots more to do!
--- Let’s go! Let’s grow!
--- Onwards Ensign!
Day 05 - Friday - 10/17/25 - Total Days: 187
-----------------------------------
Daily Averages ~[+01:00]
- Temps: 76.0°F [24.4°C]
- Humidity: 62.0%
- VPD: 1.16 kPa
- Soil %: [48, 34, 35, 55, 44, 44, 44, 42]
-----------------------------------
- [22:57]: Night check on the 4x4 tent.
--- Ca-Caw! Headies is smelling dank!
--- RH levels are getting a bit dry, but are okay.
--- Wow buds are frosty with trichomes!
--- With 5 days until trim day, getting stoked!
- [23:04]: Checked the Ecowitt soil moisture sensor data:
------------------ [ 4x4 MAIN TENT ] ---------------
------ 47% - [CH01 FT » G30 - Heady OG BX1 #1]
------ 34% - [CH02 FB » G30 - Heady OG BX1 #1]
------ 35% - [CH03 BT » G20 - TKO]
------ 55% - [CH04 BB » G20 - TKO]
------------------ [ 3x3 VEG TENT ] ----------------
------ 46% - [CH05 BL » GR7 - TKO]
------ 40% - [CH06 BR » GR7 - Gorilla Goat #1]
------ 45% - [CH07 FL » GR7 - Heady OG BX1 #1]
------ 50% - [CH08 FR » GR7 - Garlic Budder OG#1]
--------- Veg: 38% - 45% | Flower: 45% - 55%
--------- General: 30% [Dry] «| 45 - 60% [Moist] |» 70% [Wet]
- [23:11]: Checked the 3x3 veg tent.
--- Looking healthy in the veg garden!
--- Mothers are getting bushy and tall!
--- Super-cropped and trained the taller branches down to lower the canopy.
--- Plan to take tissue culture cuttings tomorrow so glad there are plenty of tops to choose. Still deciding on which mother to preserve next.
--- Clones in the propagation tray look healthy!
--- The original Garlic Budder #2 clone needs watering.
- [23:26]: Here is the starting initial watering range:
------ Garlic Budder OG#2 » 256.4g → 300.2g
--------- General Solo Range: [Dry] «| [Initial Cup Weight] + ~55-100g |» [Wet]
--- Took the starting weight before watering,
------ Garlic Budder OG#2 » 258.9g
--- While on a scale,
--- Gently misted her straw mulch with RO water.
--- Tried to keep the top growth dry.
--- Misted 5-10 sprays. Waited a few seconds, then misted again.
--- Made sure to reference the watering weights.
--- Repeated this process until the cup weighted at least 300g.
--- There was no runoff.
- [23:40]: Took the saturated weight after watering,
------ Garlic Budder OG#2 » [000.0]g
--- Marked the watering date on the side of the cup. Also marked the saturated weight on the back.
--- Placed her back into the tent.
- [23:45]: Checked the humidifiers.
--- Tanks are still full and no leaks found.
Day 06 - Saturday - 10/18/25 - Total Days: 188
-----------------------------------
Daily Averages ~[+01:00]
- Temps: 76.8°F [24.9°C]
- Humidity: 60.3%
- VPD: 1.25 kPa
- Soil %: [47, 34, 35, 55, 44, 44, 44, 47]
-----------------------------------
- [15:19]: Decided to decrease the VPD level a bit.
--- Within the AC Infinity App,
--- Changed the schedule name from 'Flower [12/12]' to 'Drying [0/24].' Oops.
--- For the Main Tent [4x4] controller,
--- Adjusted the 'Drying [0/24]' Schedule for the exhaust fan.
------ Decreased the VPD LOW trigger value from 1.5kPa to 1.4kPa
--- Adjusted the 'Drying [0/24]' Schedule for the humidifier.
------ Decreased the VPD target value from 1.5kPa to 1.4kPa
--- This should increase the relative humidity a bit and will maintain a 60-65% range
- [16:59]: Evening check on the 3x3 veg tent.
--- Wow the veg garden is raging with healthy growth!
--- Even with the lower veg temps, growth has been perky and bushy!
--- The TKO mother has been looking a bit on the purple-side, but I plan to increase the temps back after trim day.
- [17:23]: Okay! Time to continue the tissue culture journey!
--- Checked on the sterilized media, water, and tools.
--- Ooo yea! The growth media in the glass jars have solidified nicely!
--- The media in the bottles also look great! Found only one that did not gel properly.
--- Hmm. The sterile water bottles are not looking sterile. Unlike the first batch (using distilled water), each RO bottle had tiny white particles floating in the water.
--- I think this was due to the water source. The RO water used was from the plant reservoir. For the next sterilization, will try using water straight from the tap. Will discard the entire batch and try again later.
- [17:34]: Anyways! Time to cut and sterilize another batch of explant cuttings.
--- Using the similar protocols as last time, but with a few changes.
--- Instead of distilled, using reverse-osmosis (RO) water.
--- Also simplifying the workflow and will not be using the sterile water.
--- Only taking cuttings from one cultivar.
--- Today, attempting to preserve Heady OG BX1 #1
--- Unlike the last attempt, going to be cutting apical nodes and will leave all leaf growth on.
--- Last attempt was more for monsteras and not cannabis.
- [17:35]: Made sure the lung room's oscillating fan was OFF during the entire process.
--- Put on a fresh pair of nitrile gloves.
--- Okay! Let's grow Ensign!
- [17:47]: Filled a glass beaker with 180mL of RO water.
--- Using a micro-pipette,
------ Added 20mL of Clorox bleach
--- Mixed the solution.
- [17:52]: Poured the bleach solution into a glass mason jar.
------ Added 1 drop of Dawn dish soap.
--- Dropped a magnetic mixing rod into the jar before setting it onto the magnetic stirrer.
--- Turned the unit ON and set it to a low setting.
--- Placed a polypropylene lid loosely on.
- [18:02]: Rinsed and filled the glass beaker with 70% isopropyl alcohol.
--- Filled another glass beaker with RO water before adding a drop of Dawn dish soap. Mixed the solution.
--- Okay! Time to take the cuttings!
--- Using a clean pair of trimmers,
- [18:09]: Gently cut two clone cuttings from the Heady OG BX1 #1 mother.
--- Stripped each cutting down to 2-inch apical nodes making sure to leave about 0.5 inch of stem growth for planting.
------ Prepared a total of 2 nodal cuttings.
--- Dropped the nodal cuttings into the cup of soapy water.
--- Swirled the cuttings in the soapy water for a bit.
--- Opened the jar containing the 10% bleach solution.
--- Using clean tweezers,
--- Took each cutting out of the RO water and carefully submerged it into the beaker of 70% isopropyl alcohol for about 30 seconds.
--- Then transferred the cutting from the isopropyl alcohol straight into the jar of bleach solution.
--- Once both cuttings were in the jar, sealed the top with the polypropylene lid.
- [18:23]: Flipped and set the entire bleach jar upside down onto the magnetic stirrer.
--- Started using the magnetic stirrer.
--- But the cuttings were getting hit by the bar so ended up turning the unit OFF.
--- Instead, made sure to swirled the bottle every few minutes to agitate the cuttings.
--- For a proper sterilization, the cuttings should be agitated in the hypochlorite (bleach) solution for at least 20 minutes.
--- While waiting for the explants to sterilize, prepped the still air box.
- [18:39]: Unfolded and placed a Safloga still-air box onto my desk.
--- Thoroughly misted the inside of the air box with 70% isopropyl alcohol making sure to coat the entire chamber.
--- Then isopropyl misted and placed the following items inside of the still air box,
------ x1 » Jar of Establishment Media
------ x1 » Bottle of Establishment Media
------ x1 » Glass-Bead Sterilizer
------ x1 » Roll of Plastic Wrap [pre-cut]
------ x1 » Sterilization Bag Containing:
--------- x3 » Stainless Steel Forceps
--------- x3 » Stainless Steel Scissors
--- Made sure to fully coat the outside of the tool bag and each of the containers with 70% alcohol.
--- The bag had a torn corner (Oops), so made sure to spray the inside with a few mists of isopropyl alcohol.
--- For the glass-bead sterilizer,
------ Wiped the entire unit with isopropyl alcohol.
------ Before filling the unit with the included beads, misted the heating chamber with a spray of isopropyl alcohol.
------ Misted the glass beads again with a spray of isopropyl alcohol.
--- Set the cleaned glass-bead sterilizer into the still air box.
- [19:02]: Still air box fully prepped for explants!
--- Okay! Explant nodal sterilization complete!
--- While still wearing gloves,
--- Misted the outside of the explant jar with 70% isopropyl alcohol before placing it into the still-air box.
--- Turned the glass-bead sterilizer ON.
--- Made sure to re-seal the chamber.
- [19:05]: Okay! Finally time to start the tissue culture transplant!
--- Let's go Ensign!
--- Sprayed my gloved hands with 70% isopropyl alcohol (also put on a pair of cloth arm sleeves),
--- Placed my hands through the arm holes and into the still air box to begin the process.
--- Started by laying out my initial workspace:
------ » Far Left Quadrant » Jar of Sterile Establishment Media
------ » Far Center » Bottle of Sterile Establishment Media
------ » Far Right Quadrant » Glass-Bead Sterilizer
------ » Mid Center » Bleach Jar with Explant Cuttings [Main Workspace]
------ » Near Left Quadrant » Empty [Trash Area]
------ » Near Right Quadrant » Bag of Sterile Tools & Roll of Plastic Wrap
--- Opened the bag of tools and placed the forceps and scissors into the pre-heated glass-bead sterilizer.
--- Set the bag in the trash area (near left quadrant).
--- Loosened the lids of both containers of sterile media but did not remove the lids. The lids were resting on top and could easily be lifted.
--- Also took lid off of the bleach jar and gently set it on the table.
--- Took the jar of sterile media and set it in the center of my workspace (to the right of the bleach jar).
--- Using my left hand, took a set of scissors from the glass-bead sterilizer and gently cut the bottom of the first cutting.
--- Once the bottom cut was made, placed the scissors back into the glass-bead sterilizer.
--- Using my left hand, lifted the lid off of the jar of sterile media and inserted the trimmed end of the cutting straight into the growth media (using my right hand).
--- Covered the jar with the lid and placed the forceps back into the glass-bead sterilizer.
--- Tighten the lid of the jar and set it aside.
------ [ » REPEATED THE ABOVE PROCESS FOR THE BOTTLE OF GROWTH MEDIA « ]
--- Once the last cutting was transferred from the bleach jar into the sterile media,
--- Turned the glass-bead sterilizer OFF.
--- Cleaned up my workplace and placed the scrap stem tips and bleach jar out of the way (near left quadrant).
- [19:28]: Wrapped the lid of each explant container with plastic wrap before setting it in the center of the workspace.
--- Explant transplant completed!
- [19:59]: Using a label printer (Brother DT410), made a set of labels for each container:
------ Heady OG BX1 #1 | 04.24.25 | Photo | Reg
------ Formula: v0001 | ExBatch: 0002 | Lot: 01 | Pod: 01
------ Establishment Media | Sealed On: 10/18/25
--- Opened the still air box.
--- Then one container at a time, took an explant out and wrapped the lid with a label.
--- Set the labeled containers onto the propagation tray (in the 3x3 veg tent).
- [20:07]: Done!
------ The explants are around 37 μmol/m²/s which gives a DLI of 2.40 mol/m²/d under an 18/6 light cycle.
--- Will check daily for contamination.
--- Ca-Caw!! Ahh yea!
--- Heady OG BX1 is now officially my first true attempt at cannabis tissue culture!
--- Using this new workflow, I may try reusing the TKO media. Do plan to take new cuttings soon. May even try using the liquid media.
--- Shout out to microclone and Bill Graham! His 'Tissueponics' video contains tips and tricks of the trade that have straight up changed the way I think of DIY cannabis tissue culture.
--- Plan to further refine my process and will continue to refine the workflow with each attempt.
- [20:15]: Checked the Ecowitt soil moisture sensor data:
------------------ [ 4x4 MAIN TENT ] ---------------
------ 54% - [CH01 FT » G30 - Heady OG BX1 #1]
------ 34% - [CH02 FB » G30 - Heady OG BX1 #1]
------ 35% - [CH03 BT » G20 - TKO]
------ 55% - [CH04 BB » G20 - TKO]
------------------ [ 3x3 VEG TENT ] ----------------
------ 43% - [CH05 BL » GR7 - TKO]
------ 48% - [CH06 BR » GR7 - Gorilla Goat #1]
------ 42% - [CH07 FL » GR7 - Heady OG BX1 #1]
------ 45% - [CH08 FR » GR7 - Garlic Budder OG#1]
--------- Veg: 38% - 45% | Flower: 45% - 55%
--------- General: 30% [Dry] «| 45 - 60% [Moist] |» 70% [Wet]
- [20:56]: Checked the 4x4 tent.
--- Ca-Caw! Looking great my ladies!
--- Humidity levels are still a bit on the dry side, but still okay.
- [21:08]: Checked the humidifiers.
--- Tanks are still full and no leaks found.
--- Wow what a day!
--- Oh yea, 4-more days until trim day!! Ca-Caw! Let’s go!
Day 07 - Sunday - 10/19/25 - Total Days: 189
-----------------------------------
Daily Averages ~[+01:00]
- Temps: 76.7°F [24.8°C]
- Humidity: 59.4%
- VPD: 1.27 kPa
- Soil %: [48, 35, 35, 55, 44, 43, 44, 42]
-----------------------------------
- [07:08]: Quick morning checked on the 3x3 veg tent.
--- The veg garden is healthy and perky!
--- All moms and clones are healthy and raging with growth!
--- Both Heady OG BX1 #1 explants also look alive and green!
- [19:26]: Night check on the 4x4 tent.
--- Ca-Caw! We got MENDO DOPE in the trunk!
--- Wow terps are getting loud and buds are drying along nicely!
--- Looking frosty and coated in trichomes!
--- Three more days until trim day!!
- [19:33]: Checked the Ecowitt soil moisture sensor data:
------------------ [ 4x4 MAIN TENT ] ---------------
------ 46% - [CH01 FT » G30 - Heady OG BX1 #1]
------ 35% - [CH02 FB » G30 - Heady OG BX1 #1]
------ 35% - [CH03 BT » G20 - TKO]
------ 54% - [CH04 BB » G20 - TKO]
------------------ [ 3x3 VEG TENT ] ----------------
------ 40% - [CH05 BL » GR7 - TKO]
------ 43% - [CH06 BR » GR7 - Gorilla Goat #1]
------ 47% - [CH07 FL » GR7 - Heady OG BX1 #1]
------ 41% - [CH08 FR » GR7 - Garlic Budder OG#1]
--------- Veg: 38% - 45% | Flower: 45% - 55%
--------- General: 30% [Dry] «| 45 - 60% [Moist] |» 70% [Wet]
- [19:35]: Checked the 3x3 veg tent.
--- Vegging along beautifully in the garden!
--- Mothers are getting taller and probably could train, but will wait until tomorrow.
--- Clones and explants also look healthy and green!
--- Gorilla Goat #2 needs watering!
- [19:44]: Here is the starting initial watering range:
------ Gorilla Goat #2 » 255.4g → 300.3g and was last watered 5 days ago.
--------- General Solo Range: [Dry] «| [Initial Cup Weight] + ~55-100g |» [Wet]
--- Took the starting weight before watering,
------ Gorilla Goat #2 » 244.9g
--- While on a scale,
--- Gently misted her straw mulch with RO water.
--- Tried to keep the top growth dry.
--- Misted 5-10 sprays. Waited a few seconds, then misted again.
--- Made sure to reference the watering weights.
--- Repeated this process until the cup weighted at least 300g.
--- There was no runoff.
- [20:04]: Took the saturated weight after watering,
------ Gorilla Goat #2 » 345.6g
--- Marked the watering date on the side of the cup. Also marked the saturated weight on the back.
--- Placed her back into the tent.
- [21:41]: With a few days before the big trim, decided to sample a few buds!
--- Cut and trimmed branch for sampling and wow she’s got terps!
--- Buds are dense and have a gassy diesel funk! Ca-Caw!! Wow!
--- Without even curing, pretty sure she’s the one!
--- Plan to grow out another cycle (in clone of the same pheno), but I think I found my female for my first breeding project!
- [22:01]: Checked the humidifiers.
--- Tanks are still full and no leaks found.
--- Ahh yea! Three more days until the big trim!
--- Also next week will be the last for this log.
--- But already stoked for the next!
--- Planning on popping more seeds and continuing the pheno hunt for another female!
--- Since I lost TKO this harvest cycle, plan to grow a clone cutting of the same pheno (#2).
--- As for seeds, popping more regulars and going to attempt to grow some of Mr. Grow-It’s Chillout OG!
--- Got a pack of F3s and am stoked to give them a try!
--- Also going to sprout some beans of Dead Ops OG from Zaza Genetics!
--- Chillout OG, Dead Ops OG, and another round of TKO! Let’s go! Let’s grow!
--- Hunters of the dank! Ca-Caw!
--- Anyways!
--- Onwards to next week!
[END OF WEEK 26]
Likes
11
Share


Likes
4
Share


@JeyGanesha
Follow
Seconda settimana di veg...la runtz che è nata prima dell'altra sta mutando in modo strano. Non avevo mai visto spostarsi il centro apicale..sembra che si è piegata e l'apicale sta crescendo come sé fosse un ramo laterale 😂🤣🤦💪


Likes
27
Share


@Silverback_Guerilla
Follow
4/5:
Took 4 cuttings from the shortie
4/12:
All 4 are rooted and growing!
5/1:
Transplanted from 1gallon pots to 5 gallon pots.
5/3:
Decided to grow one of them in my tiny tent and the other 3 will go outdoors.
5/4:
Took 2 of them outdoors under the 270w and sunshine.
5/6:
Trained all of them today and fed some boomerang along with the kelp, molasses, big bloom, and silica. Foliar fed and took the last one outdoors.
The one in the tent is really flourishing!
5/7 - 5/17:
Excellent growth! The supplemental lights are making all the difference.👍
Did some more training on all of them early in the week.
The one in the closet is spreading out nicely and budding up pretty quickly...but what's very cool is that all 4 clones outdoors are flowering?!?!? I sure hope they go ahead and finish rather than starting to revegetate as the days continue to get longer.
Much rain for the past few days, but it let up long enough for me to install another 200w of waterproof 3000k LED lights a couple of feet above them. Very intense lighting, great bang for the buck. So now, I've got 350w of 3000k and 120w of 6500k in the outdoor garden. That's gonna have to do it, as I also am using 1400w in my indoor gardens, plus a/c..bills are getting ridiculous.
5/18 - 5/28:
The clone in the tent is still stacking up really well. I guess the ones outdoors are too, but next to the seedling plants, they seem puny. Many buds though...
Since they decided to flower early, I sprayed them all down with a product that is loaded with hormones and auxins and stuff that's supposed to retard vertical growth and promote branching. It's also supposed to speed arvest time by as much as a week. I hope they can finish before the summer solstice (June 21), otherwise they might try to reveg instead of finishing..
Hopefully it helps keep them from stretching so much that I'll have to supercrop them. Their mamma was a shortie, so they really shouldn't get too tall anyway.
I also foliar fed them several times this week with something called MicroLife Maximum Blooms, Pow! They love the stuff!
5/28 - 5/31:
I did some training on a two of the outdoor clones early in the week between rain showers, and foliar fed with Microlife maximum bloom formula. She was looking a little N deficient, so I assume the dry amendments have petered out. They were dry enough, so I top-fed her with another couple tablespoons of cavern culture and on the 31st. I gave them big bloom, tiger bloom, grow big, beastie bloomz, silica, endoboost, signal, humic acid, liquid kelp/fish emulsion, and liquid molasses. The indoor clone is looking awesome. I fed her heavily on the 30th.
It just feels so strange that I'll be harvesting outdoor photos in June!?!
That's it for week 8-
6/1 - 6/8:
Early in the week I gave them about a half gallon of water with liquid molasses, cal-mag, silica, and beastie bloomz only.
I foliar fed them a couple of times during the week, right at daybreak.
I fed them on Saturday, the 6th..about a gallon each..beastie bloomz, microlife maximum blooms, cal-mag, humic acid, grow big, big bloom, sweet & sticky, and signal.
They are looking very good..buds galore. The indoor clone got the same nutes, but on different days. She's also covered in buds, and they are beginning to fatten up.👍
6/9-7/4:
Busy with other gardens, so not many updates...
Indoor clone got to spend the last 2 weeks of her life in my closet under the quantum boards and UVB. I harvested and washed her buds on 6/28, let her hang dry and weighed and jarred her up on the 4th of July. She came in a 111g of cola and 45g of lower bud with only about 5g of larf. Nice!👍
She smells just like her mommy and has the same uber-dense buds. She was topped, so the buds aren't as mighty as the mamma's, but much more plentiful.👌
Outdoor clones:
I had a massive spider mite attack, and during the same week, I had a grasshopper invasion...I lost a few plants, one of which as a FFT1 clone.
I had just harvested my autos and my indoor clones from the closet, so I moved the remaining two clones in under the quantum boards. I treated them for spider mites several ways for several days and have given them much TLC. Hopefully their buds fatten up some more. They stanky, but they kinda slim...
7/11:
I harvested the last two clones tonight. So sticky!!! I washed them and hung them to dry.

Likes
10
Share


@Zdenda
Follow
Před čtyřmi dny jsem sundal která jednu už byla.. trichomy už začaly mít i jantarovou kterou nechávám jen trochu..ani né třetinu.Světlo jsem dal na 75%..No a dneska jsem sklidil zbytek. Prorostlé a tvrdé. Lepkavá brokolice mi voní a vypadá to pěkně.. těším se na kouř. Pověsil a nechám schnout.. potom zvážím až suché a ostříhané.
Likes
27
Share


@Chubbs
Follow
This beautiful girl got the chop. All I can say is Wow. It went full on beastmode in the Cannpot system which is a self watering pot through a wicker system. The pungent sweet and sour smell, followed by dense colorful flowers it's a growers dream. The total wet weight came to a whopping 1014g. Over all was fun to grow especially watching the flowers swell in the final weeks before harvest. Did very little besides a defoliation and lollipop and started feeding Athena Blended line around week 2. Happy Growing.
Likes
111
Share


@Salokin
Follow
Hi Growmies,
I removed the starter leaves and slightly started bending the highest set of leaves to give the lower shoots more exposure. She looks a lot like a pure indica already, very pretty :) Her root system is developing amazingly as well!
Here is the code that’ll give you 20% in Zamnesia‘s online store, just input ZAMMIGD2023 at checkout.
Thanks for stepping by and until next week!
Likes
2
Share

@Colonel
Follow
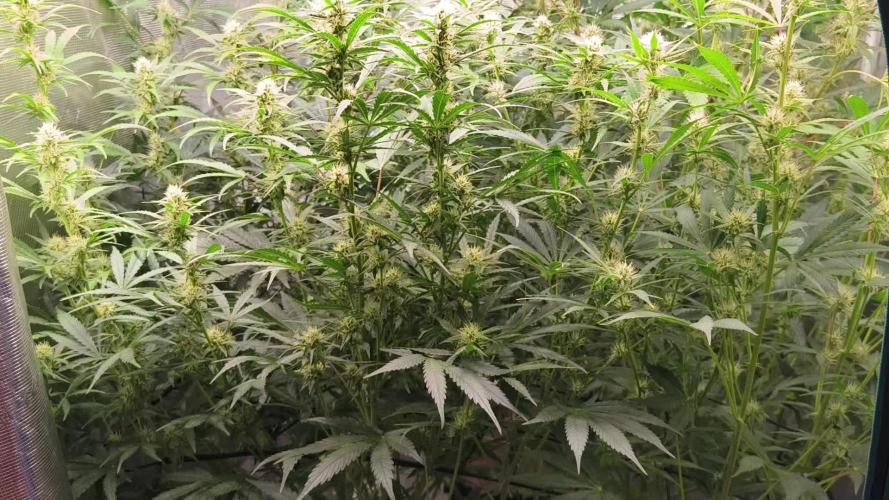
The smell is very strong up close, even with two inline fans and two carbon filters running.
The plant on the left side started showing light burn. I checked the light levels above those leaves and it was around 75 DLI — looks like that spot is where the beams from my two “suns” overlap.
I reduced the overall light output by about 5%, measured again and now it’s around 65 DLI in that area.
That should be enough, I figured, otherwise the other shoots might end up starving for light.

Likes
3
Share


@Chubbs
Follow
Weekly update on these big girls. They're in full flowers now but wow are they some bushy plants. The stems are solid and the flowers are everywhere. I'll be doing a defoliation on them this week to allow those lower sites to mature with the tops hopefully at the same speed. The smells is super citrus with hits of sweetness. All in all Happy
Processing
Likes
14
Share


@Wicked_Stix
Follow
The orange sherbet is the smallest of the bunch, but she is doing well. She is younger than the others but not the size they were at her age. I switched the feed to maxibloom this week since the other plants are flowering. Everything is still running smooth. I noticed a couple of the plants start dropping in the evening so I cut the lights back to 18 hours to give them a break. She is starting to pop some pistols so hopefully she will be flowering before the end of next week. I couldn't be happier with the grow so far.


Likes
3
Share


@simps
Follow
Great little strain Growing well nothing to complain about it’s up there with my top growers out of 25 plants it’s up there what’s the top five strongest so happy about that should be a good little plant
I went ahead and topped this plant I like to top my plants early or at the third node I get good plant structure and it ends up being a nice bushy plant if u look at my other grows you will see my grow technique I do a lot of topping and a bit of LST and some HST tying down branches and stuff like that till I get that nice round plant look it all start here at the first topping to get the bushy look
Likes
9
Share


@TeamQuality420
Follow
Well wow . This is quite a new and exciting experience for me . These FAST strains by humbolt seem like the way to go .
1. Great explosion if growth but without stretching the distance between nodes is so tight I swear they crossed it with an actual BUSH . So its didnt just get lanky as F it grew stew girth just as quick as height .
2. Great healthy .... EVERYTHING . Frow roots to cola and everything in between.
3. Response to training is 5 out of 5 . Almost can watch them grow. This gives the "good" grower a huge advantage because recovery time seem to go from a weak of healing with the photosensitive to a 3-4 days with the fast

Likes
3
Share

@PhinolaGreen
Follow
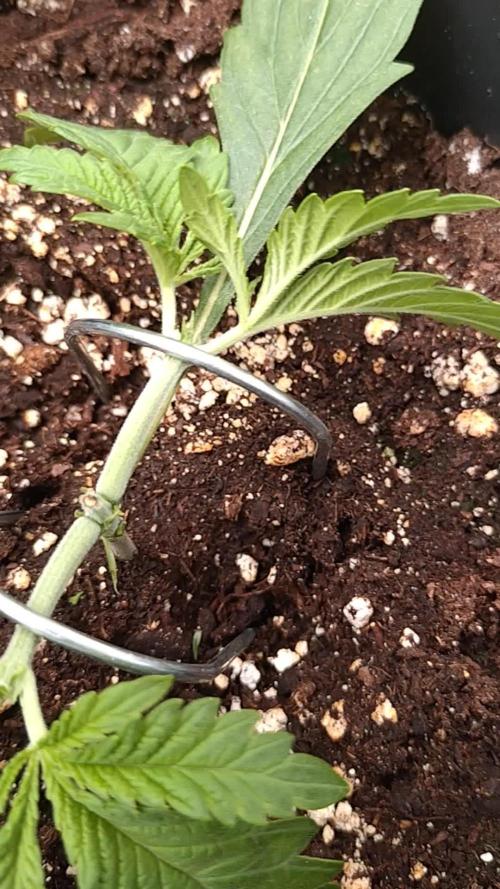
3. Woche
Alle wurden mittlerweile 2x getoppt, jetzt dürfen sie sich erstmal erholen und dann schau ich ein paar Tagen nomma nach 😊
Likes
47
Share


@CHILLING_RACOONS
Follow
✅WEEK NOTES: 20/01 LIGHTS OFF! Some days in the dark and cold box are great to increase flavors and potency
✅ 🌱GERMINATION🌱 01/10/2023 SEED IN THE SOIL 03/10/2023
🔝 10th NOVEMBER 1st FLOWERING DAY🔝
🔝 10° FLOWERING WEEK🔝
📅20/01/2023 LIGHTS OFF 📅
💡💡💡Viparspectra xs2000 at 75% Power + QUANTUM BOARD AT 75% POWER💡💡💡
💉🔍Fertilization schedule:🔍💉
ONLY PLAIN WATER
🧐 🤓 JEALOUSY DATA SHEET 🧐 🤓
Brand Zamnesia Seeds
Parents Gelato x Sunset Sherbet
Genetics 55% Indica / 45% Sativa
Flowering Type Photoperiod
Flowering Time 9-10 weeks
THC 25%
CBD 0-1%
Height (Indoor) 150cm
Height (Outdoor) 200cm
Yield (Indoor) 650-700 gr/m²
Yield (Outdoor) 700-750 gr/plant
Sex Feminized
💸💸💸💸💸 Buy JEALOUSY FEMINIZED BY Zamnesia: https://www.zamnesia.com/9479-zamnesia-seeds-jealousy.html
_______________________________________________________________________
🔧💡OUR SET UP FOR THIS GROW CYCLE💡🔧
✔️ 💲💲💲VIPARSPECTRA 🚀🚀🚀🌕🌕
ViparSpectra®️ XS2000 240W Infrared Full Spectrum LED Grow Light:
Excellent ratio between wattage and ppfd, excellent light penetraton, perfect light spectrum (it also has IR 🤩) and it has the best build quality on the market. You can touch that quality. Materials are really strong, excellent driver and the best leds on the market. Heat dissipation is perfect, the lamp is never too hot and it has a passive dissipator so you will have zero noise. It also has IP65 certification. I like that this lamp is bigger than others, so the 240w of power are well distribuited on the space. Viparspectra has an awesome customer service, and shipping was incredibly fast!
This awesome brand also offers 3 years warranty.
This lamp has no rivals.
A special thanks Viparspectra ❤️❤️❤️❤️
HERE YOU CAN BUY THIS PROFESSIONAL LIGHT: https://www.viparspectra.com/products/xs-series-xs2000 or https://amzn.to/3dyUoJl
and here you can buy other awesome stuff: https://www.viparspectra.com
💣Quantum board - 480w - 4x120w Boards
Samsung LM301B 288 led/board 3000K 0dB noise
+24led/board led Osram 660nm
Efficiency 2.6 umol/J 220 lm/w
Driver: Meanwell HLG-480H-36B
-ESTRACTION FAN:
Blauberg 125 Turbo Pro Series
Maximum air flow: 430-560 m³ / h 50W 32-44 dBA
____________________________________________________________________________________________
🙏❤️ THANK YOU FOR BEING HERE ❤️🙏
Please leave a comment with your opinions, it is very important to us to have a comparison.
If you like our job, tap the weed button and follow us. It will be really appreciated.🙏
We want to thank again everyone that help us in our project. You support us to support our dream. ❤️
SPREAD THE LOVE OF THIS PLANT ALL AROUND THE WORLD
🌿Thank you again🌿
❤️Sweet hugs❤️
👨🌾CHILLING_RACOONS👩🌾
Likes
Comments
Share


