
Likes
Comments
Share


@Master_weeda
Follow
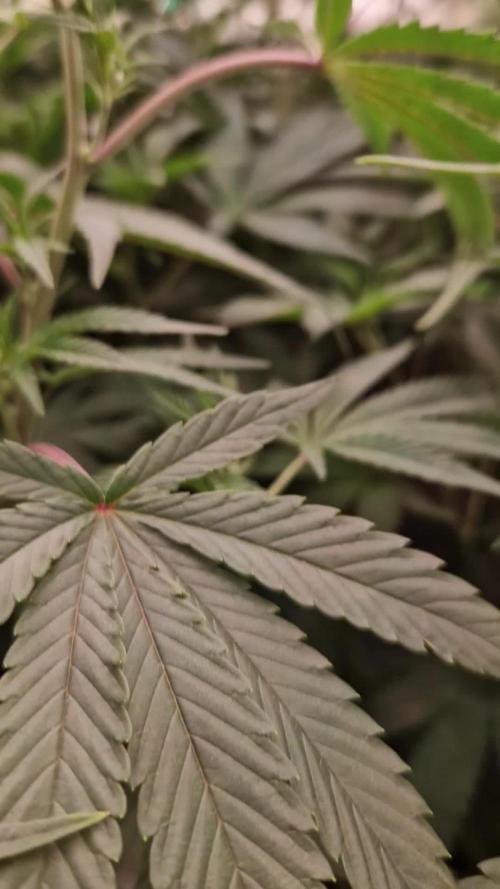
Bonjour à tous les padawans et les maîtres jedis
Pour cette semaine 3 au seizième jour ma plante fais 15 centimètres et son sixième noeud apparaît je décide donc de pratiquer un LST sur ma plante.
Pour ce j'utilise du fil de fer galvanisé que je plante directement dans le substrat en faisant attention de ne pas endommagé les racines car n'oublions pas que ce qui pousse dessus pousse aussi dessous.
Jour 17 je pulvérise (dessus et dessous les feuille) une solution composé d'une cuillère à café de savon noir mou dilué dans un litre d'eau en prévention d'éventuels nuisibles. Je répète l'opération une fois par semaine jusqu'à la floraison.
Je corrige mon LST suivant la pousse de ma plante ...
Pour ma par c'est la manière dont je procède mais petit rappel de la technique du LST:
Quand commencer à appliquer la technique LST
De nombreux cultivateurs commencent la manipulation dés que les plantes possèdent entre 3 et 6 nœuds ou une paire de feuilles. Durant cette première étape de la croissance, le tronc encore flexible est pliable sans risque qu’il ne se casse, même si au fur et à mesure du développement de la plante il sera de plus en plus difficile de le plier. Nous pouvons continuer à guider la croissance des branches durant toute la culture, même durant la floraison, ce qui pour cette étape représente un grand avantage face à la taille, qui n’est pas du tout recommandé une fois que la formation des têtes commence, cela stressera en effet la plante, ce qui aura pour effet de retarder la récolte.
Comment appliquer la technique de guidage LST
Si nous sommes prudents, la flexibilité naturelle des fibres du cannabis permet de plier leur tronc et branches avec une relative facilitée, même durant la floraison des plantes.
En utilisant une corde fine, nous pouvons accrocher la pointe de la plante à la base du pot par exemple ou à un tuteur que nous aurons planté dans le substrat. Nous plierons le tronc avec précaution et nous le fixerons avec la corde, à partir de là, nous pouvons augmenter progressivement la tension de la corde, chaque jour un peu plus, jusqu’à obtenir la position souhaitée. Soyez attentif à la réaction de la plante, essayez de ne pas appliquer trop de pression sur la corde et rappelez-vous que la flexibilité des branches peut varier d’une plante à l’autre.
Pour obtenir de meilleurs résultats, il suffit de suivre quelques règles simples. Pour commencer, nous devons choisir une corde fine mais pas trop pour ne pas blesser les troncs au fur et à mesure qu’ils grandissent et qu’ils deviennent plus gros.
Nous pouvons utiliser des crochets en plastique souple ou de n’importe quelle autre matière flexible pour éviter d’endommager les plantes. Spécialement en intérieur, utiliser des cordons en plastique de couleur (voir les diaries de @Silky) est très pratique pour voir facilement les accroches et faciliter le travail au milieu du réseau formés par les cordes, les tuteurs, les mailles ou les supports que nous aurons dans la culture. Bien entendu, en culture extérieure et surtout en guerilla nous ferons juste le contraire et nous utiliserons des matériaux de couleur qui n’attirent pas l’attention pour que notre jardin reste discret.
Pour stresser les plantes au minimum, la mieux est de réaliser ces manipulations le soir ou juste après que les lampes en intérieur s’éteignent, ce qui leur permettra de se remettre durant la nuit. Normalement, le jour suivant nous pourrons observer comme les pointes des branches que nous avons pliées se dressent de nouveau vers le haut à la recherche d’une source de lumière.
Que la force soit avec vous💪
Que la force soit avec vous

Likes
32
Share


@Juschiln420
Follow
Man she's really coming along now!! I'm really happy with this grow. Only 2nd one ever and not too bad!! I'm more then happy with this Gorilla Glue, She hasn't given me any real problems so far! Hoping she bulks up some this week! Before I start the ripen next week... 🤞🤞🤘🤘🤙
7/30 left to drink
7/31 added water, 3.5 cal mag
8/1 left to drink
8/2 left to drink
8/3 added water, 3ml cal mag
8/4 left to drink
8/5 added water, full feeding
Micro 9.6ml
Gro -
Bloom 19.2ml
Cal mag 15ml
Bud candy 17.5ml
Big bud 17.5ml
Hydroguard 8ml
3 gal = 11.3L
Record kept here:
https://1drv.ms/x/s!AmTQ-7u9iyH6kFWgDNVqoDB1_CY1
👋👋👋Hey,

Likes
89
Share


@nonick123
Follow
Me está resultando muy útil tener el TrolMaster TCS-1 Tent-X ya que puedo tener una visualización rápida de la temperatura y la humedad en tiempo real, y también de las últimas 24 horas y de los últimos 7 días (week)
Así puedo ir ajustando la extracción para tener una VPD ideal, y tener una pantalla que te indica si estás en rango, en función de si estás en Fase Vegetativa, Floración o Stress
Es genial a su vez tener un tabla / grafico visual de VPD en función de las fases. Mira las últimas fotos para ver esta tabla tan interesante! ("Trolmaster VPD Graph" photo)
-------------------------------------------------
Día 34 (19/02) Pasamos a 12/12 😁
Riego 1,25 Litro H20 + Wholly Base 2 ml/l + Solid Green 1,5 ml/l + Rise Up 1 ml/l de Gen1:11
TDS 875 PPMs - pH 6,28
Día 36 (21/02). Las plantas están explotando en crecimiento vertical! 2,5 cm al día 😍💥
Dia 38 (23/02).
Riego 1,25 Litro H20 + Wholly Base 2 ml/l + Solid Green 1,5 ml/l + Rise Up 1 ml/l de Gen1:11
TDS 875 PPMs - pH 6,28
He decidido subir el riego a 1,25 litros porque se muestran sedientas!
Día 39 (24/02) Muestra las preflores y no para de estirarse! 😍😍😍🐎
💦Nutrients by Gen1:11 - www.genoneeleven.com
🌱Substrate PRO-MIX HP BACILLUS + MYCORRHIZAE - www.pthorticulture.com/en/products/pro-mix-hp-biostimulant-plus-mycorrhizae
️️🎚️Controlled by TrolMaster TCS-1 Tent-X System Main Controller - https://www.trolmaster.com/Products/Details/TCS-1


Likes
4
Share

@MaltaHerbman
Follow
Finally Harvest day 😘
Smell is great how i had say on other weeks all house smell of this dank berry.Buds are nice and super sticky cant wait to try it.
Will plant more from this .


Likes
26
Share


@pifflestikkz
Follow
Day 29
29/07/24 Monday
Nice feeding today with De-chlorinated tap water pH 6.
Gave her 300 ml and she had a small run off.
Getting chunky in the stem now 💪💚
Day 31
31/07/24 Wednesday
De-chlorinated water pH 6 today with Plagron pk13-14 5ml to 5L
Plagron power buds 5ml to 5L
Used 300ml of the 5L solution.
I will be using these on water days from now on as they are advised to be used every irrigation.
We'll see how they perform 💪💚
Day 32
01/08/24 Thursday
Another feed today using de-chlorinated tap water pH 6, there now taking 300ml every evening.
Day 35
04/08/24 Sunday
END OF WEEK 😁
De-chlorinated tap water pH 6 today with Plagron products. 300ml each.
Had a issue with leaf invaders this week, I have treated and am checking every 48 hrs so far seems ok and not progressive.
All plants look great, very healthy, one of the Overdose is way behind and due to space maybe culled at flower I'll see how she gets on.


Likes
151
Share


@CANNASIM
Follow
------GENERAL COMMENT------
As planed I lowered the base nutrient to 2ml, and took a break from Cal Mag, to release the N a bit, green is on point now.
Tomorrow will catch up with the Cal Mag schedule as usual.
Time for some overdrive, for the rest all good, girls are developing well and buds are getting bigger, no issues.
Smelling delicious! Hope I had some Terpinator to give a go...
------SM.BB COMMENT------
BB is maturing faster you already can see I have cloudy Trichomes, she will be a fast finisher as it looks like...


Likes
220
Share


@CRiSPrGrow
Follow
Week 0 : Sixshooter
Hawkbo says Six Shooter is one of the top Fast Buds Strains, so i'm like "yeah man might as well run me some of these, i do like my weed top of the shelf!" so here it is with the six shooter , bought these direct during one of Fast bud's promotions, 3+2 x2 for the price of one, so yeah that' s a good deal ! germinating 5 let's see how many i end up keeping, depends on the rest of the seeds too ! overnight in a glass of water with a few drops of my kelp extract , protect it from the light , the next day looks like some already cracked, putting it in the RQS propagator, dont use your fingers to manipulated activated seeds , cover with some dirt, cover the propagator with a blanket to protect it from light and keep the temperature up. Let's see ! within a day three had cracked the surface, one was all squiggly from being put upside down but within a day it has straightened out, the two last ones took 3 more days to crack the surface, i'm saving them and keeping them closeby in case i need to replace any of the planted seeds. Six shooter have been great genetrics so far, i transplanted three of them on day 4. see you next week for more updates !
Likes
17
Share


@GreenHouseLab
Follow
Going into 48hr darkness at day 60, plants are sticky asf very strong sweet smells looking fwd smoke testing all 3 phenos.
Likes
16
Share


@BluHaze007
Follow
I still believe that Banana Kush #2 and Zkittlez are stunted, I wanted to remove those two but i think i will just let them grow out for the experience. I'm really banking on Banana Kush #1 to bring home the bacon.
Likes
32
Share


@BigBadLion
Follow
Week 3 of my soon-to-be purple ladies! 😻
Everything was going well but I noticed these issues:
- The girl on the back is stretching waaaaay more and is less "leafy" than her sister. Perhaps she has more sativa in her DNA?
- Leaves on both girls love to twirl around, specially on the girl on the front.
- The stem on both girls is still weak and the girl on the front no longer needs the extra help she needed!
Weather where I live is getting colder for some odd reason (it should be the opposite, damn!) and the "purple" is... perhaps starting to show a little? Which is good!? 😮
Anyway, that's all for this week. See you all next one and I hope you'll all enjoy the photos and the timelapse! 😁
Processing
Likes
12
Share


@BigBudWolf
Follow
BLUE CUSH
35 Days from sprout.
Light training. Leaf tucking and pony tailing. Pony tailing seems to help with the side branching.
She is genetically a small plant I believe, but she might be smaller then expected.. Possibly due to lower RH early on. Otherwise she seems to be doing ok.
Attempted a layer of clay pellets after soaking in PH'd water for 16 hours, to combat the gnats from reaching the soil. I feel like sand may have been a better choice and removed the clay before feeding again. There are so few gnats that its not much of an issue, but I'd like to eliminate the threat before flowering really kicks in.
Likes
97
Share

@CANNASIM
Follow
GENERAL COMMENT
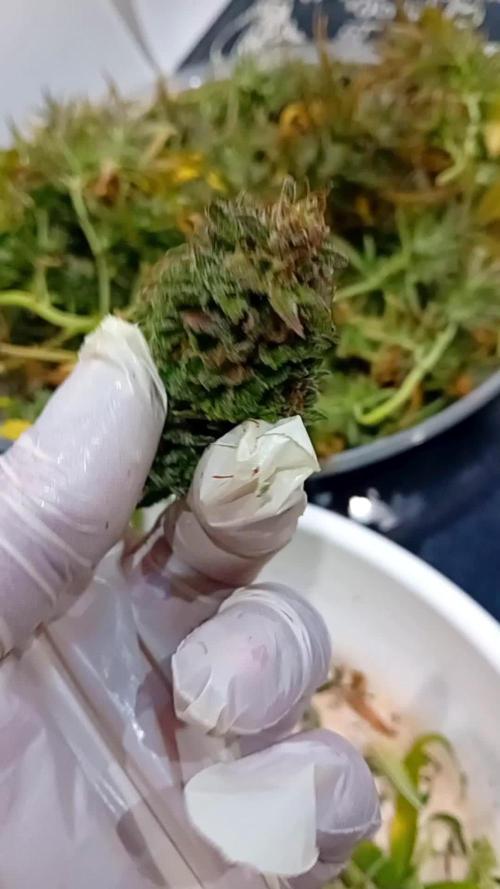
The SKR is dry and starting the cure in jars, and the NL is done.
RQS NORTHERN LIGHTS AUTO COMMENT.
This is the final week, next time will be the harvest, this girl just got mature from a day to the other, lost 70% of the top bud due to rot i haven t seen. So i could get virtually 30-40% yield from this girl
Without the locks or rot, anyhow still looking ok as far as harvest, quality will be a bit compromise, not the end of times though lol! 🙃👊🏻👍🏻

