


Likes
Comments
Share


@Gummi_Ingo
Follow
Check out the video!
7 weeks of flowering have passed. Tops are getting really heavy, I might have to buy bamboo support sticks soon.
Resin production is insane as you can see.
There was mold in one of the head buds and I had to remove a golfball-sized chunk. Some insect made its way in, died there and started rotting.
I struggle to keep the humidity down and now I am watering every second day only. And i bought a third fan (typhoon) that blows warm air from the ceiling above the lamp back onto the tops.
wish me luck for the last 4 weeks


Likes
75
Share


@DogDoctorOfficial
Follow
Week 6: Nurturing the Monstrous Beauty of Panty Punch Auto
As we embark on Week 6 of our cultivation journey with Panty Punch Auto, it's time to reflect on the remarkable evolution of this botanical marvel, from a tiny seed to the towering giant adorned with lush foliage and bountiful buds. In this report, we delve deep into the intricate fixings, sticks, and bendings that have shaped her growth, alongside an exploration of the revolutionary TrolMaster technology, with a special focus on the unveiling of the Tent-X controller.
From the earliest days of her life, Panty Punch Auto has been a testament to resilience and determination. Through meticulous care and strategic interventions, we've guided her growth, ensuring she thrives in our grow space. Fixings sticks have been instrumental in supporting her weighty branches, while gentle bendings have encouraged optimal light exposure and airflow, resulting in a robust plant with an abundance of branches and buds.
At the heart of our environmental control strategy lies the TrolMaster system, a game-changer in precision cultivation. This week, we're thrilled to introduce the Tent-X controller, a cutting-edge addition to our arsenal of tools. In an unboxing video, we'll unveil the Tent-X controller and explore its myriad features, including its integration with the Lumatek Zeus using the LMA-14 interface.
The Tent-X controller represents a paradigm shift in grow environment management, offering unparalleled control and flexibility. With its advanced capabilities, we can fine-tune every aspect of our grow space, from temperature and humidity to lighting schedules and CO2 levels. The LMA-14 interface acts as a bridge between the Tent-X controller and the Lumatek Zeus, enabling seamless communication and synchronization for optimal plant growth and development.
But the innovation doesn't stop there. The Tent-X controller comes equipped with a 3-in-1 sensor, providing real-time monitoring of temperature, humidity, and light intensity. This invaluable tool allows us to maintain the ideal growing conditions for Panty Punch Auto, ensuring she thrives in her environment.
As we marvel at the extraordinary progress of Panty Punch Auto, it's essential to express our gratitude to those who have made this journey possible. A heartfelt thank you to TrolMaster for providing the revolutionary Tent-X controller, to Aptus Holland for their unwavering support and exceptional nutrients, to Grow Diaries for the platform that connects us with fellow growers, and to the vibrant community for their endless encouragement and inspiration.
In conclusion, Week 6 marks another milestone in the cultivation of Panty Punch Auto, a testament to the power of innovation, dedication, and community. As we continue to nurture her growth, let us anticipate the wonders yet to come and celebrate the beauty of this monstrous plant.
Stay tuned for more updates as we witness the ongoing evolution of Panty Punch Auto and explore the boundless possibilities of modern cultivation techniques. Together, we'll continue to push the boundaries of what's possible and cultivate excellence in every leaf and bud.
#PantyPunchAutoAdventure #RootsAndFruits #TrolMasterControl #GrowDiariesCommunity #CultivationExcellence
Genetics - Panty Punch Auto - https://seedstockers.com/
Plant nutrition - Aptus Holland - https://aptus-holland.com
LED Photons - Lumatek - https://lumatek-lighting.com
Controls - Trol Master - https://www.trolmaster.eu/
Watering - myself
Love and attention - Me, myself and i
As always thank you all for stopping by, for the love and for it all , this journey of mine wold just not be the same without you guys, the love and support is very much appreciated and i fell honored and blessed with you all in my life, With true love comes happiness. Always believe in your self and always do things expecting nothing and with an open heart , be a giver and the universe will give back to you in ways you could not even imagine so
More info, the ocasional give-away and exclusive updates from all my adventures can be found - links in the profile description
Friendly reminder all you see here is pure research and for educational purposes only
Growers Love To you All 💚 💚 💚

Likes
4
Share


@Staffedition
Follow
Привет друзья.✋
Наше знакомство продолжается с новым фотоцветущим растением от Smail_Seeds сорт TROPICANNA POISONZKITTLEZ XXL Regular F1 reg.
Сегодня растению 66 дней.
Перевёл на 12/12 1.10.2023
Перешло в активную фазу цветения
Растение очень хорошо развивается, ни каких сбоев в генетике не наблюдается😀
Сорт выводим сами.
Смотри мой профиль, у нас всегда есть что то интересное.
Не забудь поставить лайк❤️, если понравилась как прошла неделя
И читайте наш TELEGRAM: https://t.me/smail_seeds
#Smail_Seeds 😀
Processing
Likes
25
Share


@CBD_Sweden
Follow
2018-04-02. Week 3 day 1. It was time too upgrade the 0.1 liter pot too the 1 liter.
Did the transplant today.
They are a little bit overwatered but i will let them dry out now.
This is the newest release from RQS seeds.
And i will veg her under a Apollo 10 led and flower her in Growroom Nr2 under a 600 w Hps on a light mover.
Its a organic grow and i will be using BioBizz nutrients.
Strain information.
Purple Queen is an indica dominant kush hybrid that based on the crossing between Hindu Kush and Purple Afghani. This amazing purple strain contains 75% indica and 25% sativa genetics.
The plant grows up to 1 m tall and demonstrates beautiful frosty purple buds during flowering. Purple Queen grows well both indoor and outdoor and suits for any growing medium. The warm and temparate climate is ideal for her cultivation. The harvest comes after 7-8 weeks of flowering and brings decent yeilds of resinous buds. You can expect 450 - 500 gr/m2 indoor and 800 gr/plant outdoor.
The smoke brings a soft, deep flavors with notes of citrus and relaxing and euphoric effects.
Gender Feminised
Genes 75% indica / 25% sativ
Genetics Hindu Kush x Purple Afghani
Harvest 450 - 500 gr/m2
Flowering 7-8 weeks

Likes
6
Share


@captaincondor
Follow
Hoping to have more space soon when I chop my gg4 sherbert , I have four plants in flower in one tent and its pretty overcrowded and too humid as a result. The gg4 is not fading or maturing as fast as I would like but I guess I'm just gonna have to be patient

Likes
3
Share


@ROY4L_GU4RD
Follow
Week 6 here and I'm having problems with stems leaning already. I went back to my normal feeding levels. I'll probably start removing the macro in a couple of weeks. I'm also thinking about doing another small defoliation to help with airflow. This tent is jammed packed and I regret not flipping a week sooner than I did. Thanks for checking out my diary.


Likes
19
Share


@Growdaddy420
Follow
Plant is still alive. I believe some sort of genetic mutation has caused this plant to react the way it has outdoors. I have cut neurmours clones that grow and flower normally inside. The mother plant (seen in pic) and ever clone planted outdoors had a negative reaction to being brought outdoors. I have treated for and ruled out mites. Interested for opinions. Thanks growdaddy!


Likes
234
Share


@yan420
Follow
This two were part of another diary and got moved out due to space reasons at VW8 and moved back indoors at VW20
https://growdiaries.com/diaries/218151-auto-god-s-glue-grow-journal-by-yan402
13.09.25 VW21 Both are looking good and are developing tighter nodes than when they were outside, I'm going to have to keep cutting them back every once and a while I also applied nematodes against thrips and fungus gnats.
20.09.25 VW22 some spots and some yellow leafs, I think it's a root problem, probably root bound, but both seem healthy and are getting thicker so maybe just top up with Coco coir and give a slight different nutrient schedule less Tri Part Bloom could do the trick MAYBE lol.
27.09.25 VW23 Topped up the pots with extra coco coir and trimmed the side roots a bit, both plants were root bound 📹
03.10.25 VW23 did a HST/LST session 📹
12.10.25 VW25 Done a major HST session to try and keep them in line with the Sunset Sherbet GF I have going in the same tent, rest in the video 📹
17.10.25 VW25 ffj/fpj/fish 30 → 60 ml
19.10.25 VW26 it just became a one plant diary, keeping #5, #6 gets it's own diary for testing nutrients.
20.10.25 VW26(?) Feed tweak: added 3 g Calcium Nitrate/ 30 L (≈ 15 ppm N + 10 ppm Ca)
24.10.25 VW26 did a defoliation and trimming session 📹
25.10.25 VW26 I'll be repoting tomorrow, 26.10.25 VW27 rest in the video📹
27.10.25 VW27 Epsom Salt 0 → 2.5, Calcium Nitrate 3 → 9 g
01.11.25 VW28 CalMag 60 → 30ml, TriPartBloom 20 → 30ml, Magnesium 2.5 → 3.5g
04.11.25 VW28 no more yellowing between the veins and no new spots, the changes to the schedule worked, rest in the video 📸
09.11.25 VW29 Did what I'm hoping is a last cleanup 🎥
12.11.25 VW13 Did another cleanup in the tent 🎥, also switched to the FERMAKOR PK Micro schedule, (10.11.25) added Phosphoric acid as a pH down in preparation for flowering
14.11.25 FW1 FERMAKOR PK Micros 40 → 50 ml
22.11.25 FW2 Calcium Nitrate 40 g → 35 g
05.12.25 FW3 about 2 weeks ago Calcium Nitrate 35 g → 25 g, FERMAKOR PK Micros 50 ml → 60 ml
🌱💦🌱💦🌱💦🌱💦🌱💦🌱
Day to day tasks & actions 🌿
🌱💦🌱💦🌱💦🌱💦🌱💦🌱
29.11.25 FW2 – Fed 5l of #1 → 2l runoff
30.11.25 FW2 – Fed 5l of #1 → 2l runoff
01.12.25 FW3 – Fed 5l of #1 → 2l runoff
02.12.25 FW3 – Fed 5l of #1 → 2l runoff
03.12.25 FW3 – Fed 5l of #1 → 2l runoff
04.12.25 FW3 – Fed 5l of #1 → 2l runoff
05.12.25 FW3 – Fed 5l of #1 → 2l runoff
06.12.25 FW3 – Fed 5l of #1 → 2l runoff
(*RUNOFF reused for indoor house plants)
💧💦💧💦💧💦💧💦
🌱 Nutrients in 30 L #1 Veg – FERMAKOR
💧💦💧💦💧💦💧💦
Calcium Nitrate (Calcinit / Nitcal): 45 → 40 g → 35 g → 25 g
= 1.50 g/L → 1.33 g/L → 1.17 g/L → 0.83 g/L
= 207 ppm N / 253 ppm Ca → 184 / 225 → 161 / 197 → 115 / 141
PK Concentrate (FERMAKOR Base): 30 → 40 ml → 50 ml → 60 ml
= 1.00 → 1.33 ml/L → 1.67 ml/L → 2.00 ml/L
→ balanced 1:1 P:K + light micros (from extract)
Home-made FFJ/FPJ (Fish + Veg): 30 ml
= 1.00 ml/L
Epsom Salt (MgSO₄·7H₂O): 8 g
= 0.27 g/L → ~26 ppm Mg + ~35 ppm S
Fetrilon Combi 1 (Micros): 0.5 g
= 0.017 g/L
→ Fe 0.7 ppm · Mn 0.7 ppm · Zn 0.3 ppm · Cu 0.3 ppm · B 0.1 ppm · Mo 0.02 ppm
Phosphoric Acid (pH down) + Citric Acid (chelation): as needed
→ First set pH with phosphoric acid, then add a little citric only if you want extra chelation
Target pH: 5.8 – 6.0 (drop test yellow-green)
📦 TOTAL:
Liquids: 60 → 70 → 80 → 90 ml per 30 L
= 2.00 → 2.33 → 2.67 → 3.00 ml/L
Solids (CaNO₃ + Epsom + Fetrilon):
53.5 → 48.5 → 43.5 → 33.5 g per 30 L
= 1.78 → 1.62 → 1.45 → 1.12 g/L
💧💦💧💦💧💦💧💦
⚙️✂️⚙️✂️⚙️✂️⚙️✂️⚙️
✂️ Tools & equipment ✂️
⚙️✂️⚙️✂️⚙️✂️⚙️✂️⚙️
✂️ 2× MarsHydro SP3000
⚙️ MarsHydro 150mm ACF Ventilator
✂️ Trotec dehumidifier (big unit)
⚙️ Mini no-name dehumidifier
✂️ Kebab skewers (LST – stainless)
⚙️ Wire + roast skewers (LST assist)
✂️ Scissors (HST)
⚙️ Vacuum (for spills & cleanup)
✂️⚙️✂️⚙️✂️⚙️⚙️✂️⚙️✂️⚙️✂️⚙️
🍒🍭🍬🌈🍒🍭🍬🌈🍒🍭🍬🌈🍒
🦄Fantasy Feast ( Seeds)🦄
🌈🍒🍭🍬🌈🍒🍭🍬🌈🍒🍭🍬🌈🍒
Species: Hybrid (Regular)
Genetics: The mother is Unicorn Whip by Dirty Bird Genetics. The father is Charcuterie by Cannarado Genetics.
Effect: Unknown Mixed effect body and head high
Flavor: Some phenos are Skunky gassy fruity, some are fruity sour citrus with a chemical touch and a touch of skunk
Flowering: Estimated 8–10 weeks
Resistance: Strong — Testing phase done
YouTube Link: https://youtube.com/-m8h?si=A7x4Zlr2kj-_ga31


Likes
3
Share


@Dgessy
Follow
Fin de la 1er semaine, tout se passe bien 😁 Arrosages à l'eau déminéralisée au PH ajusté à 6.8.

Likes
5
Share


@Growin_Ish
Follow
Day 8
One of these girls has an issue. I think my misting has not provided enough hydration. Trying not to overwater.
Today I watered to runoff with distilled water and a blended up aloe leaf. I would like to transplant no later than day 15. Hopefully she perks up by then. The other girl has a yellow coyledon. Since my last grow is wrapped, I dropped the light from 34" to 24" and decreased from 400w to 200w. Humidity set to 55%. We'll see.
Day 10
Light is at 24" and 25% (100w). Medium was super dry, so I spritzed it. Both plants have the droop. It's more of a downward leaf curl, so I'm going with light stress.
Lesson: one change at a time. I adjusted the light and switched up watering method at the same time so now I don't know which is causing the droop.
Day 11
Added a heaping half tsp of SimPro Veg to 17oz of spring water to clear up Nitro deficiency. Each plant got roughly 4oz. The second plant is stunted with severe leaf curl from light stress. She's off to the side in indirect lighting. Hopefully the food will wake her up.
Day 13
Transplanted the Sweet Cheese XL into the 3 gallon cloth pots instead of the 5 gallon buckets inadvertently, so these will stay inside while the others (Top Gun) go outside.
Super soil has been cooking for a few weeks. Watered in with 17oz of rain water, 2ml of CalMag, and 2ml of Fish Sh!t. A bird pooped in my rain water, I still used it🤣.
Looking forward to some rapid growth so I can top. If they don't take the transplant well, I won't top. On to week 3!💪🏾
Likes
4
Share

@Smoking_Joe_Frazier
Follow
26.05.2026
Hi Growmies!
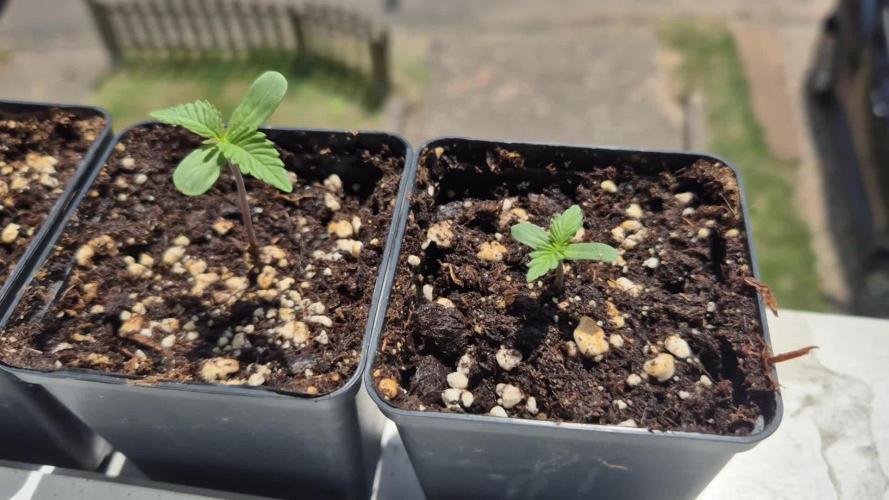
Finally, it’s that time again, my friends! The grow season has begun, and I’m so excited to take this journey with you. This year, I’m growing three Fast Buds strains (Leftovers from last year): Apricot, Tangie, and Papaya Cookies. The germination kicks off on my windowsill, in small pots of about 0.25 liters, filled with Biobizz Light Mix. I can’t wait to see them sprout as I add mycorrhiza to the planting hole. Once they’re strong, I’ll transplant them into 15-liter fabric pots with Plagron Bat Mix. After that, they’ll move outside into my greenhouse, where they’ll fully flourish under the sun. I can’t wait to see what this season brings!
All three seeds germinated (as always) although the seeds are from last years grow.I don’t use any additional lights; the natural sunlight is perfect right now. I keep them on the windowsill in the morning, and during the day, I move them to the back of my balcony where they get plenty of sun.
Alright fellas, thats it for now, catch you late
Smoking_Joe_Frazier
Likes
4
Share


Likes
25
Share


Likes
18
Share


@SpotWeed420Original
Follow
Y bueno Fumetillaas ya en la semana 10 cumpliendo con el propósito de este medio ... Ir informando que pasa x ende querías decirles que nunca medimos ec... La verdad no podía frenar el amarillento o esas carencias ... Controlaba ph y suficiente... Ahora empezaremos a medir ec y ph para poder tener mejor electro conductividady tener mejor absorción de nutrientes ya que medimos macetas después del riego y tenemos una ec de 4.5 a 3.5 la cual deberia estar en otros parámetros por ende ... Siempre tuvimos alimentos suficientes para ellas solo que no teniamos la implementación necesaria... Después de la 11 a 12 cortamos y subimos el final de esta planta que luchó con todo