
Likes
Comments
Share


@Growshh
Follow
The top dress from last week is working nicely. Everyday watering with brix, green aminos, calmag and silica.
2 of the Blueberry Cherry are ultra blueberry phenos.
2 black patronus are very sherbsy but one is ultra sherbs

Likes
8
Share


@hooolian
Follow
20/02: The plants are overall reacting well to the larger dose of nutrients especially the ignitor - there are lots of bud sites throughout. I was under watering some plants which has resulting in wilting stems and leaves - will move onto 1 litre of water every other day from next week. 1 OG kush and 1 White Widow is lagging behind but we'll get there. Good strong stalks mostly for all the plants. Gave the a hefty defoliation this week also trimming the fan leaves and letting light penetrate the lower branches and bud sites.
Likes
2
Share


@toriyama
Follow
Wie man sieht, haben die beiden F1-Samen ein enormes Wachstum gezeigt, während das Apple Flitter langsames Wachstum zeigte. Ich baue zum ersten Mal F1-Autoflower-Samen an und die Wachstumsrate ist wirklich beeindruckend. Nach drei Wochen habe ich Holzstäbchen zur Unterstützung hinzugefügt, und die Wachstumsrate der F1-Samen ist weiterhin beeindruckend. Sie sind bereits bereit, Blüten zu bilden.
ご覧の通り、2つのF1種は驚異的な成長を見せたのに対し、Apple Flitterは遅い成長を示しました。私は初めてF1オートフラワーの種を育てていますが、その成長速度は本当に驚異的です。3週間が終わった時に木の棒を挿して整理しましたが、F1種の成長速度はやはり驚異的です。すでに花を咲かせる準備ができています

Likes
23
Share


@420DeepGrow
Follow
Gracias al equipo de Kannabia, Marshydro, XpertNutrients y Trolmaster sin ellos esto no sería posible.
💐🍁 RS11:
Las variedades de marihuana son cada vez más grandes y mejores, y la Rainbow Sherbet #11 de Kannabia ha llegado para revolucionar tu mundo con su extraordinario contenido de THC del 30% y sus terpenos increíblemente deliciosos. Con una genética 70% índica, esta descendiente de la Pink Guava y la Sunset Sherbet ofrece muchas características interesantes, como su espectacular belleza. Sus cogollos a veces adquieren una tonalidad azul y brillan con una gruesa capa de tricomas, por lo que parecen piedras preciosas cannábicas.
Germina las semillas en exterior o interior, y prepárate para quedarte con la boca abierta. La Rainbow Sherbet #11 no necesita muchos cuidados para producir plantas robustas y vigorosas. Incluso los principiantes podrán conseguir un buen botín cuando llegue el momento de la cosecha, y los cultivadores que ya tienen experiencia no tendrán problemas para hacer que sus plantas rindan al máximo. Con un poco de LST podrás maximizar su producción, y tras 9 semanas de floración en interior conseguirás alrededor de 450-500g/m². Al aire libre, esta variedad puede generar hasta 500-600g por planta.
El nombre de esta variedad augura un montón de sabor, y la Rainbow Sherbet #11 cumple con creces. Sus cogollos tienen un aroma extremadamente complejo que convierte cada fumada en un viaje aromático. Las fragancias que más destacan son las afrutadas (principalmente a cerezas y bayas), así como las cítricas. Esta mezcla va acompañada de unos matices terrosos y especiados y de un toque de pino. Tras unas cuantas caladas, los efectos de la Rainbow Sherbet #11 aparecen con toda su fuerza, potenciando la alegría y la creatividad, calmando el cuerpo y la mente, y ayudándote a olvidar las penurias del día.
💡TS-3000 + TS-1000: se usaran dos de las lámparas de la serie TS de Marshydro, para cubrir todas las necesidades de las plantas durante el ciclo de cultivo, uso las dos lámparas en floracion para llegar a toda la carpa de 1.50 x 1.50 x 1.80.
https://marshydro.eu/products/mars-hydro-ts-3000-led-grow-light/
🏠 : Marshydro 1.50 x 1.50 x 1.80, carpa 100% estanca con ventanas laterales para llegar a todos los lugares durante el grow
https://marshydro.eu/products/diy-150x150x200cm-grow-tent-kit
🌬️💨 Marshydro 6inch + filtro carbon para evitar olores indeseables.
https://marshydro.eu/products/ifresh-smart-6inch-filter-kits/
💻 Trolmaster Tent-X TCS-1 como controlador de luz, optimiza tu cultivo con la última tecnología del mercado, desde donde puedes controlar todos los parametros.
https://www.trolmaster.com/Products/Details/TCS-1
📆 Semana 4:
Aparecieron un monton de erizos esta semana, el temporal ha hecho algo de mella en la carpa al bajar las temperaturas aunque todo sigue correcto.
Continuamos con las dosis de nutrientes recomendadas por el fabricante.

Processing
Likes
20
Share


@eldruida_lamota
Follow
Que pasa familia, andamos por aquí, puesto que está farm cheese a cogido muy buen ritmo, esta será la última semana que la daremos de crecimiento, y en nada pasamos a 12/12.(floración).
El ph está controlado en 6.5 , la humedad está por debajo de 55% y la temperatura no sube los 26 grados.
Vemos un ejemplar que está ramificando bien, el led me está gustando mucho la flor crece más compacta.


Likes
27
Share


@DjgrowingMj
Follow
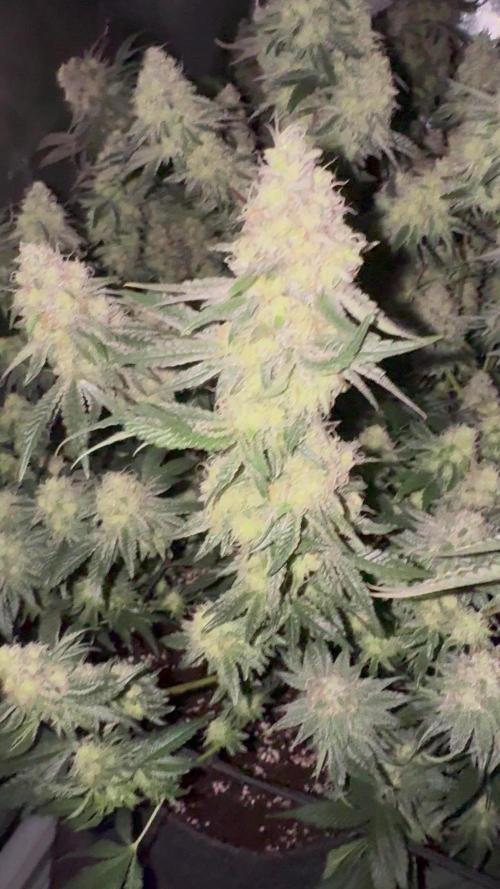
Last watering before harvest, I'm planning on chopping her down Wednesday! Buds looks so full and smells wonderful! Very excited to harvest this strain

Likes
Comments
Share


Likes
31
Share


@deFharo
Follow
🖐️👨🌾 ¡Bienvenidos amantes de la Marihuana!
Después de unas semanas de descanso de la temporada anterior, comienzo este nuevo viaje con mi bodega de marihuana llena, muchas ganas y la esperanza de conseguir la mejor cosecha de mi historia.
Nueva cepa anunciada con extrema potencia, gran producción y un nombre que me trae recuerdos del infierno...
"Cielo o infierno, ¿qué importa?" Charles Baudelaire
La semilla germinó dos días después de ponerla entre servilletas de papel humedecido y al calor de una manta, ahora lleva 4 días en su pequeña maceta, la pequeña plántula, curiosa, se asoma al mundo donde va a crecer, la luz de una ventana la ayuda de momento a estar activa, en un par de días comenzaré con las luces eléctricas y dos nuevos COB azules de 450nm que me van a ayudar a darle forma y compactar al máximo las plantas hasta que pase a floración.
HASTA LA PRÓXIMA...
SALUDOS A TODOS!
================================
Info de la cepa Opium de Divine seeds: https://divineseeds.net/opium/
"Varias variedades índicas afganas, reconocidas como las más potentes y resinosas, se cruzaron con una poderosa sativa brasileña..." Divine Seeds
- Genética: Afghanistan x Brazil
- Sativa / Índica
- Tiempo de Floración - 63 días
- Rendimiento en interior: 1000 g/m²
- THC: 29%
- Aromas afrutados y terrosos.
================================


Likes
38
Share


@Cariboo_OG
Follow
Utopia Haze is a rare heavily sativa dominant hybrid (90% sativa/10% indica) strain created through back crossing Brazilian Sativa strains. This tasty little bud took home 1st Place for Best Sativa in the 2008 High Times’ Cannabis Cup and for good reason – with its potent 18-22% average THC level and long lasting cerebral effects, Utopia Haze is one powerhouse smoke. The Utopia Haze high comes on soon after you finish your first toke, hitting you with a strong cerebral lift that infuses you with a sense of hazy relaxation.
Type: Feminised/Photoperiod
Cultivation: Indoor/Outdoor
Flowering Time (days): 70-75
Indoor Yield (g): Up to 650
Feminised Outdoor Harvest Month: October
Feminised Outdoor Harvest Month Week: 3rd-4th week
Aroma: Citrus, Woody, Pungent, Mint
Effect: Cerebral Lift, Hazy Relaxation, Sleepy
Welcome Everyone to the Final Entry of my Utopia Haze Grow !
There is so much to discuss ! I have been extremely busy as of late trying to get this Harvest together, but i am happy to have it here for you now !
I Seriously under estimated the amount of time, help from others, and my own necessary skills to pull this off.. and i still kind of screwed it up lol !
But its worth noting i have never actually done this before and trying to document it during....was extremely hard.
It is next to impossible to work an iPhone with rubber gloves on !
First I want to discuss everything step by step so before you jump straight into the comments on how the end product is so small in "quantity"
Rest assured i am happy with its"quality"...and thats all that matters to me because Life is a journey not a destination! and i have learned so much from this grow that I couldn't be any happy even if i messed some things up :)
But at the very least I hope you read through this entry in its entirety with an open mind and focus more on the process, rather than just the outcome!
I ran out of Ice & i was only able to wash three times..(normally I've heard you should go sometimes 5-6 washes)
Preparation is Key & things will be much better next round :)
Photos 1-22
These are pretty self explanatory but for those of you just tuning in now.. this is what happens to a very happy plant when you don't have the necessary tools to monitor key components of growing cannabis.. Ph, as well as EC levels play a very key role in the outcome of your grow lol that being said I was just able to save this plant by purchasing both tools but that doesn't mean the plant didn't suffer because of the prior events.. This was a Huge reason behind me choosing to turn this harvest into what i would consider
"Solventless Hash Rosin" from "Ice water extracted Bubble hash".
Pictures 23
The idea here is the process of using "fresh Frozen Cannabis" this has been discussed many a time online on such sites as instagram and here on grow diaries as well.. I personally have Never tried the process so i decided to try it out and make a judgement for myself..
Video 24
The Cannabis has now been in the freezer for 72 hours making it very well frozen.. as you can tell i struggled getting it all into the 25u Screen Wash Bag. One thing of note i would do differently is i will de-stem my next batch as i also believe this played a part in the amount of plant matter that escaped through the sieves.
Photo/Video's 25-28
The idea here is "ice water Seiving" & especially with the bags that I am using here that are only have screen material on the bottom portion of the bag it is very important to have spaces in-between the screens to allow the water to pass directly through the screens into the bottom bucket with the least amount of resistance.. because the hash is so extremely temperature dependant if it gets warm on the side of the bag.. it will stick there and not make it to the bottom to become use able product..
29
You do not need to use as much Ice as i used here lol... the idea is to keep everything very cold..i certainly achieved that but at the sacrifice of using so much that i ended up grinding product and producing "contaminants" but in the end they are just plant matter that i would be smoking when i rolled up my joint either way so.. I'm not super disappointed..
But it should be noted that what you want to achieve here is a Layering effect where you have the wash bag between two small layers of ice while the "water current" washes the Trichomes away allowing them to be separated by the screens setup below :)
Before Starting the machine you should allow some time (i.e.;10-12minutes pre soak to allow the product to become saturated) before the first cycle.
By video 32 I have just ran out of ice lol..
Video 33-34
Here I have a tip for you.. to separate the screens that you sieve through.. cut 5 gallon buckets to stretch them across nice and tight.. it'll make scooping your Bubble that much easier ! i learned this from the many "Frenchy" videos I have watched :)
Picture 35
Here in lays the problem for most people.. drying your hash without loosing vast amounts of "Terpenes" whilst also stay ever vigilant against mold !
Thanks to all those videos I've watched on youtube.. id like to think this was one of my most successful parts of this process..
Things to Note; Terpenes start to seriously evaporate at temperatures 68F or 20C
you need to stay as cold as possible whilst bringing the Relative Humidity in the space down into the 40-30% to stay away from that nasty mold !
I used my cold storage room in the basement.. with a dehumidifier running to keep the space at 45% RH & staying at a constant 15c.
All while spreading the hash as thin as possible across parchment paper, on top of the white screens with a fan moving air across both sides of the paper.
Pictures 36-38
These are some macros i took in the middle of my drying session I fell in love with the colour.
Yes i know the black spots are plant material but they will get caught when i bag the hash & squish the oil out.
Thing to Note; at this stage it is important to ensure you 'micro plane" the hash down as fine as you can whilst staying weary of the temperature... any "chunks" will hold pockets of moisture.. that lead to potential problems..ie; mold ...
Picture/Video 39-41
Successfully planed bubble hash ready to be bagged and Squished !
Picture 42
Ive decided to follow Pedro.. from Pedros Grow Room and double bag to be on the safe side so i don't have any blow outs.
So thats One 25u bag inside one 160u bag ! :)
Pictures 43
This is almost 3 grams of the bubble hash from above, already melting in the bag.. this is where i ran into trouble again lol things started getting to warm in the house and i was only able to get one of the three squish's i did on video :( things started getting sticky.
Picture 44
This is basically just a photo of the equipment I'm using; 3x5 LowTemp Cage in the frame I built myself, with a 20Ton bottle jack.
Something to note here is this is an older Lowtemp model with only a single heating zone which is which i have it closed here heating Both sides of the press :)
As well as the importance of having adequate pressure on your plates.. my rig is very overkill for the size of hash bags..lol
Video 45
Here is the lovely press video.. its didn't quite work the way i wanted either lol my directional folding wasn't quite tight enough for a big "drip" :)
&the Press was set to 65°c
Photo's 46-50 are pretty self explanatory :) I had a blow out.. but still managed to pull an 80% return from the hash once squished...& yes it tasted amazing :)
Was it worth it in the end... that could be debated.. for some..i understand..its not your thing, but for those of us that are interested in making our own concentrates.. free from Solvents...
I wouldn't make it any other way :)
If even ONE of you reading this diary finds it helpful to reference for ANYTHING.....even if its "what not to do" ill consider it a success !
Thanks again for tagging along on this garden adventure.. its been one heck of a journey !
Much Love from B.C. Canada,
Until Next time,
Cariboo

Likes
14
Share


@Bushleague_Botanicals
Follow
So… 12 cuttings, 2 are toast right off the bat. 3 have rooted, 1 of which was transplanted into 3 gal pot and the two 8 day clones will stay another day in the humidity dome in veg tent (now known as Planck). My flowering tent is called Einstein (don’t judge me!) 😂 I have the vs1000 at 25% in Veg tent and sf4000 at 100% in flowering tent.
I decided that I want feminized seeds from one (2) of these ladies so I’m going to pick two clones, one to get hit with colloidal silver to make pollen sacks and the other to get pollinated. Since both clones are female they don’t have the Y chromosome so they can’t make male seeds (although you could have a herm I guess and not know it. Maybe? Dunno) When the colloidal silver disrupts the plants normal flowering process it makes the plant make pollen sacks but doesn’t change the DNA of the plant so you are only getting XX from the pollen. And the recipient plant is also XX so the resulting seeds are only female. If I’m wrong please correct me…anyone!! What if I pick two clones from same mother?! Hmmmm. Also got to be careful to not pollinate the 7 in the flowering tent (Einstein). Plastic bags over the plant? Separate tent enough? We will see…
I’m naming the clones that root after famous female scientists I admire.
The first one is Ada, after Ada Lovelace, who was an English mathematician and writer, chiefly known for her work on Charles Babbage's proposed mechanical general-purpose computer, the Analytical Engine. (https://en.wikipedia.org/wiki/Ada_Lovelace)
The other two get named when they are transplanted.
For the 7 in the flowering tent it’s just hurry up and wait. Right?

Likes
14
Share


@Squaregrouper
Follow
I am so stoked about the mystery sativa that ended up being Cinderella 99 last year's favorite crop of mine. The rest of the garden is doing awesome just need to thin out a few more plants for the final stretch.. I am so looking forward to harvest this year with the varieties that I chose... I would be remiss if I did not mention the fact that red cherry berry and tangerine dream were added to the outdoor crops, they reside in the 20 gallon bucket.. I don't have the exact date when I propagated the red cherry berry and the tangerine dream from seed but it was when the other plants were already in the ground..I gave myself a challenge to see if I'd be able to do tangerine dream and red cherry berry outdoors with the other plants.. I pondered putting them in ground but I settled with the 20 gallon pot.
Likes
2
Share


@homegrow_pro
Follow
Last week of flowering. I would have to use a scrog to spread her further. I decided against that option becuase i like to keep the plant available at all times. Scrogging hinders this. So im keeping her down with some lines. Look at the stem. If it looks like this in veg, you know this lady is going to be huge!
Likes
16
Share


@Jays_Not_Here_Man
Follow
**Update** 96.5 grams dry from 1 Autoflower! Amazing smells, still has some of the 🍈 funk. She needs to cure to let the Terps and Flavors come out. She is still very sticky and resinous. Will update once a week or two of cure is done, but with the 1 joint I smoked, full heavy hitter, body buzz and heavy head high. Looking forward to the finished product.
This plant flourished with little work on my part. Good nutrients, and not being too hands on let this beast do her own thing. I would definitely recommend as a beginner strain/auto flower to go with, she is easy to see through to the end. Didn’t really need much attention until flower came on and she fed hard for phosphorus and potassium while she stacked. I’ve got some of her cousins already sprouted and am looking forward to trying some different techniques to see what she can do! Happy growing all 🌱😎

Likes
22
Share


@Malibu_buds
Follow
It grew so fast, I’d definitely recommend it for a first time grower, im gonna try growing a photo next time,
It’s was very sweet tasting, but a bit dry think I need to learn a bit more about drying and curing before my next grow
Likes
5
Share


@69XINEYESEEKAYX69
Follow
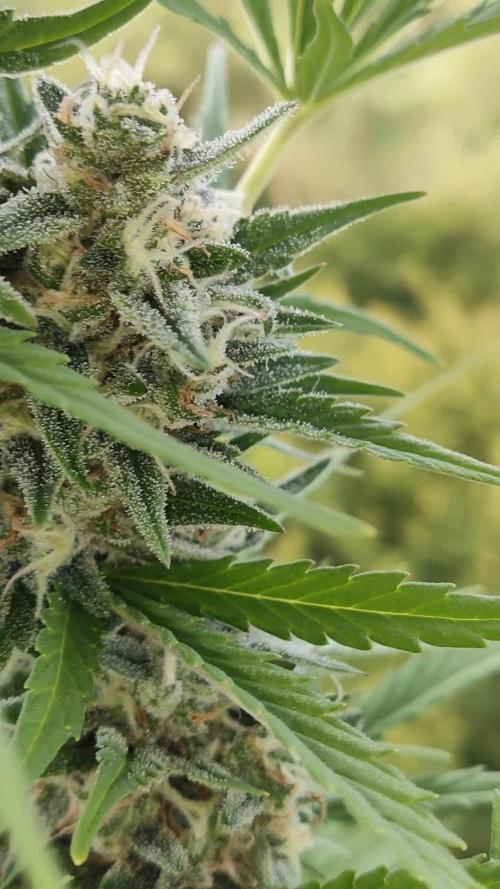
A lot of growth this week, the ladies are just shooting up, they all look healthy, the Humboldt sour diesel that was looking kinda funky is growing good and all the new growth looks normal an healthy gunna FIM the Matanuska Thunder an Humboldt Sour Diesel, waiting on the blue Sunset Sherbert till it gets a bit taller.


Likes
10
Share


@berlinbeginner
Follow
Day 22 Veg Blueberry Muffin. They are growing fast. I topped them on day 19 below the 5th node leaving only the 3rd n 4th node. I also filled up the pots with more biobizz allmix and (rain) worm castings. 2nd topping will follow in a week or so, depending on the speed of growth.
Day 24 Veg - explosive growth. Hopefully, the whole grow goes this smooth.
Processing
Likes
93
Share


@MadeInGermany
Follow
Welcome to the Zamnesia Spring Cup 🏆.
Hey everything together 🤗.
This week has continued to develop super 👍.
It was topped for the first time 3 days ago.
I think I will not use LST this time because of the short time that remains 😅.
Maybe I will do it a few more times top 😁.
The Monster Bud Mix also seems to be working, they're pretty dark.
They are a little too dark for me , but I will see that in the coming days.
Otherwise there is nothing great to report for this week.
I wish everyone a nice week, stay healthy 🙏🏻 and let it grow 🌱.
The Strain Runtz is available at
www.Zamnesia.com
Zamnesia Spring Cup 🏆🏆🏆
Type:
Runtz
☝️🏼
Genetics:
Zkittlez x Gelato
👍
Vega lamp: 2 x Todogrow Led
Quantum Board 100 W
💡
Bloom Lamp : 2 x Todogrow Led
Cxb 3590 COB 3500 K 205 W
💡💡☝️🏼
Soil : Canna Bio
☝️🏼
Nutrients : Monster Bud Mix
☝️🏼🌱
Water: Osmosis water mixed with normal water (24 hours stale that the chlorine evaporates) to 0.2 EC. Add Cal / Mag to 0.4 Ec Ph with Organic Ph - to 6.0 - 6.3
💦💧

Likes
7
Share


@Ieiogrow94
Follow
Eccoci qui...
Ormai manca davvero poco ci siamo quasi.... Ora niente più fertilizzanti solo acqua ed attendiamo la maturazione..
Seguiranno aggiornamenti, grazie a tutti per il supporto🔥🌲❤️
