
Likes
Comments
Share


@Dunk_Junk
Follow
The seed popped after ~48h and was planted directly into her forever home. A 20 litre airpot filled with new 6:1 compost:perlite mix.

Likes
2
Share

@Nocone_Purple
Follow
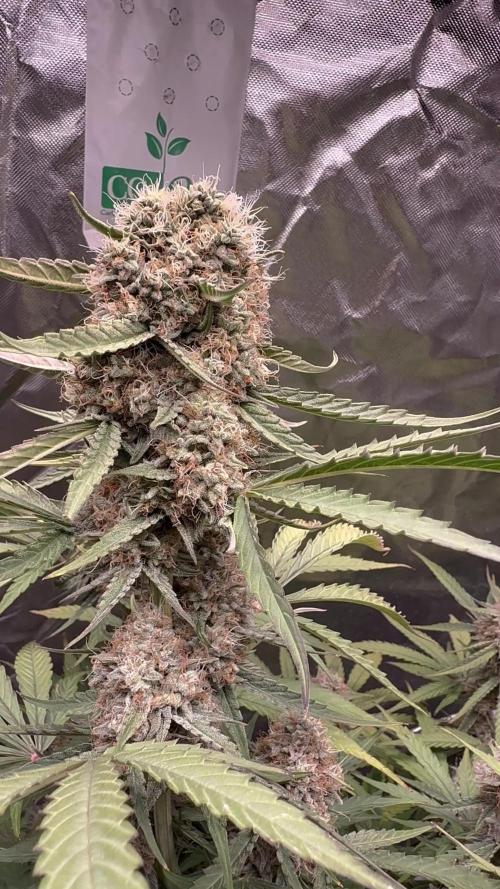
This week the Epsilon F1 is showing what true modern F1 genetics can do vigorous growth, perfect uniformity, and resin production on another level. The structure has filled out beautifully: strong central cola supported by multiple side branches, each one stacked with dense, symmetrical buds. The plant has remained compact yet incredibly efficient under my 220W LED, proving that these F1s know how to use light and nutrients perfectly.
Trichome development has gone wild this week the buds are now completely covered in frost, from the main tops down to the lower nodes. Most trichomes are still clear to milky, which means we’re right in the middle of the ideal bulking phase. The pistils have started to darken and curl inward, while the calyxes are swelling fast, gaining weight each day. The Overdrive and CO₂ bag combo seem to have given an extra boost in density and terpene formation.
Aroma-wise, the tent is filled with a complex mix of citrus, pine, and herbal notes, slightly spicy but still fresh. It’s a very refined and balanced scent not overpowering, but clearly high in terpene content. Every time I check the buds, the stickiness is unreal the resin literally glues your fingers together.
This week I kept the feeding stable, using the full Advanced Nutrients line with Big Bud as the main bloom booster, and next week I’ll gradually transition toward Overdrive as we approach the ripening stage. The leaves remain healthy and green with slight fading at the bottom exactly what I want to see at this point.
Overall, the Epsilon F1 is performing like a true next generation autoflower: fast, strong, consistent, and extremely frosty. If the swelling continues at this pace, it’s shaping up to be one of the heaviest yielders of this run, combining efficiency with top tier resin quality.

Likes
38
Share


@Miss_Greenthumbs_Garden
Follow
So I'm very happy with how this Purple Ghost 👻 Candy 🍬 turned out she's just beautiful . Had no problems growing her and she took multiple topping like a pro !! she's produced some lovely flowers

Likes
24
Share


@nonick123
Follow
Día 9 (10/06) N/A
Día 10 (11/06) N/A
Día 11 (12/06) Llueve mucho. Humedad alta por aquí. Eso les favorece
Día 12 (13/06) Se empiezan a desarrollar las hojas verdaderas a una buena velocidad! Todo en marcha! 💨
Día 13 (14/06) Riego ligero 100 ml sólo H20 EC 0,5 en previsión del trasplante en el día 15 de la planta
Día 14 (15/06) Se nota que estamos en el día 14 desde germinación y la mayoría de las plántulas van viento en popa!
Día 15 (16/06) Hoy procedemos a trasplantar a las chicas a su maceta intermedia de 6,5 litros
Se prepara con 5,5 Litros (85%) de sustrato PRO-MIX HP BACILLUS+MYCORRHIZAE + 1 Litro de Insect Frass (15%) + 65 gramos de Earth Vibes Super Soil (10 g/L substrato)
Se llena la maceta de sustrato con las manos (limpias) y rompiendo los trozos más gruesos, para que el sustrato esté aireado y esponjoso, sin presionar
Se coloca una maceta vacía de 1L para que quede la forma perfecta de la maceta donde están las plántulas (ver fotos)
Se espolvorea la parte proporcional de la probeta de microorganismos sobre el agujero de trasplante
Se saca la plántula de su maceta actual (bonitas raíces 😍) y se coloca en la maceta final
Se riega muy lentamente hasta percolación profunda con H2O EC 0,5 pH 6,5
Se coloca mulch (acolchado) de paja para evitar traspiración excesiva y cuidar a los microorganismos del suelo
A ver como reacciona al trasplante!
💦Nutrients by Lurpe Solutions - www.lurpenaturalsolutions.com
🌱Substrate PRO-MIX HP BACILLUS + MYCORRHIZAE - www.pthorticulture.com/en/products/pro-mix-hp-biostimulant-plus-mycorrhizae


Likes
9
Share


@JohnnyGrower
Follow
Es una buena cepa medicinal, tiene grandes niveles de cbd y casi nada de thc lo cual es ideal en algunas enfermedades, en la epilepsia es mas efectivo que los cogollos contengan thc tambien pero sin superar el ratio 1:1 thc cbd.. pronto iniciare un seguimiento de alguna variedad ratio 2:1 cbd thc amigos
Likes
Comments
Share


@Chaaaaarl
Follow
Switched one generic t8 8w led for a t8 9w grow led.
Plants have responded well to the change.
Will give the plants a few more days before moving them down to the 2nd grow chamber with double the lights.
Will leave the small ones in the current chamber until they recover and catch up.
USB Desktop fan seems to be too directional. WIll adjust so that the airflow is a bit more uniform.
Likes
11
Share


@Skull
Follow
Good week my diesel glue is really starting to branch up after topping at the end of last week I have continued 4days ago and today moderate defoliation I need the Poppin Cherrys pheno to get growing lol, I had a cultivator mystery stain, not last grow the one before that had a decidely slow start but bloomed into an exceptional phenotype, hopefully more similarities than Early leaf structure
Likes
5
Share


@Jays_Not_Here_Man
Follow
Easy week, girls have been doing pretty good. The cronk nutrients are a bit of a learning curve. Very potent stuff, I have been working my way up and am still at 1/2 recommended dose. Noticed some yellowing starting on the bottom leaves, have started to increase nutrient dose, hopefully no burn.
VPD has been good, they are just chugging along. Happy Gardening 🇨🇦❤️🌱😎💨

Likes
18
Share


@Grower_Of_Persia
Follow
week intel:
its time to harvest some of plants the ones that is mature enough. indica dominant plants will done first always so we should harvest them first
because my base nutrients and one of boosters was salt based, i'll do flushing this week to get some relieve to plants in the last days
stresses :
flushing
Drought stress via watering only one time with flushing this week
feeding:
day 1 : i flushed them with Advanced Nutrients Flawless finish and adjusted ph
day 3 : no more feeding from now on
day 5 : no more feeding from now on
guide of the week :
i harvest in 2 parts : first i harvest top of the branches and will let the lower buds to ripe another week then ill harvest the second wave.
indica dominant plants will get done 1 or 2 weeks sooner than sativa dominant plants that will often takes more than 8 weeks so be aware to harvest them sooner.
my dry and cure style is this:
3 days of hanging upside down to get water activity lower to around 0.6 in 50% humidity and 26 C temp (i know its a little high but we are in a hot summer right now and i cant get it lower even with air conditioner) and then after 3 days of drying i remove leaves and stalks, trim buds and move them to jar for the rest of their life :D . and in the first 4 days of curing i open the jar door and let hem get some fresh air in the jar for about 5 minutes and close the jar door again, after 4 days of curing like that buds are smokable but they will get better as they getting cured about 1 month.
im happy as hell with this harvest :D.

Likes
39
Share


@Hazecat_420
Follow
Quité la malla porque me costaba un mundo poder regar de manera correcta además de que el tallo central que salió doble de una de las nenas estaba comenzando a doblarse por el peso, por ende tuve que entrar a amarrarlo a un tutor para poder tener la precaución de que no se fuera a caer. El color y olor es maravilloso. Seguimos con este crecimiento ...

Likes
18
Share


@Discepolo
Follow
What a week my buddy growers! What a week!
The dogs literally ate my homework!😳
I understand that they are German shepards and got K-9 insitinct in their blood...but what the fuck!😱
Both my gelato & Nothern got dig out of the ground, leaving me with little hope...plus I had to build a shelter before this happend due to strong wind!
But fast buds really has a kick ass genetic very resistent to all factors, and beside all she doing well!💪
As nutrients I added bio-tabs Pk-Bio and boom boom spray for all the stress she got.
Love to all😘


Likes
8
Share


@eldruida_lamota
Follow
Vamos familia cosecha de Original de GrowBarato.
La verdad que el secado muy bien 7 días en Malla y a los botes, 40% humedad y 24 grados es la temperatura ambiental que han tenido en el secado.
Por lo demás de miedo os la recomiendo.
Gracias Agrobeta y Mars hydro , sin ellos este proyecto no sería igual 🙏.
Agrobeta:
https://www.agrobeta.com/agrobetatiendaonline/36-abonos-canamo
Mars hydro:
Code discount: EL420
https://www.mars-hydro.com/
Buenos humos.

Processing
Likes
14
Share


@Thckaos
Follow
25-10-20 Se cambia la solución y se realiza un lavado de raíces. Para bajar la conductividad de las raíces de 2.05 a 0.2 ms para que la solución nueva sea más efectiva. Se corrige el PH de 7.8 a 5.6. La solución tiene 2.6 ms y 5.6 PH. Se añade una pastilla de CO2.
25-10-20 (2 horas más tarde) Se corrige el PH 6 a 5.6 Conductividad 1.9 ms con los nutrientes ya.
26-10-20 Se corrige el PH 5.8 a 5.6 Conductividad 1.95 ms.
27-10-20 Se corrige el PH 5.9 a 5.6 Conductividad 2.00 ms.
28-10-20 Se corrige el PH 6.00 a 5.6 Conductividad 2.03 ms.
29-10-20 Se corrige el PH 6.00 a 5.6 Conductividad 2.10 ms.
30-10-20 Se corrige el PH 6.00 a 5.6 Conductividad 2.14 ms.
31-10-20 Se corrige el PH 6.00 a 5.6 Conductividad 2.20 ms.
Processing
Likes
12
Share


Likes
7
Share


@Growa
Follow
Für die Kamera wurde ein Clip bestellt, solange werden auf dem Luftbefeuchter kleine Türmchen gebaut.

Processing
Likes
102
Share


@GirlGoneWeed
Follow
Entering week 3 nice and strong, my big girl have formed 4 levels of branches, we can now see the fan leafs starting to get thick and shaped like Indica leafs. Both girls show such good resistance to drastic changes so far, I had to travel and got a friend to come over and give them some love, boy oh boy, for my surprise (as a newbie) the variations of humidity jumping from 45% to 80%, I thought the plants were going to show sign of stress, however they are as green as ever, leafs look nice and healthy!!
I am having some difficulties in stabilizing the environment inside my grow tent since transplanting both plants into the 5 gallon smart pots, humidity is all over the place. I have to be constantly checking, turning the exhaust system on and off if I want to maintain the levels between 50 and 60%. Now, When I get up in the morning and check the thermometer humidity have been as low as 44% and as high as 77%, I am wondering if my light schedule is the problem…I have lights off from 12am to 4am and than lights on for the rest of the clock.
If anyone (TheBudWhisperer help! lol) have some advice and suggestion please let me know!
Happy Grow and Stay Lit Folks😎


Likes
5
Share


@Smokwiri
Follow
Welcome to the diary of the Limited edition strain: Orange skunk ryder
OMG, this DANK has started to finish
it smell like i have at least 50 of them in flowering, but when you follow your nose you only find this little lowryder crossbreed.
it looks great, trichomes look very tiny like grown under LED, but it's outdoor
i'm leaving this outside for some extra days and then i'll start to cut the main cola, which isn't really big, but smells o so promising.
this plant is very stealthy, and it needs to be stealthy because it's that stinky.