
Likes
Comments
Share


@Bread_n_Buds
Follow
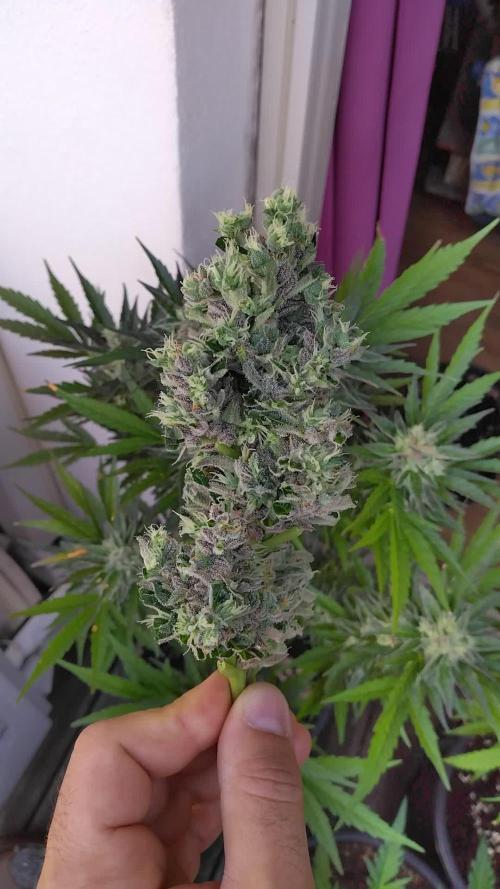
Here we are at the halfway point, after the first month our photoperiod plants are multiplying their florets and then going into flowering.
Jet Fuel has just undergone the topping of 8 florets, you can see the 4 fresh florets just cut. We are therefore at 8 very small branches growing, my plan for photoperiod plants is to get to 16, wait a few days and go into flowering. 16 florets as I see it is the perfect size for the 11 liter pot.
Topping is an extremely delicate moment as regards cutting the florets to split them, we always take care not to damage the new growing florets.
Topping is also a delicate moment as regards fertilization because the plant slows down and absolutely does not need all that nitrogen that it would normally need and that the producers recommend in their sheets. So you should arrive with the plant green and in perfect shape at this moment and dose the fertilizer very well for growth.
Mine came from a slightly deficient veg because I kept it low fearing this over effect during the topping that I know well and now I'm a bit over. Nothing to worry about, of course, but if you do repeated topping my advice is to use preferred soil or prepare the soil with Monster Bud Mix by Zamnesia or Plagron Super Mix, in short, enrich the soil and start and only add nitrogen if necessary, especially during repeated topping.
In any case, everything is under control and I will demonstrate it to you during the flowering phase. Wait for the Uncle BreadandBuds and see what it does to you.
Remember the cold temperature makes the girls absorb food much more slowly than in summer so be careful to give the right amount and to dry the plant in maximum 2 days or you risk imbalances.
We are always using soil, feeding and all the recommended additives from Plagron 100& organic we have only lowered the amount of grow in this topping phase for the reasons given above.
---- Decide on the right soil and calculate your fertilizer card based on the soil on the official website.
-- www.plagron.com
Try a seed of this strain that drives us crazy...
---- https://www.zamnesia.io/it/11258-zamnesia-seeds-jet-fuel.html
Zamnesia Description // Jet Fuel (also known as G6, Jet Fuel OG, and G6 Kush) is a modern hybrid rich in THC and terpenes with a diesel aroma. Originally created in Colorado by crossing Diesel with Aspen OG, this 60% sativa-dominant hybrid is a must-have for any smoker who enjoys an uplifting and energizing high. Now, thanks to the hard work of our breeders, the original Jet Fuel is even easier to grow at home. Order your seeds, plant them in soil, and enjoy their rapid growth. After just 9–10 weeks of flowering, you can expect a generous harvest of premium sativa buds!
All the best that mother nature can offer is on —— www.zamnesia.com
*Sorry I Don’t know why I dont find the white background photo only for this strain

Likes
19
Share


@BearBuds
Follow
WHAT A HARVEST!!! My largest ever to date. After drying and curing the final weight is ~10.5 ounces of total flower and an additional 2 ounces of golden keif made from dry ice and bubble bags. I am SO STOKED right now. Thanks for checking out my grow diary. I will be back next season to continue to improve my technique.


Likes
92
Share


@DogDoctorOfficial
Follow
Week 7 Veg Report 🌿✨
Hey Grow Fam! 🌱 Week 7 of veg is here, and let me tell you, the grow room is buzzing with life! Each of the girls is showing off her unique personality, and I’m especially stoked about the Papaya Zoap—she’s really coming into her own! The scrog net is nearly filled out just how I wanted it, and I can feel we’re so close to flipping to flower. The anticipation is real! 😁
But before we get to flowering, let’s take a dive into something that makes this grow so smooth—ThinkGrow LED drivers and cables.
ThinkGrow LED Drivers – Plugging Into Success 💡🔗
This week, I had a chance to work deeper with the ThinkGrow LED system, and honestly, it’s like a dream come true for efficiency. I’ve been using the TLD-4 Four Spectrum Control Channels Model One LED Driver, and let me break down how it works. The drivers attach directly to the bars—super sleek and no extra bulk. And, the connections? It’s a matter of matching the male and female connectors on the TDC-2 Daisy Chain Cord. It’s like a simple puzzle that snaps together perfectly. The TDC-4 cord takes it to the next level, connecting the top bars to the ICL-300 Inner-Canopy LED Bar, giving complete control and balance across every layer of my canopy.
Why is this important?
The driver-to-bar connection ensures that each LED bar is operating optimally, and the daisy-chain system makes it effortless to manage multiple bars without a ton of wires everywhere. It’s neat, efficient, and delivers even light distribution, which my plants are loving! 🌞
Are My Girls Ready for Flower? 🌸
When I look at the plants up close, it’s like they’re whispering, “Flip me to flower already!” 😆 Their growth has been so vigorous, each filling out the space with character, and that scrog net is almost fully covered. So, I’m thinking we’re super close to the big switch. Each plant has its own pace, but as a whole, the grow is looking fantastic!
Room Stats – Tuning Into the Environment 🌡️
The TrolMaster system is still killing it with data and control, making it easier for me to keep everything balanced. Here’s a quick breakdown of the week’s environmental numbers, and a few jokes along the way! 😜
• Room Temps: Max 25.5°C | Min 24.4°C (Keeping it cool but not too chill!)
• RH: Max 76.4% | Min 67.1% (Humidity stays right where it needs to be.)
• CO2: Max 832 ppm | Min 420 ppm (Shout out to that magical 420! 🌬️😂)
• VPD: Max 1.06 kPa | Min 0.64 kPa (All dialed in for peak veg mode.)
Light Levels – All in the Details 💡
• Max PPFD: 506 | Min 0 (because, you know, when the lights are off, it’s dark! 🌚😆)
Keeping the light intensity balanced, and using the ThinkGrow LED system to spread that goodness across the entire canopy, I’m seeing explosive growth. Those PPFD levels are perfect for this stage!
Water & Nutrients – The Lifeline 💧
• Solution pH: Max 6.32 | Min 5.78 (Keeping it in the perfect range.)
• TDS: 355 ppm steady (Every drop counts, right?)
• Solution Temp: Max 23.5°C | Min 22.3°C (Keeping things cool, just like the grow!)
And medium moisture? It’s a solid 100% thanks to my AutoPots and the genius of the AquaValve system. No electricity needed—just gravity doing its magic. It makes my life so much easier, and the girls are loving the consistent hydration! No more worrying about under- or over-watering.
Why I’m Obsessed with TrolMaster 📱
I can’t talk about this grow without shouting out the TrolMaster system. Every bit of data—whether it’s temperature, RH, VPD, CO2, light intensity, or pH—gets tracked and displayed in real-time on my app. It’s like having a grow assistant in my pocket, making sure I can monitor and adjust at any moment. The level of control I get with TrolMaster is out of this world, and it’s helping me keep everything dialed in perfectly.
Ready to Flip Soon 🌸
With the Papaya Zoap filling out so nicely and the rest of the plants following suit, I feel like we’re right on the edge of flipping to flower. It’s going to be a smooth transition, and I can’t wait to see these beauties bloom!
Stay tuned for next week, where we might just make that flip! 😉
Environment Stats Recap 📊
• Room Temp: Max 25.5°C | Min 24.4°C
• RH: Max 76.4% | Min 67.1%
• CO2: Max 832 ppm | Min 420 ppm (Seriously, shoutout to 420 again! 😂)
• VPD: Max 1.06 kPa | Min 0.64 kPa
• Light PPFD: Max 506 | Min 0 (obviously, when the lights are off! 😜)
• Solution pH: Max 6.32 | Min 5.78
• Solution Temp: Max 23.5°C | Min 22.3°C
• Medium TDS: Max 430 | Min 420 (I can’t get enough of these 420 jokes! 😆)
Final Thoughts 💚
This week has been a blast! Between the ThinkGrow LED system and the TrolMaster gear, I feel like I’m pushing the limits of what’s possible in indoor horticulture. Everything is dialed in, the plants are healthy, and the data just keeps showing that we’re right on track.
Shout Outs!
As always, huge thanks to TrolMaster and ThinkGrow LED for the amazing gear, to Aptus Holland for their top-notch nutrients and Pro-Mix for the best soil i have used so far. Big love to the seed banks, the amazing Grow Diaries community, and all my followers—you guys make this journey so much more exciting. Don’t forget to catch up on my social media, Instagram, and YouTube for real-time updates and exclusive content!
Stay tuned for more—next week is going to be epic!
DogDoctorOfficial Discount Codes so you can save big on your next check out 💚💚💚
Kannabia - DOGDOCTOR 30% off
SeedsmanSeeds - DOGDOCTOR 10% off
CannaKan- DOGDOCTOR 15% off
terpyz.eu - DOCTOR 15% off
The Neutralizer - PORKIT5-DOG 15% off
As always thank you all for stopping by, for the love and for it all , this journey of mine wold just not be the same without you guys, the love and support is very much appreciated and i fell honored and so joyful with you all in my life 🙏
With true love comes happiness 💚🙏 Always believe in your self and always do things expecting nothing and with an open heart , be a giver and the universe will give back to you in ways you could not even imagine so 💚
Friendly reminder all you see here is pure research and for educational purposes only
Growers Love to you all 💚💚💚


Likes
4
Share


@eldruida_lamota
Follow
Vamos familia, actualizamos la octava semana de floración de estas Thunder Banana de Seedstockers, salieron las 3 de 3, 100% ratio éxito.
Aplicamos varios productos de Agrobeta, que son increíbles para aportar una buena alimentación a las plantas.
Temperatura y humedad dentro de los rangos correctos dentro de la etapa de floración.
La tierra utilizada es al mix top crop, por cambiar.
De 3 ejemplares seleccioné los 2 mejores para completar el indoor, cambié el fotoperiodo a 12/12 y también apliqué una poda de bajos, se ven bien sanas las plantas, tienen un buen color progresan a muy buen ritmo por el momento, las flores han tricomado que da miedo.
Agrobeta:
https://www.agrobeta.com/agrobetatiendaonline/36-abonos-canamo
Hasta aquí todo, Buenos humos 💨💨💨.
Likes
10
Share


@Cannabot
Follow
Transplants been done into final containers(20l)and started LST.They doing really well,they've started sexing so I reckon from next week I'd say week 1 flower.Havent fully saturated the medium as yet with fertigation ,want that stem thicker before I do that. Weathers been decent but the wind has been strong on 1 or 2 days.


Likes
13
Share


@Medmandan420
Follow
I harvest
this strain at my other grow
this week so I'll have a preliminary smoke test
super
strong genetics
super trainable fast growing
and smelly
they also boast a 27 percent
thc content ( I normally consume 19 to 21 %) this gonna knock my socks off
Likes
1
Share


@spanish420pasiongrow
Follow
Muy caros los productos, efectivos pero me sigen pareciendo caros, probaré nuevas gamas! Un saludo

Likes
5
Share


@Mz876
Follow
I was slightly disappointed with the yield but I’m content with the taste and affect that I got from the plant .
Likes
19
Share


@Takeaims
Follow
Since the weeks are messed up on this video of my whole tent all different
Likes
44
Share


@Cogollo_eu
Follow
**Encontrarás la traducción a español al final de la descripción**
From/Desde: 15/03/19 || To/Hasta: 21/03/19
From day/Desde día: 22 || To day/Hasta día: 28
You can find the Money Maker Diary here:
** Podéis encontrar el diario de las Money Maker aquí:**
https://growdiaries.com/diaries/25667-gorillamakingmoney-gorilla-vs-money-m
-----IMAGES & VIDEOS-----
Video 1:
Exactly the same video as 2 but accelerated +300% to fix it to 1 minute for instagram.
Video 2:
4 days (25~28) TimeLapse, 1 image each 60 secs @ 30 fps, awesome video of how is responding the main Gorilla to the Man Linning, at about minute 2:00 i pruned and trained the other gorilla and the main Money Maker, and at the end of the video i pruned the last Money Maker.
Video 17:
General video of the 4 plants and it's trainings, i'm sorry for being so repetitive with the music.
Video 18:
Video focushed on the second Gorilla
Photo 10:
Top and bottom cuts marked on photo 11
Photo 26:
Last main branches toppings
Photo 29:
The main internodal became very rocky, awesomly robust.
-----WEEK SUMMARY-----
As you see i'm testing many different things among the plants, the first Gorilla is recieving a heavy training in man-lining, and with the second gorilla im trying to equilibrate all the tops and then i will push them horizontally, also i twisted the main branch a little so there's no node below any other.
I love how the man-lining is forming the plant, but i'm really scared as i really don't know what am i doing, i just sin in front of the plant some minutes, and then i cut where i fill, same with the grab points. please don't be too enthusiast with this growing as maybe i will fuck up everything at some point lmao!! 😭
-----WATERING CALENDAR-----
18/03/19 - 400 ml with all "LAST" week nutrients @ 0.95 E.C. PH5.9 (i had some rests from the last watering)
- Also i applied a foliar irrigation with the same mix as the last week
20/03/19 - 1.000 ml with all week nutrients @ 0.9 E.C. PH5.9
*****ESPAÑOL*****
-----IMÁGENES & VÍDEOS-----
Vídeo 1:
TimeLapse, exactamente el mismo vídeo que el 2 pero acelerado a un poco más del 300% para ajustarlo a 1 minuto para Instagram.
Vídeo 2:
4 días (25~28) TimeLapse, 1 imagen cada 60 segundos @ 30 fps, vídeo increíble en el que se ve com responde la Gorila al Man Lining, en aproximadamente el minuto 2 podo y entreno un poco a la otra Gorila y la principal de las Money Makers, al final del vídeo podaré la última Money Maker.
Vídeo 17:
Vídeo general de las 4 plantas y sus entrenamientos, siento la repetitividad de la música entre los vídeos.
Vídeo 18:
Video enfocado a la segunda Gorilla
Photo 10:
Los cortes nombrados (Top&Bottom) de la foto 11
Photo 26:
Los toppings de las ramas principales.
Photo 29:
El internodo que he dejado como principal se ha puesto duro como una piedra, extremadamente robusto.
-----SUMARIO SEMANAL-----
Como se puede observar estoy probando diferentes cosas enter las 4 plantas, la primera de las gorilas está recibiendo un man-lining y entrenamiento bastante heavy, y con la segunda Gorila intentaré equilibrar las partes altas y después la extenderé horizontalmente, también he torcido el tallo principal para que los pisos se distribuyan en círculo.
Me encanta como el man-lining está distribuyendo la planta, pero estoy muy asustado pues realmente no se lo que estoy haciendo, simplemente me siento delante de las plantas un rato y después las meto cortes donde siento, de la mima manera las estoy agarrando. Por favor no seáis muy entusiastas con este cultivo, pues en cualquier momento puedo liarla y destrozarlo todo Jajajajajajajaj 😭
-----CALENDARIO DE RIEGO----
18/03/19 - 400 ml contodos los nutrientes de la "ÚLTIMA" semana @ 0.95 E.C. PH5.9 (me quedaba un resto del útlimo riego)
- También he hecho un riego foliar con un resto del ultimo riego foliar
20/03/19 - 1.000 ml con todos los nutrientes de la semana @ 0.9 E.C. PH5.9

Likes
33
Share


@weedelicious030
Follow
Letzte Woche wurden die Damen in ein größeres Zelt gebracht nachdem sie vorher in 18l Töpfe gepflanzt wurden. Leider kann ich bei dem Grow die Beleuchtung ändern. Alle pfanzen stehen jetzt unter einer GC Bar 8 von "Greenception".


Processing
Likes
32
Share


@Vega0284
Follow
Hey Guys!
Super excited this week! I've really been wanting to try growing outdoors, so I built a cheap hoop house! Got most of this stuff for the frame from Lowes under 300$. All the soil products I got from GrowGreenMI. Some really cool people out there.
One thing I'm super worried about is drainage. Right now those holes are about 4 feet deep and they've got about 4 inches of water in them already. What's been cautioned is that, eventually, about 2 months in these plants roots will grow and reach the bottom and cause root rot to form. One of the biggest things I was trying to be wary of was causing root rot. This was also the biggest precautionary measure I took when mixing the soil. Adding the extra perlite, coco, and clay pebbles. Best advice right now is to build the soil up on the holes another 16 to 18 inches and possible stick a PVC pipe down to the lowest drainage point of the hole to allow some of that natural occurring water to evaporate.
Any advice anyone has on it is welcomed!
Making a compost tea for the soil outdoors, will probably put 2 cups in each RDWC bucket as well and let that do it's magic for a day or so before nutrient change. Raised the bed about 14 inches as well!
All the seeds sank! Off to a good start! Lol


Likes
10
Share

@LandraceCBDLover
Follow
Comme la semaine dernière, on peut observer une importante refloraison sur une des deux Mazar (la n°2 est plus discrète), et sur l'Afghani#1.
Les trichomes ne sont plus ambrés. Patiente donc....
J'ai eu l'impression que la tête principale de la Mazar était en train de moisir. Du coup séchage et fumage ;)
Les landraces (Sinaï et Libanaise) continuent leurs floraisons tranquillement 🐫


Likes
11
Share


@BudBeezy
Follow
Now that the plant is dry, I can go into a few more details.
In my opinion, the harvest is a complete success for a beginner.
During the harvest I realised how hard the flowers are. After drying, they became even harder, almost rock hard. The flowers are covered with many shiny trichomes.
The harvest took quite a long time. I spent about 14 hours on it, which was also due to the super meticulous wet trim. The reason for the thorough wet trim was the mould. Every single flower was examined. I disassembled the large flowers before drying to be on the safe side. It's nice to have huge flowers, but in the end they are chopped up anyway.
At the end of the 8 days of drying, the GG4 Sherbet FF rewarded me with finest ice-coated flowers. Thanks to the wet trim, I didn't have to do any more work. I was able to separate the buds directly from the branch and put them in the jars to mature. As the offcuts were also super potent due to the thorough wet trim, I processed them into butter.
Likes
24
Share


@Mr_Awesome_Badass
Follow
We are on auto-cruise right now. Feed and water everyday. Like watching the side root grow.
For my first cannabonsi I think I've done well so far. Hope I can keep it up.
I'm showing the saucer I made at the start at the grow. That's all you get of it for now until more toward the end of the grow. Had a blast making it.
Likes
5
Share


@Steevoh978
Follow
Plants are growing strong. Gotta do some trimming. The smell reminds me of old school weed smell.

Likes
2
Share

@Ninjabuds
Follow
I like the structure of this plant it starting to look pretty healthy ima hook up the watering system soon and flip to flower soon aswell
Likes
16
Share


@Love420bluedream
Follow
Hello, I will start the harvest on June 5th, a purple punch brings a week longer. 🔥💚🔥
Likes
16
Share


@Ieiogrow94
Follow
Eccoci qui...
Tutto va per il meglio, ogni volta che apro la tenda per lavorare sulle piccole la mia casa profuma intensamente!!!
Seguiranno aggiornamenti, grazie a tutti per il supporto🔥🌲❤️