




Likes
15
Share


@AK1210
Follow
New flowering continues to develop on this lady, she seems to be swelling up day by day.
Yellowing of the fan leaves has started which usually means it's time to flush, I need to check the trichomes to see how amber they appear before I do just in case the flavour or yield could be effected.

Likes
4
Share


@Dmars
Follow
11/14 Day 23 from flip. The stretch has been explosive, so much so that I’m beginning to have height concerns. I can probably add another trellis net and lower it down a little bit, but not by much. I just have to hope they level off soon. I’ve needed to turn the lights down every day or two, and even then I’m at almost 800 PAR / 34.6 DLI at the topmost part of the canopy. The majority is closer to about 725 PAR / 31.3 DLI so I’ll leave it there for now.
11/19 Day 28 from flip. Well, the stretch sadly hasn’t stopped. I was able to raise my lights a few extra inches but it’s now maxed out at the top of the tent. The topmost branch is about 12” away from the lights so this really is about as much as I can realistically handle. I realize Ethos was up front about sending this strain into flower earlier than normal due to the way it grows but this is really nuts. We’ve now easily tripled, if not almost quadrupled, in height and lord knows how much there is still to go. Stretch aside, everything else with the grow is bang on. Everything looks healthy, no signs of any disease or pests, every branch has solid airflow around it with nothing being too crowded. I just need the stretch to stop and everything will be great.


Likes
6
Share


@Mr_Horse
Follow
She is doing well, running Big Rootz soil so not much is needed by way of nutes just yet. Watching for discoloring of leaves in future so I can start a 25% nute feeding regiment.
Noticed last night she is already in preflower. Honestly I am pleased to see it happening sooner rather than later. She is a thirsty girl and a long grow in a solo cup sounds intimidating as hell to me lol.
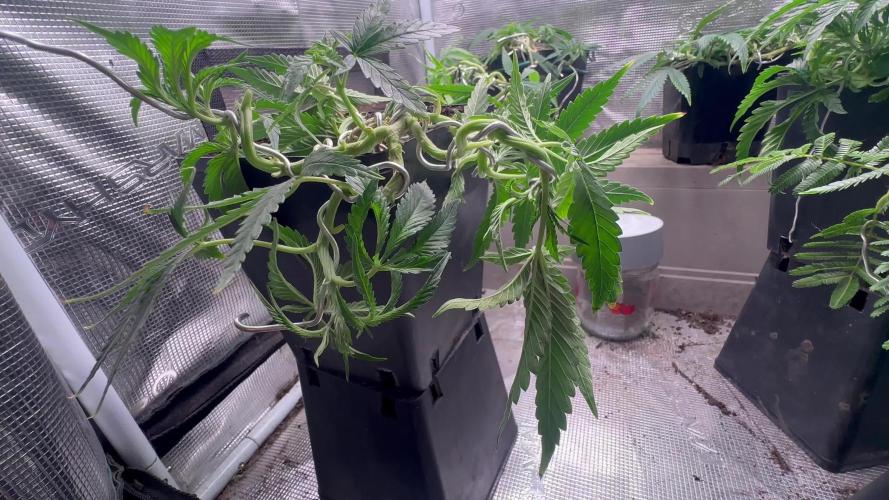
Decided to go for it put a nice bend on her and strapped her down for the ride!
Likes
35
Share


@Master_weeda
Follow
Bonjour à tous les padawans et les maîtres jedis
Pour cette semaine je prévoit de pratiquer comme technique spéciale le LST et juste un arrosage.
Pour cela comme à mon habitude j'attend le cinquième noeud ou que je juge la plante robuste.
Je profite que cette semaine qui va être relativement calme pour faire un LST appliqué et vous faire un rappel de ce qui est pour moi la meilleure technique pour arroser une autofloraison et la façon dont je pratique le LST.
En suivant ces quelques simples conseils vous obtiendrez un résultat optimal tout au long de votre culture :
Le cannabis est une plante qui n’aime pas recevoir un léger arrosage en continu. Il est impératif de l’arroser en grosse quantité, puis d’attendre que la terre soit bien sèche avant d’arroser à nouveau!
Pour calculer la quantité d’eau nécessaire à chaque plante, suivez cette règle :
Le volume d’eau à donner lors de chaque arrosage doit représenter au moins environ un quart du volume du pot !!
Exemples :
pour un pot d’1L, donnez 0,25L d’eau à chaque arrosage pour un pot de 4L, donnez 1L d’eau à chaque arrosage pour un pot de 12L, donnez 3L d’eau à chaque arrosage pour un pot de 30L, donnez 7,5L d’eau à chaque arrosage !etc…
Pour donner un tel volume d’eau, il est souvent nécessaire d’arroser en deux (voir trois) fois, lentement et uniformément sur toute la surface. Disposez de bonnes coupelles sous les pots, celles ci se rempliront d’eau qui remontera dans le pot par capillarité en moins d’une journée. Il est également très important d’utiliser un bon terreau de qualité, avec une bonne capacité de rétention d’eau mais qui assure également un bon drainage (celui ci doit contenir de la perlite, et/ou de la coco, etc..)
Il vous faut alors maintenant attendre quelques jours en sous-pesant régulièrement les pot avec vos bras. Quand ils seront redevenus très légers, vous pourrez arroser à nouveau !!
En effet, comme l’eau pèse beaucoup plus lourd que la terre, un pot gorgé d’eau pèse plusieurs fois le poids d’un pot d’une plante prête à être arrosée. Avec un peu d’entraînement, vous apprendrez donc très rapidement à sous-peser vos pots pour savoir quand une plante a soif.
C’est une technique à la fois très facile et très efficace, et qui peut être appliquée à toutes les plantes en pots !
En arrosant de cette façon, en général vous devrez arroser vos plantes tous les 3 à 6 jours.
Pour cette semaine 3 au jour 17 ma plante fais 12 centimètres et son cinquième noeud apparaît je décide donc de pratiquer un LST sur ma plante.
Pour ce j'utilise du fil de fer galvanisé que je plante directement dans le substrat en faisant attention de ne pas endommagé les racines car n'oublions pas que ce qui pousse dessus pousse aussi dessous.
Jour 17 je pulvérise du une solution composé d'une cuillère à café de savon noir mou dilué dans un litre d'eau en prévention d'éventuels nuisibles.
Je corrige mon LST suivant la pousse de ma plante ...
Pour ma par c'est la manière dont je procède. Comme promis petit rapel de:
Quand commencer à appliquer la technique LST
De nombreux cultivateurs commencent la manipulation dés que les plantes possèdent entre 3 et 6 nœuds ou une paire de feuilles. Durant cette première étape de la croissance, le tronc encore flexible est pliable sans risque qu’il ne se casse, même si au fur et à mesure du développement de la plante il sera de plus en plus difficile de le plier. Nous pouvons continuer à guider la croissance des branches durant toute la culture, même durant la floraison, ce qui pour cette étape représente un grand avantage face à la taille, qui n’est pas du tout recommandé une fois que la formation des têtes commence, cela stressera en effet la plante, ce qui aura pour effet de retarder la récolte.
Comment appliquer la technique de guidage LST
Si nous sommes prudents, la flexibilité naturelle des fibres du cannabis permet de plier leur tronc et branches avec une relative facilitée, même durant la floraison des plantes.
En utilisant une corde fine, nous pouvons accrocher la pointe de la plante à la base du pot par exemple ou à un tuteur que nous aurons planté dans le substrat. Nous plierons le tronc avec précaution et nous le fixerons avec la corde, à partir de là, nous pouvons augmenter progressivement la tension de la corde, chaque jour un peu plus, jusqu’à obtenir la position souhaitée. Soyez attentif à la réaction de la plante, essayez de ne pas appliquer trop de pression sur la corde et rappelez-vous que la flexibilité des branches peut varier d’une plante à l’autre.
Pour obtenir de meilleurs résultats, il suffit de suivre quelques règles simples. Pour commencer, nous devons choisir une corde fine mais pas trop pour ne pas blesser les troncs au fur et à mesure qu’ils grandissent et qu’ils deviennent plus gros.
Nous pouvons utiliser des crochets en plastique souple ou de n’importe quelle autre matière flexible pour éviter d’endommager les plantes. Spécialement en intérieur, utiliser des cordons en plastique de couleur (voir les diaries de @Silky) est très pratique pour voir facilement les accroches et faciliter le travail au milieu du réseau formés par les cordes, les tuteurs, les mailles ou les supports que nous aurons dans la culture. Bien entendu, en culture extérieure et surtout en guerilla nous ferons juste le contraire et nous utiliserons des matériaux de couleur qui n’attirent pas l’attention pour que notre jardin reste discret.
Pour stresser les plantes au minimum, la mieux est de réaliser ces manipulations le soir ou juste après que les lampes en intérieur s’éteignent, ce qui leur permettra de se remettre durant la nuit. Normalement, le jour suivant nous pourrons observer comme les pointes des branches que nous avons pliées se dressent de nouveau vers le haut à la recherche d’une source de lumière.
Que la force soit avec vous
Processing
Likes
3
Share


@Dunk_Junk
Follow
Day 56 - She grew 6cm this week. Not a lot... but she continues to grow well.
Day 56 - Tent configuration changed: 4x more CREE CXB3590's have been added and 4x blurple LED things removed. Lights now consist of 8x CXB3590's & 1x 1000W HID with flower bulb.

Likes
25
Share


@BudHaks
Follow
Hey, there peeps!
Apologies for not updating my diary as I have been quite busy balancing non-plant responsibilities -.-!
Anyway, we are now on day 75 since I ordered my equipment and started germinating my seed and day 71 since I placed my seedling in her first Coco pot! She is now a staggering 4 foot 2 - which was overwhelming considering this is my first grow and orginally only cleared out 2/3 of my cuboard but now it uses the whole space but she's coming along so well! I have also added a LED Grow Light Full Spectrum 50W Red COB as I wanted some extra light for the bottom half nuggests.
She is very healthy (I assume from the strong healthy roots) and hasnt shown any major defects other then the initial defects i encountered in week 2-3 and slight light burn on the top cola in week 7 which was from the plant growing so quickly and touching the light, but I did then adjust the light within 2-3 hours.
What do you guys think and how did she get so tall consdiering she is an auto-flower and the strain is meant to be indica domiant?


Likes
11
Share


@Microsun
Follow
Alright, the time is here, I’ve started the harvest but I don’t want to press the harvest button until I have all my info correct, but I’ll show some photos from my baby, we started a slow 6.0 flush about 2 weeks ago and finishing flush about 4 days ago. She was already fading but I had some problems since I fed her without thinking after having some drinks witch is obviously a very rookie move. But as I’m still learning it’s just another oof under the bridge, she was fading and I got some nice looking tricombs and I’m happy with the smell and size for her life cycle, I’m aiming for a slow dry and cure but my space is limited in my appointment and grow room so I have a drying tent set up but conditions could be hard to handle since the season change. Cheers. (And yes I didn’t wanna flush my auto but I figured it was the safest route.)

Likes
3
Share


@zugzugnugnug
Follow
Shes pretty but dont think it will fatten up much, smells very fruity tropical with a hint of sour, love the golden hue to the resin. Stretch ended at 51cm from the top of the pot, I had to backfill some coco so its probably more like 60cm. Started adding canna pk 13/14 at 1ml/l for now will upto 1.5ml/l after a few days and end the pk addition after 7 days from starting.
Likes
1
Share


@Hash268
Follow
Now every time I open the tent fifty cent candy shop song intro plays in my head and my nose do that Lil bewitched dance and I smile like wow this is really like a candy shop and there's a big cotton candy party going on. The ladies a feeding now like food is running out, I'm down to ever tree days watering and they are just in overdrive with bud development. The fade has begun to be more pronounced long with the different tones of citrus.


Likes
9
Share


@kapai
Follow
Into week 4 now and I'm starting to pour the coal to these girls. I did a nutrient change and increased the solution PPM to 950. At the same time I replaced the air pump for a more powerful one as the other one I had was fairly weak.
Still seem healthy and they are getting very bushy. I did a little LST mid last week and they seem to be responding well to that. This is my first grow and I'm not sure if I should defoliate a little so I can expose more tops to light or if I should just let them do their thing. I will see how they go this week.

Likes
14
Share


@CannabisSecreto
Follow
La semana a ido bien, como hemos trasplantado a maceta de 3 litros las tengo solo con agua, asta que se acomoden en la nueva maceta.


Likes
48
Share


@CatnipGrower
Follow
Its my first time with photo's but im very impressed by the results of this plant. Just amazing


Likes
10
Share


@CityFarmer
Follow
Hello everyone,
Well its getting kinda packed in the greenhouse so all i have for you guys is a little video,
See you guys next week... 🤘🤘🤙🤙

Likes
2
Share

@Ninjabuds
Follow
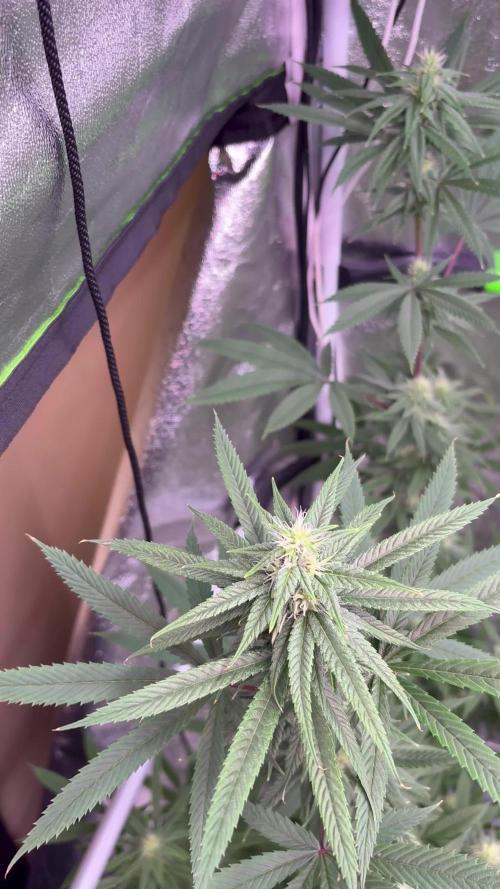
This plant is a beast I finally got the nutrients down and got rid of the light color growth it was having the plant would have been great to have a clone it is definitely something worth growing again

Processing
Likes
19
Share


@ThatoneAKguy
Follow
The roots are all tapped in and taking up nutrients. I’m on the fence as to the prospect of using grow slabs under my rockwool cubes in the future as it seems to slow the growth in the early stages on autos when time is critical. I’m sure they have a better base to grow on but when the roots tap through the bottom of the medium and move about the totes is when the magic happens. Not much I can do about it now and it would be more than fine in my photo room to make healthy beast mode plants. They are on a full 1200 ppm of nutrients and the one mutant In the back I have no doubt will end up happy and beautiful in the end. She just had a hard time getting rid of her shell.
Likes
11
Share


@Billgluckman710
Follow
Was having some issues with the plants. To much heat not enough humidity. They started show deficiencies and had to flush #1,2,4,5. #3 was healthy with very little signs of issues. No flush. Stopping nutes for the rest of the grow. May use the fishshit still. Will use half recommend and see how that goes since its good throughout growth cycle.