


Likes
Comments
Share


@SkunkyDog420
Follow
Hallo zusammen 🤙.
Sie wächst sehr schön und macht keine Probleme.
Rabattcode für den BIOTABS-Webshop https://biotabs.nl/en/shop/ GDBT420, damit erhalten Sie 15 Prozent

Likes
8
Share


@Mo_Powers
Follow
she tolerated the first topping well. i will continue to use LST on her and also try FIMing on her. the attempt is to generate a nice bushy plant

Likes
93
Share


@PEAKYPLANTERS
Follow
Hello friends. Welcome back to peaky's garden
Second week of rinsing for this beautiful little girl who is already starting to show some signs Amber on these Trichomes
One of the strains is giving me huge satisfaction ,I think I've never grown such a big beast "autoflowering" wow I'm really surprised by its branching
I really like this strain a lot

Likes
4
Share


@Ferenc
Follow
Lovely buds sweet and fruity with citrus smell. Taste is the same ;) She has a potential to have a good yield if you have a good lamp. Nice buds really sticky, with nice trichomes. :) It must be tried.

Likes
21
Share


@TheGanjaFarmer
Follow
The buds are starting to get really dense now, very strong smell of diesel, some amazing colours coming off this beauty looks so good 🤤🤤🤤 hopefully only a few more days

Likes
170
Share


@Master_weeda
Follow
Bonjour à tous les padawans et les maîtres jedis
Jour42 ma plante entre bien en floraison je pratique sur elle une defolliation pour permettre aux têtes de prendre la lumière
La floraison des plantes de cannabis
La plante de cannabis passe par différentes étapes de vie avant de parvenir à la récolte. Ces étapes sont : la germination, la pré-croissance, la croissance et la floraison.
Pour les autofloraisons il n'est pas nécessaire d'avoir de changer le cycle de lumière elle entre en floraison automatiquement voilà d'où elle tient son nom "d'autofloraison"
L'origine de l'auto-floraison vient de la sous-espèce "cannabis sativa ruderalis" , qui à l'origine produit de très faibles niveaux de THC. C'est en croisant cette variété de marijuana avec d'autres qui produisent des niveaux de THC plus élevés qu'à vu le jour ce magnifique compromis que sont les variétés auto-fleurissantes avec des taux de THC très satisfaisants. En parallèle, cela a permis d'améliorer la production de ces variétés, qui initialement étaient exceptionnellement basse.
Pour des résultats optimaux, en culture Outdoor (extérieur), je recommande que la germination des graines de marijuanaAuto-flo se fasse entre avril et août.
En culture Indoor(intérieur), la photopériode idéale que ce soit pour la croissance comme pour la floraison est de 20h de lumière. N'oubliez pas que ces graines ne sont pas tributaires de la photopériode pour passer en floraison.
Il est préférable d'utiliser des pots d'une capacité de 10 à 20L dès le début, étant donné que leur cycle de vie est réduit, les auto-flo n'ent pas besoin de plus de volume pour se développer. Vu sa petite taille (et la discrétion) elle fait l'objet d'un bon choix pour la culture de cannabis sur balcons.
La première variété de Lowryder auto-floraison a été créé à partir de cannabis indica sativa croisé avec des génétiques de cannabis sativa rudelaris par la banque de graines de marijuana "The Joint Doctor". Puis vinrent la White Dwarf de "Buddha Seeds", la Roadrunnerde "Dinafem", l' Auto Stoned d' "Autofem", la Speed Devil de "Sweet Seeds" , la Maxi Gom de "Grassomatic", la Flash, la Gnomo de Kannabiaet bien d'autres.
Jour42 defolliation (video)
Avant toute chose n'oublions pas de bien désinfecter ses outils et bien ce laver les mains.
Quesque la defolliation ?
LES CULTIVATEURS AMATEURS, PRENEZ GARDE, MAIS NE PRENEZ PAS PEUR
La défoliation consiste à retirer les feuilles des plants de cannabis en intérieur afin d'accroître le rendementfinal. Le cultivateur amateur doit faire preuve de vigilance lorsqu'il commence à appliquer cette technique de taille. Malgré le débat sans fin entre ceux qui prônent cette technique et ceux qui la dénigre, il n'y aucune raison pour qu'un amateur ne s'y essaie pas afin de voir si ça lui convient ou non.
COMMENT DÉFOLIER
Que vous tailliez les feuilles ou les branches des plants de cannabis, il vaut mieux utiliser un sécateur stérile qui est confortable en main. Arracher des feuilles à la main manque de finesse et engendre souvent par accident, l'arrachement des couches d'une tige en plus de la feuille. L'objectif principal de la défoliation est de permettre une meilleure pénétration de la lumière et de promouvoir la production de plus grosses têtes. Les feuilles éventails qui font de l'ombre doivent être retirées. Tailler la tige principale et/ou les pousses secondaires n'est pas de la défoliation.
La règle d'or lorsque vous donnez à vos plantes un rafraîchissement est de commencer avec les feuilles nourricières les plus grandes et les plus larges, en taillant du bas vers le haut. Il est important de retirer les feuilles stratégiquement et non pas au hasard. Pensez également qu'il vous faut limiter votre rafraîchissement à approximativement 10 à 20 % des feuilles totales de votre pied. Il est très facile de s'emporter durant la taille et de se retrouver avec des plantes chauves. Un excès de taille de feuilles empêchera la photosynthèse et paralysera vos plants.
QUAND FAUT-IL DÉFOLIER
Il est assez rare d'appliquer la défoliation comme seule technique pour obtenir un fort rendement. La taille des feuilles est généralement associée à d'autres méthodes de tailles et de palissage pour un meilleur rendement telles que le topping ou étêtage, le FIMming, le LST, le manifolding, le supercropping et le ScrOG. Les cultivateurs utilisant la méthode ScrOG auront besoin de retirer toutes les croissances inférieures ainsi que les feuilles et les tiges se trouvant sous le filet.
Les plants de cannabis peuvent être défoliés dès lors qu'ils sont passés de la phase de plantule vers la phase de croissance végétative. Cependant, il est recommandé aux cultivateurs amateurs de laisser aux plantes 1 à 2 semaines de croissance végétative avant de s'attaquer à la défoliation de celles-ci. De plus, certaines variétés sont plus sensibles à la taille que d'autres et de ce fait, seront plus stressées par la taille des feuilles. Surveillez minutieusement le comportement de vos plants après la taille. Une période de convalescence de minimum 3 à 7 jours avant de recommencer la défoliation est fortement recommandée pour éviter trop de stress aux plants. Les cultivateurs peuvent également défolier pendant la phase de floraison, ce qui permettra à l'énergie de la plante d'être concentrée vers la production de têtes tout en limitant l'ombre et l'excès d'humidité. Néanmoins, il est important de ne pas défolier trop tard sous peine de simplement blesser ses plants inutilement.
LES AVANTAGES DE LA DÉFOLIATION
Évidemment, l'avantage numéro un de la défoliation, c'est l'augmentation du potentiel de rendement de cette technique de taille pour tous types de cannabis allant de la photopériode aux variétés autofloraison. Ce n'est pas un secret que les fleurs qui reçoivent plus de lumières deviennent plus grandes et larges que celles dissimulées dans l'ombre des feuilles. De plus, retirer les feuilles intérieures des plants touffus aide à prévenir toutes menaces de moisissure. Les plants très feuillus avec un feuillage intérieur dense produiront une quantité importante de têtes pop-corn. Dans le pire des cas, les branches de têtes et les têtes qui sont denses succomberont au pourrissement.
Si vous observez des gouttes d'eau se former sur la surface des feuilles, il est grand temps de penser à faire de la défoliation. Libérer la zone inférieure et médiane des feuilles est un excellent moyen d'améliorer la circulation de l'air.
LES DÉSAVANTAGES DE LA DÉFOLIATION
Les plants de cannabis en intérieur bénéficient de la défoliation pour deux raisons. La première est parce qu'ils reçoivent la lumière d'une source stationnaire au-dessus d'eux, et la deuxième est parce que les conditions environnementales sont contrôlées par le cultivateur et non Mère Nature. Les plants d'extérieurs eux, n'y gagnent pas beaucoup, car les cas échéants se vérifient pour eux. Le soleil traverse le ciel, illuminant sur sa route, différentes portions de la plante de son lever à son coucher.
Les cultivateurs en extérieur n'ont pas besoin de manipuler les plantes afin qu'elles se développent en adoptant une structure plate puisque le soleil est infiniment plus puissant que n'importe quelle lampe de culture et qui plus est, il est toujours en mouvement. Tailler les feuilles des plants extérieurs les rend également plus vulnérables aux conditions humides et brise leurs barrières naturelles contres les nuisibles.
De nombreux cultivateurs d'intérieur peuvent, et malheureusement, c'est souvent le cas, réduire le rendement final à cause d'une défoliation faite au mauvais moment et/ou excessive. Tailler les plantules n'est pas conseillé et engendre souvent des plants nains. Scalper les plants matures est encore pire, et au lieu d'obtenir de longues branches de têtes, vous obtiendrez probablement encore moins de fleurs. De même, tailler des plants malades ou en mauvaise santé à n'importe quelle période de la croissance risque de paralyser la croissance plutôt que d'encourager la formation de fleurs denses.
Jour44 Arrosage une fois sur 2 topmax de biobizz
Jour46 arrosage avec de l'eau ph6.3 à laquelle j'ajoute 0.8g par litre d'eau de feeding enhancer greenhouse.
Jour47 léger arrosage.
Jour48 léger arrosage
Likes
2
Share


@BakingBaked
Follow
🗓️ Day - 23
⏰ Hour - 8:20 am
🌬️Air Temp. - 77
💦Humidity - %68
⛽️ TDC (ppm) - 780
⚱️Reservoir Tmp. - 75
PH - 5.6
📝 Notes - at 8 pm added 2 gallons of tap water to bring down ppm (from 830 to 690) and to raise PH (from 5.6 to 5.8).
🗓️ Day - 24
⏰ Hour - 8:30 am / 10:00 pm
🌬️Air Temp. - 76
💦Humidity - %64 / 52
⛽️ TDC (ppm) - 710 / 490
⚱️Reservoir Tmp. - 73 / 74
PH - 5.8 / 6.0
📝 Notes - Complete clean up of reservoir.
Rinse and washed with hydrogen peroxide and tap water. The system was rinse until achieved a ppm of 100 with clean water before adding new water and nutrients.
Feed 12 gallons of tap water with 1/4 Flora pro-series RDWC week #3 vegetation.
🌿 Daisy - She was cloned today. 4 Clones were taken from upper area. 2nd and 3rd node from top to bottom. Each around 2”-3”. Couple fan leaves were also removed.
🗓️ Day - 25
⏰ Hour - 8:00 am / 11:10 pm
🌬️Air Temp. - 76 / 77
💦Humidity - %60 / 57
⛽️ TDC (ppm) - 500 / 530
⚱️Reservoir Tmp. - 76 / 72
PH - 6.1 / 6.1
📝 Notes -
3 ml of PH down were added to reservoir because PH was on 6.2 by 5 pm.
🌿Daisy - Removed two extra large fan leaves that were casting shadows over the exposed steam area. She still looks stressed .
🗓️ Day - 26
⏰ Hour - 9:00 am / 11:30 pm
🌬️Air Temp. - 76 / 76
💦Humidity - % 60 / 52
⛽️ TDC (ppm) - 540 / 570
⚱️Reservoir Tmp. - 72 / 73
PH - 6.1 / 6.1
📝 Notes -
The ppm levels are rising. They reached 560 by 6:00 pm.
🌿 Daisy : Still recovering, bouncing back.
🗓️ Day - 27
⏰ Hour - 9:45 am /
🌬️Air Temp. - 76 /
💦Humidity - % 65 /
⛽️ TDC (ppm) - 580 /
⚱️Reservoir Tmp. - 73 /
PH - 6.1 /
📝 Notes -
The ppm reached 580 by 9:00 am. Reached 600 at 3:00 pm.
🌿 Daisy looks better. Leaves starting to lift again so I I went ahead and did some extra pruning and cleaning.
🗓️ Day - 28
⏰ Hour - 8:30 am / 10:00 pm
🌬️Air Temp. - 74 / 77
💦Humidity - % 50 / 54
⛽️ TDC (ppm) - 630 / 650
⚱️Reservoir Tmp. - 73 / 72
PH - 6.1 / 6.1
📝 Notes -
The ppm levels keep rising.
🌿 Daisy: Looks perky and happy after pruning. She’s is recovering very well. Her root system is showing new white roots so seams she’s liking the higher TDC levels.

Likes
14
Share


@CookiesAndCake
Follow
Week 14
Day 92 (13/11/2020)💧:
Great start to the week with watering today and because all the girls are entering their 4th week of flower, I will again be increasing the BioBloom as per the commendations on the watering chart, but since the pH has been increased they are definitely looking great and have enough nutrients between the watering days. So today I gave the girls 4.5 ml of BioBloom, 1.5ml of BioGrow, and 1.5ml of TopMax for 1.5L of water. I think I will be giving the same nutrients for the rest of the week as well.
Day 93 (14/11/2020):
Not that many updates today actually. The girls are looking amazing as always
Day 94 (15/11/2020):
I wanted to check the trichomes on the girls today with a loupe to see how they are developing up closer but I have no idea where my loupe is :( Really wanted to look closer at the flowers but will have to find it first to take some close up pictures as well
Day 95 (16/11/2020)💧:
We watered the girls today and gave them the same nutrients as before. They were watered with 4.5ml of BioBloom, 1.5ml of BioGrow and 1.5ml of TopMax. I think the TopMax is definitely making the buds fatten up
Day 96 (17/11/2020):
Took some lovely pictures of the girls today. Was finally able to capture on camera the redness of the flowers (or at least on girl#1). It’s quite difficult to the get the true colours because of the way the camera perceives the light.
Day 97 (18/11/2020):
Just can’t get enough of the smell of the girls omg they smell so great. It’s kind of a mixture of citrus and spicy at the same time. Cannot wait to taste them
Day 98 (19/11/2020)💧:
I keep wanting to measure the pH to make sure that it is still above 6.0 but I haven’t had enough time because it takes a while, but I will make sure to measure the pH before the next watering. So as mentioned at the beginning of the week, I will be giving the same nutrients. I watered the girls with 4.5ml of BioBloom, 1.5ml of BioGrow, and 1.5 of TopMax. So far the girls are looking good and happy with the nutrients. I’m only noticing yellowing leaves at the very bottom because there is not enough light, other than that the leaves seem like all the nutrients are balanced well. Also it looks like have finally stopped stretching length-wise and started focusing on growing the buds because the height is the same as last week. But really amazing progress this week, I’ve included a video of all the girls in the tent as well so it’s easier to see how different they are!

Likes
1
Share


@Dabcik
Follow
I fiori diventano sempre più compatti e incominciano a sentirsi sempre di più i profumi delle cime
Sono riuscito a stabilizzare la temperatura a 24.5 gradi con la lampada al 100% di intensità luminosa a 45cm dalle cime
Questa settimana per pulire un po’ il substrato ho dato 2 irrigate a ph 6.4 e circa 100ppm



Likes
Comments
Share


@420stuffs
Follow
# Cannabinoids
In the ever-evolving world of cannabis, enthusiasts are constantly on the lookout for the highest quality products to enhance their experience. Whether you’re a seasoned connoisseur or a curious newcomer, understanding the different types of cannabis products available can elevate your high to new heights. Among the most sought-after options are Grade A+ products, including shatter, hash, and more. Explore these premium offerings with https://t.me/cerianberigam a trusted supplier on Telegram, ensuring you have access to the best cannabis products available.
Telegram contact:https://t.me/cerianberigam
https://medium.com/@cryptoflash000/cannabinoids-8ed5ba487075
What Makes Grade A+ Cannabis? Grade A+ cannabis is characterized by its superior quality, potency, and purity. These products are meticulously cultivated and processed to ensure they meet the highest standards. Factors that contribute to the Grade A+ classification include:
Genetics: The strain’s lineage plays a crucial role in its overall quality. Top-tier genetics often result in more potent and flavorful products. Cultivation Techniques: Expert growers utilize advanced techniques, such as hydroponics and organic farming, to produce cannabis that is rich in cannabinoids and terpenes. Harvesting and Curing: Proper harvesting and curing methods preserve the plant’s integrity, enhancing its aroma, flavor, and effects. Exploring Premium Cannabis Products
Shatter Shatter is a type of cannabis concentrate known for its glass-like appearance and high potency https://t.me/cerianberigam. It is created through a process of extracting cannabinoids and terpenes from the cannabis plant using solvents. The result is a product that can contain upwards of 80–90% THC, making it one of the most potent options available. Shatter is perfect for dabbing, providing an intense and flavorful experience that can elevate your high significantly.
Hash Hash, or hashish, is one of the oldest forms of cannabis concentrate. It is made by compressing the trichomes (the resinous glands) of the cannabis plant. The result is a potent product that can be smoked, vaporized, or used in edibles. Hash comes in various forms, including traditional pressed hash, bubble hash, and dry sift. Each type offers a unique flavor profile and potency, making it a versatile choice for cannabis enthusiasts.
Telegram contact:https://t.me/cerianberigam
https://medium.com/@cryptoflash000/cannabinoids-8ed5ba487075
Live Resin Live resin is another popular concentrate that captures the full spectrum of flavors and aromas from the cannabis plant. It is made from fresh, frozen cannabis flowers, preserving the terpenes that are often lost during the drying and curing process. This results in a product that is not only potent but also rich in flavor, making it a favorite among those who appreciate the nuances of different strains.
Distillate Cannabis distillate is a highly refined product that contains pure cannabinoids, typically THC or CBD. It is created through a process of distillation, which removes impurities and other compounds, resulting in a clear, viscous oil. Distillate is incredibly versatile and can be used in a variety of ways, including vaping, edibles, and topicals. Its potency and lack of flavor make it an excellent choice for those looking to customize their cannabis experience.
Your Trusted Supplier: Cerian Berigam on Telegram Finding high-quality cannabis products can be a challenge, especially with the vast array of options available. That’s where Cerian Berigam comes in. As a trusted supplier on Telegram, Cerian Berigam offers a curated selection of Grade A+ cannabis products, including shatter, hash, and more. With a commitment to quality and customer satisfaction, you can rest assured that you’re getting the best products available.
To explore the offerings and elevate your cannabis experience, join Cerian Berigam on Telegram at https://t.me/cerianberigam. Whether you’re looking for potent concentrates or flavorful edibles, Cerian Berigam has you covered.
Telegram contact : https://t.me/cerianberigam

Likes
31
Share


@Pedrojuan
Follow
En esta semana se ven que crecen mucho, se empiezan a ver los tricomas y el desarrollo de los cogollos. Las temperaturas están un poco altas y todavía faltan al menos 2 semanas más… tuve que poner deshumidificadorpara bajar la humedad que estaba sobre el 70%, eso hace que consuma más agua de lo normal. Esperemos todo siga bien.

Likes
45
Share


@Natrona
Follow
Sour Jealousy Auto FastBuds 2025 Outside Grow
Week 3 April 20-26 Veg
This week was mostly sunny in the mid-eighties and low 60s at night with an occasional drop into the low 50s. I added kelp fertilizer to the water twice during the week. She is about 3 inches tall. I have had her under a dome for these past two weeks. This week, after heavy rain, I removed it for good since the leaves were touching the sides. Hopefully no renegade squirrels trample her.
Pics taken 4/21 & 24
Your likes and comments are appreciated. Thanks for stopping by.
Growers love 💚🌿
💫Natrona💫


Likes
27
Share


@HiddenMessage
Follow
Week 5 pretty successful, nothing bad happened, had good growth considering the troubles I had the week before. Leaving town for 3 days so they will be on their own. Plan on watering right before I leave and right when I get back. Got my lights on timers now. Pulled the light up to 24 inch assuming/expecting the plants will grow a bit while I'm gone.
Had a lil bit of yellowing at some of the tips of one of the plants as seen in pic above. Any ideas y?
Also posted a video and just curious if the wind is too much..?
Processing
Likes
2
Share


@Patillac31
Follow
•Morning of day 19, ¾ through week 3.
Did a light defol on both ladies. I gotta say I'm a big fan of Big Bud by Seedstockers! This girl is going to be exactly what her name is. I know its early with roughly 40 days to go, but I will for sure be growing this girl again. Any suggestions drop me a line. Happy gardening and stay safe Gromies! 🔥🌱🙏🖖✌️😷
•Morning of day 15, start of week 3.
°Big bud is 32" in diameter after more LST. And 37"tall (soil to top). Less stretching and more compacting of nodes. Very pleased! She's feeding at full strength and looking like she might want more. Very vigorous growth.
°Agent Orange. 30" in diameter after LST. plant did NOT respond well to LST. AND IS 36½" tall (soil to top). Also showed signs of nutrient burn. Will only feed half strength every 3rd watering.
Any suggestions drop me a line! Happy Gardening!


Likes
27
Share


@R_Dank
Follow
10 days into flower with the first taste of bloom! Happy with how things are going.. don’t know why my videos won’t play

Likes
7
Share

@psychonaut420
Follow
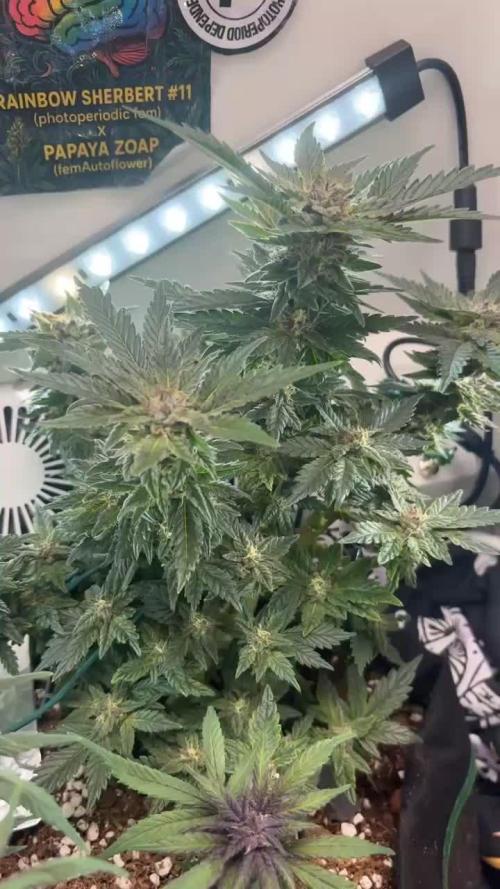
Mental rainbow F1 the development and the complex colours of buds forming is interesting and looks/feels dense the plant is mainly focusing energy on side branches as well as main branches bud development they are definitely fattening up and thrichome are sparkling in development too looking forward to seeing her fatten up over next few says till flush
Likes
7
Share


@GanjaFarmar
Follow
Week 12 from seed and not as heavyweight looking. But its been doing good.
Ive started flushing it 3 days ago. Ill post about the harvest soon!
One love!

Likes
Comments
Share


@gr3g4l
Follow
Empecé la semana con una poda de hojas y primeros nudos de todas las ramas. Poca cosa y así no estresarlas.
Con 9 dias mostraron sus primeros pistilos.
A los 11 dias me deshice del humidificador, ya no habia espacio para él.
Una semana loca de temperaturas y de cambios de potencia para evitar que subiese mucho la temperatura. Igual se me estresan un poco .
Una semana de un crecimiento desmesurado. Contaba que habiendo ramificado las plantas no crecerian mucho pero a la vista está que esta variedad no es fácilmente domable.
Para quienes buscan como tutorar sus plantas..
Con estos clips es una maravilla montar unos tutores, puedo hacer y deshacer como quiera adaptándolo al tamaño de las plantas o de las macetas . Fácil de poner y quitar. Una maravilla.
Likes
25
Share


@eldruida_lamota
Follow
Bueno familia ya finalizamos con el proyecto de las Runtz de seedstockers, son una cepa bestial.
La verdad que el secado muy bien 9 días en Malla y a los botes, 40% humedad y 21 grados es la temperatura ambiental que han tenido en el secado, aparte deshumidificador enchufado 24 horas al día.
En resumen la cepa es muy fácil de cultivar, el germinado se me resistió igual es complicado el germinado pero el resto es simple resistente fácil de alimentar pienso que es rápida los tricomas ya estaban hechos y se me hecho el tiempo encima.
Por lo demás de miedo os la recomiendo.
Gracias a Seedstockers, Agrobeta y Mars hydro, sin ellos este proyecto no sería igual 🙏.
Agrobeta:
https://www.agrobeta.com/agrobetatiendaonline/36-abonos-canamo
Mars hydro:
Code discount: EL420
https://www.mars-hydro.com/
Buenos humos 💨💨💨