Likes
Comments
Share
@Borberad
Follow
Nochmal ca 5 bis 6 Pollenbeutel gefunden und vor Panik wieder vergessen Fotos zu machen. Ab Ende der Woche gibt es wieder UV-b auf die Mütze.
Likes
2
Share
@Jabbamo
Follow
_______________________________________________________ Di. 17.2. - 2,3 Liter pro Pflanze gegossen (ca. 50ml Drain) 0,3 ml / Liter "Calmag" 1,0 ml / Liter "Bio Grow" 1,0 ml / Liter "Bio Bloom" 1,0 ml / Liter "Top Max" Ph 6,5 / 430 qqm - Toplight Abstand auf 60cm verringert - Toplight Leistung auf 75% erhöht - Luftbefeuchter deinstalliert - under canopy lights (UCL) installiert - Abluft Leistung auf stufe 4 erhöht
Likes
216
Share
@Ju_Bps
Follow
Hello my friends 👨‍🌾👩‍🌾, The Cherry cola, continue his senesence, more and more yellow leaves, end is close ✂️, Buds continued to bump a bit this week 🌲🍒🍒, frosty ❄️❄️ I've stopped nutes. 💦I've given this week 3x 2l/plant - Water + cannazym - Water + cannazym - Water + cannazym PH@6 Lamp 75% One more week for harvest, trichromes not yet ready. See you next week and have a good week end my friends 🔥👨‍🌾👩‍🌾 Thank to Mars Hydro and @marshydrococo2 for sponsoring the FC3000 ❤️❤️, as well as @Fast_Buds for sponsoring the Seeds ❤️❤️ If you want a litle discount on your Mars Hydro order, add this coupon to your cart, Ju_Bps Thanks community for follow, likes, comments, always a pleasure 👩‍🌾👨‍🌾❤️🌲 Mars Hydro - FC3000 https://www.mars-hydro.com/fc-3000-samsung-lm301b-led-grow-light 42 Fast Buds - CHERRY COLA 🍒🌲 https://2fast4buds.com/seeds/cherry-cola-auto
Likes
2
Share
Week 6 from seed. No pollen on this run. I think the silver is old so better luck next time.
Likes
165
Share
💩Holy Crap Growmies We Are Back💩 Well after another short break we are back at it 😁 So what do you say we have some fun 👈 We got some EXOTIC SEEDS 👉 👻👻👻MONSTERMASH👻👻👻 😛 Seed soaked for 24 then placed in a tub with paper towels , once it cracked and rooted , placed into its main pot 👌 Lights being readjusted and chart updated .........👍rain water to be used entire growth👈 👉I used NutriNPK for nutrients for my grows and welcome anyone to give them a try .👈 👉 www.nutrinpk.com 👈 NutriNPK Cal MAG 14-0-14 NutriNPK Grow 28-14-14 NutriNPK Bloom 8-20-30 NutriNPK Bloom Booster 0-52-34 I GOT MULTIPLE DIARIES ON THE GO 😱 please check them out 😎 👉THANKS FOR TAKING THE TIME TO GO OVER MY DIARIES 👈
Likes
15
Share
2/1/2024- Pre-Germination Activities Day 1 I have 21 weeks until final photo is do.. I took 3 seeds out of cold storage and will let them get to room temp for the next 48 hours before I go with Glass of water for germination. I have 3 beans because I will start from the very beginning helping ensure I present the best Pheno. This is going to be a fun one.. I am a few days away from being able to clear my tent out for this run.. I have a breeding run in right now and the Seeds are a few days away from being mature enough for me to take down the girls. Once I get them down I will need to get my tent cleaned up and turned over right away. This is going to be close, I will have to time them to the water and into the tray at the right time.. because I will need to get lighting on them right away.. I have my 2X2 and my light ready incase I need to hold them in the cloning machine if the others are not done in the next few days.. Glad I have options that can stretch me out for a week or 2 to give me a little more time. 2/2/2024- Pre-Germination Activities Day 2 I checked on my breeding run to see how close the seeds are and if the tent is ready for me to clear and clean but alas I am still going to need a few days. I setup the emergency 2X2 and that should give me 2-3 weeks. The plan is to still wait one more day to allow the beans to warm up to room temp and then drop them in Water sometime tomorrow. Form my Emergency 2X2 I have the following: 4" inline fan and carbon filter Fan VS-2000 light 2/3/2024- Germination Activities Day 0 - Dropped the Beans in.. Today is 0 day.. Go.. Go .. Go.. 2/4/2024- Germination Activities Day 0-1 - Checked in on them this morning and no tap roots yet.. covered them back up and back in to the closet they went. I setup the Root Riots and the Seed tray for them. I Ensured my water that I was soaking the root riots in was PHed to 5.8 and I used RO water. Afternoon Update: Checked on my Breeders and they are done. I started to harvest them, I took down the one I had reversed with STS and I took down the Black African Magic- All but one bud, I wanted to get some pics of that one today. I was only able to get 2lbs into the Cannatrol because I had to be very careful to keep the bud from the plant that was treated with the STS separated from the other seeded bud that was pollenated from the plant I reversed. Cannatrol could have held an additional 2oz of wet but not today. Ideally I need 1 more Cannatrol so I can take an entire Tent, but will figure that out. I put an additional 1.5lbs into the freezer to wait it's turn into the Cannatrol, I would have left it on the plant and taken it in 4 days when the dry cycle gets done but wasn't sure how much 2.2 lbs was equivalent to chopped and wet trimmed. 2/5/2024- Germination Activities Day 0-2 - Checked in on them this morning and 2 of them have very small tap roots out.. one still doesn't going to give them some more time. I will check in on them this evening and see if they are more open if so I will transfer the ones that are ready to their medium and seed tray. 2/6/2024- Planting Day TRUE Germination Day 0- Checked in on them this morning and all 3 of them have tap roots out. I broke the bottom of the tap root for #1 which was the biggest.. pretty sad.. I hope she survives.. I tried to be careful it just snapped off when I was trying to get it in the root riot right. Other than that all three are now in their in-between home in the 2X2 while if finish clearing and cleaning out their forever homes. 2/7/2024- Germination Day 1- Checked in on them and no surprise no sprouts yet. Sprayed the dome to moist it and light spray to the tops of the Root Riots. 2/8/2024- Germination Day 2- #3 is popped and it looks like #2 will be popped by this evening.. I got my second Cannatrol today so now I can take down the rest of the tent and get it into the dry/cure. 2/9/2024- Germination Day 3- #2 is popped as well.. so I have #2 and #3 up and still waiting to see on #1 but that might be a loss since I accidently broke off some of the Tap root when transplanting. 2/10/2024- Germination Day 4- #1 has Popped... We have ignition on all 3.. YAY!! I finished clean up and install of RDWC system, this time was unique the back left buckets 3 inch pipe wasn't seated correctly so I had to clean up about 12 gallons of water all of the floor. I also had two leaks coming from one of the Waterfall return junctions, this is why I do a full pressure test before I put anything in. I will continue to monitor it through tomorrow to ensure that I am good to go and then I will finish setting up the baskets and prepping the water to be ready for the ladies planting day!!! 2/11/2024- Germination Day 5- #1 Of course is going to be my trouble plant.. No matter what If she lives through planting in the system and making it, I think I might not cull her at all regardless, she has been such a problem, makes me wonder if she will be super worth it towards the end.. We will see as we go through this grow, but #1 has a piece of the shell on the leaves, Other than that I set up a new thing I have been doing since last grow converting my Baskets into Sure plants so I can see exactly where the water is when I plant them and ensure I have the water up high enough that they are able to access it and grow but not too high were they are drowning. 2/12/2024- Germination Day 6- Everything seems to be going good.. will just keep them moist and let the roots grow for a few more days before I transplant to forever home. 2/13/2024 - Germination Day 7- Just keeping them Moist. 2/14/2024 - Germination Day 8 - Planting day.. they are now in the system.. :-)I had to fill the water to the bottom of the basket where I could see water on the bottom rocks and just coming up where I had created my whole/ sure plant. 2/15/2024 - Germination Day 9- Top fed just a little to keep them moist and encourage root growth towards the water. I ensured the PH is right at 5.98-6.02 range. 2/16/2024 - Germination Day 10- Top fed just a little to keep them moist and encourage root growth towards the water.
Likes
35
Share
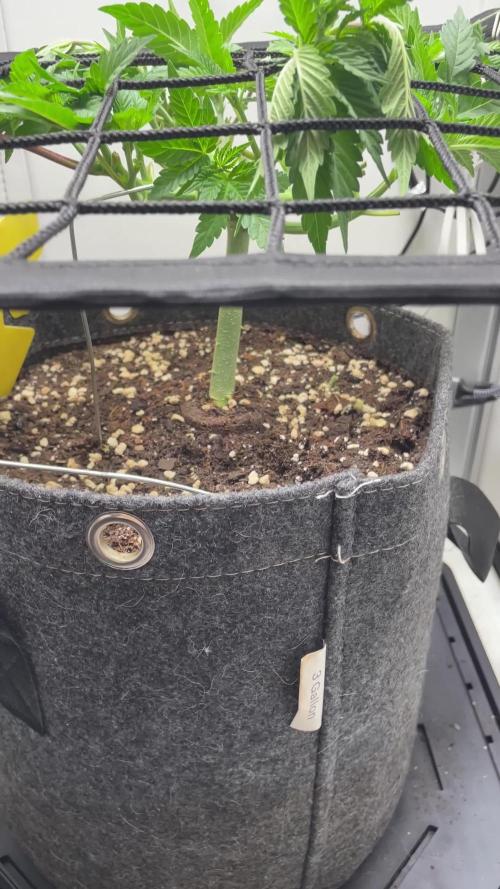
Bonjour à tous les padawans et les maîtres jedis Pour cette semaine je prévoit de pratiquer comme technique spéciale le LST et juste un arrosage. Pour cela comme à mon habitude j'attend le cinquième noeud ou que je juge la plante robuste. Je profite que cette semaine qui va être relativement calme pour faire un LST appliqué et vous faire un rappel de ce qui est pour moi la meilleure technique pour arroser une autofloraison et la façon dont je pratique le LST. En suivant ces quelques simples conseils vous obtiendrez un résultat optimal tout au long de votre culture : Le cannabis est une plante qui n’aime pas recevoir un léger arrosage en continu. Il est impératif de l’arroser en grosse quantité, puis d’attendre que la terre soit bien sèche avant d’arroser à nouveau! Pour calculer la quantité d’eau nécessaire à chaque plante, suivez cette règle : Le volume d’eau à donner lors de chaque arrosage doit représenter au moins environ un quart du volume du pot !! Exemples : pour un pot d’1L, donnez 0,25L d’eau à chaque arrosage pour un pot de 4L, donnez 1L d’eau à chaque arrosage pour un pot de 12L, donnez 3L d’eau à chaque arrosage pour un pot de 30L, donnez 7,5L d’eau à chaque arrosage !etc… Pour donner un tel volume d’eau, il est souvent nécessaire d’arroser en deux (voir trois) fois, lentement et uniformément sur toute la surface. Disposez de bonnes coupelles sous les pots, celles ci se rempliront d’eau qui remontera dans le pot par capillarité en moins d’une journée. Il est également très important d’utiliser un bon terreau de qualité, avec une bonne capacité de rétention d’eau mais qui assure également un bon drainage (celui ci doit contenir de la perlite, et/ou de la coco, etc..) Il vous faut alors maintenant attendre quelques jours en sous-pesant régulièrement les pot avec vos bras. Quand ils seront redevenus très légers, vous pourrez arroser à nouveau !! En effet, comme l’eau pèse beaucoup plus lourd que la terre, un pot gorgé d’eau pèse plusieurs fois le poids d’un pot d’une plante prête à être arrosée. Avec un peu d’entraînement, vous apprendrez donc très rapidement à sous-peser vos pots pour savoir quand une plante a soif. C’est une technique à la fois très facile et très efficace, et qui peut être appliquée à toutes les plantes en pots ! En arrosant de cette façon, en général vous devrez arroser vos plantes tous les 3 à 6 jours. Pour cette semaine 3 au jour 17 ma plante fais 12 centimètres et son cinquième noeud apparaît je décide donc de pratiquer un LST sur ma plante. Pour ce j'utilise du fil de fer galvanisé que je plante directement dans le substrat en faisant attention de ne pas endommagé les racines car n'oublions pas que ce qui pousse dessus pousse aussi dessous. Jour 17 je pulvérise du une solution composé d'une cuillère à café de savon noir mou dilué dans un litre d'eau en prévention d'éventuels nuisibles. Je corrige mon LST suivant la pousse de ma plante ... Pour ma par c'est la manière dont je procède. Comme promis petit rapel de: Quand commencer à appliquer la technique LST De nombreux cultivateurs commencent la manipulation dés que les plantes possèdent entre 3 et 6 nœuds ou une paire de feuilles. Durant cette première étape de la croissance, le tronc encore flexible est pliable sans risque qu’il ne se casse, même si au fur et à mesure du développement de la plante il sera de plus en plus difficile de le plier. Nous pouvons continuer à guider la croissance des branches durant toute la culture, même durant la floraison, ce qui pour cette étape représente un grand avantage face à la taille, qui n’est pas du tout recommandé une fois que la formation des têtes commence, cela stressera en effet la plante, ce qui aura pour effet de retarder la récolte. Comment appliquer la technique de guidage LST Si nous sommes prudents, la flexibilité naturelle des fibres du cannabis permet de plier leur tronc et branches avec une relative facilitée, même durant la floraison des plantes. En utilisant une corde fine, nous pouvons accrocher la pointe de la plante à la base du pot par exemple ou à un tuteur que nous aurons planté dans le substrat. Nous plierons le tronc avec précaution et nous le fixerons avec la corde, à partir de là, nous pouvons augmenter progressivement la tension de la corde, chaque jour un peu plus, jusqu’à obtenir la position souhaitée. Soyez attentif à la réaction de la plante, essayez de ne pas appliquer trop de pression sur la corde et rappelez-vous que la flexibilité des branches peut varier d’une plante à l’autre. Pour obtenir de meilleurs résultats, il suffit de suivre quelques règles simples. Pour commencer, nous devons choisir une corde fine mais pas trop pour ne pas blesser les troncs au fur et à mesure qu’ils grandissent et qu’ils deviennent plus gros. Nous pouvons utiliser des crochets en plastique souple ou de n’importe quelle autre matière flexible pour éviter d’endommager les plantes. Spécialement en intérieur, utiliser des cordons en plastique de couleur (voir les diaries de @Silky) est très pratique pour voir facilement les accroches et faciliter le travail au milieu du réseau formés par les cordes, les tuteurs, les mailles ou les supports que nous aurons dans la culture. Bien entendu, en culture extérieure et surtout en guerilla nous ferons juste le contraire et nous utiliserons des matériaux de couleur qui n’attirent pas l’attention pour que notre jardin reste discret. Pour stresser les plantes au minimum, la mieux est de réaliser ces manipulations le soir ou juste après que les lampes en intérieur s’éteignent, ce qui leur permettra de se remettre durant la nuit. Normalement, le jour suivant nous pourrons observer comme les pointes des branches que nous avons pliées se dressent de nouveau vers le haut à la recherche d’une source de lumière. Que la force soit avec vous
Likes
14
Share
Final Report: Grow: The plants has grown very beautiful and healty without pests and diseases. They grown bushy and with medium height during the vegetative stage. I had try to use LST in third veg week but i did't made correctly and after that i dicided to return to grown normally without any particolar tecnique. I used a littel more fertilizer then mine usual and that made the plants grown fast without any problem. In the first two weeks of flowering stage the plants started grow taller and the number of the branches increase, in this phase i only defoliated when the fan leaves turn yellow in late stage. Form the start to the end the flowers grown dense and bigger every day and this time i waited until almost all of them were mature before harvest the plants. I changed the plants from one grow room to another(in the sixth week) when they became too high and they couldn't stay more in the smaller grow box(nothing changed in the enviroment between the two boxes). Equipment and grow box: The enviorment of grow box has been optimized every stage with the right temperature, umidity and air flow. Vegetative temp/umidity --> 23-29 °C/45-55% Flowering temp/umidity --> 20-26 °C/40-50% The air flow was created by two pc fans and one big fan. Harvest: This time i harvest a big numeber of beautifull dense buds and i just discarde only few fluffy buds in the lower branches. The result of this grow is amezing compared to my old expiriences. I harvested the flower and i made a fast curing process after i washed the crop and i let them to dry with a fan on it. After five days a take the branches which were to dry and i did the final trimmig before put all the harvest in a open jar for finishing to dry. I collected all the leaves, fluffy buds and trimming scraps in a bag and i let them dry. Later i put the bag in the freezer and when i collect and dried all the scraps from OG Kush and Dandoverde Haze i did some Ice-O-Lator hash. I used 250g of trimming stuff and i made 11.50 g of hash, I had use a set of 5 bag and i take the resin from the 160µ - 120µ - 73µ- 25µ bags. I pressed all the resin in a great block of tasty strong hash. Always better every time 😊💪 Total harvest ---> 90g only of dense buds and 11.50g of hash.
Likes
26
Share
Day 64 02/09/24 Monday Feed today using de-chlorinated tap water pH 6 with calmag. Day 66 04/09/24 Wednesday De-chlorinated tap water pH 6 today only. Smell is really coming on strong now!! Day 68 06/09/24 Friday Feed again today using de-chlorinated tap water pH 6 only. Day 69 07/09/24 Saturday De-chlorinated tap water pH 6 only today. Mould 😔🤦‍♂️ Absolutely gutted!! Had a very humid past 3 days, wet with no wind... 2 plants have suffered... Auto Orange Bud has lost a side branch. Auto critical orange punch has lost her main colar, and 2 sides, the yeild is going be to now be appalling, but this is due to environmental, not the seed or genetics, as far as they go this was one of the strongest and biggest in the group Day 70 08/09/24 Sunday (END of week) Feed today using de-chlorinated tap water pH 6. ☠️ Auto critical orange punch 🍊👊 Had to remove completely, after isolating the rest of the greenhouse, mould persistently grew on her. The remaining plants after 2 days isolation have been moved indoor to finish underground 600w hps and a more controlled environment.
Likes
53
Share
@Boomer911
Follow
Week 3 Update: Plant Growth: Progress has been slower than anticipated due to persistent cloudy and rainy weather. Despite the setbacks, I've noticed some signs of growth in the plants, albeit at a slower pace. Implemented Low Stress Training (LST) on a few of the stronger plants, including the Gorilla Glue and Gelato varieties, to encourage more robust growth. Weather Conditions: The weather continues to be a challenge, with only a few sunny days throughout the week. Rainfall has been frequent, making it difficult to provide the optimal growing conditions for the plants. Adaptations and Solutions: To counteract the lack of sunlight, I've constructed a mini tent equipped with LED lights to provide supplemental light and warmth to the plants. Despite the less than ideal conditions, the plants seem to be responding positively to the additional light and warmth. Nutrient Management: Feeding schedule adjusted to once every 2-3 days, alternating between water and nutrient-rich solutions. Using a combination of guano, worm tea, and a basic Grow NPK Autogrow mix to provide essential nutrients to the plants. Observations: Although growth has been slower than expected, I'm encouraged by the resilience of the plants and their ability to adapt to challenging conditions. Keeping a close eye on the plants for any signs of stress or nutrient deficiencies and adjusting care accordingly. Looking Ahead: Hoping for a change in the weather in the coming weeks to provide better growing conditions for the plants. Despite the challenges, remaining optimistic and committed to nurturing the plants to their fullest potential.
Likes
3
Share
@DoMoNe
Follow
Bent branches, took some leaves off (which were brown'ish and were falling anyway)
Likes
8
Share
@sellem
Follow
24/03 watered AGAIN after 2 days with 1.5L 5.9 PH 1.5 EC, 5ml/L of Terra Bloom. So far im really happy with plagron. Just one bottle for grow and one for bloom and the plants look healthy and show no signs of deficencies. really happy with the product. Moreso than biobizz, where i used Grow, bloom, calmag, activera and topmax and still fought deficencies here and there. I also am conflicted about the trellis net. I like what it does but i think my tent is too full with plants or too small to really enjoy it growing-wise. I cant move the plants and its hard to reach them during watering. So i removed it again. its an on/off relationship with us :D I also did some more defoliation, PROMISE ITS THE LAST TIME. i took out the plants of the tent for it to better reach the insides of them and made some nice videos of their progress so far. ALSO: Tent smells really good and overwhelming when i open it! sadly, it escapes pretty fast so ill put "normal" smell on here. but its decent! Watered again on 27/03, 1.5l 5ml/L Terra Bloom 1ml/L Green Sensation, 5.8 PH 1.7 EC 29/03, 1.5l 5ml/L Terra Bloom 1ml/L Green Sensation, 5.7 PH 1.7 EC
Likes
9
Share
Plants really looking how I like, nice leaf colour, healthy and vigorous. With another two weeks of stretch left these are going to be some very big girls.
Likes
12
Share
@thonhash
Follow
Simplemente aplique una PEQUEÑA poda de bajos antes de trasplantar y pasar a floración. Empezamos la aplicación de enzynabis para crear una buena vida microbiana (también muy útil para evitar excesos o aprovechar cualqier “resto” que contenga nuestro suelo). También empezamos a regular los watts del led mars hydro ts1000,y a medida q vayan pasando las semanas se irá regulando a mayor potencia, hasta llegar al maximo (150w)
Processing
Likes
9
Share
@howrad
Follow
Cutdown GDP this week. 5gl bucket yielded 2.25 dry ounces. 3gl bucket yielded 3 dry ounces.
Likes
Comments
Share
Tag 38, Blütetag 12 🌸 Ich sag gar nichts mehr die Mädels übernehmen das Reden 😌 Heute nur pH angepasst und gegossen. Pure Pflege, kein Schnickschnack. 💧
Likes
12
Share
@AGP90
Follow
Been trying to correct a problem over last few days started with a flush and lowering nutrients. Hopefully will get better but not 100 % on what it is.