




Likes
20
Share


@Ieiogrow94
Follow
Eccoci qui...
Non ho più parole per giudicare questa meraviglia!!!
Strain 1 è la migliore varietà che io abbia mai coltivato, nel processo di maturazione delle cime ho visto qualcosa di assurdo in quanto questa piccola ha una maturazione totalmente diversa rispetto a tutte le altre erbe!!!
Sono davvero soddisfatto, peccato che Strain 2 sia cresciuta storta, ma poco importa anche essa ha cime che sono dure come sassi, e sono solo 4 settimane di’ fioritura, NE VEDREMO DELLE BELLE!!!
Grazie a @KhalifaGenetics e @xpertnutrients per la collab e a tutti per il supporto🔥🌲❤️





Processing
Likes
14
Share


@kevgrow
Follow
Hey Friends, end of Week 10 from seed
Colas are looking Very nice
Noticed some orange color on some leaf tips so I lowered the amount nutrition when feeding
I used a magnifier to have a closer look at the colas, trichomes used to looked like little crystals, now they are bigger and cloudy.
So far no amber coloring on trichomes
I need some advice as to when I should begin flushing and harvest
Smell is slowly getting stronger, like a muffin with a small touch of gas ⛽️
Looking Forward in seeing some bud growth in the following week, will keep you guys posted!


Processing
Likes
36
Share


@MadeInGermany
Follow
Hey everyone ☺️.
This week it has developed really well and has finally taken on color again :-) 👍.
The additional nutrients as described last week have taken off. 1 liter per pot is poured twice this week 🤗.
In about 2 weeks it goes over to the flowering tent 👍.
Otherwise there is not much to report this week.
I wish you lots of fun with the update, stay healthy and let it grow 🍀😊
You can buy this Strain at :
https://sweetseeds.es/de/sweet-skunk-f1-fast-version/
Type:
Sweet Skunk F1 Fast Version
☝️🏼
Genetics:
Sweet Skunk Auto (SWS34)
X
Early Skunk
👍
Vega lamp:
2 x Todogrow Led
Quantum Board 100 W
💡
Bloom Lamp :
2 x Todogrow Led
Cxb 3590 COB 3500 K 205W
💡💡☝️🏼
Soil :
Canna Coco Professional +
☝️🏼
Fertilizer:
Green House Powder Feeding
☝️🏼🌱
Water:
Osmosis water mixed with normal water (24 hours stale that the chlorine evaporates) to 0.2 EC. Add Cal / Mag to 0.4 Ec Ph with Organic Ph - to 5.5 - 5.8 .

Likes
70
Share


@Fatnastyz
Follow
3-16
1.5 grams game time, 4 ml green sensation, 3ml cal/mag, 1 ml slf-100.
Made 6 liters.
419 ppm.
Runoff 1355 ppm ph 6.7
Started the final little push. See if she likes it or have to give another feed. All new to me, so 🤞
Game time increases terps and oil/resin production. Hope I get to do a 2nd dose.
3-23
1.5 grams game time, 3 ml green sensation, 4 ml cal/mag, 1.5 ml frost nugs, 1.5 ml drops of balance, 1.5 ml slf-100. Ph 6.1 ppm 350
Run off 950ppm ph 6.7
Runoff was 1150 ph 7.0,
So I gave a little more to wash some salts out.
3-19
1.5 grams game time, 3 ml green sensation, 2 ml cal/mag, 1.5 ml drops of balance and 1.5 ml slf-100 ph 6.1
Run off 1146 ppm ph 6.5
Shes rockin hard. 💪🤘
.

Likes
9
Share


@caspersaints1
Follow
Day 51-26
Fed 2 L till run off . She was thirsty from no feeding yesterday but humidity still fighting hard in the high 50s
Day 52-27-
Fed 1.5 L
Starting to lower nutes
Day 53-28-
Fed 1.5L
Day54-29
Fed 1.5L
Day 55-30
Missed
Day 56-31
Fed 2.5 L
Day 57-32
None
Day 58-33
Fed 2L
Day 58-34
No feed
Day 35
Feed2 L
Day 59-36
In one
Day60-37
Fed 2L
Day 61-38
None
Day. 62-39
Feed 3 L . 1st L plain ones water as no run off last few days
Then fed 2L with nutes
Day 63-40
None
Day 64-41
None
Day 65-42
Fed 2L
Day 66-43
Nothing - starting to see fading I think . Might start flushing in next few days
Day 67-44
Fed 2.5 L
Say 68-45
None
Likes
7
Share


@ChitownCannaChica
Follow
Adding some green gro flower finisher to her abs that should be it for the rest of her life. Little bit of a slow mover. Placed in the center of the light/tent for more intensity.
Frost is decent
Yield is decent
Easy to grow
Terps are candy with a piney after
Probably 2 more weeks
Likes
7
Share


@Bingbings_garden
Follow
Hello growers
15th - feed in tea, also added clips and raised net. She is a thirsty girl now im adding 1L per 24hrs.
DLI 4.2
PPFD 65
Cruising
Likes
7
Share

@ChitownCannaChica
Follow
The tops are no different that a photo.
Easy to grow
Decent yield
Terps are decent with floral citrus tones
Smokes smooth
I will have to try and grow again
Likes
Comments
Share


@High_Grade_Dadli
Follow
Had a bit of rainfall(blessing) as u can see other than that so far so good nothing to complain about nugs are forming lovely aroma is getting loud...could be from the previous crop I had in the ground they are closer to the end of their cycle (15) of them rest got water damage/nute burn (200+)snip a glimpse in the second vid....
I haven't included my nute cause most of it ain't recognize on here only the urea, down to earth fish bone meal and langbeinite.. the rest is jus my foliar mixture according to their
Likes
11
Share


@Mikeyc420
Follow
Week 6 of flowering
Buds are looking fat and fell very dense with the THC shining
Producing An nice strong pungent smell
Ruffly 3week left untill harvest and I quite looking forward to the outcome for my first grow
Humidity 45%-50%
Temperature 23°c-26°c
Lighting 18hrs on 6hrs off
Shogun fertilizers and growth chart
And tips would be greatly appreciated

Likes
22
Share


@DadGrowsTomatoes
Follow
Started harvesting the lower limbs to sample and consolidate any remaining nutes.
The primary buds are turning well. Too large still need a week or so.

Likes
101
Share


@biggreens420
Follow
Did a little move around as the gorillas we're taking over the light so we get better light spread buds packing up nice and tight not much else to report....added the 3rd light not a hps though a mars hydro 960 thougt id better do it due to the gorillas taking over and just trying it out gonna try one for the last week in my gorilla and gsc diaries also see what there like thanks for reading happy growing guys
Likes
13
Share


@WeedM8
Follow
Hello m8 welcome to this journey with me in this diary will have very interesting strains hope u find something useful
O.G. Kush Titanium
- [ ] 1st week Veg: germinated in substrate lighting very close so it jets medium high humidity after the 3rd day they started sprouting
- [ ] 2nd week Veg: this week my ventilator broke down and as the temperature stayed very warm nothing developed much
- [ ] 3rd week Veg:fortunately this week i had fixed the ventilation and the temperature has go down a bit allowing the little plants to develop and reinforce
- [ ] 4th week:very good developments in this week I already started feeding a bit two times but i didn’t have to…once was enough
- [ ] 5th week Veg:this week they were very strong green i only had to water them good and keep the ventilators going no stop .They have good hight already ,but as i have to strains together. I want to transplant them when the hight of the other one have stretched… I’m thinking to transplant next week if not the next one
- [ ] 6th week Veg: this week it went great fortunatly i dont have pests that eat my buds i’ve givven a fed once the substrate is very rich already the plants streached very well i will transplant today so be ready m8 i cant wait to show you the progress
- [ ] 1st week Fl:they started stretching and looking very healthy just transplanted
- [ ] 2nd week Fl this week I’ve been away i had a friend taking care of them they stretching very well i hope that she starts putting energy into the flo
- [ ] 3rd week Fl:they are streaching very well ..getting the light very well
- [ ] 4th week Fl:there we aree guys the good stage is heree good high hope dosent effect de prod
- [ ] 5th week Fl:pumping very good this week a lot of changes started already being frosty
- [ ] 6th week Fl:this diaries its not daily updated this week its going’s so great we are close to harvest between next week and the other one . Ill harvest them at different time just because they are not all at the same point of flowering
- [ ] 7th week Fl

Likes
34
Share


@AshBrand
Follow
Welcome!
In this grow we have:
2x Platinum Wedding Crasher
2x Gelato 41
1x Sour OG
2x Lemon Kush
Germination/Rooting - 14 Days
9/17/21 - The clones look good in solo cups of soil. We will transplant into 5 gallon pots in the grow tent after they fully root in the cups.
9/18/21 - Looks like the clones are doing well in soil! We are so excited to grow these out. The clones came from a very highly respected grower.
9/19/21 - No ugly growth. All clones look amazing! We upgraded the light to a Mars TSW 2000.
9/20/21 - They are looking good and most likely rooting throughout the cups. I’ll give them a little bit of water today. I want the roots to go looking for the water so I’ve kept them slightly dry.
9/21/21 - They look happy. I will let them just do their thing… We are waiting on our Mars TSW 2000 light to show up anyways. No roots visible from the drainage holes in the cups.
9/22/21 - Looking really healthy and growing nicely. I’m excited for them to fully root in the cups so we can transplant them into the tent. The Mars TSW 2000 should be here in the next few days.
9/23/21 - Looking so good! We can’t wait to get these under the Mars TSW 2000 in the tent. They smell and look great.
9/24/21 - The clones look really good except for one Sour OG. It wilted and died, roots did not take unfortunately. I have a Lemon Kush started from seed we will grow in place of the dead Sour OG. Today we got our Mars Hydro TSW 2000 light. We will be hanging it and updating with pics/videos.
9/25/21 - They look amazing. Lots of growth while rooting.
9/26/21 - So far so good. Watering when the cups get light in weight. In just a few days we will be transplanting. See the video for today, we hung the Mars Hydro TSW 2000!
9/27/21 - Watered them yesterday, they look healthy. The Lemon Kush isn’t a clone, it is from seed. It’s the smallest girl but it’ll perk up quickly.
9/28/21 - Transplant day!! The clones are looking really good and it’s time to transplant into the 4x4 under that Mars Hydro TSW 2000 at 50% intensity. Check out the pictures and videos from today!

Likes
1
Share
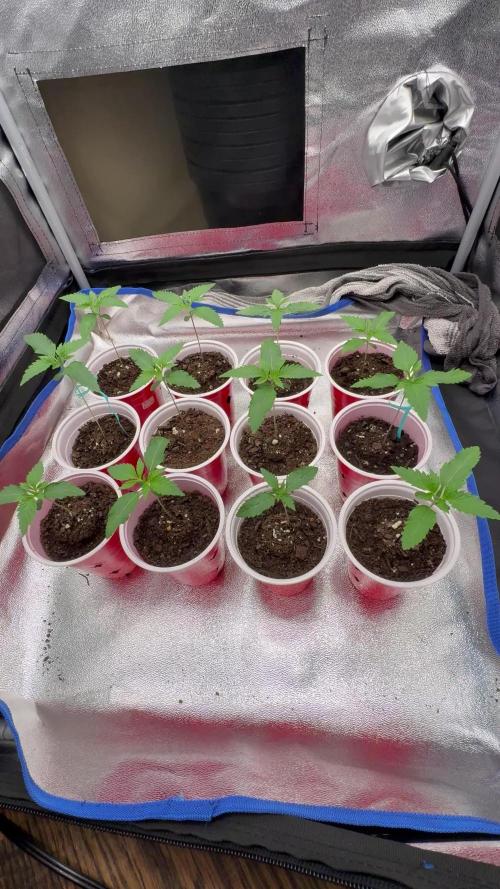

@Ninjabuds
Follow
It's been a great week for the seedlings! They've really taken off and are looking strong. I'm planning to transplant them into larger pots in the next few days, so next week's photos should show some impressive growth. I'm so excited to see how they thrive in their new homes! I've been giving them distilled water from the start, and I'm still doing that, but I just started adding 10 milliliters of Fox Farm Big Bloom and 1 milliliter of Fox Farm Grow Big. All of the seedlings are doing really well, and there's not really any visible difference between all the ten strains. I started all ten packs of each strain and kept all the best seedlings, so that's why they're all doing so well.
Likes
2
Share


@Chefc14
Follow
I grow amazing !!! 3 weeks of vegetative 8 of flowering healthy and strong wonderful plants !!! Barneys Farm increasingly synonymous with guarantee🤩🤩🤩
