Check the winners The Grow Awards 2026 🏆
Likes
Comments
Share
@BruWeed
Follow
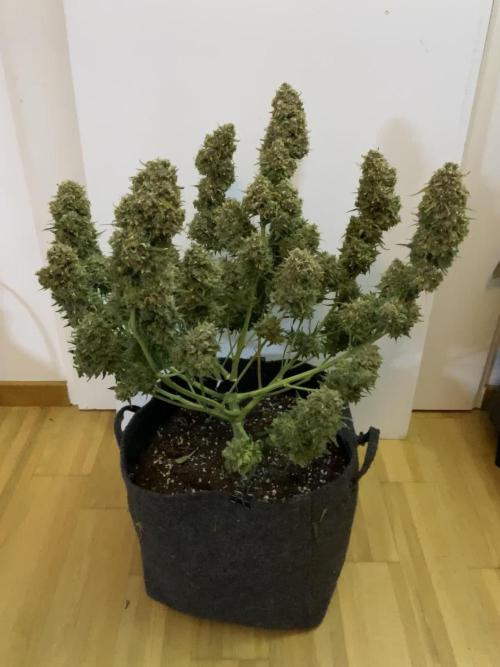
08/11 - comenzo su octava semana de floración. Le agregue el limpiador de raices para ayudar a limpiar mas rapido. Su olor es muy fuerte y dulce. Las hojas ya están amarillas. La semana que viene ya la podo. Estuvo casi dos semanas en lavado de raiz. Los cocos estan llenos de tricomas. En estos dias estare subiendo mas imagenes de como viene. Podes seguirme en instagram como @bruweed_arg
Likes
11
Share
@DrDuhboto
Follow
This week I inoculated the room leaves and plants with Neoseiulus cucumeris, I have had minor thrip problems all summer, Usually I use lady bugs to combat them but none have been available this year. I inoculated the plants by shaking the bottle full of Cucumeris and bran over the leaves. I will do this a few times before pre flowers show. Cucmeris are predatory mites that eat the thrip larvae. And are supposed to work for spider mites as well. I added the scrog nets to the room and began training the plants through them. I then flipped the lights over to 12 and Initiated pre flower. All vegetative growth was very vigorous. The goal of this grow is to do a preliminary test to begin to determine if Mycelium provides any additional benefits to Cannabis when allowed to colonize in super soil before being added to bottom layer of the pot. The Process: 1) 8 weeks Prior to Germination Super Soil is mixed (see super Sub cools super soil recipe further down the page) and added to spinning two part composter, water is added and the super soil mix is allowed to break down for a week. 2) 7 weeks Prior To germination 1L of colonized mycelium is added to each side of composter. Mycelium is now allowed to colonize the super soil. 3) After 8 weeks total the Mycelium has had enough time to colonize throughout the super soil mix and is ready to be added to the bottom 1/3rd of the pots. See Pictures for an example of what this looks like.
Likes
20
Share
@Dunk_Junk
Follow
Chopped during the week and drying now............ The first pics are taken just before harvest. Video is as it is drying out. Dry weight 140 g!!!!!!!!! Very pleased with this. Nice genetics, I'm excited to do more strains for Barneys Farm.
Likes
10
Share
@GrowerGaz
Follow
Great strain all three phenos are really greasy and high in resin. Two phenos are very kushy gassy , one has more citrus than the other. The third pheno is a the super frosty #1 more sweet and a little funkier than the other two
Likes
1
Share
Smell Fire really cakey grape smell throwing out pure tricks and she starting to fatten nicely
Likes
38
Share
7 Blüte Woche Tag:73 Es kann sich nur noch um 3-4 Tage handeln bis die Mrs. Glue Gelato erntereif ist. Die Trichome sind jetzt alle wolkig, ein paar Bernsteinfarben. Die Buds sind in den letzten Tagen noch kompakter geworden und haben an Volumen zugelegt. Der ganze grow room riecht fruchtig süß🍊🍋🍍🍭🍰. Ich denke mit 76 Tagen müsste die Lady zufrieden sein dann wird gehackt. Ich bin mit dem ganzen Verlauf wie die Glue Gelato gewachsen ist hoch zufrieden. Sie fällt einem sofort ins Auge, selbst wenn sie zwischen zahlreichen anderen Schönheiten steht. Sie hat ein besonderes Aussehen das einem sofort auffällt, die schokoladige Farbe und dann die stacheligen Stigmen, als würden sich zahlreiche Wespen in den Blütenkelchen tummeln. Auch hat sie ein besonderen Terpen Geruch, von dem ich sehr angenehm angetan bin. Ich bin auf die Verkostung gespannt, ich hoffe sie schmeckt wie sie riecht. Ich danke euch für eure Unterstützung und werde euch auf den Laufenden halten. Ich wünsche allen meinen Kollegen ein Glückliches Wachstum und reichliche Ernten.
Likes
151
Share
@BioBuds
Follow
It has been a week of amazing growth for the Xtrakush too. What an amazing plant this is. Resilient, enormous growth, it was only last week that we took out her brother. It turned out to be male, which is why we planted two in one pot. Already she has taken up its space almost entirely. And the bud growth is also something I haven't seen before. This can really turn out to be enormous buds if the buds grow out like advertised. All in all a great week with lots of activity on my part to facilitate these results. We are three weeks into flowering, the deadline I set myself from where I'm allowed defoliating the underside. To prevent stress, but also to maximize growth I hadn't touched them all grow. Also, I made the flowering amendments, it didn't seem they needed anything so I waited a couple of weeks. I made a mix of 2 cups worm castings, 2 cups bonemeal, 1 cup of micro life (per plant) and mixed this. I dropped this on the soil around the stem. In just a day another amazing stretch happened. The combined defoliation and added nutes gave a boost they seemed to love. I watered with a heavy mix of BAC organic flowering, Topmax and Calmag, and a one in 6 mix of my trusty permaculture tea. This SP 3000 is performing so well. Thanks again @MarsHydroLED for letting us try it. We are believers! If you are in the market for a light, give this one a chance!! Thanks again for all the likes, comments and the people following! Only 6 more weeks to go!! Big hug!! Bud
Likes
3
Share
Every week I watch my girls grow into beautiful budding trees only difference is now she in flowering I take her outside to absorb some of the beautiful sunshine and she's loving every bit of it. I let her stay outside for 8 hours in nature then back inside for another 8 hours of led full spectrum and turn out my lights for another 8 hr she's an Auto so she loving every minute of this ...... this is the results ⬆️
Likes
4
Share
@masm24
Follow
Generally pleased with the outcome of this grow considering the space limitations of a 2x2x4 tent. Flowers were very resinous, making this strain perfect for extraction. (Harvested May 27)
Likes
22
Share
Busy week this week, both in the garden and in life, hence the later update than usual. Early week gave the girls a good leaf stripping on the inside of the plants. Also removed any scraggly growth that was not getting any sun. As usual really helped open them up to more airflow and light penetration. At start couldn't even see the sun through them! Next day both looked great with no visible signs of stress. Now I'll say it was a VERY hot week this week, daytime highs 32°C feeling like 42°C with 90% humidity and the girls were thirsty AF, dropping heavy every night, . Watering every evening, hose on full soaker setting for 3 minutes per plant, roughly 35 liters of water each! Even with all the water, the bigger plant was looking sad, and I had a sneaking suspicion that it just did not have enough root space. So I tuned into my inner MacGyver again, and came up with a solution. Using no nails or screws, I was able to fashion a 3x3 bed for her! All thanks to growing on plastic skids. Just slid 2x4 PT into the slots in a 3x3 square, and then slid 1/2" PT sheet (cut to size) on the inside of the wood. Afterwords cut the fabric pot, and lay it down to make the perfect base inside the new bed to prevent soil from coming out. Topped it up with three wheel barrow of garden soil that I had left from the spring load, watered and hoped my idea worked. The next day, she's looking happier than ever, and I haven't seen a droopy leaf on her since! Now she's really ready to bring on some serious bud weight. Mentioning that, I also added the second layer of horizontal trellis, as well as vertical trellis around the smaller plant. Temps look cooler for the next two weeks, and not much of any rain forecast, even though we desperately need it. At least with forecast being 25°C highs and 10°C lows the girls should slow down on water intake, trying to conserve where we can right now but got a keep them fed. Until next week!
Likes
220
Share
These had a pretty good life. I actually only fed NPK the one time . Germinated them in a Zambeza propagator, i really recommend getting one of those propagators, they're reusable and really take the heat off those first days when you're sweating. Pooped them into their plugs they sprouted out strong, germinated 5 kept 3. transplanted them no problem. Veged these for 4 weeks, then they shot up. during veg they stretched out a bit early on i should have been giving some specialised micro i had on had but for some reason on the other i didnt. They needed extra support for their first three weeks, so i decided to LST them around week 2. Two camping hooks one anchor for the main stem and one to keep the plant down. Once i dialed in my lamp to plant distance they benefitted by slowing down on the stretch a bit. they all took to LST extremely well, bushing out and creating an nice even canopy. They pushedout these thick indica leaves, one of my plants was a lighter colored leaf pheno, the vertafort one. The Six Shooter genetic really stretches, if just off the top of my head it seems that the plants quadrupled in size over an 8 week period, completely eclipsing their neighbours and creating a thick dense canopy throwing shade down below. Each turned into a bush with three or more mains sticking out the top by week 6. IThe results start to look real pro around week 8. Before that though I hadn't been defoliating. This and simple lack of light means that I had loads of undevellopped colas. If I'm honest I should have tried to harvest in stages but by colas. Anyway these kind of grew like a gorilla glue but with much different and much better flower structure. The plants started pushing out flowers and pistils and preflowers etc early, but then took a while to gear up towards towards getting fat. The flower branch out in a spiral pattern up and down the main and secondary colas evenly, creating this misssile shaped colas, but they branch out once sometimes twice, which means less branch to nug ratio than a gorrilla glue by a full multiple. They started smelling like lemons around the time they were fattening up. Then they started getting buff, really little by little, what did rippen rippened evenly. Some colas was basically waste especially the colas stuck on the sides of the tent and some of the colas where for some reason or another there was no light there due to the dense canopy. Truly a BEAST OF A PLANT, HIGH POTENTIAL, great BRANCHING, if you look carefully each plant has more than a dozen colas, Timed it so the harvest was on a day the plants were chock full for plain water after ten day's worth of additive aided flushing. hung to dry slowly in the tent, got it around 55RH inside the buds over 12 days then trimmed and jarred in miron glass with boveda 62. The trim was a great experience, took a while but not that long because the flowers were so nice in the way they are. you do have to trim every sugar leaf one by one though if you're doing it by hand, broke these sizzors that @Mrs_Larimar sent me because of the resin lol. so I pull these plants out my tent and I just kinda look at them and they're basically dark green because of all the sugar leafs, i'm thinking to myself "shit i messed up this isnt even that frosty". well, what i found out is every time i clipped one of those trademark long sugar leafs off it revealed absolutely resious white frost. That's what can keep someone motivated. ! Once jared, if there's boveda in your jar, you dont really need to burp it daily, or even weekly i just let it sit there, obviously i've been smoking it and following the cure, let me tell you this one needs longer to cure than you're used to maybe, at least two more weeks of cure after a slow dry. Four weeks after the chop , it's a strong weed ! Didn't smell all that loud, but I have a 1300M3/H exhaust so... i'm not surprised. I will say though that my neihbour said she could smell weed even when I wasnt home and she could smell weed in the corridor, from the times I was trimming and basically every time I open my jar. Gonna need a new carbon filter for the next grow. I retired my lightbulb too. Hard to put my finger on the taste because the smoke is so smooth, and when i saw GD had a tag for Woody, i knew right away this was that taste i felt. I will say this though, cure this correctly, dont rush, dry it real slow, then cure it, citrussy tastes, usually those will evaporate, leaving this distinguished terpene heavy hitter much better tasting. So what can i tell you, this weed is white weed, so frosty. Bag appeal is great too, this strain pushes out pistills like no other, maybe even more than the gorilla glue. that means this is a chill weed right? One of the phenos I grew had more pistils than the other two. Mr. B's did, but i dont know if you can really tell from the close ups, i'll try to put some more pictures up. I got two maybe three phenotypes in terms of taste. Mr. B’s is much pine-ier than the others, and when the joint goes out and you light it again, it’s even more piney … I’m actually really happy about that reminds me of white rhino from the east coast back in the day but way piney-ier than that even. When you smoke the other phenos the smell is incense and the taste is really really smooth & woody. Sometimes I find different after tastes on the exhale like coffee, pepper, and maybe sweet/fruity sometimes too depends on the pheno I'm toking on. It is LOUD THOUGH, always have a spare filter on hand IT’S NOT WORTH IT get it ! Well at the end of my first grow, i'd like to quickly review all of Bulbi's own : Bulbi"s Own Early VegMicro: Fine green powder with calcium and all the rare metals in it. I didnt use it ! Damn, next time I'll amend my soil with it like i did this time on the FBT1 Bulbi's Own Cal Mag : Organic fine white powder with calcium and magnesium, i used it in the feed and sometimes as a spray. I didnt know how much to put in because these things dont come with instructions so i ended up putting 1/4 doses most of time. The correct amount should have been 2.5G/L. Bulbi's Own Flower Micro : Organic fine beige powder that I used mixed in with the sulfur. I think this one's a keeper, really helped my plants make it through the stress of bottom feeding and all that heat. Bulbi's Own Mag Sulfur : Organic fine red powder that I used mixed in with the Flower Micro I used this one in my spray too , to great effect, in my opinion Bulbi's Own Beneficials Trio : This was the base beneficials mix I had, you need to put 7.5 to 15g/l , watch out for clumps, use at the night fall, or when still dark. Bulbi's Own Anti Afid : I threw it in there i think just in time to protect my plants when I intentionally overwatered when I went on my trip. There were some white flies that emerged, because... well that's what they do isnt it. but there were just a few of them and they ended up flying around wierdly, and within four days, no more white flies, didnt even use yellow sticky tape ! You mix this one with the trio for even more effect. I used these in a spray I think , also. Bulbi's own Anti-Worm : This one is more directed against larvae, and can be combined with the base trio. I was weary of using it, but I'm glad i did to give my soil matrix that full spectrum of biological protection. Bulbi's own Humic Acid : This one i loved, looking back I'm regretful not having used it more. the dry humic acid is a great experience, the quality of it was impressive, clumps would seperated into more clumps ad infitum the feed slowly turning completely ink black. definituely using this once a week from now on Bulbi's own Amino Acids : this one is just amino acids, maybe next time I'll use it at the same time as the humic acid, but I'm not 100% on that. What i did do was spray the top layer of the soil with amino acids when I accidently ran into some issues from spraying kelp all over the place. So in that sense it's an absolute life saver and a must to have on hand. Bulbi's Own Kelp Extract Concentrate. Loved this one too haha, so thick, and green, check out the video of when i pour it lol. Worked great, raises the pH some so be careful, i used this one as a sprat aswell to get those plant growth hormones pumping during the seeding and veg stage. Bulbi's Own CO2 : well part of what I set out to do was to test the CO2 theory. Like roots do absorb CO2 but at a lower efficiency than leaves say 15% vs. 85% the theory being enriching your water or feed with CO2 would ultimately benefit the plant. So i enriched water with these ceramic based co2 tablets, because CO2 is a soluble gas, it stays in water. Then i fed the plants in this manner in the feed and also as a spray. The idea behind that was that co2 enriched water would come in direct contact with the plant allowing for absorption of some quantity of CO2 through the leafs. Someone explained to me that these are actually old school techniques. Well I know i started late and didnt follow a regular schedule like i wished for but the plants didn t die, or show any immediate negative upon innoculation, so what can I say? I'm doing this again, perhaps. Only problem is that these things are really a pain to pH correctly General Hydroponics Dry pH Down : GREAT PRODUCT, hard to find but amazing – not registed on GD for some reason I still have to make my bubble hash so any advice welcome ! 🚀
Processing
Likes
16
Share
@Iop420
Follow
Hi all and thanks again for watching my post🤗. From now it's all about waiting and patience😁. Next step is flushing, I think to start next week. I let the pictures and grow log to speak. Peace✌️
Likes
47
Share
Hey there, The clones rooted very good. So i gave them a bigger pot. Also the mainlined O.GKush went to a bigger pot. The clones from to 1L airpot O.GKush from 4L to 38L airpot This week i added a little of the nutrient Result-c is showed last week. This one is supposed to make your plant stronger and also makes the blooming up to one week faster. So we will see Only thing bothering me is the one in the back falling a bit behind but hey not every grow can be perfect right. So im very happy the clones made it. They are growing together with the clones in a small 60x60 tent also under a cree 55 watt cob light. Now looking for some growth in the og.Kush so i can put her outside and let the clones take the space they need. Will be continued
Likes
5
Share
Have got the soil good ph i am pretty sure. I have got good growth out of the last week and few inches and some fan leafs and they look just barley burned and they are way happy standing up so I am thinking (fingers crossed) that I have got it under control. Going to do a trim and take some clones in the next week. Then a train for a couple weeks and put her in in flower tent get used to that light and flower her see what I get. Still just doing declorinated water at 6.5 let the soil do her job. Stay tuned
Likes
20
Share
Eccoci qui... In questa prima settimana di fioritura ho notato come le due piccoline abbiano avuto questa crescita così esponenziale e come tutte le collab DA ORA SI INIZIA CON I VIDEO per testimoniare meglio la fioritura!!! Grazie a @KhalifaGenetics per la collab e a tutti per il supporto🔥🌲❤️
Likes
11
Share
@PanGrower
Follow
Leaves continue to turn yellow and fall off
Likes
96
Share
💩Alrighty then Growmies We Are Back At it 💩 Well folks we just finished up the last run and so we are bad to do it all over again 😁 So what do you say we have some fun 👈 We got some Z & Z 🚗 🚘 🚗 🚘 👉 From Exotic Seeds Well we are just 35 days and folks shes doing pretty good 👌 It's been a crazy few weeks 👉 huge storm rolled in and we lost power for around 4 days😳 so I had to get creative and then i has some uptake issues over the weekend 👈 So I gave them a light flush and then switched to there new brand of nutrients and began there new regiments 👌Just need to remind myself to take it easy 🤔 FC4800 from MarsHydro Lights being readjusted and chart updated .........👍I've added a UR45 to the mix👈 www.marshydro.ca 👉I am using Agrogardens for nutrients for my grows and welcome anyone to give them a try .👈 👉 www.agrogardens.com 👈 Agrogardens Cal MAG Agrogardens Grow A+B Agrogardens Bloom A+B Agrogardens Bud Booster Agrogardens PK13/14 I GOT MULTIPLE DIARIES ON THE GO 😱 please check them out 😎 👉THANKS FOR TAKING THE TIME TO GO OVER MY DIARIES 👈 Would you like to hang with the growdiary community 👉 https://discord.gg/gr4cHGDpdb 👈
Processing
Likes
16
Share
@S1993
Follow
Rapid plant growth in the last week.