


Likes
Comments
Share


@mistaminista420
Follow
So I had to cut all leaves, and also some of the smaller leaves due to mold. It was only a little bit mold but I cut away every part that seemed to white for me in the end. It probably would habe worked out growing her 2-3 weeks longer but I decided to chop/save her.

Likes
1
Share

@Crazy_Doofus
Follow
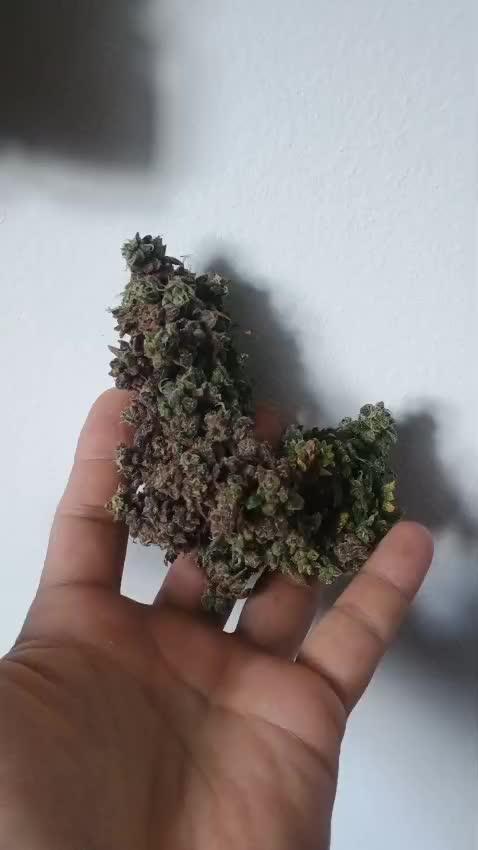
Small plant, no side nodes, just grew a top, guess quite a nice one, just for a top... Prob around 5-ish grams dry... 50-50 ish brown trichomes, I normally don't cut that late


Likes
1
Share


@socialhemp
Follow
34 days. Looks like is doing fine…defoliation, a little bit of food, but mainly water. what do you think?

Likes
4
Share

@Bunterbiber
Follow
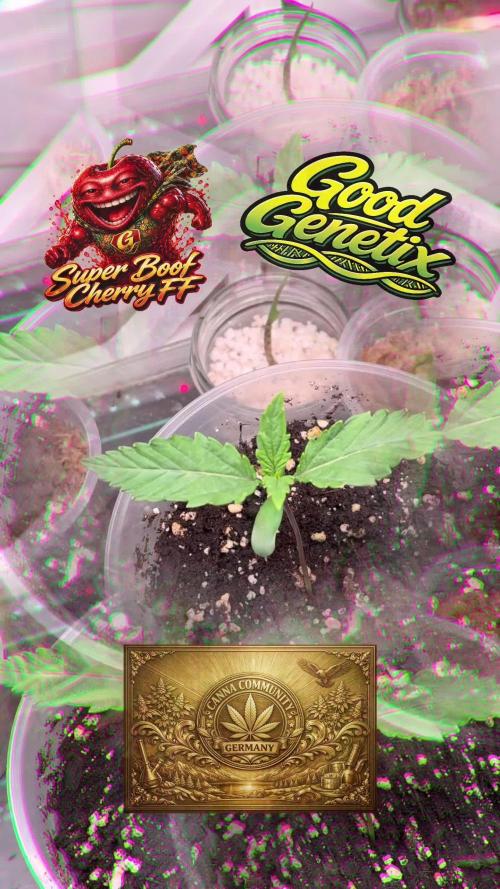
Week 1 is in the books, and everything is running right according to plan!
The little lady is currently settled in a 0.5L pot. Right at the start, she stretched just a tiny bit—likely due to a bit too much heat on the top leaves—but she quickly caught her balance and is looking fantastic for her age now.
Thanks to the transparent pot, I can already see some solid root development coming along nicely, which is super encouraging to see. She’s building a great foundation, and if all goes well, she’ll be ready for an upgrade to a larger pot in about a week.
Off to a great start!
Likes
4
Share


@Dc43_
Follow
I would’ve had a better stretch on the plants for flower if I would’ve took the lay clips off when I should’ve I’m gonna do another run

Likes
14
Share


@TheCannaProphet
Follow
~ FASTBUDS TESTER #2202 ~
Well friends, here we go on another 'canna-venture' together!
The grow room has had a complete remodel and some upgrades done to it including brand spanking new 4x8 and 4x4 tents and a Trolmaster Hydro X controller along with a new Control Panel.
This tester strain is one of six tester strains that FastBuds has graciously provided me with and I'm looking forward to seeing what this girl has to offer when she's grown to her full potential!
One drawback of 'testers' is I have little to no information on it other than its number and that it's an autoflower... 🤪 But, it's ALWAYS a blast growing them for me because not knowing a lot allows me to just concentrate on the essentials: Light, Environment, Water, Nutrients and possibly a bit of LST... not complicated, just basics like keeping a constant temperature and RH in the tent at a level that gives a good VPD, watering when almost dry and maintaining proper light levels according to their stage of growth.
____________________________________________________________________________________________________________________________________________________________________________________________________________________________________________________________________________________________________________________________________________________________________________________________________________________________________________________
~THE SETUP~
~Initially seeds were lightly scuffed, then soaked for 3 hours in 78℉ distilled water after which they were transferred to moist paper towels laid out in a Jiffy Pellet plastic starter tray with lid. Underneath the tray was placed a Vivosun Heat Mat with Controller that was set to 78℉ where they stayed until their tap roots emerged.
~Planted into Jiffy Peat Pellets that were hydrated with distilled water warmed to 78℉ with a 7.0 ph.
~Once roots emerge from the Jiffy Pellet they're transferred to their fabric pots.
~Grown 100% organic in a 4g Gronest fabric pot and a 3g fabric pot by Wraxly filled with Mother Earth 70/30 Coco/Perlite medium and initially amended with Dr. Earth 4-4-4 / Earthworm Castings / Dr. Earth Flower Girl 3-9-4 and Coast of Maine Stonington Blend Organic Plant Food 5-2-4.
~19/5 light cycle for the entire run with supplemental UVA added during flower. Lights are controlled by a Trolmaster Hydro X controller set for a 15min Sunrise/Sunset simulation.
~Top dressing every 3-4 weeks with slow release dry amendments and Earthworm castings.
~Straight water ph'd @ 6.2-6.8 when needed and bi-weekly Compost Tea's.
____________________________________________________________________________________________________________________________________________________________________________________________________________________________________________________________________________________________________________________________________________________________________________________________________________________________________________________
Weekly Updates:
12/1- I soaked both seeds for 3 hours in 78℉ distilled water after which they were transferred to moist paper towels laid out in a Jiffy Pellet plastic starter tray with lid. Underneath the tray was placed a Vivosun Heat Mat with Controller that was set to 78℉ where they stayed until their tap roots emerged roughly 24 hours later.
12/3- Today their tap roots were about 1/2 to 3/4" so at 11 am I transferred them into Jiffy Peat Pellets that were hydrated with distilled water warmed to 78℉ with a 7.0 ph using a tine off of a plastic fork as a 'mini trowel' to make a hole in the pellet and to gently cover the tap root, leaving only the seed head slightly exposed. This method accomplishes most of the initial work the seed has to do by eliminating having to orientate itself, push it's root down and head up. By 10pm the #1 seed had her cotyledon leaves opened and the #2 isn't far behind!
12/5- Well this is the full Day One for the #2 FBT #2202 and the second day for her sister! I'll keep them in the covered/heated Jiffy tray until I see their roots beginning to emerge from the peat pellet, then I'll transfer them gently into their respective fabric pots. The #1 will be going into the 4g Gronest pot from FastBuds and the #2 will reside in a 3g pot by Wraxly, which I'm trying out for the first time.
12/7- Yesterday I checked the #1 tester and she had roots starting to emerge from her pellet so I transferred her into her 4g Gronest pot. After making a hole in the medium for the peat pellet, I coated the entire surface with Xtreme Gardening Mycos then placed the pellet in the hole and planted her in. Lastly, I watered her in with about 4oz of de-chlorinated water with 3ml/g of FishShit added which was then ph'd to 6.4 @ 75℉ after which I placed a humidome over her for 24hrs to ensure that the humidity stays constant.
The #2 tester is doing great and I'm confident that she should be ready to transfer into her fabric pot in the next couple of days!
😎💚 Thank you for checking out my passion in life! Please visit as often as you wish and I hope you enjoy this journey as much as I know I will! Grow Strong! 💪😎🤙
Processing
Likes
5
Share


@Ensign420
Follow
Week 02 Introduction
This week has been a bit of a struggle. Had my first experience dealing with slime and brown algae. But I think adding enzymes and increasing the beneficial bacteria helped to fix the issue. Also experienced nutrient burn for the first time. My nutrient solution strength got as high as 671 PPMs. So backed it down to about 430 PPMs during the end-of-week reservoir change. Also cut Hydroguard (expired?), CaliMagic, and Superthrive from this grow. Now she's still stunted, but is starting to recover. Hopefully...
[START OF WEEK 02]
Day 01 - Monday - 08/10/20 - Total Days: 008
-----------------------------------
- [0830]: Still looks a bit yellow. But getting larger!
--- Solution strength was at 248 PPMs.
--- Just topped off with a bit of distilled water
--- PH went up to 6.1 so PH'd down to 5.8
--- Ran the top feed for a bit to wet the hydroton.
- [2130]: She's looking even more yellow now.
--- Even the new leaves are really yellow.
--- Decided to add more base nutes.
--- Added 4ml of Sensi A
--- Added 4ml of Sensi B
--- Now at about
--- Solution Strength went up to 304 PPM.
--- PH was at 6,
--- Also raised the water level a bit more.
--- I really hope it's a nutrient deficiency and not an over-watering issue.
--- Please live!
Day 02 - Tuesday - 08/11/20 - Total Days: 009
-----------------------------------
- [0830]: Looking less droopy. But still yellow.
--- Decided to do a reservoir change.
--- 4.5gal of distilled water
--- 8ml of Sensi Grow A
--- 8ml of Sensi Grow B
--- 8ml of Voodoo Juice
--- 4ml of B-52
--- 4ml of CaliMagic
--- 4ml of Hydroguard
--- 4 drops of Superthrive
--- PH'd down to 5.8
--- Solution strength: 302 PPM
--- Since I didn't want to risk over-watering the rockwool, I did not to do a top feed, may do one tonight after the sleep cycle (lights are still set to go off at 10am and back on at 4pm).
--- As I was doing a reservoir change, I noticed that the tubes and bucket were a bit slimy. Didn't really stink or anything. Is this normal? Maybe due to the Hydroguard and Voodoo Juice?
--- I hope she gets better soon!
- [2215]: Getting larger! But still yellow.
--- Also can see a root growing through the net pot! Tiny little thing but it's there! Will have to start dropping water once more appear.
--- After looking over a few DWC diaries using AN nutes, seems like my solution strength is still too low. Most around this stage average around 500 PPMs with about 4ml per gallon.
--- Top fed for a minute to wet the top of the hydroton.
--- Solution strength went down to 263 PPM.
--- Added 8ml more of Sensi A
--- Added 8ml more of Sensi B
--- Now base nutes are at 16ml for 4.5 gal of water.
--- PPMs went up to 411.
--- Still lower than 500 PPMs, but that's okay.
--- PH was at 6. Not sure if I should adjust PH using AN nutes. So going to not ajdust unless PH goes above 6.1.
Day 03 - Wednesday - 08/12/20 - Total Days: 010
-----------------------------------
- [0830]: Looks like more root growth!
--- She still looks yellow. But leaves are perky.
--- PH was at 6.2 so lowered down to 5.8.
--- Solution strength was at 394 PPMs
--- Since roots are still growing, I decide to lower the water level a bit. Now water level is a bit below the net pot.
- [2200]: Root is getting longer!
--- Slime is returning. Not sure why.
--- Solution strength: 357 PPMs
--- PH: 6.1
--- Decided to add an enzyme along with more beneficial bacteria to hopefully cure the slime.
--- Added 16ml of Sensizym
--- Added 5ml of Hydroguard
--- Added 8ml of Voodoo Juice
--- New solution strength: 430 PPMs
--- New PH: 6.1
--- Top fed for a minute.
--- This slimy residue is really freaking me out! I hope the added enzymes will help eliminate the slime.
--- Going to do a full reservoir sterilization/nutrient change over the weekend. Please survive until then girl!
Day 04 - Thursday - 08/13/20 - Total Days: 011
-----------------------------------
- [0930]: I think the enzymes worked! There is little to no slime now!
--- Although I think the root was also dissolved in the process. It's now just a little stub sticking just below the net pot. The enzyme is also suppose to dissolved dead roots too but guess that root was too weak? Not sure what happened there. But I think the slime is cured!
--- Solution strength went down to 395 PPMs. Decided to add more base nutrients.
--- Added 8ml of Sensi A
--- Added 8ml of Sensi B
--- Added 4ml of B-52
--- Solution strength went up to 598 PPMs.
--- PH was at 6.1
--- As long as the PH is between 5.5 and 6.3, I'm not going to use PH Up or Down. But still will monitor PH levels.
- [1715]: Checked up on her after her nap and shes looking alive but stunted. But no slime!
--- Decided to add some sugars to help maintain the enzymes and beneficial bacteria.
--- Solution strength was at 587 PPMs.
--- PH was at 6.2
--- Added 8ml of Bud Candy
--- Solution strength went up to 671 PPMs.
--- PH also went up to 6.3
--- Lowered water level a bit to hopefully promote more root growth.
--- Top fed for a minute.
--- She is getting bigger, but still looks yellow.
Day 05 - Friday - 08/14/20 - Total Days: 012
-----------------------------------
- [0915]: Leaves look a little burnt on the tips. Still no slime.
--- Going to back off on the PPMs to hopefully fix the nutrient toxicity.
--- Solution strength was at 632 PPMs
--- PH was at 6.3
--- Added/Removed water until PPMs were at 536.
--- PH was still at 6.3
--- Raised water up a bit, then top fed for a minute.
- [2200]: Looking better. Still yellow though.
--- Solution strength: 514 PPMs
--- PH: 6.5
--- Added PH down.
--- New solution strength: 518 PPMs
--- New PH: 5.2
--- PH was kind of high. So decided to PH down. Had to use quite a bit to bring it down. But eventually got it to drop down to 5.3. A little low, but so far, the PH has always gone up so wanted to start it really low.
--- Ran the top feed for a minute to re-saturate the top of the hydroton.
Day 06 - Saturday - 08/15/20 - Total Days: 013
-----------------------------------
- [0830]: She looks stunted. leaves are still yellow.
--- Solution strength: 514 PPMs
--- PH: 5.6
--- Top fed for a minute.
--- Not sure what to do at this point. Going to do another reservoir change soon. Hoping she lives until then.
- [2145]: Looking pretty much the same.
--- A bit of slime has returned. Since I've been diluting the nutrient solution, the enzyme ratio has dropped. So I guess this is expected.
--- Also noticed that slime build up was on the air-stones. Never really checked the stones so not sure how long that has been there. Looks brown too, which can't be good.
--- Going to do an H202 sterilization of the system (minus the net pot) tomorrow so did not add anything.
--- Lowered the water level to below the net pot.
--- Then top fed for a minute.
Day 07 - Sunday - 08/16/20 - Total Days: 014
-----------------------------------
- [0900]: STERILIZATION DAY!
--- Decided to skip today's night cycle for a deep clean.
--- I'm hoping that skipping a night cycle won't be too stressful.
--- Temporarily moved her to a new bucket.
--- Used about a half of gallon of straight distilled water to flush out the net pot.
--- Drained the system and wiped up all the brown sludge. Also removed the air stones and cleaned up all the goo.
--- Filled the system with 2 gallons of distilled water and at least 30ml of food grade hydrogen peroxide (35% strength).
--- Yea its a lot, but since I'm not going to sterilize the system overnight, I went with a really high doseage. Basically I kept adding until I started to see little bubbles start to form.
--- Then I ran the water pump.
- [0915]: Boiled the air stones in tap water for about 10 min. Then reconnected them to the airlines.
--- I let the air stones and hose soak in the sterilization solution for about 5 minutes so the peroxide can absorb into the stones. Then ran the air stone to help mix and agitate the solution.
--- Occasionally, I'd repeat the process of turning the air pump off for a few minutes to let the stones soak.
- [1000]: Covered the top two row of holes of the net pot with some aluminum tape. Hopefully this solves the light leaking in through the hydroton.
- [1200]: Used an old toothbrush and scrubbed the pump clean. Then drained the system.
--- Refilled with more distilled water and peroxide. Again added a lot.
--- Ran system again to sterilize even more.
- [1530]: Drained the system and refilled with distilled water to rinse.
--- Ran the system for a few minutes, then drained and rinsed again.
--- Did this a few more times over about an hour.
- [1630]: Added 4 gallons of fresh distilled water.
--- Added 15ml Sensi Grow A
--- Added 15ml Sensi Grow B
--- Added 12ml of B-52
--- Added 16ml of Voodoo Juice
--- Added 16ml Sensizym
--- Solution strength was at 430 PPMs
--- PH was at 5.6
--- I was going to add Hydroguard, but I think the bottle is expired. Since 2017 or 2018!? I think Hydroguard is good for up to 2 years from the date on the bottle or 6 months after opening. So not going to use from now on. I wonder if this could have contributed to the slime build up.
--- Also removed the CaliMagic and Superthrive too. Going to only use AN products to eliminate the chance of incompatible nutrients.
--- Placed her back in the bucket and top fed for a minute.
--- Here's hoping for the best. Going to let it ride until morning! Please feel better!
[END OF WEEK 02]

Likes
81
Share


@m0use
Follow
SPONSORED DIARY===SPONSORED DIARY===SPONSORED DIARY
TRANSPLANT #3 THIS WEEK!!!!
Big week, did the last transplant of the grow before she enters flower. I decided to skip out on the 3gal and upgraded to a 4.97 or 5gal container. The plastic is cheep and looks like it was going to break but its all the grow store had in stock at the time. Was talking to them about going from a 2gal to 3gal and how it did not do much for the plant but stress it out. They also gave me a free sample of a bokashi fertilizer, I divided that in between the two plants. It looks identical to the regular non fertilizer branded bokashi, and I feel its the same but with a mist of NPK on it or something.
Plants are doing well, Dynomyco had a slighter bigger root ball upon transplant and the plant its self is a tiny bit more robust. Given all the other soil boosters and microorganisms I have added into this, I don't feel I will see the true potential of just Dynomyco vs soil nothing else added. I just can't not add the others as it feel like a massive step backwards and end of day a big healthy plant is worth it. This diary may not have massive contrast in favour of Dynomyco but I will still use it none the less and I think its helps plus its not over just yet.
Would love to hear what y'all think about this, hit me up in the comments and I'd try and get back to yea as fast as I can.
I like how the dead Blue Cindy plant looks like a biophage, sifi like alien thing.
SPONSORED DIARY===SPONSORED DIARY===SPONSORED DIARY
This is my diary entry into the Dynomyco Show Us What You Got Contest!
#DynomycoShowUsWhatYouGot!
@DynomycoShowUsWhatYouGot!
@Dynomyco
Big Shoutout to @Dynomyco for picking me in their contest. Happy to be involved and as a user of Dynomyco I am curious to see this side by side with my own eyes. I will be honest I am a little skeptical it will show any major differences. but we will see what happens. Some disclaimers, I am still using LABS serum I made, This is also beneficial to the root mass however it's a bacteria based product and not fungal or mycorrhizae like Dynomyco.
https://growdiaries.com/giveaways/DYNOMYCO_Show_Us_What_You_Got


Likes
4
Share


@Ryno1990
Follow
All these beautiful girls are going thre flush now getting ready to harvest up they are all very resiny an covered in trichromes all the nugs are nice an dense an are smelling amazing can't wait to be able to dry an start curing them

Likes
12
Share


@SiriusBlack117
Follow
They’re finally doing their thing. There’s a little smell in the tent now, not crazy but definitely there. The cold temps definitely have them using way less water and nutes but they’re still doing ok despite lights out temps in the 40’s. The Green Crack has gone from the most to the least impressive in my opinion although I’m still looking forward to trying out the flowers. The gelato has blown me away, you’d never know it was 2 weeks younger than the others besides it being a little behind on the flower. Hoping to chop these ladies next month, thanks for hanging out with me for this run, bud shots coming next update!

Likes
7
Share


@LeakyTitsBukkake
Follow
Going to have great good grow only premium Milk Solids Big champion Plant. Household mothers hidden formula.
Coming more tomorrow week.
Good Luck me!

Likes
3
Share

@Ninjabuds
Follow
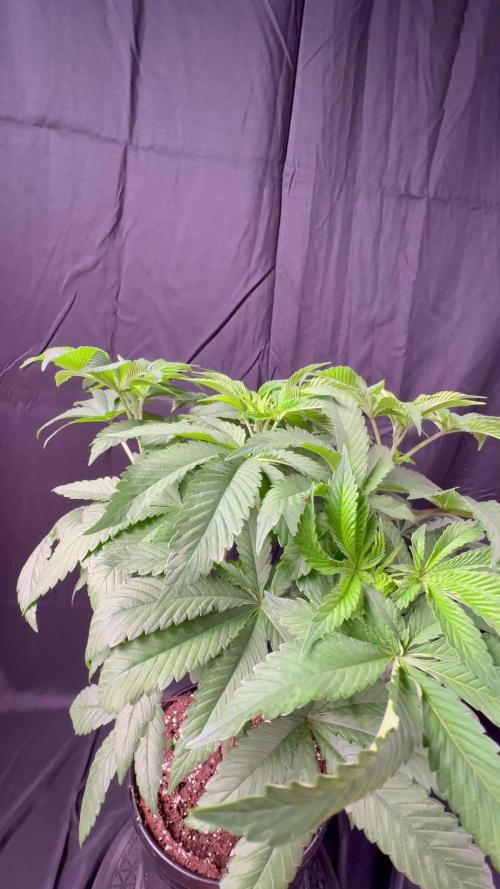
It’s the 1st week of flower I flipped the plants to 12/12 a few days ago. There is a lot going on and a lot of cool and amazing things coming in the near future. Make sure to check out my YouTube page. I bought me a DJI gimbal this week. Might be my new favorite toy. The temps are starting to break for the summer. I don’t see it being very long until winter is here and it’s time to use a heater and not an ac unit. All of the plants are healthy. The plants have all grown so well I turned down the light intensity a bit today the plants didn’t seem like they was starting to strech very much. Hopefully the lower light intensity will make them strech out just a bit

Likes
45
Share


@Mosquito_Haarlem
Follow
Heerlijke harde volle toppen en voor het eerst dat ik harsdruppels zie.
Een heerlijke strain om te growen.
De plant wordt in zijn geheel opgehangen en ik zal het droge gewicht wegen.


Likes
12
Share


@XperencdGmanXG
Follow
this auto seems to be chugging right along. Growing nicely. I am not going to do anything to it and we will see what happens. The other auto GC has already gone into flower kinda early. so will need to put another seed of this variety down.
Likes
31
Share


@Alex8o
Follow
Plants have a bit deficiency of potassium but they're growing well.I dropped humidy from 55-65 to 45-55%.
I Also watered with 5l. Of water and 25g of Gurumix bloom and molasses.