
Likes
Comments
Share


@ThatoneAKguy
Follow
The blue kush is a savage auto from dinafem. This plant almost died in week one of flower and I missed that weeks entry because I was more interested in saving it than that weeks diary. She’s at week three day four and a beast. Filling out nicely even though her neighbor is crowding her. She’s required very minimal pruning and all of her bud sites are producing worthy keepers.

Processing
Likes
10
Share


@LittleBigTrees
Follow
I put it in the pollytunnel as it was bleaching under a light


Likes
11
Share


@KushManF
Follow
Good strain, strong strain and good grow. Regular seed ended up as a female which was my wish. Happy 😁. The yields were more than I expected. Came in 100g give or take on the scale as wet weight. Did a little bit of trimming on some of the buds, but will see how it goes during drying and curing. Great great genetics and Strain.


Likes
4
Share


@7circleshg
Follow
Se uso la tecnica de ScrOG y planta C presenta clorosis, podría ser un exceso de nutrientes, por lo que se le lavaran las raíces. Cambio a horario 12/12


Likes
15
Share


@Lordviper28
Follow
These lady's have formed very nice buds even have a few show purple 😍 this strain has been very good can't wait to see war other color pop off right it's the start of 6th week flower
Likes
71
Share


@DogDoctorOfficial
Follow
Hello, Grow Diaries family! 🎉🍌
I’m beyond excited to share the harvest report for my incredible Red Banana Pudding! This journey has been nothing short of amazing, and I can’t wait to dive into the details. Let’s get into it! 🚀
🌿 The Harvest
After a wonderful flowering period, it’s time to celebrate the fruits of our labor. The Red Banana Pudding has reached its peak, and I’m thrilled with the results! 🌈🍑
Visuals: The buds have developed beautifully, showcasing an array of stunning colors and a perfect density. The aroma is incredibly sweet and fruity, promising a delightful smoke. 😍
🌟 Harvesting Process
• Timing: Harvested at the perfect moment to ensure maximum flavor and potency. The trichomes were checked and showed an ideal mix of cloudy and amber for peak effects. ⏳✨
• Technique: I followed a meticulous process, ensuring each branch was trimmed with care. The process was smooth, and the final product is a testament to the love and effort put into this grow. ✂️💪
Fun Fact: Did you know that Red Banana Pudding is renowned for its unique banana-like flavor with a hint of creaminess? It’s a true treat for the taste buds! 🍌🍰
🌿 Post-Harvest
• Curing: After trimming, the buds were carefully hung to dry in a controlled environment, maintaining optimal humidity and temperature. The curing process will enhance the flavor and potency, making for a truly exceptional smoke. 🌬️💨
• Batches: The buds are being sorted into batches to ensure even curing and to preserve the quality of each nugget. The anticipation is building as we wait for this next phase! 🎉
Pro Tip: Proper curing can significantly impact the final taste and smoothness of your buds. Make sure to store them in airtight jars and burp them regularly! 🍁
🌱 Looking Ahead
The Red Banana Pudding has set the bar high, and I’m excited to see how it turns out after curing. This has been an incredible experience, and I’m grateful for the support and engagement from the Grow Diaries community! 💚
Sneak Peek: Stay tuned for upcoming content, including taste tests and smoke reports! You won’t want to miss out. 😉👀
🎥 Catch the Full Journey
For a detailed look at the entire grow process, including the harvest, be sure to check out my YouTube channel, where I share in-depth updates and tips. Dive into the full experience and see how it all came together! 🌟🎥
Thank you for following along with this amazing journey. Your support means the world to me! 🌍💚
Happy growing and see you in the next update! ✨🌿


Likes
11
Share


@Ninjabuds
Follow
The Blackberry Moon Rocks are looking promising. One of them is growing into this beautiful little bush, and I think it's almost ready to harvest. The other plant is stacking up buds, but I'm thinking it's still a couple of weeks away.
The past few weeks have been so beautiful, watching the plants grow and change. It's amazing how something so small and fragile can turn into something so strong and vibrant. Now that they're getting ready to bloom, it feels a little bittersweet. I'm so excited to see the finished product, but I'll definitely miss having them around while they're growing.

Likes
27
Share


@Hawkbo
Follow
This is what's left in the tent, the gelato is comin down tonight and maybe the 2 smaller lemon aks maybe tmm. The cream cookies and other lemon AK will come down soon too and then I can get some pics. The pineapple and blue dream get 1 more flush


Likes
36
Share


@Cannabis_King
Follow
Everything is going smooth I flipped her to flower because unlike the package says she is not an auto

Likes
3
Share


@I_roll_my_own_420
Follow
Flushing started. All looking fantastic and smells even better. The biggest bud of Amnesia Bilbo is 18cm long and 7cm wide. Cant wait to try it after curing. So now only clean water is given. Peace and love 💚

Processing
Likes
52
Share


@CBD_Sweden
Follow
@MephistoGenetics,
Hi all the happy people here in GrowDiaries.
This is my second cultivation ever and it will be fun to try a bigger space than my closet grow.
First, I'm just going to say I'm done with the construction of my new growroom.
The room is 2.14 meters by 1.7 meters and has a ceiling height of 2 meters.
It provides a floor area of 3.6 square meters.
I use a 54 Watt Lightwawe T5 for germination and 2 Pcs 400 Watt HPS lamps.
I have a channel fan that replaces the room air about 40 times an hour to get a comfortable environment in the room, the air enters a fresh air intake from the outside.
The air is purified through a carbon filter to then leave the room to the rest of the basement.
Then I use that heat to heat the rest of the basement.
I will use 10 pcs 15 liter Autopots to grow with and a 100 liter water tank that supplies the pots of water and nutrition.
I will grow completely organically in soil and will watercure my buds to get the best possible medicine for me.
But there are no cultivation rooms to be displayed here, so I continue with what is most important.
I am very excited to see how the new growroom will work and how this Stilton Special will turn out.
Strain Name: Stilton Special F1
Genetic heritage - Sour Livers F3 x Northern Cheese Haze F3
Strain behaviour - Stilton grows well from the off, and develops into a stout but branchy specimine that leads to a fine yield of awesome flowers. She's not too stretchy but also is sizeable enough with good growth, to train and shape to your liking. Flowers develop pretty fast and grow to a good size, it may to advised to clear out some undergrowth and if needs be a very gentle defoliation mid-way through the grow, although leaf tucking may suffice well enough.The end product is of top shelf quality and she doesn't lack in yield either.Give your garden, nose, and body a treat and be sure to indulge in a slice of Stilton this year, You won't regret it.
Size - 50 - 70 cm
Structure - Medium height but bushy
Flower Density - 9/10
Indica/Sativa - 65/35
Cycle Time - 65 to 70 days from sprout
Yield - 90 to 140 grams as a single plant
Best Method for overall high yield - 9-12 per 1,2m x 1,2m sq in 10-15 Liter pots (Soil)
Aroma - Very strong, Cheesey/fruity/sour/spicey/ with a dash of coffee.
Taste - Dank berries
Effect - Good hybrid powerful but balanced effect
Medicinal Benefits - TBA
Best Grown - Indoor/Greenhouse
Cannabinoids - TBA
Extract information - Ideal extract candidate - High in resin, oil and terps.
--------------------------------------------------------------------------------------------------
2017-09-18. Start of week 4. I have defoliated her and she got water and nutes. She is 17 cm high and have not start to stretch yet.
---------------------------------------------------------------------------------------------------------------------------------------------------------
2017-09-19. 2 new fan is installed in the grow room. Added pic and video.
-----------------------------------------------------------------------------------------
2017-09-20. Kl 23.00. Did some massive defoliation, added video and pics
------------------------------------------------------------------------------------------------
2017-09-22. The girl has recovered well after my massive defoliation. She is now 22 cm high. I accidentally lowered the lamp a bit too far down and burned some leaves on one girl. They have got water and nutrition today.

Likes
21
Share


@Mr_Gezeta
Follow
06/05/21
-Riego todas las plantas con 1.8 litros de agua y los nutrientes.
-Los cogollos siguen engordando poco a poco, se nota sobre todo en los inferiores, que ahora están llenos de pelos.
-Algunas hojas están amarillas pero supongo que será debido a que no les da suficiente luz. Las que están peor son las que defolio, además de 1 o 2 hojas por planta que tapan algunos cogollos.
10/05/21
-Riego las plantas con 2 litros de agua cada una y los nutrientes.
-Se nota una pequeña quemadura en los cogollos de arriba de una de las plantas, quizás porque la luz estaba demasiado cerca. Estuve 4 días fuera y no lo pude corregir.
-Por lo general las plantas siguen fuertes y sin ningún problema
11/05/21
-No se qué ha pasado pero cuando hoy he abierto el armario tenía uno de los cogollos de CCXLA1 cubierto de moho. Me fijé porque 2 hojas parecían un poco podridas y al tocar el cogollo estaba muy blando. Me puse guantes, corté el cogollo con unas tijeras e inspeccioné la planta buscando otros posibles signos de moho. Parece que no hay más así que dejaré la planta por ahora. La he defoliado más para que tenga más flujo de aire.
-No entiendo cómo ha podido pasar esto ya que la humedad relativa del cultivo no supera nunca el 57% aprox y en general se mantiene al 50%.
-Ahora toca estar muy pendiente estas últimas semanas para ver si se forma más moho que pueda acabar con la cosecha. Fck
Likes
20
Share


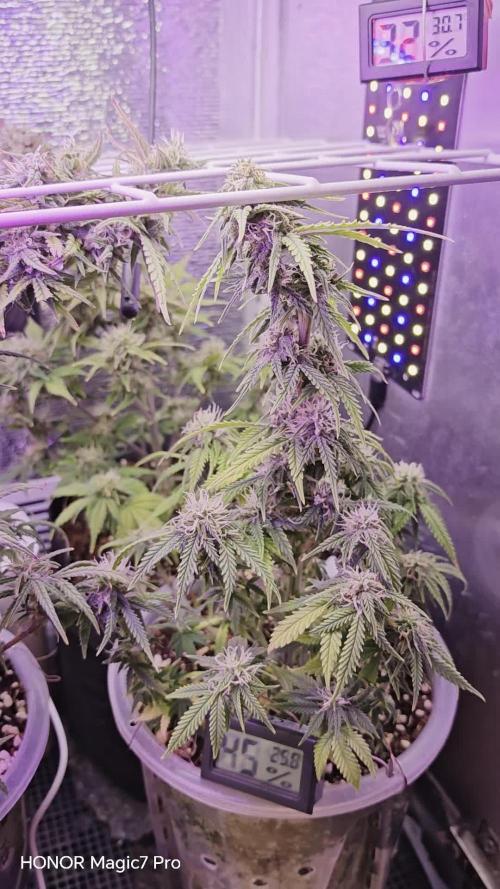
@GrowinHome
Follow
Day 78.
Now this is the canopy I was looking for! I am so excited🤩
Look at the difference with the last update post 3 days ago! All because I changed the blue/white light to red.
2 more days before we go into flower.
Day 80 the scrognet is in!
Today I placed the scrognet and changed the timer to 12/12.
Lets flower these gorgeous ladies!
Yesterday I removed some new grown side shoots again. The next defoliating will be done after the first few weeks of flower.


