
Likes
Comments
Share


@ChefJimbo420
Follow
8/12/24 - 8/18/24
Start of Flower - 1st Full Week
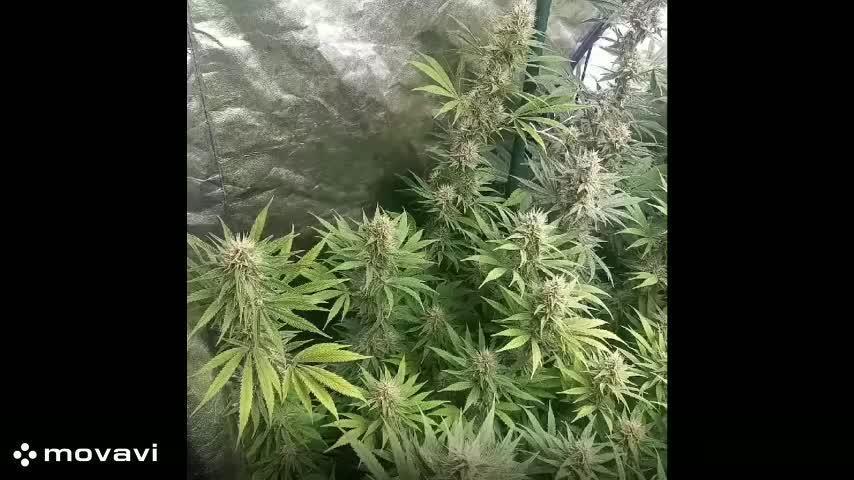
Saw a potential for Nitrogen Toxcitiy. Dark green, almost black tips, downward pointed. #1 was 35 cm @ 8pm-ish.
#1 was 40 cm @ 8pm-ish.
#1 was 45 cm @ 8pm-ish.
"2:30 am-ish - Going for a ""flushing"" watering. Hoping to slightly lower the suspected nitrogen levels. Warning Watch: Runoff was 5.6 pH, EC 3.2, 1650 ppm500, 2250 ppm700 at the end. Might be high but another flushing watering will calm it. #1 was 51 cm @ 10pm-ish."
They looked great throughout the day.
"1:00am ManBear (friend's name) became the proud surragote father for #4. She became his to manage the way he sees fit. #1, #3, and #4 have not been watered since Day #20. I suspect they will need it soon. #1 in now 60cm at 1am-ish.
6:30pm: Flush watering of #1
#1 was 65"

Likes
35
Share


@Reyden
Follow
Lst e ML continuano è la bimba inizia a crescere di prepotenza!!!
Da oggi nuove foto e qualità alta con macro e nuovi filtri 👽😼

Likes
14
Share


@Highsince92
Follow
Picking the odd leaf off watering every 3 days with ro with no run off. Must only have a a couple of weeks left looking and smelling heavenly

Likes
5
Share

@Xipsiomega1
Follow
End of 6th week (day 42) in bloom. Plants have stopped growing in height. Colas are filling fast so i put some big sticks to stabilize them and avoid crushing down from weight. One of nine plants is about 10 days back in bloom as it started to show signs of sex in day 20 after i changed the light circle! No nutrients this week and generally i don;t feed much. I do some light feeding mostly weeks 1-4 in bloom. I mix some bio nutrients in the soil (light mix) before transplant. These strains are 100% sativas and need low N and moderate P/K


Likes
5
Share


@johnwill
Follow
Pleased that both seeds germinated and sprouted. The fascination is just beginning.

Likes
10
Share

@Growfather1
Follow
Hello everyone,
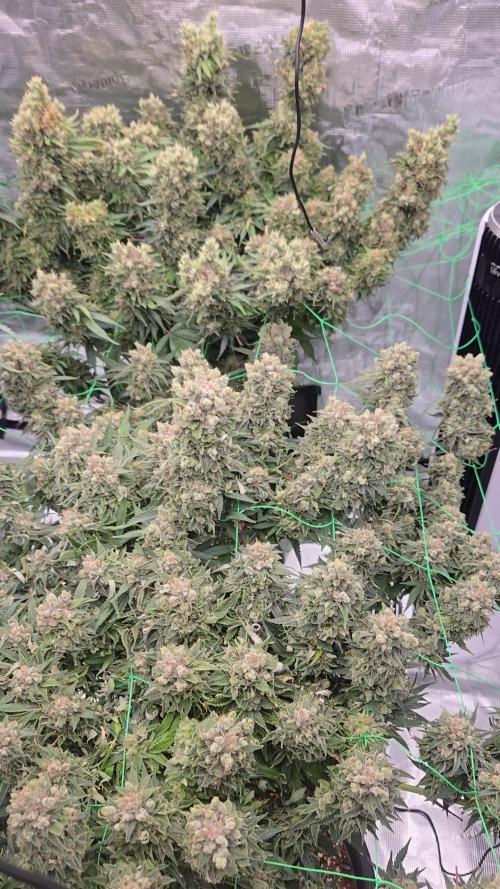
The girls approaching the finish line, the amnesia fast is ready to be harvested.
The 2 amnesia haze by expert seeds need one more week and that is a problem considering the plant in the back continues developing budrot so I'm thinking about removing some branches.
The runoff is in the last 6 days under the 100ppm I'm only giving the plants reversed osmose water.
Thanks for stopping by and have a nice day.
Growfather


Likes
6
Share


@Seedtoweed
Follow
Well this girls just looking gorgeous now and smells incredible flowers are really chunking up big time now n everything still has to swell yet so I'm really happy with everything this girls doing at the moment
Crystal and smell have definitely increased alot this week n starting to see the first orange hairs here n there I'd say probably half way point now depending on what crystals do colour wise at the end as I really want to get this girl absolutely perfect so can take a nice branch back to my friend who supplied the clone
As his lot have been decimated by the Borg...thank God I didn't get any as I'm stoked to be bug free other than couple of white fly but I just squish them as I see them haha
Likes
4
Share


@thefrozenking
Follow
great week! they are really getting dence. had to tie up the wedding glue and put up a trellis to keep it upright.
down to base nutrients. will flush next week.
Likes
16
Share


@OrganicPower
Follow
Week 8 flower and the Gorilla Glue #4 is swelling up nicely and looks like about a week to go, but I’ll probably wait until the Sour Diesel finishes up before I harvest her as I need to dry in this space, the lung room. Lots of frost and thick dense flowers. Very nice colours coming out and the smell is incredible! A few nanners popping out here and there, I’ve plucked a few but it’s late in flower and doubt much will develop from now until the end, if anything at all, definitely not pulling her down because of them. More than likely had the light turned up to high later in flower and was pushing them too much, and that’s why the Sour Diesel is growing a bit foxtail like. Turned the lights down now to 50% and they seem to be happy with that. Still just water through the drip and hand water once a week. Gnats suck and need to take care of them before next grow and do a better job moving forward. These TSW 2000’s from Mars Hydro are awesome and with two of them side by side are more than enough for this space. Blimburn GG#4 is turning out really good and smell is incredible but hard to describe. Thanks for the view!

Likes
5
Share


@ertaverd
Follow
Empieza el adiestramiento! Corte apical en el brote central y defoliacion general😋

Likes
13
Share


@Robeeriegenetics
Follow
Added nutrients to top off reservoirs everything looks good …I am content so far with testing will be dropping light schedule to 11 on 13 off to accelerate bud development hopefully shortening flowering time


Likes
5
Share


@CannaIGrow
Follow
This plant seems to have grown much denser and better than my first plant. I just got the ac infinity ventilation setup with controller 69 for my 2x2, still trying to learn, hopefully grow #3 goes even better. Stay tuned
Likes
28
Share


@TrueNorth
Follow
-Strain: Purple Lemonade - Fast Buds
-Tent: 5x5 Gorilla Grow Tent
-Lights: Budget LED Grow Lights 2 x 250 Watt
LED Full Spec/Red Spec mixed boards
-Light Cycle: 18/6
-Soil: Fox Farm
-Air Circulation: AC Infinity Cloudline T6 Inline Duct Fan
WECLOME BACK GROWMIES! Week 14 here with our PURPLE LEMONADE by Fast Buds!
February, 24, 2020 (DAY 93) - THATS IT THATS ALL FOLKS! The flush has began, absolutely nothing but RO water for 2 days and then 36Hrs of darkness and she is chopped!!!!
She has really really turned purple in the last week!! i am so in love with this plant, the smell is phenomenal so sweet and citrusy, i cant wait to enjoy this wonderful beast!


Likes
4
Share


@DmbTexasRanger
Follow
Exotic pheno of elephant trunk. Mostly sunset sherbert. Will highlight the Gary Payton leaning phenols in harvest


Likes
149
Share


@CBD_Sweden
Follow
Hi all the happy people here in GrowDiaries.
This is my second cultivation ever and it will be fun to try a bigger space than my closet grow.
First, I'm just going to say I'm done with the construction of my new growroom.
I put some pictures on the construction here in week one.
The room is 2.14 meters by 1.7 meters and has a ceiling height of 2 meters.
It provides a floor area of 3.6 square meters.
I use a 54 Watt Lightwawe T5 for germination and 2 Pcs 400 Watt HPS lamps.
I have a channel fan that replaces the room air about 40 times an hour to get a comfortable theme in the room, the air enters a fresh air intake from the outside.
The air is purified through a carbon filter to then leave the room to the rest of the basement.
Then I use that heat to heat the rest of the basement.
I will use 8 pcs 15 liter Autopots to grow with and a 100 liter water tank that supplies the pots of water and nutrition.
I will grow completely organically in soil and will watercure my buds to get the best possible medicine for me.
But there are no cultivation rooms to be displayed here, so I continue with what is most important.
Today I have put my seeds in my moisture dome and hope the seeds have germinated within a few days.
I am very excited to see how the new growroom will work and how this Blue cheese Auto from Royal queen seeds will turn out.
Blue Cheese automatic cannabis seeds are a cross of Blueberry Automatic and Cheese Automatic that has been perfected over five years of breeding and careful selection. The result is a feminized, autoflowering strain with superior yield, flavor, and effects to either of its distinguished parent strains.
THC: 16%
CBD: Low
Yield Indoor : 325 - 375 gr/m2
Yield Outdoor: 60 - 110 gr/plant
Height Indoor: 40 - 70 cm
Height Outdoor: 60 - 110 cm
Flowering: 7 - 8 weeks
Harvest month: 9-10 weeks after planting
Genetic Background: Blueberry x Cheese x Ruderalis
Type: Sa 35% In 40% Ru 25%
Effect: Cerebral and uplifting
Climate: Mild
..............................................................................................................................................................................................................................................................................................................................................
Update 2017-08-15. All 4 seeds have germinated and planted in small pots inside the humidity dome.
I'm so glad it worked so well and now it's just hoping they'll start growing and become 4 big healthy girls :)
...............................................................................................................................................................................................................................................................................................................................................
Update 2017-08-16. I have mixed my own soil today. Its 40% sieved peat harrow H2-H4 0-30 mm, 45% sieved peat harrow H4-H6 0-30 mm. 5% sand and 10% of compost soil. And i use 15% of perilite and mix it all together.
................................................................................................................................................................................................................................................................................................................................................
Update 2017-08.20. Nr1 and 2 grow and thrive.
Number 3 just got rid of the seedpod and is folding out the sheets.
Number 4 is a bit shy and can only be seen if you look carefully into the soil.
.........................................................................................................................................................................................................................................................................................................................................
Update 2017-08-21. Nr 1 and 2 is doing well. Nr3 is trying to catch up and Nr4 is still shy.
--------------------------------------------------------------------------------------------------------------------------------------------------------------------------------------------------------
2017-08-23. Transplanted 2 girls from humidity dome and the small germinating pots to 15 liter autopots. The other 2 girls have to wait a little more before transplant to the autopots.
................................................................................................................................................................................................................................................................................................................................................................................
2017-08-27. The girls have settled in to there new home of the 15 liters autopot after a little transplant chock. Now the real week 1 starts for me and the girls.
--------------------------------------------------------------------------------------------------------------------------------------------------------------------------------------------------------
2017-08-28. New pic and movies.
---------------------------------------------------------------------------------------------------------------------------------------------------------------------------------------
2017-08-28. Nr3 is transplanted in 15 liter autopot.
-------------------------------------------------------------------------------------------------------------------------------------------------------------------------------
2017-08-29. New movie of the girls. Its no water for 3 days now for Nr1 and 2 so the roots develop more and match the plant above the soil. The temp controlled fan is awesome, its easy to set what temp you like to have in the room. Right now its 28 celcius. And humidity is 56%.
------------------------------------------------------------------------------------------------------------------------------------------------------------------------------------------
2017-08-29.
Hello to you who read my diary, I just want to say that I am pleased that you have chosen to check in with me and in my diary.
I just want to say that I do this for myself and for a steady flow of my medicine.
Everything you read and see in my diary is 100% honest and I will never distort or beautify anything here.
I document my crops so that I can learn from my mistakes and also to look back at those different crops.
I try to update with pictures every day and with text if something special has happened in the garden.
This is my strainhunt for the best medicine and the beginning of my journey with cannabis and the cultivation of it.
-----------------------------------------------------------------------------------------------------------------------------------------------------------------------
2017-08-30. Cleaned the room this morning, just vacuuming and cleaning with chlorine solution. Im testing the fan to control temp and humidity, it works great.
Added some pics with measurements and movie. Everything is looking great right now.
---------------------------------------------------------------------------------------------------------------------------------------------------------------------------
2017-08-31. New pics and videos.
---------------------------------------------------------------------------------------------------------------------------------------------------------------------------------
2017-09-01. New pics and videos. Gave each of the girls with 2 ml Alg-A-Mic, 4ml Bio-Grow, 4ml Bio-Heaven and 10 ml Formulex mixed in 2 liters of water.
I hope they like it :)
-------------------------------------------------------------------------------------------------------------------------------------------------------------------------------------------------------------------------------------------
2017-09-02. New pics and the girls liked the water and nutrients yesterday.
-------------------------------------------------------------------------------------------------------------
2017-09-03. New videos of the girls this morning. Nr1 and 3 looks great and nr 2 is looking a little funny, maby a little stressed.
Kl. 16.00. Did some defoliation on the girls. Added video.
Kl.. 23.00. New videos, defoliation and leaftucking.
-----------------------------------------------------------------------------------------------------------------
2017-09-04. Kl. 11.00. Week 3 starts. Trying to LST the girls and defoliate/leaftuck. New picks.
KL 23.00. New video.
--------------------------------------------------------------------------------------------------------------
2017-09-05. KL 08.00. Cleaned the room this morning, just vacuuming and cleaning with chlorine solution.
KL 12.00. The girls got 2 liters of water each with nutes in it, added a video.
----------------------------------------------------------------------------------------------------------------
2017-09-06. KL 08.00. The girls woke up after their beauty sleep, the leaves are always a bit down after 6 h of darkness, but they will stretch now when the HPS lamp starts.
Everything looks good and I keep trying to tuck the leaves so they get the maximum amount of light where needed. Added pics and video.
The Nr 3 girl is still a little bit behind the other 2 girls and all the 3 girls look like there 3 different pheno of the same plant.
KL 23.30. Did some LST.
----------------------------------------------------------------------------------------------------------------------
2017-09-07. Day 21 from sprouting, Nr3 is 17 days from sprouting. I have never tested PH in my grows, when growing organic in soil iv learned that it adapt PH by it self. But im curious by nature so i had to test.
Kl 10.00 Tested PH in the soil, it was 6.9 and tested my tap water and it was 6.8. Added a video of the girls, its 10 H after defoliation, LST and leaftucking. I think its looking good.
Kl 22.30. New pics.

