


Likes
Comments
Share


@Bread_n_Buds
Follow
Here we are, ready, after a week of truly fruitful germination we have 20 beautiful plants all marked with the Z of Zamnesia.
We have moved on to autoflowering, unlike many growers I have no prejudices about this type of plant, it is true that they are the easiest to make but it is also true that they have improved a lot in terms of flower quality and if once ease meant lower quality now even the most presumptuous old school flower children growers struggle to understand if a flower is autoflowering or a normal photoperiod plant. There are people who claim to recognize it by the flavor but then never succeed, it's funny how it works. I enjoy making them strip their heads with these magnificent new autoflowering. This one in particular is not brand new but it has always kept up with the times and has the strength of the name and the stability of the historic strains of Zamnesia this is nothing universal strains this is one of the spearheads of the house: Sticky Beast autoflowering. It's really a great plant already grown in the past by me and some of my friends have always loved it like crazy. I think it's the only one or one of the few to have won CUP from the Zamnesia catalog but we hope to find company for it very soon...
---- New Home - The young ladies have almost all been transplanted into 11-liter pots which is my favorite size to get the best ratio of presence of plants in the grow box / yield. Especially if you don't have to do exaggerated topping or you have to grow the plants straight with main cola like I do for catalog needs like I do, 11 liters guarantees you to make excellent plants. Topping with 11-liter pots is recommended up to a maximum of 16 tops (4 main crops) - The pots are square plastic and canvas branded Zamnesia - The soil used is Plagron Promix with peat and worm castings but not fertilized -
--- Start feeding program - A very serious feeding program branded Plagron has begun. We made our own custom table based on the chosen soil (Plagron Promix 100% organic) that you can all do at the link https://plagron.com/en/tools/grow-schedule-calculator and I started giving:
- Power Roots - 1ml/l
- Alga Grow - 2 ml/l
- Pure Zym - 1 ml/l
- Sugar Royal - 1ml/l
- Vita Race - 1 ml/l
- The 100% Organic pack by Plagron can be found on Zamnesia at the link:
https://www.zamnesia.io/it/11457-plagron-easy-pack-natural.html
We are giving a lot of humidity with a humidifier and we oscillate between 65% and 70%.
// Strain Description // What happens when three famous strains come together? Sticky Beast Automatic by Zamnesia Seeds is a pure autoflowering composed of some of the best strains. From this combination, where the delicious flavors of Bubble Gum meet the famous OG Kush and the productivity of Critical Auto, a real autoflowering is born that is extremely easy to grow!
// AWARD WINNING STRAIN // First Prize at Autoflowering Highlife CUP 2018 --
- Get a seed of this amazing strain --- https://www.zamnesia.io/it/3331-zamnesia-seeds-sticky-beast-automatic-femminizzato.html
- Soil and Fertilizers entirely organic --- https://plagron.com/en buy on www.zamnesia.io
- Growbox and air system --- https://www.secret jardin.com/
- Light — P2000 - https://www.viparspectra.com
- Music and sound --- I made my girls listen to 432hz frequencies and music from www.radionula.com
- Z --- You can find these seeds, much more from the world of cannabis, mushrooms and an incredible series of accessories and gadgets on the reference site not only mine but of many growers ---- https://www.zamnesia.io

Likes
12
Share


@Papabro2k
Follow
Quick update added my pets for the comp Started with some bloom this week topped her too happy days growing fast

Likes
6
Share


@GanjaDjarin
Follow
For the Grow section on my page: Throughout the germination stage, I explored three distinct seed germination techniques: the direct soil implantation, immersion in a hydroponic medium, and the classic paper towel method. My tests involved the Gods Gift autoflower from Premium Cultivators, Northern Lights from Royal Queen Seed Bank, and the F1 Epsilon strain, also from Royal.
My primary focus, however, has been on the F1 Epsilon strain. As part of my shift towards commercial operations, I'm currently pushing the potential of these seeds to achieve maximum efficiency and productivity. I'm in the midst of identifying the optimal strains for my commercial venture.
My objective, quite simply, is to strike an optimal balance between quality and yield for my future cannabis crops. With astute business planning and leveraging emerging laws, I plan to provide these products at a significantly lower price than my competitors. End of Germination Stage - Staring Vegetation Stage
Day 9 - I inadvertently oversaturated my plants with nutrients, which led to the immediate demise of two plants. A key lesson learned was that utilizing old woolite medium is not advisable. Instead, using dirt plugs proves to be a more effective method. Moreover, it's crucial to ensure that nutrients are introduced directly into the water supply to avoid any potential harm to the plants.
Additional Note: For enhanced root stability and quicker access to the water supply, it's important to situate the dirt plugs deeply within the pebbles.
Also ensure germination process as follows: 12 hour soak, drop into soil plug deep into hydroponics pebble medium.


Likes
27
Share


@OldDabKing
Follow
Started this week out by super cropping the plant right above the fourth node. The next day the plant was pointed towards the light again, and after a few days I had to tie the top down or it would have been standing up straight again. Watering with 1L every 2-3 days.
Processing
Likes
2
Share


@Valedor
Follow
semana de crecimiento de tricomas, ademas las flores presentan un crecimiento muy bueno, ya están madurando de verdad, el próximo cultivo lo documentaré con fotos mas claras, he aprendido mucho de tenerlas en hidroponia, me gusta y lo voy a seguir usando y explotando


Likes
22
Share


@Jwjoh
Follow
This was an interesting harvest. Everything was going great and the buds/trichomes were still piling on, when suddenly almost overnight plant "C" shifted to about 20% amber trichomes. So I harvested it, and because the other plant wasn't ready yet I decided to try water curing the first one for 7 days. Then at the end of the 7 days, I figured I'd hack down plant "D" and dry them both on the racks in the tent at the same time before moving into jars.
The water curing was a huge success! After the first day, the water was cloudy with a slight green tinge. Second day was about the same. Then the water was just a little cloudy each change, no green tinge. Compare it to the diary I just opened around water re-curing some cannabis I bought from the government store, where the water is diarrhea brown :O On day 7 of my water cure, the water was perfectly clear so I decided to hack down plant "D" and get them both drying on racks in the tent together.
While water-curing plant "C", I had its trim sitting in a bowl in the freezer. When I hacked down plant "D", I put its trim in the same bowl. After my typical wet-trimming, I hung up Plant "C"'s water-cured buds on the top rack, plant "D"'s buds on the 2nd rack for an old fashioned cure, and random trim from both plants spread out on the bottom 2 racks.
The water-cured buds dried within about 24 hours and went into a jar with a 58% humidipack. The buds are SUPER dense and potent! Nice clean high, doesn't kill my throat. The downside is that the taste is really weak and not that great. But everything has pros and cons. Almost no trichome loss in the bucket during the water curing as well -- I was really worried about that!
The other buds dried in about 36 hours and went into a jar with a 58% humidipack, where I burped it many times a day for a week. The smell and flavour are much more potent than the water-cured bud and it's a little harsher on my throat, but otherwise I'm not sure there's a detectable difference.
However, you can SEE there's a sharp visual difference between the water-cured buds and the jar-cured :) Of course the jar-cured will mature more with time as well.
Once the trim was completely dry, I put it in a bag in the deep freezer and dropped it to about -20. I didn't need to use a grinder this way -- I could just mash it all up in the bag with extreme ease! Sifted it through the kief screen, and pressed down 17 grams of lazy-man's hash!
After processing the trim through the kief screen, I decarbed in the oven at 200F for 1 hour (this converts THC-A into THC or something to that effect -- if you don't do this, the edibles won't get you very high). I put the trim into a big mason jar and back into the freezer along with my bottle of Everclear. Once they dropped somewhere down around -20, I poured in the Everclear, put the lid on, and shook as hard as I could, as often as I could, for 5 minutes or so. I noticed that as I shook it around, the contents inside would alternate between solid and liquid which was kinda cool :) Shake it one way and it freezes, shake it the other way and it thaws... or something to that effect, anyway. I was able to use a double-coffee-filter to extract about 2 cups of dragon tincture!
I threw everything in the coffee filter out -- next time I'm going to do a better job of it as there's a little pile of trichomes that forms at the bottom of the filter which I could put to use. Once I get that down next harvest, I'll have around 99% efficiency milking every last drop out of my harvests!
White chocolate is so yummy, as are candy canes... I wanted to combine the two to make some edibles. Looking around for candy cane crush, I decided to check out Amazon. They had the same candy cane crush I was looking at from popular stores, for only a couple dollars more, so I figured sure why not have it delivered. I was planning to get some white Baker's chocolate, but on checkout of the candy cane crush I got a deal for adding on white chocolate Lindt bars for $1.25 a piece LOL! So I bought 10 of those.
When the Amazon package arrived, I slowly boiled down 1/2 cup of my dragon tincture in a pot, then used a double-boiler setup to melt down 4 of the Lindt bars in the same pot. Once it was mixed well with the hash oil, I set it aside to cool for about 3 minutes before stirring in 1/8 cup of candy cane crush (plus I ended up adding maybe like a tablespoon more), pouring into a pan lined with parchment paper, and putting in the freezer for 30 minutes.
So now I have a nice big chunk of white chocolate candy cane crunch stuff where a piece the size of my thumb gets me super high for like 8+ hours; 17 grams of lazy-man's hash; and 88 grams of bud :) And still enough dragon tincture left over to make 3 more rounds of edibles -- not sure what I'll make next!
From now on I'm going to water cure a large portion of all my buds -- not just the ones I grow myself, but ones I buy from the Gummint too!

Likes
14
Share


@ernest_twwg
Follow
November 25th:
I did some defoliation throughout the week.
Water only, still.
Decided to leave the fasciation flower, let's see how it grows.
Lights are officially at 100%
Giving BuildABloom every other water starting tomorrow.
UPDATE!
The light timer took a shit and blasted the plants for 24 hours straight, from this week until the first of December.
Accidental monster cropping for the win! 🙄
Likes
14
Share


@VB_Grows
Follow
Hi everyone!
The plants are going nicely. All of them were topped on Day 14. Started giving 2ml of Advanced Nutrients Grow, Micro, Bloom - They took it very well.
Amnesia Haze - I'm going to mainline this plant with 2 branches only
Apricot - Got stretched more than other plants, so I started doing LST on Day 16.
Other plants - I'm going to mainline and test with 4 and 6 branches. For now, Im gonna let the branches grow a bit to maintain even canopy.
Temp doesn't go up more than 27-28 which is perfect at day and at night, goes down at 21 around.
Humidity day 55%, night 75%.
Happy growing!
-----
UPDATE Day 18
- Did some adjustments on the LST on day 17 and day 18.
had a surprise guest in one of the pots but now we are good (the video) 👽
Likes
81
Share


@Mtmtc
Follow
It harvest time for this Sunset sherbet auto. I’m happy how it turned out! thanks to Zamnesia seeds for sponsoring this grow 🙌🌱
Likes
13
Share


@RFarm21
Follow
11 março - 17 março
12 março - feeding
16 março feeding:
bio heaven 1.5ml; sílica 0.1ml; bio grow 1ml
Likes
44
Share


@Cogollo_eu
Follow
**Encontrarás la traducción a español al final de la descripción**
From/Desde: 19/04/19 || To/Hasta: 25/04/19
From day/Desde día: 57 || To day/Hasta día: 63
You can find the Money Maker Diary here:
** Podéis encontrar el diario de las Money Maker aquí:**
https://growdiaries.com/diaries/25667-gorillamakingmoney-gorilla-vs-money-m
-----IMAGES & VIDEOS-----
1 - Before defoliation
2 - Defoliation
3 - After defoliation
-----WEEK SUMMARY-----
(Following text was translated with tools and reviewed, sorry for mistakes, misspellings or nosense things)
As you can see I've done a defoliation this week. Yes, I have really gone over the top, I have removed many more leaves than I had, and the tails of the plants has not come to join at all due to the failed defoliation.
Being the first defoliation I do, I did not really know what I was doing and I went crazy. Now that it has been several weeks since I made this defoliation, I realize that I should not have removed the leaves from the nodes of the tails, because they have stopped growing and have not joined with their superior parts. Anyway, the plants are beautiful today and although they could be much better I feel very happy with them.
I know I've made 2 fatal mistakes in this grow
- The first has been the massive defoliation badly done, defoliation yes, but with head ... do not follow my example.
- The second failure that I see today, is that I did not leave enough growth time (18/6) after having made the last pruning and that has made the tails have been a length much less than what would have been desired, I think that 2 more weeks of growth would have been perfect.
-----WATERING CALENDAR-----
20/04/19 - 1,250 ml with Sensizym, Silica, Rhino Sk, Bud Ignitor, Big Bud, Bud Candy & Bud Factor-x @ PH6.4 & 1.2 E.C.
23/04/19 - 1,250 ml with All week nutrients - (Silica, Sensizym & Bud Ignitor) @ PH6.5 & 1.5 E.C.
*****ESPAÑOL*****
-----IMÁGENES Y VÍDEOS-----
1 - Antes de la defoliación
2 - Defoliación
3 - Después de la defoliación
-----SUMARIO SEMANAL-----
Como podéis ver esta semana he hecho una defoliación. Si, efectivamente me he pasado de listo, he quitado muchas más hojas de las que debía y las colas de las plantas no ha llegado a unirse del todo debido a la fallida defoliación.
Al ser la primera defoliación que realizo, no sabía muy bien que hacía y me lancé a lo loco. Ahora que han pasado varias semanas desde que realicé esta defoliación, me doy cuenta de que no debí de haber quitado las hojas de los nodos de las colas, pues estos han dejado de crecer y no se han unido con sus partes superioras. De todas maneras, las plantas están preciosas a día de hoy y aunque podrían estar mucho mejor me doy con un canto en los dientes.
Se que he cometido 2 errores gordos en este cultivo
- El primero ha sido la defoliación masiva mal realizada, defoliación si, pero con cabeza.... no sigáis mi ejemplo.
- El segundo fallo que yo veo a día de hoy, es que no dejé suficiente tiempo de crecimiento (18/6) después de haber realizado las últimas podas y eso ha hecho que las colas hayan quedado de una longitud muy inferior a la que hubiera deseado, creo que 2 semanas más de crecimiento hubiera sido perfecto.
-----CALENDARIO DE RIEGO-----
20/04/19 - 1.250 ml con Sensizym, Silica, Rhino Sk, Bud Ignitor, Big Bud, Bud Candy y Bud Factor-x @ PH6.4 & 1,2 E.C.
23/04/19 - 1.250 ml con todos los nutrientes semanales - (Silica, Sensizym y Bud Ignitor) @ PH6,5 & 1,5 E.C.
Likes
35
Share


@LoneStrainger
Follow
I think I got a little light burn but I got a lux meter and adjusted the light. She looks happier now. Upping to veg state dosage of nutes next week. Topped last week and started some LST yesterday. FAT stalk.. guessing that the “tree trunk” additive. Happiness. Kombucha cream!

Likes
137
Share


@MrJones
Follow
mrjones - Slurricane #7 S1
🌱Slurricane #7 S1
@inhousegenetics_official
👨🌾🏽GD Grower: MrJones
🔹🔹🔹🔹🔹🔹GOALS🔹🔹🔹🔹🔹🔹
🌞Environment - 75/80℉ and 60% Humidity Good Old Mother Nature
💧 Feeding - The Green Sunshine Company - Earth Dust All-Natural Plant Nutrients
⚗️Soil - 35% ProMix MP / 25% Ocean Forest / 20% Tupur Royal Gold / 10% lobster Compost / 10% Additional Perlite
🍃Training / So this girl was 60 Inches and spread her out under a 5x5 Trellis
🕷️ IPM - Will be using Green Cleaner" 1 OZ per Gallon, and CannControl from Mammoth alternating between products each month
🔹🔹🔹🔹🔹🔹🔹🔹🔹🔹🔹🔹🔹🔹🔹
📜 Rambling - This week will be more of the same, keep the plants wet, defoliated, and supported, will be doing a few rounds of IP<.
🔹🔹🔹🔹🔹🔹🔹🔹🔹🔹🔹🔹🔹🔹🔹
▶️ Sunday - 07.04.21 / The girls are loving life - just keeping the pots wet in between the rain!
▶️ Monday - 07.05.21 / Adjusted the trellis today and added another one. On these hot days, the girls do like their water!
▶️ Tuesday - 07.06.21 / Moving along nicely - between the rain, and great weather only having to do light waterings!
▶️ Wednesday - 07.07.21/ Moving along nicely - between the rain, and great weather only having to do light waterings!
▶️ Thursday - 07.08.21 / Moving along nicely - between the rain, and great weather only having to do light waterings!
▶️ Friday - 07.09.21 / Moving along nicely - between the rain, and great weather only having to do light waterings!
▶️ Saturday - 07.10.21 / The plants are really loving life at the end of this week, they are responding to the trellis well, and starting to grow up through the second one, The trellis is there only for support.
🔹🔹🔹🔹🔹🔹🔹🔹🔹🔹🔹🔹🔹🔹🔹
Earth Dust - DESCRIPTION
🔹Earth Dust is our all-natural plant nutrient designed for indoor and outdoor flowering plant growers. You can grow easily by “just adding water” to your soil for the entire growth cycle. It creates a “living soil” so your plants thrive from seedling all the way through flower and harvest. Earth Dust represents an organic dry amendment method of gardening, it’s made of a natural powder of ingredients.
🔹Because you only need to water your soil with Earth Dust, you can concentrate on caring for your plants and getting a healthy crop “on autopilot”. Now you can grow without spending hours of your life mixing chemical nutrients, and you can do it naturally. What’s more, is you will enjoy the cleanest, most aromatic, and flavorful harvest you’ve ever experienced when a plant grows in a rich, organic web of living soil.
Product Highlights
🔹All-Natural Ingredients – Mostly plant-based – Safe around children and pets.
🔹Packaged in kraft paper bags that are recyclable and compostable.
🔹Easy to Use – Just mix the powder into the soil 3 separate times – then water only.
🔹Packed full of rich microbe food & contains billions of beneficial fungi and bacteria! Creates a resilient, living soil that defends against pests and diseases.
🔹Rich in trace minerals and nutrients for full plant expression. Sourced from rock dust, sea-farmed kelp, and land-grown crops.
🔹Soil Conditioners help balance pH and make nutrients more available in the soil. Achieved with ingredients like bat guano, worm castings, limestone, molasses, and humic acid.
🔹The correct balance of N-P-K nutrients for each stage of growth:
🔹Earth Dust Base (3-1-2) contains key nutrients for sustained vegetative growth. High nitrogen (N), Low Phosphorous (P), and Medium Potassium (K).
🔹Earth Dust Boost (2-3-6) contains accelerated-release nutrients for powerful flowering growth. Low nitrogen (N), Medium Phosphorous (P), and High
Potassium (K).
🔹Re-use soil harvest after harvest by simply adding more Earth Dust Base to begin again. Create your own living soil that gets better every time it’s used.
🔹Go organic, save time, and get predictable, healthy harvests.
🔹🔹🔹🔹🔹🔹🔹🔹🔹🔹🔹🔹🔹🔹🔹
Compost Tea for Vegetative Stage
Water 4 Gallons
3 Cups Composr (Your Favorite Worm)
4 TBL Molasses
4 TBL Seaweed Extract
4 TBL Fish Fertilizer
Use air Stone o the tea for 24/3 hours 70/75F, use at full strength for establishing plants and a half strength for younger plants

Likes
1
Share

@Bones_1986
Follow
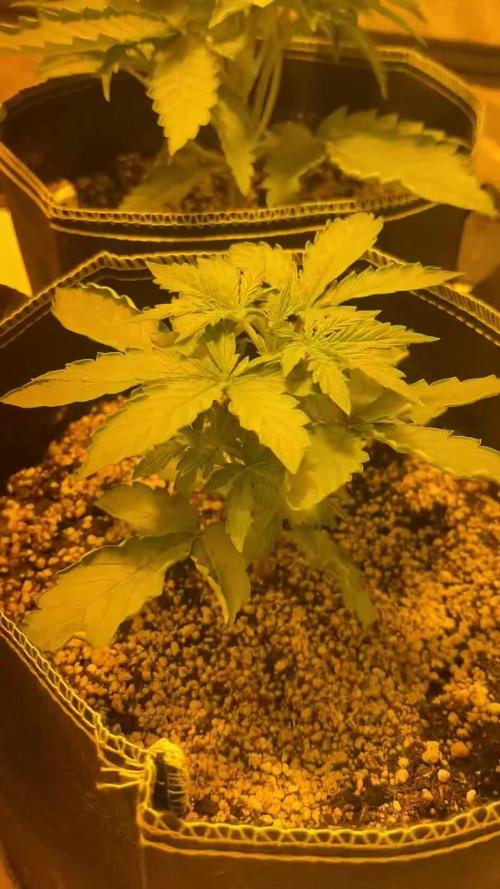
Day 15 added grow. Feeding 1.5L per plant which gives a little run off. Pot drying out every 3 days and growing about an inch daily atm, big changes to come over the next 7-10 days really looking forward to seeing these grow taller

Likes
4
Share


About to start flushing in about a week or so
Processing
Likes
26
Share


@LumberjackBuds
Follow
These guys seem to have some stunted growth from being in that shitty rock wool dish setup I had but they are making up for it now that they are in the air pots. I transplanted them into sunshine #4 because my other plants have had problems with N tox in coco loco, the only other soil mix I have...probably won’t ever be using fox farm soil again. Too expensive for what it is and it’s a pain in the ass dealing with nute probs.
Day 8: into the new grow tent tomorrow

Likes
4
Share


@WeedDoctorSam
Follow
Well, boys and girls and those who don't differentiate, it's Weed Doctor Sam here and I'm about to fail gloriously or succeed by the skin of my teeth.
This being my first grow -- of any kind, let alone a hydroponic grow involving (potentially) advanced training techniques -- I fully expect things to go wrong. And, well, golly... wouldn't it just be fun to watch?
Tune in week to week to see what goes wrong, what goes right, and what goes just luckily enough not to fuck up the whole grow.
Update to this week coming at the end of Week 1. Until then, may the rain fall soft on your fields.


Likes
13
Share


@MrPott
Follow
She started out tiny but definitely surprised me halfway through. She doesn't really smell as a plant but in the jars and paper bags, she smells like berries and watermelons. Only been a week since I dried her in the fridge but I can't wait so I'm going to try to smoke some of her tonight. I also had to harvest partially as some of the lower buds are not quite ready yet which means I'm not done yet as of now. Will update more soon.


Likes
101
Share


@DogDoctorOfficial
Follow
OMG the smells are becoming so intense, from lemon to the sweet caramel mix with chilies and a touch of pine trees, i think i cant put in words what im smelling and were is taking my mind, but i can tel this, what an amazing combination of fragrances that are flying around
The tricomes are shouting up as they become fatter and frostier, all cristal clear so far, i think i still have 3 mb 4 more weeks to harvest, lets see 😜
Just calculate my VPD and it’s 0.98 kPa need to increase this up to 1.2 for now s i’m moving my ligth up a bit and see if it works 🙏🤓🙏
Thank you all for following, comment, like and all 🙏 100 likes 😅🙏 🙌🙌🙌🙌🙌🙌🙌🙌 ❤️❤️❤️❤️
Loving this LED Tec 😍
Girls:
1-BlueBerry
2-Alaskan Purple
3-Poyote Gorilla
4-Hindu Kush
5-Whitw Mango
6-Super Glue
7-Badazz Cookies
8-S.A.D.
tent -8x8 / 2.4x2.4 but i'm only using 1/2 so 4x4 / 1.2x1.2
Led - Lumatek 465w Compact Pro at 100%
All i Grow is medicine for myself,
Stay safe, stay tuned and B Happy
Peace out
D


Likes
Comments
Share

@GracelessGardens
Follow
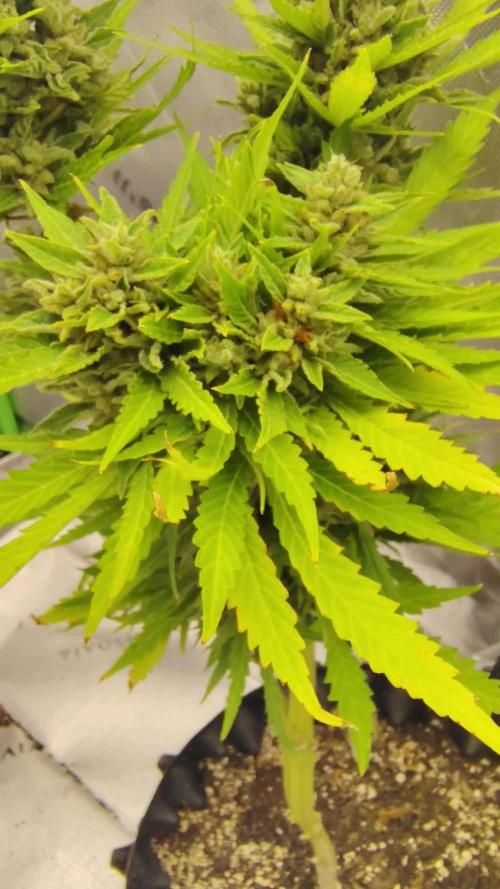
Been keeping this as happy as I can for the next week, hopefully ready for harvest in the next 7-10 days. Trich are looking good at about 60% cloudy, very trace amounts of amber near the top . Smell is skunky B.O and sweet tarts!