





Likes
34
Share


@crystal_garden_0
Follow
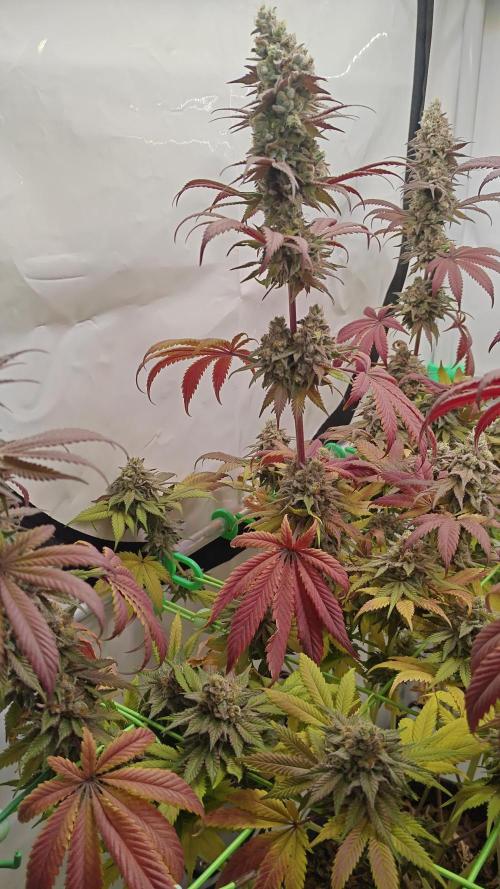
End of week 4 , huge difference each week. Buds started fast, strong purple genetics showing instantly. Can't wait to see what happens. So far everyone is healthy and happy


Likes
Comments
Share


Processing
Likes
1
Share


@Funkyskunky1
Follow
They are looking real good. I think I may have gotten some nutrients on one plants leaves and it caused some yellowing and leaf curl, I’m hoping it straightens out.
Likes
21
Share


@Rollex420
Follow
Dos Si Dos # 33 ready for drying in the jar, honest weight (53,5g) seeing the structure which was very small I would have expected something less..
but I am very satisfied. the quality of this weed is absolutely at the top, the taste is very well defined.. when smoked it makes your nose tingle,flavor it is mainly pure lemon with a hint of mint in it. even the strong smell induces an entire room in a few seconds without even smoking it yet.
I also collected a 0.4g of scissor hash which turned out very well.
it is my favorite in this crop because it surprised me in everything both for its unique terpene profile and for its yield that I never expected given its size compared to wedding cakes.
the total weight therefore of all three plants is (135.5g) and a total trim of (44.9g)
that according to the calculations even of these crops I reached (1g/watt) precisely. (And im not a pro)
I am certainly satisfied with that. 🙌🏻💚

Likes
27
Share


@adam_pawloski87
Follow
Let’s Go day 29!! This week went real nice ! Girls are staying very healthy and building up nicely and even started showing signs of female sex which is super great ! We started doing a little bit of leaf tuck training method on em , nothing to big as like I said I want these girls just to do there thang an grow more on naturally side! My Air temp and Humidity have been on point all week, staying from 70-75 degrees throughout the day and humidity staying around 58-61% humidity , my girls are loving that summer an 75 feeling !! Can’t wait to see what we do this week ! Hopefully you all enjoy, and are ready for another great productive week ! Peace love an positive vibes to y’all Cheers 😶🌫️💨💨💨💨🤙🏻Happy Grows✌️🏻Week 4 let’s get it !
Likes
28
Share


@DutchFarmer
Follow
Youtube video coming soon
Check the other diairies!
Along with harvest and bud pictures in the next couple of days!
I love this strain no doubt

Likes
7
Share


@UgoGrower
Follow
I was on hollidays for all the week, i was thinking that the survive of rhe pla t would be very hard, but it’s ok. She feels very well, and beggin the flowering.

Processing
Likes
19
Share


@AsNoriu
Follow
Day 15. Girls are flying !!! Think on day 18 i will do heavy defoliation, maybe Middle girl will have to be treated differently, she is a bit behind by flower development.
Still see one or two bugs, but today i should get ladybugs from friends shed, they always nest there, but you never know ....
Worst case - this wednesday i will get 200 LadyBug larvas, they should do a deal !!!
Plus, new adventure on horizon ....
FastBuds send me theirs surprise package !!! I know i said never again autos indoors, but this house is just too good not to give a try ! Huge thanks !!! I really will try my best to show beauty of theirs strains !!!
So Future is planed, now just finish those wonderfull Kushes !!!
As you see, my anti-fim'ing worked well on Tallest Kush, other girls managed to save main cola as main, Tallest have it as well, but it shrinked to smallest size and stayed lower than main canopy.
Main stretch is going to the end and after training i will lift Smallest Kush to Middle's level.
Day 15. Update, got like 50 ladybugs. 10 went to this tent, others will go to big one. Still waiting for larvae postage.
Day 16. Heavy training done now : defoliation, lolitoping, watering straight after....
Tallest Kush - 14 tops, amazing, cleared her really high, but it will be 3-4 ounces plant easy, i see structure already, after my version of fim'ing she made 3 tops, where center one shrink to side branch size. Very good structure - thats my target for future grows.
Middle Kush - a bit delayed in flower, but very bushy. After failed attempt of anti-fim'ing all side branches had triple shoots, needed to repeat action most probably ...
Anyway - she will be dofoliated in 4-5 days i think.
Smallest Kush - Midget warrior ;))) She will have hardest nugs from all 3, let's see what size colas she will make, branches shortest, but fatest of all 3.
Day 17. Girls are on absolute max power, looks happy as f@ck and that makes my heart sing !!! ;)))
Day 20. Gave Silica acid with watering. Looks like this tent is free from thrips, girls always prays and drink quick, so its all good in the neighbourhood ;)))
Happy Growing !!!
Likes
104
Share


@SmokingTiki
Follow
I defoliated the 3 plants to give some light to all the branches.
I broke one branch of the Cashew Kush during the watering. I inadvertently pulled on one of the string used for LST with the bottle cap. I also noticed that another branch of the Cashew Kush broke because of the LST, but the tip is still attached to the rest of the branch. I already broke 3 branches of this poor Cashew Kush so far, sorry little plant 😞 I also almost completely broke one branch of the Jack Herer but since it was still attached a bit, I've tried to fix it with some tape and wire. I already did that in the past and it worked but this time the extremity of the branch did not make it 😔
I'm now watering every 2 days. No fertilizer yet.
Due to increasing humidity before defoliation, I put the fan ON 18h/day again. Humidity was around 65% before the defoliation and 62% after. For the last days of the week, I set the dehumidifier to 50%.
I slightly reduced the light intensity from 75 to 70% to try to reduce the light burns of the top leaves. Next week I'll set the lamp to 12h/12h.
Plants heights at the end of the week :
-------------------------------------------
Blackberry Cake : 25cm
Jack Herer : 32cm
Cashew Kush : 32cm

Likes
39
Share


@J_diaz420
Follow
Se hace defoliación extrema 5 días antes del corte para intentar hacer madurar la planta de forma mas pareja.✌️👨🌾🏻
Likes
4
Share


@JardineiroBr
Follow
Uma planta estava muito travada e pela minha experiência não vale a pena o custo da manutenção dessas plantinhas é chato mas preciso do espaço e do tempo para cultivar plantas que deem resultado.
Coloquei um gancho leve em cada planta hoje para ver se aumenta a área verde.

Likes
5
Share

@RakonGrow
Follow
+
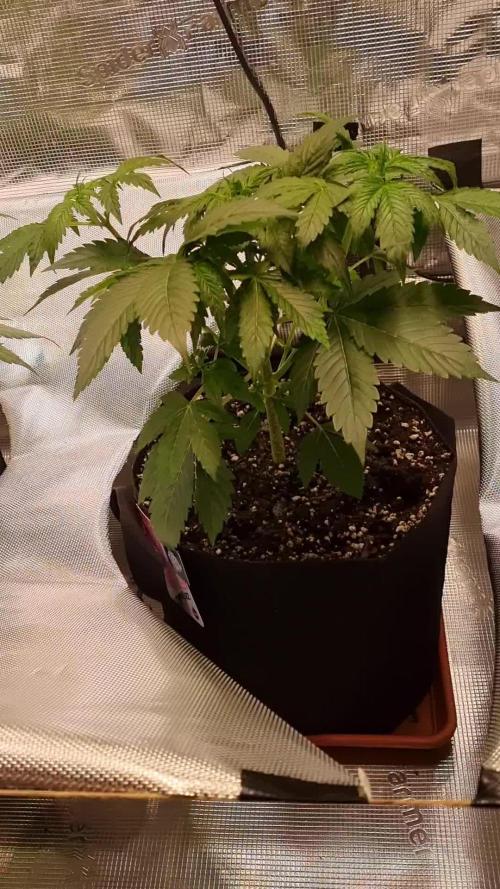
Day 37
2.0L bottle water EC 0.35 + 0.2ml/l CalMAg , 3.3ml/L Vega . PH 6.1
DIY Project fixed my Problem :
+ Top Values : 25.4°C ; 57%rH
+ Bottom Values : 23.0°C ; 64%rH
Day 34
3L bottle water EC 0.35 + 0.4ml/l CalMAg , 3ml/L Vega . PH 6.12
Day 32
1L bottle water EC 0.35 with 0.4ml/L CalMag , PH 6.10 . Reduce EC in some spots .
Build a shadow plane with reflective foil (diamnond tent foil).
my new light is large as hell , and heating all around lol . this DIY project should fix it .
Day 29
2.5L bottle water with 0.4ml/L CalMag 3.3ml/L Vega , PH 6.07
+

Likes
2
Share


@burnercorona
Follow
Solid week. She's recovering quite well from training and some pH issues almost time for flower
Likes
112
Share


@Tropicannibis_Todd
Follow
ALRIGHTY THEN GROWMIES 😎
👉SHES PRETTY MUCH A BEAST , FROSTY AS HELL AND CANT WAIT TO CURE THEM UP AND GET SMOKEN 👈
👉I would recommend Shes the Mother of all Indicas 👈
Was a blast to grow thanks for hanging in there and following me on my journey👊
I GOT MULTIPLE DIARIES ON THE GO 😱 please check them out 😎
👉THANKS FOR TAKING THE TIME TO GO OVER MY DIARIES 👈
👉NutriNPK NUTRIENTS USED FOR FEEDING 👈
👉www.nutrinpk.com right now get 10% off using SPRING2022 👈
Likes
7
Share


@Andres
Follow
she grows healthy ... and her flowering begins ... she is small because I change her very late to a bigger pot ... I hope she delivers something
Likes
Comments
Share


@xHide_BG
Follow
Good Strain ..
it's not the best of all.
but the experience is worth it.
😀I think it's a great plant to test
xxxxxxxxxxxxxxxxxxxxxxxxxxxxxxxxxxxxxxxxxxxxxxxxxxxxxx
xxxxxxxxxxxxxxxxxxxxxxxxxxxxxxxxxxxxxxxxxxxxxxxxxxxx
xxxxxxxxxxxxxxxxxxxxxxxxxxxxxxxxxxxxxxxxxxxxx
xxxxxxxxxxxxxxxxxxxxxxxxxxxxxxxxxxxxxx
xxxxxxxxxxxxxxxxxxxxxxxxxxxxxxx
xxxxxxxxxxxxxxxxxxxxxxxxxx
xxxxxxxxxxxxxxx
xxxxxx
x
it's not the best of all.
but the experience is worth it.

Likes
39
Share


@Mrs_Larimar
Follow
May, 8th
AFriend took Clones of her, so she already got her final " Haircut", before Flowering
She went into Floweringmode Today
So let us stay Courious what she shows us
She might be Big, because i waited until i could cut some Clones
but iam sure we find a good Place for her


Likes
19
Share


@DrGr33nThumb
Follow
Week 6 - Veg - her nutes have been upped to 2ml of grow, micro and bloom and feeding every 3rd day now.
