




Likes
19
Share


@Comfrey
Follow
Tropicana had to go back indoor because the temperature outside is the opposite of tropical. I took off two leafs and gave her time to relax after.
Everything is fine and I can already smell something when I‘m near to her. 🤭☺️
Where is the sun? Preparing for sun storm!

Likes
22
Share

@Greenkush420
Follow
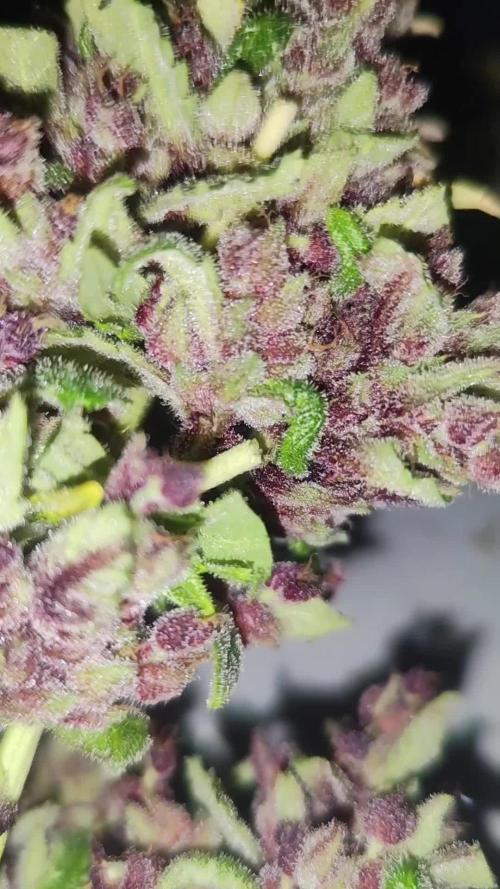
Cosechamos la Tropicanna Poison XL Auto, increíble el color purpura que adquirido al igual que su aroma 🤯🤤 sin duda esperar a que seque y saber cuántos gramos en seco hemos sacado, pero la calidad es excepcional 🌱😍


Likes
8
Share


@CanadianFillmore
Follow
Start of week 5. Week 4 went well, bud site development is going great, she's gaining size and packing on the weight! She's the least sticky of the four plants I'm growing and her smell is the mildest too. Still, she's a happy looking girl.

Likes
5
Share


@Bdawg
Follow
Tied up few branches opened canopy up abit fpr better airflow for the last 2-3 weeks.
Likes
44
Share


@Cogollo_eu
Follow
**Encontrarás la traducción a español al final de la descripción**
From/Desde: 19/04/19 || To/Hasta: 25/04/19
From day/Desde día: 57 || To day/Hasta día: 63
You can find the Money Maker Diary here:
** Podéis encontrar el diario de las Money Maker aquí:**
https://growdiaries.com/diaries/25667-gorillamakingmoney-gorilla-vs-money-m
-----IMAGES & VIDEOS-----
1 - Before defoliation
2 - Defoliation
3 - After defoliation
-----WEEK SUMMARY-----
(Following text was translated with tools and reviewed, sorry for mistakes, misspellings or nosense things)
As you can see I've done a defoliation this week. Yes, I have really gone over the top, I have removed many more leaves than I had, and the tails of the plants has not come to join at all due to the failed defoliation.
Being the first defoliation I do, I did not really know what I was doing and I went crazy. Now that it has been several weeks since I made this defoliation, I realize that I should not have removed the leaves from the nodes of the tails, because they have stopped growing and have not joined with their superior parts. Anyway, the plants are beautiful today and although they could be much better I feel very happy with them.
I know I've made 2 fatal mistakes in this grow
- The first has been the massive defoliation badly done, defoliation yes, but with head ... do not follow my example.
- The second failure that I see today, is that I did not leave enough growth time (18/6) after having made the last pruning and that has made the tails have been a length much less than what would have been desired, I think that 2 more weeks of growth would have been perfect.
-----WATERING CALENDAR-----
20/04/19 - 1,250 ml with Sensizym, Silica, Rhino Sk, Bud Ignitor, Big Bud, Bud Candy & Bud Factor-x @ PH6.4 & 1.2 E.C.
23/04/19 - 1,250 ml with All week nutrients - (Silica, Sensizym & Bud Ignitor) @ PH6.5 & 1.5 E.C.
*****ESPAÑOL*****
-----IMÁGENES Y VÍDEOS-----
1 - Antes de la defoliación
2 - Defoliación
3 - Después de la defoliación
-----SUMARIO SEMANAL-----
Como podéis ver esta semana he hecho una defoliación. Si, efectivamente me he pasado de listo, he quitado muchas más hojas de las que debía y las colas de las plantas no ha llegado a unirse del todo debido a la fallida defoliación.
Al ser la primera defoliación que realizo, no sabía muy bien que hacía y me lancé a lo loco. Ahora que han pasado varias semanas desde que realicé esta defoliación, me doy cuenta de que no debí de haber quitado las hojas de los nodos de las colas, pues estos han dejado de crecer y no se han unido con sus partes superioras. De todas maneras, las plantas están preciosas a día de hoy y aunque podrían estar mucho mejor me doy con un canto en los dientes.
Se que he cometido 2 errores gordos en este cultivo
- El primero ha sido la defoliación masiva mal realizada, defoliación si, pero con cabeza.... no sigáis mi ejemplo.
- El segundo fallo que yo veo a día de hoy, es que no dejé suficiente tiempo de crecimiento (18/6) después de haber realizado las últimas podas y eso ha hecho que las colas hayan quedado de una longitud muy inferior a la que hubiera deseado, creo que 2 semanas más de crecimiento hubiera sido perfecto.
-----CALENDARIO DE RIEGO-----
20/04/19 - 1.250 ml con Sensizym, Silica, Rhino Sk, Bud Ignitor, Big Bud, Bud Candy y Bud Factor-x @ PH6.4 & 1,2 E.C.
23/04/19 - 1.250 ml con todos los nutrientes semanales - (Silica, Sensizym y Bud Ignitor) @ PH6,5 & 1,5 E.C.

Likes
24
Share


Likes
45
Share


@Richard_Harrow
Follow
Hi there,On the screen u can see what means perfectionism, Power of Grower and the quality💚😎She is on THE BEAST MODE , One of the best strain I ever grown , This week is last before Flushing , I’m gonna dry the whole plant and soon ITS TIME TO HARVEST!!!
💚💚💚🍋🧀💚💚💚
All The Best , Richard.

Likes
7
Share


@Minuteman_Organics
Follow
Another boring week in flower. One of the indigo childs is fading to yellow. Checked the trichomes and I'm starting to see some ambers. Will probably wait till 7.5 week. The rest of the indigos will probably go 8-8.5 weeks.
The medipak needs a lot more time. Not a resinous as I would have liked to see at this point. But I have a feeling that it might be my fault with not providing them proper environment for a sativa. I also suspect there might have been a fungal issue from the medipak tent as one suddenly died. Classic fusarium. We shall see with the others.

Likes
10
Share


@nonick123
Follow
🚀 4 clones de Blueberry Pie F1 Fast seleccionados por @stacksfarmz - https://www.instagram.com/stacksfarmz/
🚀 Breeding by @seedsmangenetics - https://www.seedsman.com/eu-en/blueberry-pie-f1-fast-feminised-seeds-sman-blpi-fast-fem
💦 BioTabs 15% DISCOUNT code "GDBT420" biotabs.nl/en/shop/ @biotabs_official
🌱Substrate PRO-MIX HP BACILLUS + MYCORRHIZAE @promixmitch @promixgrowers_unfiltered
💡2 x Mars Hydro FC1500 EVO Led Grow Light (2024 NEW FC 1500-EVO Samsung LM301H 150W LED) - https://marshydro.eu/products/fc1500-evo-led-grow-lights/ - https://www.amazon.de/dp/B0CSSGN5D8?ref=myi_title_dp

Likes
2
Share


@Gromie
Follow
Continued w/ the feeding schedule for this week. I used about 1.5-2 solo cups of water for this 1 gal fabric pot. Just enough to have the coco wet.
Processing
Likes
1
Share


@Ferenc
Follow
Hi! In this diary I will grow 5 Sativa and Indica dominant Auto Feminized Strains:
Sour Orange Auto Feminized Seeds (2 seeds.) By The Bakery Seed Co.
Sour Orange Auto Feminized Seeds are a cross of the famous Sour Tangie and the Bakery’s in house Ruderalis. Also a 80% sativa dominant strain with 56 to 70 day flower period. Tested at 17% THC this genetic is highly stable and the Bakery are very happy with the results. This Auto Feminized seed can be cultivated indoors as well as outdoors but definitely prefers a slightly warmer climate to gain the best terpene profile possible. An uplifting effect with a sweet and sour aroma of tangerines. This auto flower seed is another great addition to the Bakery Seed Co’s Automatic Range
Auto Critical Orange Punch Seeds By Dutch Passion.
Auto Critical Orange Punch Seeds are Dutch Passions first Critical Autoflower. A cross of (Grandaddy Purps x Orange Bud) x XXL Auto Kritical Bilbo, creating an easy strain to cultivate. Expect a full life cycle of 75 days from sprout to harvest with impressive XXL yields. She thrives with 20 hours of light and can grow up to 70-100cm indoors. Certain phenotypes can flower for an extra week or so to gain the XXL yields! Sweet skunk aromas with a hint of rich Afghan hash.
Sour Stomper Auto Feminized Seeds are an example of what careful selection can achieve with breeding. A fruity style pheno of the Sour Crack female crossed with the Grapestomper OG male from Gage Green then crossed with ruderalis by Mephisto. This 50/50 Indica Sativa hybrid has a great stretch contributing to large yields. Due to cooler conditions late in flower, this dense canopy can produce beautiful blues and purples. A great genetic for indoor and outdoor cultivation and all finished and ready to harvest in just 65 to 70 days. This hybrid is popular with extracts and has Grape aroma in bloom.
Auto Lemon Zkittle Feminized Seeds are made from quality USA genetics. It is an Overall Highlife Cup Winner 2018!!! It has won 1st prize in Sativa category and also was awarded the Overall Highlife Winner Trophy. Lemon Zkittle Auto retains its high THC and yields even in automatic form. Due to the lineage, this hybrid is very simple to cultivate and a great choice for beginners. Fruit and skunk aromas combined with citrus flavors and long-lasting effects. 20 Hour light cycle is recommended as well as a minimum of 75 days from seed. Some phenos can take a week longer to produce the massive yields. Outdoors this variety can take up to 100 days from seed to harvest. With THC levels tested 21% as well as minimum yields of 400g/m2, this automatic hybrid is a great addition to Dutch Passion Automatic range.
24 hours light schedule, 90 percent humidity, trigger spray, no fertilization. 15th of August: Girls are ready for germination, tonight I will place the seeds to be in water at least for 12 hours :) 15th of August: I put the seeds in the water. 16 of August 2019: Seeds are placed between damp paper towel :) 17th of Augsut 2019: All good so far, They are ready to be planted tomorrow;) Day 1: They are in the soil. Hopefully they will come out soon :) 60W LED for 5 plants and the humidity is very high 98 percent. I give 5 ml water a day per plant and plus triggering to keep the humidity very high. All the holes are closed. Day 2: Non of them are out yet but I think by tomorrow it will happen:). Day 3: All out :)
Day 5: Sour Stomper and Lemon Zkittle a bit slower but all of them grow nicely. Babies ❤️
Day 6: They are coming! Critical Orange Punch is growing very quick she is already 10 cm but the rest of them are 6-7 cm.


Likes
11
Share


@DogDoctorOfficial
Follow
🌿 Nectar Drip – Week 5 Report
Early Vegetative Development (12/12 from Seed)
Zamnesia Seeds x TICAL – Pack #268
Note on timing:
This is labeled as Week 5 in GrowDiaries / Grow Iris, even though in real growth rhythm we are closer to Week 3 of true vegetative development.
This offset comes from starting the diary early and using photo-heavy germination documentation. We’ll continue to clarify this each week for transparency and consistency.
⸻
🌱 Growth Overview – Training Reveals Character
This week confirmed something important:
training doesn’t slow a plant — it reveals it.
Last week, we began Low Stress Training (LST) on one selected plant using clamps to gently guide the main stem close to horizontal. At the time, she was the smallest plant of the Nectar Drip group.
This week, her response has been nothing short of beautiful.
Despite being smaller, she reacted with:
• accelerated side branching
• clear apical redistribution
• strong node activation
• healthy, vibrant green growth
She is opening up, spreading out, and showing structure — not by force, but by invitation.
⸻
✂️ Training Focus – Low Stress, High Precision
The trained plant is now the focus of this week’s report, because she’s telling us a story worth listening to.
What’s being done:
• Main stem gently bent and held near-parallel to the soil
• Leaves progressively opened and repositioned
• Lower growth sites intentionally exposed to light
• No snapping, no crushing, no stress points
This is classic Low Stress Training (LST) — the goal is not control, but redirection.
What we’re seeing:
• Lower branches actively pushing upward
• Tighter internodal spacing
• A wider, flatter structure
• Balanced energy distribution
She’s currently entering her fourth node, and already the lower growth is responding like it knows it’s been invited to participate.
You can clearly see this in the macro photos — the symmetry, the confidence, the way each branch is waking up.
⸻
📸 Macro Session – When the Plant Earns the Spotlight
This week, the trained plant earned her moment.
She was taken into the studio for a dedicated macro session — and she deserved it.
The photos reveal:
• clean, healthy tissue
• vibrant green coloration
• active growth points
• no signs of stress or hesitation
Up close, it becomes obvious:
this plant isn’t struggling — she’s thinking.
⸻
🌿 The Other Plants – Natural Expression
The remaining Nectar Drip plants are not being trained as intensively.
For them:
• leaves are gently tucked
• some bending is done to guide light penetration
• no structural manipulation beyond basic canopy management
They are:
• taller
• more vertical
• opening naturally
• branching in their own rhythm
They look fantastic — healthy, lush, and confident — but their expression is clearly different from the trained plant. Same genetics, same room, same feed… different guidance.
This contrast is exactly why this approach is valuable.
⸻
🌡️ Environment & Room Conditions (Unchanged)
Conditions remain consistent with last week:
• Relative Humidity: ~65%
• Day Temperature: ~26 °C
• Night Temperature: ~18 °C
• CO₂: ~666 ppm
• Lamp Distance: ~1.70 m
• Substrate Temperature: ~22 °C
• Solution Temperature: ~22 °C
Airflow continues to increase slightly, encouraging movement and stem strength without stress.
⸻
💡 Light – Growing Into Intensity
PPFD continues its gradual rise:
• Previously: ~500 PPFD
• Current range: 500 → 600 PPFD, depending on plant height
Once again, the plants are growing toward the light, not being forced into it. This progressive increase matches structure and development perfectly.
⸻
Nutrition – Stay the Course
Nutrition remains unchanged, because the plants are clearly happy.
• Terra Grow
• Power Roots
• Pure Zym
• Sugar Royal
• Vita Race (foliar)
Leaf color, posture, and response all confirm that stability is working. This is a deliberate mix of mineral precision and biological support, based on experience and personal philosophy.
As always:
everything shared here reflects my own experience, opinions, lessons, and mistakes, offered openly to the community.
⸻
🔮 What to Expect / What Not to Expect
Expect:
• continued lateral development on the trained plant
• more defined structure
• increased canopy complexity
• visible divergence between trained vs untrained plants
Do Not Expect:
• instant size catch-up
• explosive vertical growth
• stress reactions
The trained plant may not become the tallest —
but she may become the most interesting.
⸻
🤝 Gratitude
Much love and respect to:
• Zamnesia Seeds
• TICAL (artist and collaborator)
• Plagron
• Future of Grow
And thank you to everyone following this journey —
supporters, critics, silent readers, and longtime friends.
⸻
🌟 Week 5 Summary
• Training is working
• Genetics are solid
• Differences are emerging
• Structure is forming
• The story is getting richer
She was the smallest.
She’s responding the strongest.
And she’s just getting started.
Growers love always 💚
FOR DISCOUNT CODES AND MORE JUST FOLLOW THE LINK https://website.beacons.ai/dogdoctorofficial
📲 Don’t forget to Subscribe and follow me on Instagram and YouTube @DogDoctorOfficial for exclusive content, real-time updates, and behind-the-scenes magic. We’ve got so much more coming, including transplanting and all the amazing techniques that go along with it. You won’t want to miss it.
GrowDiaries Journal: https://growdiaries.com/grower/dogdoctorofficial
Instagram: https://www.instagram.com/dogdoctorofficial/
YouTube: https://www.youtube.com/@dogdoctorofficial
⸻
Explore the Gear that Powers My Grow
If you’re curious about the tech I’m using, check out these links:
🔆 Lighting & Environmental Control
• Future of Grow — Advanced LED lighting technology
https://www.futureofgrow.com/
DISCOUNT CODE: DOG20
• Lumiflora — Under-canopy LED lighting
https://lumiflorade.com/
• TrollMaster — Environmental controllers and automation gear (past collaboration)
⸻
Genetics
• Zamnesia Seeds — Genetics used in this project
https://www.zamnesia.com/
⸻
🌱 Soil, Substrates, Boosters & Root Support
• Plagron — Substrates, bio mixes, and supportive products
https://plagron.com/en/
⸻
🎒 Storage, Curing & Preservation
• Grove Bags — Curing and storage solutions
https://grovebags.com/
⸻
📸 Photography Equipment & Tools
(Not sponsors, but part of my creative toolkit)
• Sony A6700
• Sony full-frame macro lens + few more
• Stacking photography workflow - learning
• iPhone (for behind-the-scenes shots)
We’ve got much more coming as we move through the grow cycles. Trust me, you won’t want to miss the next steps, let’s push the boundaries of indoor horticulture together!
As always, this is shared for educational purposes, aiming to spread understanding and appreciation for this plant. Let’s celebrate it responsibly and continue to learn and grow together.
With true love comes happiness. Always believe in yourself, and always do things expecting nothing and with an open heart. Be a giver, and the universe will give back in ways you could never imagine.
💚 Growers love to all 💚
📸 P.S. – The Eye Behind the Lens
All photos in this diary (for now — except for the ones showing the camera, which I took with an iPhone) are taken with a Sony A6700 paired with a Sony full-frame macro lens and a few more.
Photography is part of the story — it’s how we share the fine textures, the glow, and the quiet details that words can’t always capture.
I’ve also started experimenting with photo stacking — a technique where multiple images, each taken at a slightly different focus point, are layered together to create one perfectly sharp image from front to back.
It’s not digital enhancement or AI; it’s pure photography — a way to reveal the plant’s beauty in microscopic depth, from trichome to petal.
You’ll even see a few shots of "ghost me" capturing the shots — camera, lens, setup — because every grow deserves not just to be cultivated, but documented like art.
FOR DISCOUNT CODES AND MORE JUST FOLLOW THE LINK https://website.beacons.ai/dogdoctorofficial
NEW DISCORD - Official Server Invite Link : https://discord.gg/ksjAkA5T74


Likes
8
Share


@pzwags420
Follow
On day 1 I adjusted the PH of my reservoir down to 6.1. On day 2 I adjusted the PH of the reservoir from 6.3 to 6.1. On day 3 the buds are really starting to bulk up and are putting out side flower clusters already in week 5. I adjusted the PH to 6.1. The goal is to coast from 6.1-6.3 then back to 6.1-6.3 ect. On day 4 things look good I scoped out the trichs and found some to be filing up with cannabinoids :) maybe she will be done in 7-8 weeks like the breeder says. On day 5 my reservoir temp got into the 80's because when the reservoir gets depleted it lowers the water level below the thermostat and I'm getting into the colder months so the cold air temperatures are causing the heater to heat when not needed. My temporary fix is to place the heater diagonally when the water level gets low and then when the water level drops a little more I will fill my reservoir back up fully so to keep the heaters thermostat running correctly. On day 6 I did another defoliation to improve light penetration and airflow in the canopy. I installed a new "Nano aquarium heater" this will be able to heat my reservoir without being affected by the water level in my reservoir. I also changed out my reservoir and adjusted the PH to 6.1. On day 7 the girls are looking and smelling great! I adjusted my reservoirs PH from 6.6 to 6.1. My Nano aquarium heater seems to do the job nothing out of the ordinary that I could tell after a night in the low 30's.
Likes
16
Share


@brokeboyz
Follow
So.. still getting FATTy!
I changed the cob, cause i needed to lower temperature.. Now im testing a QB x 150w LM301H + 3500k660IRUVBlue
I just ran out of solo tek-bloom, so im using biobizz.
Likes
3
Share


@AestheticGenetics
Follow
5/28/25 starting to fill out nicely and getting frostier and stankier.
Still havent been giving any nutrients or anything. Just water
Likes
6
Share


@KannaGrowing
Follow
Semana de transición entre el abono para el periodo vegetativo (Bio Vega) y el abono que utilizaremos durante el periodo de floración (Bio Flores). El primero más rico en nitrógeno y el segundo, en fósforo, magnesio y potasio.
Mezclo Bio Rhizotonic + Bio Vega + Bio Flores y riego con 50 litros de agua, todo el cultivo... Alterno riegos cada tres días, unos con abono y otros con agua.
La próxima semana, elimináremos Bio Vega.

Likes
7
Share


@Mr_nugs_lover_David
Follow
Beautiful pair of phenos of Badaz og cheese very excited about what strain is gonna offer me in terms of quality buds, so excited to see what is every of this 2 phenos gonna be like, I really hope that both of them have the exact terpenes profile and the same potency! Let's keep on working! We'll the ladies have been Transplanted on February 2nd after 17 days since planted, they were very big and the pot was completely conquered by strong roots as you can see, now both of them are in their new 11l pot home let's see how they keep developing! 💛❤️💚🔝💎
Processing
Likes
5
Share


@Ensign420
Follow
Week 02 Introduction
This week has been a bit of a struggle. Had my first experience dealing with slime and brown algae. But I think adding enzymes and increasing the beneficial bacteria helped to fix the issue. Also experienced nutrient burn for the first time. My nutrient solution strength got as high as 671 PPMs. So backed it down to about 430 PPMs during the end-of-week reservoir change. Also cut Hydroguard (expired?), CaliMagic, and Superthrive from this grow. Now she's still stunted, but is starting to recover. Hopefully...
[START OF WEEK 02]
Day 01 - Monday - 08/10/20 - Total Days: 008
-----------------------------------
- [0830]: Still looks a bit yellow. But getting larger!
--- Solution strength was at 248 PPMs.
--- Just topped off with a bit of distilled water
--- PH went up to 6.1 so PH'd down to 5.8
--- Ran the top feed for a bit to wet the hydroton.
- [2130]: She's looking even more yellow now.
--- Even the new leaves are really yellow.
--- Decided to add more base nutes.
--- Added 4ml of Sensi A
--- Added 4ml of Sensi B
--- Now at about
--- Solution Strength went up to 304 PPM.
--- PH was at 6,
--- Also raised the water level a bit more.
--- I really hope it's a nutrient deficiency and not an over-watering issue.
--- Please live!
Day 02 - Tuesday - 08/11/20 - Total Days: 009
-----------------------------------
- [0830]: Looking less droopy. But still yellow.
--- Decided to do a reservoir change.
--- 4.5gal of distilled water
--- 8ml of Sensi Grow A
--- 8ml of Sensi Grow B
--- 8ml of Voodoo Juice
--- 4ml of B-52
--- 4ml of CaliMagic
--- 4ml of Hydroguard
--- 4 drops of Superthrive
--- PH'd down to 5.8
--- Solution strength: 302 PPM
--- Since I didn't want to risk over-watering the rockwool, I did not to do a top feed, may do one tonight after the sleep cycle (lights are still set to go off at 10am and back on at 4pm).
--- As I was doing a reservoir change, I noticed that the tubes and bucket were a bit slimy. Didn't really stink or anything. Is this normal? Maybe due to the Hydroguard and Voodoo Juice?
--- I hope she gets better soon!
- [2215]: Getting larger! But still yellow.
--- Also can see a root growing through the net pot! Tiny little thing but it's there! Will have to start dropping water once more appear.
--- After looking over a few DWC diaries using AN nutes, seems like my solution strength is still too low. Most around this stage average around 500 PPMs with about 4ml per gallon.
--- Top fed for a minute to wet the top of the hydroton.
--- Solution strength went down to 263 PPM.
--- Added 8ml more of Sensi A
--- Added 8ml more of Sensi B
--- Now base nutes are at 16ml for 4.5 gal of water.
--- PPMs went up to 411.
--- Still lower than 500 PPMs, but that's okay.
--- PH was at 6. Not sure if I should adjust PH using AN nutes. So going to not ajdust unless PH goes above 6.1.
Day 03 - Wednesday - 08/12/20 - Total Days: 010
-----------------------------------
- [0830]: Looks like more root growth!
--- She still looks yellow. But leaves are perky.
--- PH was at 6.2 so lowered down to 5.8.
--- Solution strength was at 394 PPMs
--- Since roots are still growing, I decide to lower the water level a bit. Now water level is a bit below the net pot.
- [2200]: Root is getting longer!
--- Slime is returning. Not sure why.
--- Solution strength: 357 PPMs
--- PH: 6.1
--- Decided to add an enzyme along with more beneficial bacteria to hopefully cure the slime.
--- Added 16ml of Sensizym
--- Added 5ml of Hydroguard
--- Added 8ml of Voodoo Juice
--- New solution strength: 430 PPMs
--- New PH: 6.1
--- Top fed for a minute.
--- This slimy residue is really freaking me out! I hope the added enzymes will help eliminate the slime.
--- Going to do a full reservoir sterilization/nutrient change over the weekend. Please survive until then girl!
Day 04 - Thursday - 08/13/20 - Total Days: 011
-----------------------------------
- [0930]: I think the enzymes worked! There is little to no slime now!
--- Although I think the root was also dissolved in the process. It's now just a little stub sticking just below the net pot. The enzyme is also suppose to dissolved dead roots too but guess that root was too weak? Not sure what happened there. But I think the slime is cured!
--- Solution strength went down to 395 PPMs. Decided to add more base nutrients.
--- Added 8ml of Sensi A
--- Added 8ml of Sensi B
--- Added 4ml of B-52
--- Solution strength went up to 598 PPMs.
--- PH was at 6.1
--- As long as the PH is between 5.5 and 6.3, I'm not going to use PH Up or Down. But still will monitor PH levels.
- [1715]: Checked up on her after her nap and shes looking alive but stunted. But no slime!
--- Decided to add some sugars to help maintain the enzymes and beneficial bacteria.
--- Solution strength was at 587 PPMs.
--- PH was at 6.2
--- Added 8ml of Bud Candy
--- Solution strength went up to 671 PPMs.
--- PH also went up to 6.3
--- Lowered water level a bit to hopefully promote more root growth.
--- Top fed for a minute.
--- She is getting bigger, but still looks yellow.
Day 05 - Friday - 08/14/20 - Total Days: 012
-----------------------------------
- [0915]: Leaves look a little burnt on the tips. Still no slime.
--- Going to back off on the PPMs to hopefully fix the nutrient toxicity.
--- Solution strength was at 632 PPMs
--- PH was at 6.3
--- Added/Removed water until PPMs were at 536.
--- PH was still at 6.3
--- Raised water up a bit, then top fed for a minute.
- [2200]: Looking better. Still yellow though.
--- Solution strength: 514 PPMs
--- PH: 6.5
--- Added PH down.
--- New solution strength: 518 PPMs
--- New PH: 5.2
--- PH was kind of high. So decided to PH down. Had to use quite a bit to bring it down. But eventually got it to drop down to 5.3. A little low, but so far, the PH has always gone up so wanted to start it really low.
--- Ran the top feed for a minute to re-saturate the top of the hydroton.
Day 06 - Saturday - 08/15/20 - Total Days: 013
-----------------------------------
- [0830]: She looks stunted. leaves are still yellow.
--- Solution strength: 514 PPMs
--- PH: 5.6
--- Top fed for a minute.
--- Not sure what to do at this point. Going to do another reservoir change soon. Hoping she lives until then.
- [2145]: Looking pretty much the same.
--- A bit of slime has returned. Since I've been diluting the nutrient solution, the enzyme ratio has dropped. So I guess this is expected.
--- Also noticed that slime build up was on the air-stones. Never really checked the stones so not sure how long that has been there. Looks brown too, which can't be good.
--- Going to do an H202 sterilization of the system (minus the net pot) tomorrow so did not add anything.
--- Lowered the water level to below the net pot.
--- Then top fed for a minute.
Day 07 - Sunday - 08/16/20 - Total Days: 014
-----------------------------------
- [0900]: STERILIZATION DAY!
--- Decided to skip today's night cycle for a deep clean.
--- I'm hoping that skipping a night cycle won't be too stressful.
--- Temporarily moved her to a new bucket.
--- Used about a half of gallon of straight distilled water to flush out the net pot.
--- Drained the system and wiped up all the brown sludge. Also removed the air stones and cleaned up all the goo.
--- Filled the system with 2 gallons of distilled water and at least 30ml of food grade hydrogen peroxide (35% strength).
--- Yea its a lot, but since I'm not going to sterilize the system overnight, I went with a really high doseage. Basically I kept adding until I started to see little bubbles start to form.
--- Then I ran the water pump.
- [0915]: Boiled the air stones in tap water for about 10 min. Then reconnected them to the airlines.
--- I let the air stones and hose soak in the sterilization solution for about 5 minutes so the peroxide can absorb into the stones. Then ran the air stone to help mix and agitate the solution.
--- Occasionally, I'd repeat the process of turning the air pump off for a few minutes to let the stones soak.
- [1000]: Covered the top two row of holes of the net pot with some aluminum tape. Hopefully this solves the light leaking in through the hydroton.
- [1200]: Used an old toothbrush and scrubbed the pump clean. Then drained the system.
--- Refilled with more distilled water and peroxide. Again added a lot.
--- Ran system again to sterilize even more.
- [1530]: Drained the system and refilled with distilled water to rinse.
--- Ran the system for a few minutes, then drained and rinsed again.
--- Did this a few more times over about an hour.
- [1630]: Added 4 gallons of fresh distilled water.
--- Added 15ml Sensi Grow A
--- Added 15ml Sensi Grow B
--- Added 12ml of B-52
--- Added 16ml of Voodoo Juice
--- Added 16ml Sensizym
--- Solution strength was at 430 PPMs
--- PH was at 5.6
--- I was going to add Hydroguard, but I think the bottle is expired. Since 2017 or 2018!? I think Hydroguard is good for up to 2 years from the date on the bottle or 6 months after opening. So not going to use from now on. I wonder if this could have contributed to the slime build up.
--- Also removed the CaliMagic and Superthrive too. Going to only use AN products to eliminate the chance of incompatible nutrients.
--- Placed her back in the bucket and top fed for a minute.
--- Here's hoping for the best. Going to let it ride until morning! Please feel better!
[END OF WEEK 02]

Likes
11
Share


@Ninjabuds
Follow
Blackberry moonrocks both plants are still some of the best seedling in the tent so far. The better if the 2 is for sure the #1 plant in the tent. It has had the best start of a seedling i have seen in a wile. The leaves are angled like an airplane and they just seem thicker than the average leaf. They both seem like there going to have middium to longer indernode spacing.
It's looking like a good start to a week the plants are strong they are getting to the point I can let the dried dry out completely. I'm thinking by the end of this week the plants will be starting to be sold.
Last week I put all the plants into my bigger 2x4 tent with my medicgrow mini sun 2 the 500w version. Only a few of the plants were ready for that light. Seems like the only plants that really have good resistance and have a strong start are the weedseedsexpress.com seeds. Shout out to weedseedsexpress.com for the strong plants.
I ended up putting all the plants back into my 2x2 tent with the 55w amazon light it has alot more blue light in its spectrum. It's kinda weird b4 I switched the plants to the 2x4 tent they were getting 220umol under my amazon 55w led then when I put them under the 500w light 25% strength about 50in from plants and they were getting only about 195umol in that tent but it was stressing most the plants. I assume a larger light has more side lighting hitting the plants. I think when useing larger lights it's good to measure umols from the top but also coming from the sides. I think durring seedling stage they only need about 50% the umols coming from the side the plants as the top is receiving.
When I put the plants back in the small tent about the same umols as they were getting b4 the switch and they were still a little stressed. So for a few days I put the small light at the top the tent giving them 100umols for a few hrs then 130umols the rest the day.
