


Likes
Comments
Share


@TOMI08
Follow
45.nap
Hizlalásban vannak😀
Hesi bloom complex 50ml 10víz
B52 1ml 1liter víz
Hesi tnt 15ml 10 liter víz


Processing
Likes
25
Share


@Master_weeda
Follow
Bonjour à tous les padawans et les maîtres jedis
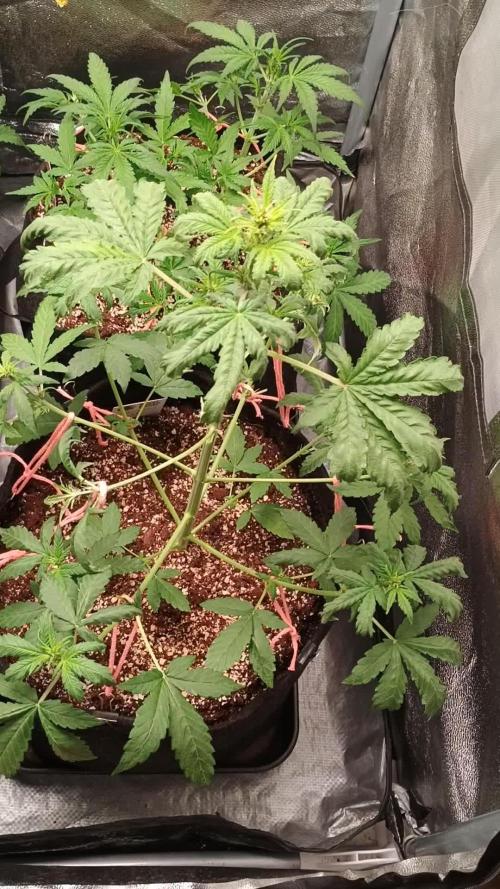
Pour cette semaine 4 au jour 23 ma plante fais 17 centimètres et son sixième noeud apparaît je décide donc de pratiquer un LST sur ma plante.
Pour ce j'utilise du fil de fer galvanisé que je plante directement dans le substrat en faisant attention de ne pas endommagé les racines car n'oublions pas que ce qui pousse dessus pousse aussi dessous.
Jour 17 je pulvérise du une solution composé d'une cuillère à café de savon noir mou dilué dans un litre d'eau en prévention d'éventuels nuisibles.
Je corrige mon LST suivant la pousse de ma plante ...
Pour ma par c'est la manière dont je procède mais petit rappel de la technique du LST:
Quand commencer à appliquer la technique LST
De nombreux cultivateurs commencent la manipulation dés que les plantes possèdent entre 3 et 6 nœuds ou une paire de feuilles. Durant cette première étape de la croissance, le tronc encore flexible est pliable sans risque qu’il ne se casse, même si au fur et à mesure du développement de la plante il sera de plus en plus difficile de le plier. Nous pouvons continuer à guider la croissance des branches durant toute la culture, même durant la floraison, ce qui pour cette étape représente un grand avantage face à la taille, qui n’est pas du tout recommandé une fois que la formation des têtes commence, cela stressera en effet la plante, ce qui aura pour effet de retarder la récolte.
Comment appliquer la technique de guidage LST
Si nous sommes prudents, la flexibilité naturelle des fibres du cannabis permet de plier leur tronc et branches avec une relative facilitée, même durant la floraison des plantes.
En utilisant une corde fine, nous pouvons accrocher la pointe de la plante à la base du pot par exemple ou à un tuteur que nous aurons planté dans le substrat. Nous plierons le tronc avec précaution et nous le fixerons avec la corde, à partir de là, nous pouvons augmenter progressivement la tension de la corde, chaque jour un peu plus, jusqu’à obtenir la position souhaitée. Soyez attentif à la réaction de la plante, essayez de ne pas appliquer trop de pression sur la corde et rappelez-vous que la flexibilité des branches peut varier d’une plante à l’autre.
Pour obtenir de meilleurs résultats, il suffit de suivre quelques règles simples. Pour commencer, nous devons choisir une corde fine mais pas trop pour ne pas blesser les troncs au fur et à mesure qu’ils grandissent et qu’ils deviennent plus gros.
Nous pouvons utiliser des crochets en plastique souple ou de n’importe quelle autre matière flexible pour éviter d’endommager les plantes. Spécialement en intérieur, utiliser des cordons en plastique de couleur (voir les diaries de @Silky) est très pratique pour voir facilement les accroches et faciliter le travail au milieu du réseau formés par les cordes, les tuteurs, les mailles ou les supports que nous aurons dans la culture. Bien entendu, en culture extérieure et surtout en guerilla nous ferons juste le contraire et nous utiliserons des matériaux de couleur qui n’attirent pas l’attention pour que notre jardin reste discret.
Pour stresser les plantes au minimum, la mieux est de réaliser ces manipulations le soir ou juste après que les lampes en intérieur s’éteignent, ce qui leur permettra de se remettre durant la nuit. Normalement, le jour suivant nous pourrons observer comme les pointes des branches que nous avons pliées se dressent de nouveau vers le haut à la recherche d’une source de lumière.
Je combine un pincage d'Apex au LST cela me permettra d'avoir une canopé plus homogène donc une meilleure pénétration lumineuse et par conséquent un meilleur rendement.
Que la force soit avec vous💪
Processing
Likes
38
Share


@Silverback_Guerilla
Follow
8/2:
Everybody is potted up in a 3 gallon pot now. I sprayed them all with Boom Boom Spray one day, and foliar fed with kelp and Superthive all week.
They got their first real feeding with TPS One and seemed to like it. I also gave them a little molasses.


Likes
48
Share


@AsNoriu
Follow
Day 57. Statement :
Even with hard beginning - thats my best run ! Zamnesia is AMAZING !!!
With veg hiccups, they still bushout to really nice plants in less than 7 weeks. Now Blue Dream is targeting my roof, Kalini Asias are thick as f@ck. Runtz very dense plants, thought they would be a bit bigger ...
They drink every 36 hours, hard to keep up with work, but i do my best not to screw up with them ;)
This week : feed, water, water. Defoliation too !!!
Day 59. That game - "who will reach sealings" - I don't like !!!!
Moved lights two days ago ... Soon i will need axe for my roof !!! ;)) That Monster Blue Dream is insane !!!
Hope will do heavy defoliation in two days, maybe this will shock her ;))) other plants keep up with her and canopy is even without all three Blue Dreams. Huge plants.
Day 60. Video is showing how less space is left, but they just keep climbing !!! ;))
Day 61. Thinking to defoliate all girls tonight, but maybe i will do it after next watering. Had to reposition them, loads of branches need to be chopped, some didn't see light for last two weeks( Curly, looks like sh$t, will never reach light). Girls are too big for my setup and i really hope it will be enough light and HEIGHT for them...
And so Defoliation has started !!! Hope everything will go fine !!!
All done !!
With the thought " WHAT HAVE I DONE !!!!??????!!!!!" i go to try to fall asleep ;)))
Happy Growing !!!

Likes
10
Share


@eldruida_lamota
Follow
Que pasa familia, vamos con la novena semana de floración de estas Lemonpaya feminizadas de fastbuds.
Vamos al lío, de las 3 plantas, me quede con 2 por espacio, siempre pongo alguna semilla de más por si no abriese alguna por no perder ese hueco del indoor.
También se trasplantaron a su maceta definitiva, en este caso de 7 litros que además provocó un shock que también solucione.
El ph se controla en 6.2 , la temperatura la tenemos entre 20/24 grados y la humedad ronda el 50%.
Las flores están bien prietas y sacan unos aromas cítricos bien llamativos, está acabando de madurar pero no veas como se han puesto.
Hasta aquí todo, Buenos humos 💨💨💨

Likes
44
Share


@Cogollo_eu
Follow
**Encontrarás la traducción a español al final de la descripción**
From/Desde: 05/04/19 || To/Hasta: 11/04/19
From day/Desde día: 43 || To day/Hasta día: 49
You can find the Money Maker Diary here:
** Podéis encontrar el diario de las Money Maker aquí:**
https://growdiaries.com/diaries/25667-gorillamakingmoney-gorilla-vs-money-m
-----IMAGES & VIDEOS-----
Video 1:
Complete week 7 in 2 minutes (Original frame rate modified), i used something composed by me playing with Logic Audio, please don't blame me 👉😳👊
Video 2:
Complete growing stage plus some flowering days in 2 minutes
Photo 3:
Additives used at day 5, all but Iguana
Video 13:
Overview video of the Gorillas and the Moneys
Photo 14:
Nutrients & additives used on day 9, again all but Iguana
-----WEEK SUMMARY-----
Finally I decided to Switch to 12/12 the first day of this week, and at the end of the week i will leave the SCROG mall fixed. As you can see it's not a tru SCROG as the man-lining plant is taller than the others and there's also height differences among it's colas. In the other hand i'm very happy on how the plants are distributing themselves after i removed the training structures. I removed those structures to prevent more stress to the plants, as they have recieved a hard training and i want to give them a breath and also grow as they like.
You can see how many vegetation they have, it almost cover the 85-90% of the tent, in the middle of flowering week 3 i will perform a massive defoliation.
This week i can see how the Gorilla with the main-lining is developing more defined and taller colas than the other plants, let's see how they evolve in some weeks.
Also this week i will apply the last foliar irrigation, just to help them a bit.
-----WATERING CALENDAR-----
05/04/19 - 1.250 ml with all week nutrients -(Foliars, Bloom Stimulator & Bloom Nutrition) @ 1.1 E.C. PH6.4
- Foliar application of 250 ml of water with (Foliar Nutrition & Plant Vitality+) among the 4 plants
09/04/19 - 1.250 ml with (Sensizym, Bloom Stimulator, Bloom Nutrition & bud Ignitor) @ 1.4 E.C PH6.4
*****ESPAÑOL*****
-----IMÁGENES Y VÍDEOS-----
Vídeo 1:
Semana 7 completa en 2 minutos (Frame rate original modificado), he usado algo que he compuesto jugando con el logic audio, disculpadme por esto 👉😳👊
Vídeo 2:
Fase de crecimiento completa y algunos días de floración en 2 minutos
Foto 3:
Aditivos usados el día 5 excepto Iguana
Vídeo 13:
Vídeo general de las Gorilas y las Moneys
Foto 14:
Nutrientes y Aditivos usados el día 9, de nuevo todos menos Iguana
-----SUMARIO SEMANAL-----
Finalmente he decidido cambiar a 12/12 el primer día de esta semana y al final de la semana dejaré fina la red de SCROG, como veréis no es realmente un SCROG pues la planta con Man-Lining tiene colas más largas que las demás y todas son un poco desiguales entre si. Por otro lado estoy muy contento en como se están distribuyendo las plantas después de haberles quitado las estructuras de entrenamiento, las he quitado para quitarlas stress ya que han tenido un entrenamiento duro y quiero dejarlas respirar e ir por si solas a partir de aquí.
También podéis observar como tienen mucha vegetación que casi cubre el 85-90% de la superficie del armario, a mitad de semana 3 de floración les haré una defoliación masiva dejándolas peladas.
Esta semana ya puedo observar cómo la Gorilla con man-lining está creando colas más definidas y largas que el resto de las plantas, veremos a ver en unas semanas como evolucionan.
Por último esta semana también aplicaré el último riego foliar para ayudarlas un poco con el cambio de estado y el stress recibido.
-----CALENDARIO DE RIEGO-----
05/04/19 - 1.250 ml con todos los nutrientes semanales excepto -(Foliars, Bloom Stimulator & Bloom Nutrition) @ 1.1 E.C. PH6.4
- Aplicación foliar de 250 ml de agua con (Foliar Nutrition & Plant Vitality+) para las 4 plantas
09/04/19 - 1.250 ml con (Sensizym, Bloom Stimulator, Bloom Nutrition & bud Ignitor) @ 1.4 E.C PH6.4

Processing
Likes
2
Share


@Kindbot
Follow
Kindbot has been taking care of this grow since these were tiny clones. This is the most recent grow by the device we are developing called Kindbot. Kindbot has fully documented and controlled this grow since they were small clones. Follow our journey here and on kindbot.io. We are also on instagram- @kindbot and twitter- @Kindbot_io :D. We look forward to sharing what Kindbot can do!

Processing
Likes
17
Share


@JustKeepGrowing
Follow
I placed the 2 seeds in a damp paper towel and placed it into a closed Tupperware. The tupperware was placed in my stereo cabinet (warmest place I could find) and less than a day taps roots were showing. I then placed them in my humidity dome and within 18hrs I had roots sprouting thru the bottom of the sponge. This has been the best start I have yet to have. I also built a new RDWC system with waterfalls to veg and flower these two in. I have photos and video above on the new tent setup. I have it running with just regular tap water until the seedlings are ready to go in. I have also installed a 90gpd RO system (APEC brand) under my kitchen sink. The water comes out 5.8ph and 7ppm. I will be using this RO water thru the entire grow with some Cal-mag of course. The system holds about 25 gallons total of water. The main res is 17 gallons and the two buckets are 5 gallons. I will no longer be using air stones. I have a recirculating pump in the main res, waterfalls in the buckets and of course the main pump running the whole system. Should be plenty of air for the roots. I used 2 in return pipes in the hopes of avoiding roots clogging the pipes. I scrogged last time but I'm not sure I will be going that route. I might just top and train. I will be doing a major defoliation on one and just simple trimming on the other. I am trying to find out if the risks of stressing the plant are worth the returns. Well wish me luck....and away we go.
Equipment used on this grow:
VIVOSUN 48"x48"x80" Mylar Hydroponic Grow Tent
AC Infinity CLOUDLINE T6, Quiet 6" Inline Duct Fan
Grower's Choice Horticulture Lighting with Full Spectrum 315W Ceramic Metal Halide
Kingbrite diy 240W lm301h qb288 v3 led grow light
PHILIPS 901573 Master Color CDM Lamp 315 Watt Elite MW, 4200K (Blue)
PELONIS PFT30T2ABB-V Portable 3-Speed 12-Inch Oscillating Table Air Circulation Fan,
Bluelab Guardian Monitor for pH, Temperature, and Conductivity Measures
Power Strip Surge Protector, Anker 12 Outlets & 3 USB Ports
hygger 1060GPH Quiet Submersible and External 24V Water Pump, with Controller
Marineland Maxi-Jet 600
Midea SmartCool 8,000 BTU Wi-Fi Window Air Conditioner (will be running a 4 inch tube into tent from a/c)
All hardware and buckets were bought from Lowes.
1in & 3/4 in for supply lines
2 in for returns


Likes
371
Share


@love_2_grow
Follow
D60.
I'm back again after being out of town for six days. The tent was packed when I opened it! The girls had stretched more, and a couple of leaves were even touching the lights and had gotten burnt.
They are now 125 cm tall. That's five times the height they were when I flipped to flower. Five times!!! I have never had a strain stretch this much, and I hope they are done now since there's no more room in the tent.
I removed the fan and carbon filer and placed them outside the tent. It looks a bit stupid and is far from stealthy, but what to do?
I moved up the lights as far as possible, but I will probably switch the lights with the one I have in my autotent. That light has a much lower profile, so raising it even further is possible.
Should that not be enough, I will have to cut off some tops, but I hope it doesn't come to that.
The first girl already has dark purple flowers, while the second looks more green with some purple.
------------------------------
D61.
I opened the tent today, only to find that the second girl had stretched another 2 cm overnight! This is getting ridiculous, and I hope they stop soon. I super-cropped the tallest top, hoping it would slow down the stretch. A few hours later, she had already recovered. These genetics are nuts!
In other news, my girlfriend found spider mites on her papaya plants that are in the same room as my tents. We immediately removed the plants from the room, and I started to scout my plants for an infestation.
The good news is that I didn't find any spider mites. However, the bad news is that I found thrips on the lower leaves of the second girl. Ugh!
I had thrips last grow season, and I guess some survived.
The thrips were only on the lower part of the plant, so I defoliated the girls by removing a bunch of leaves and tiny branches down low and immediately threw them out of the apartment.
Thrips don't like it humid, and since the buds are still tiny, I don't need to worry about botrytis yet, so I cranked up the humidity into the high 70s to low 80s.
Finally, I ordered a bunch of lacewing larvae that will get here next week.
They should eat the thrips and any spider mites that I might not have been able to find.
------------------------------
D63.
The girls have slowed their stretch, BUT they are still stretching somewhat. I freaked out when I opened the tent today and saw they were taller, so I attacked them immediately and super-cropped the highest tops. I will switch out the lights next week, gaining me another few centimeters, which I hope will be enough.
The VPD in the tent is way off, but I'm more interested in figuring out the light and getting rid of the thrips.
Finally, I watered each girl with 2.5 liters of water L pH 6.1, with 10 ml humic acid and 5 ml Fermented Fruit Juice I made a few months ago.
------------------------------
Likes
63
Share


@MrHightimes
Follow
Holy Chunkers!
I know I had been noticing some nice phat buds forming but DAMN!
I had to get in there and throw another pack of bamboo supports in b/c the nugs are soooo damn heavy!
It was much needed too and the canopy looks much better for it, there was some droopy shit up in there!
I see some spots that i should definilty defoliate a bit but i'm sorta just letting the girls ride it out!
Always shooting for about 12 weeks and for most of the plants i think that is about on schedule!

Likes
43
Share


@420DeepGrow
Follow
Gracias al equipo de Kannabia Seed y XpertNutrients, sin ellos esta magia no seria posible.
🍁💐 Runtz (Auto):
Si esta cepa se ha ganado su popularidad a pulso, esta versión autofloreciente es digna heredera de sus atributos. No es de extrañar que nuestros criadores hayan acertado con su programa de reproducción, al combinar dos de las cepas más fascinantes de la actualidad: Zkittlez y Gelato.
planta resistente y robusta, de cuerpo esbelto y fuerte ramificación lateral, que se puede cultivar prácticamente en cualquier entorno; pero prefiere los veranos largos y cálidos, tal y como quiere la madre naturaleza, donde bañada por el sol se eleva hasta los 120 cm. para producir unos rendimientos muy gratificantes de 100-150 gramos por planta.
En interior, y tras solo 70 días desde la semilla, también recompensará con cosechas abundantes de hasta 500 gr./m²
Inmediatamente después de encontrarte con ella, lo primero que notarás es su aroma descaradamente afrutado, con un toque tropical cortado con reminiscencias terrosas y amaderadas, que se entremezclan de forma agradable para ofrecer un combo que hace salivar las papilas gustativas.
Ofrece un sabor confitado, refrescante y similar a sumergirse en una piscina de frutas cítricas y flores de fragancia intensa. Al inhalar, obtienes la bondad de la dulzura; al exhalar, el humo se convierte en suave y cremoso, dejando suficiente profundidad en cada bocanada para satisfacer a aquellos que buscan los matices más complejos.
⛽ XpertNutrients: es una empresa especializada en la producción y comercialización de fertilizantes líquidos 🍶y sustratos🐛, que garantizan los mejores resultados y cosechas de la más alta calidad. A través de una cuidadosa selección de materias primas y un proceso de producción avanzado, sus productos son sinónimo de resultados confiables.
🛒 Consigue aqui tus fertilizantes:
https://xpertnutrients.com/es/sobre-nosotros/#:~:text=Xpert%20Nutrients%20es%20una%20empresa,de%20la%20m%C3%A1s%20alta%20calidad.
📆 Semana 5:
Un temporal ha ralentizado el crecimiento, aunque ella sigue creciendo algo mas lento.
No riego esta semana porque hay lluvias constantes que mantienen la humedad en el suelo.
Esta semana creo que apareceran las primeras preflores.

Likes
19
Share


Likes
26
Share

@Targona
Follow
22 days since my little girl sprouted from a seed🌱
Third week of growth for my Purplematic CBD Auto ⚕️💚💜
Nutrients:
Plagron Alga Bloom is an organic flower fertilizer for growing in soil. The fertilizer is based on algae and contains amino acids, proteins and a balanced ratio of phosphorus and potassium 🌺
----------------------------------------------------------------------------------------------------
Plagron Green Sensation is a flower booster. Green Sensation is a 4-in-1 product, so you don't need to add additional fertilizers. Suitable for all types of substrates and systems 💚💜💚
-------------------------------------------------------------------------------------------------------------------
Bud Candy is a carbohydrate supplement from Advanced Nutrients that maximizes the growth and aroma of flowers. It supports strong root activity by providing food for beneficial microorganisms
-------------------------------------------------------------------------------------------------------------------
BioBizz Calmag is a 100% organic, but also vegan-friendly fertilizer with BIO certification. Biobizz Calmag was designed for professional growers and home growers who need an extra dose of calcium and magnesium. It contains added humic acid 💩☘️- I only apply it once a week.
---------------------------------------------
Biobizz Bio pH-/ Biobizz Bio pH+ is a 100% natural and vegan-friendly pH regulator. Suitable for all types of substrates and crop types. For use in growth and flowering. 💩🍋🌱
-------------------------------------------------------
PRO-MIX CONNECT MYCORRHIZAL POWDER - in the substrate
General:
Purplematic CBD Auto ⚕️💚💜
The plant is already strongly transitioning to flowering, beautiful white pistils are forming on the tops 🌺 Above I listed the nutrients I switched to during this period. Anyway, I stick to organics, except for the bloom booster, which is about half organic.
This week - the third week - in most cases, she does LST and defoliation twice 🍃 🌿
The girl has very curled leaves down, they practically grow like that. I have no idea how it could have happened. She is not even overwatered, there are no problems with nitrogen and I measure the ph and ec regularly and she is fine. All the other girls in the tent look good, only this one is like that 😢💚💜. It looks like there will not be much of a harvest, probably unstable seed, that happens. But I am sorry because I use pure CBD to make tinctures.
I use the new PH and EC meter Aqua Master Tools P110 PRO, the measurement is fast and accurate. So far I have managed to keep the PH and EC as they should be. I use Biobizz Bio +/- to correct. These are excellent products.
I think that the plants are definitely very well affected by the spraying of the Vita-Race preparation and the excellent PRO-MIX Connect Mycorrhizal powder to support the roots. All the girls are very strong and stable since they were little 💚
Training:
As I mentioned above, I did the first LST and defoliation, the plants usually quickly re-leaf, other branches will grow quickly. So in this third week I do two defoliations and two LSTs 🍃🌿 🌺
But I didn't cut this plant much, it doesn't have many leaves and I need it to go well for photo shoots
The girls grow in a tent:
Mammoth Pro+ 80, with reinforced reflective Mylar 600D foil
Lighting:
Mars Hydro TS1000, this light is sufficient for lighting in my growing space. The plants respond effectively and the light is technically very well managed - I try to have 50cm between the light and the plants, so I regularly move it up.
Mars Hydro TS1000 Quantum Board 💡💡💡
Power: 148W
Dimensions: 90 x 90 cm
Dimensions: 360 x 330 x 34 mm
Chip brand: Epistar
Thanks for the likes
See you soon 😍😻
Likes
223
Share


@Tropicannibis_Todd
Follow
Well growmies this one is a keeper that's for sure 👈 couldn't of asked for better Genetics 😉
She kept chunking up week after week , I had a feeling she was gonna be a chunky monster but Holy hell 😳 😍 😅
Amazing Plant
👉 Big thanks to all my Growmies out there in GD land 👈 Much appreciated 🙏
Thanks To MarsHydro for the TS1000
👉I used NutriNPK for nutrients for my grows and welcome anyone to give them a try .👈
👉 www.nutrinpk.com 👈
NutriNPK Cal MAG 14-0-14
NutriNPK Grow 28-14-14
NutriNPK Bloom 8-20-30
NutriNPK Bloom Booster 0-52-34
Likes
101
Share


@FrontRowAG_BrianG
Follow
I apologize upfront for all the photos. It was hard to pick which ones to upload, so I picked a good variety.
There is gonna be between 4-6 pounds once dried/cured. These were all super dense and very little larf.
This was a higher temp/higher humidity run with lots of co2 and they blew up big. It’s been a minute since I’ve grown a cola or 2 that were bigger than my arm…this time there was dozens of them.
Each plant was only topped one time. The temps were usually mid 80’s and humidity in the mid 60’s during flower. This might seem high to some, but learning to apply VPD to a grow should not be trial and error, in other words, this was intentional. It’s not risky either. During the first 6 to 7 weeks of flower it is very important to not let your night time temps to go below 75 degrees. POWDERY MILDEW=LOW TEMPS AND HIGH HUMIDITY. Take one of these away and there will not be any powdery mildew! Do not let your temps go below 75! The last 2 weeks I dropped the humidity to 40% and my night temps to mid 60’s for resin production.
A couple of thing one should have to create large buds is a temperature gun(for leaf temp), a par meter and co2. Keep the stomata open and feed lots of co2=huge buds. Learn about VPD and not just a quick google search!
When it’s dry and cured I’ll be back for an update on weight, taste and effects. Currently the plants are drying in the room at 60 degrees and 60% humidity until I can get in there to trim them. Might be 2-3 weeks.
Thanks again for all the likes and comments!


Likes
1
Share


@SessionMeister
Follow
I put the clones into bigger Pots once their roots were fully established. Immediately started LST and put in the clones at an angle so that light is distributed more evenly. Autos also growing well but Panty Punch is lacking because of crippled leaves. I still let her live to see how she develops. I plan to bend the clones in a circular shape so they grow into an even canopy.


