


Likes
16
Share


@GRow_M8s
Follow
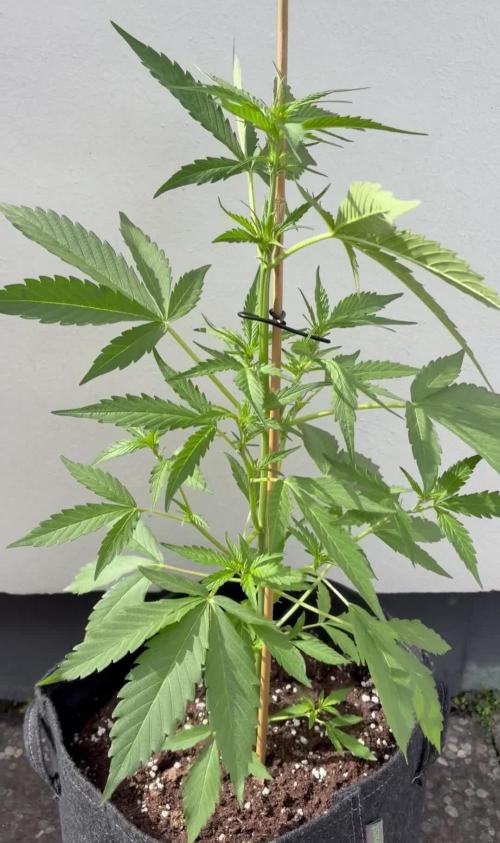
* MephHeads for 1st time, really excited about that.😁
* we're gonna try the LST technique.
~ Grow tent : 1m×1m×2m.
~ Soil : allmix biobizz 65% + Bioterra plus 25% + perite extra 10%.
~ Seedling soil : Bioterra plus
~ 6 plants { 3 Sstomper, 2 GWK n 1 SODK (5 days later) }.
* Only tap water, co2 tablets, microorganisms and snake poison(foliar spray) until week 4.
* No chemicals ✋🛑 only tap water.
● One stomper has issues and its already stressed ( we had to put more soil over it ).

Likes
27
Share


@R_Dank
Follow
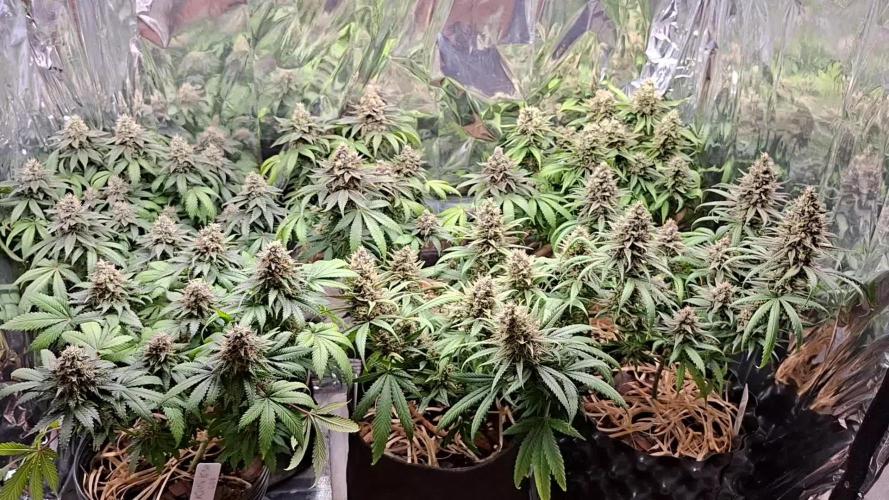
Before and after the defoil!!
Slow flush with water only, cleaning them veg nutrients away!
Net down to manage the stretch in next 3 weeks 🤞 first time using this tech, I usually just topt like a radical!!

Likes
7
Share


@RivenWaters
Follow
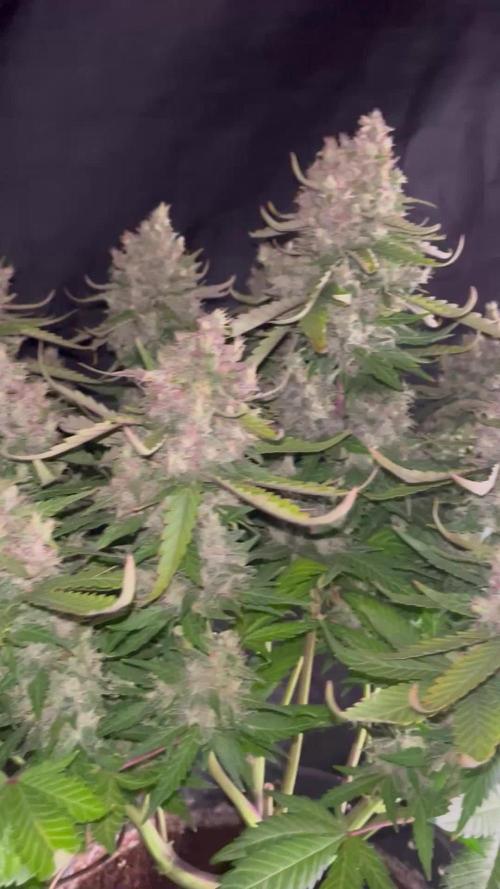
Getting close to harvest, maybe one or two weeks more. I had some powdery mildew starting on one plant so I cut those out, drying them now.

Likes
4
Share


@theVotanaGarden
Follow
The plant on the left is starting to get lockout from issues with the autopot valve in that setup. It stays attached and working fine for about a month, and then eventually stops working and I open my tent to see water flooding the autopot. The flooding stays contained in the system thankfully, but destroyed my rootzone pH. The plant on the right is doing fine besides the heat.
Likes
Comments
Share

@RooftopFarmer
Follow
Banana Guava – Week 6 (Fast Buds Outdoor 2026)
Another week with good weather. Banana Guava is receiving plenty of sunlight and regular feeding.
She has grown significantly in height and is now around 35 cm tall. The plant remains healthy with strong foliage.
Clear vertical growth this week.


Likes
6
Share


@Nothingbutcolas
Follow
Great first week getting everything dialed in. First time growing for me, spent a lot of time thinking about it and have an advanced background in Agronomy, but haven't applied it before now, all new :)
Have an Infinity S6 fan with the 067 controller, pretty awesome, wish it was wifi and not just Bluetooth. Have a Govee wifi temp/hum sensor which helps keep track while away. Heating pad and dome have been invaluable.
The SE7000 is working perfectly, doesn't put out that much heat at all, especially with the detachable driver and 8ft cable. Pretty sweet.

Processing
Likes
Comments
Share


@Isle_of_dank
Follow
Flicked to flower 21th June under two 600watts LEDs in bloom humidity 47to53 temperature 20c to 25c will update with pictures on 26th June

Likes
22
Share


@knnabisgrower
Follow
En el transcurso de la 7ma semana hicimos una defoliación general, trasplantes a 16 lts cargando el sustrato con nutrientes de asimilación lenta, enfocados en la etapa de flora, sacamos 2 clones de la parte baja a cada planta y ajustamos el p.H a 6.2. Dejaremos un par de días que se adapten al nuevo espacio y mandamos a florar.

Likes
36
Share


@nonick123
Follow
Día 37 (08/07) Ajustes de LST en todas las plantas! 🚀
Día 38 (09/07) Ajustes de LST en todas las plantas. Las ramas inferiores están creciendo como un cohete! 🚀😍
Riego con 250 ml H2O pH 6,5
Día 39 (10/07) Las plantas se muestran sedientas! Creo que el cepellón está lleno de raíces y piden el trasplante!
El crecimiento no se ha visto afectado de momento
Riego con 500 ml H20 pH 6,5
Día 40 (11/07) Paso a regar con 500 ml / día, ya que hace mucho calor (30 ºC) y efectivamente las plantas ya han copado la maceta de raíces
Las ramas de nodo inferior se han quedado enanas tras el entrenamiento, de modo que las elimino y aplico canela en polvo en los cortes
Riego con 500 ml H20 pH 6,5
Día 41 (12/07) Riego con 500 ml H20 pH 6,5
Clones! Mi experimento vuelve a demostrar que NO necesitas complejos productos de clonación ni sistemas para obtener clones!
Hace 15 días puse 2 clones con el tallo sumergido en miel durante 5 minutos en una maceta de 400 ml con PRO-MIX HP BACILLUS + MYCORRHIZAE
He mantenido la humedad alta con una cúpula de humedad casera hecha con una botella de agua PET de 5 litros cortada por la mitad y pulverizando a diario.
Han estado los 15 días en mi terraza con luz indirecta, y temperaturas que rondan los 30 - 32ºC durante las horas centrales del día
Hoy los he trasplantado a una maceta de 1 litro porque ya habían formado raíces y empezaban a formar nuevas hojas!
🐥🐥🚀🐥🐥
Día 42 (13/07) Riego con 500 ml H20 pH 6,5
Día 43 (14/07) Trasplante a maceta definitiva de 21 litros de ROOTPLUS Pot de GSKOREA GLOBAL!
Estas macetas son una maravilla!
Proceso de trasplante:
Se prepara con 17,85 Litros (85%) de sustrato PRO-MIX HP BACILLUS+MYCORRHIZAE + 1,05 Litros de Humus de Lombriz (5%) + 2,01 Litros de Insect Frass (10%) + 210 gramos de Earth Vibes Super Soil (10 g/L substrato)
Se llena la maceta de sustrato con las manos (limpias) y rompiendo los trozos más gruesos, para que el sustrato esté aireado y esponjoso, sin presionar
Se coloca una maceta vacía de 6,5L para que quede la forma perfecta de la maceta donde están actualmente
Se espolvorea la parte proporcional de la probeta de microorganismos sobre el agujero de trasplante
Se saca la planta de su maceta actual (bonitas raíces 😍) y se coloca en la maceta final
Se riega muy lentamente hasta percolación profunda con H2O EC 0,5 pH 6,5
Una vez asentada, complemento con un riego de 500 ml con 25 ml/L de Humus de Lombriz Liquido
Se coloca mulch (acolchado) de paja para evitar traspiración excesiva y cuidar a los microorganismos del suelo
A ver como reacciona al trasplante!
Aplicación foliar Kelp hidrolizado de Lurpe Solutions a 0.25 ml/l
Realizo ajustes de LST aprovechando el trasplante a la nueva maceta. De momento tienen una canopia muy bien formada!
💦Nutrients by Lurpe Solutions - www.lurpenaturalsolutions.com
🌱Substrate PRO-MIX HP BACILLUS + MYCORRHIZAE - www.pthorticulture.com/en/products/pro-mix-hp-biostimulant-plus-mycorrhizae

Likes
38
Share


@Cariboo_OG
Follow
Utopia Haze is a rare heavily sativa dominant hybrid (90% sativa/10% indica) strain created through back crossing Brazilian Sativa strains. This tasty little bud took home 1st Place for Best Sativa in the 2008 High Times’ Cannabis Cup and for good reason – with its potent 18-22% average THC level and long lasting cerebral effects, Utopia Haze is one powerhouse smoke. The Utopia Haze high comes on soon after you finish your first toke, hitting you with a strong cerebral lift that infuses you with a sense of hazy relaxation.
Type: Feminised/Photoperiod
Cultivation: Indoor/Outdoor
Flowering Time (days): 70-75
Indoor Yield (g): Up to 650
Feminised Outdoor Harvest Month: October
Feminised Outdoor Harvest Month Week: 3rd-4th week
Aroma: Citrus, Woody, Pungent, Mint
Effect: Cerebral Lift, Hazy Relaxation, Sleepy
Week 18
Week 4 of 12/12 Lighting
Welcome Back to This Weeks Episode of Cariboo's Utopia Grow !
1.) Overall another smooth week for this plant, those crispy edges from last week have settled down a bit..by that I mean they haven't gotten any worse lol (I believe we've fixed the issue, PH)
2.) The most notable thing for me this week is the frost ! it has arrived in full force ! the aroma in this tent has certainly gotten more notable as well !
3.) She is drinking about 0.5 of a Liter every day..soil plant experts.. is that on "par" for this size of plant ?
4.) Her Nutrients increased this week !
Cautiously Cruising through the epidemic.. I know that is not the case for everyone so I am Thankful.
🙏Take Care Out There !🙏
& As Always
Thanks for checking in, if you have a question or a comment leave it down below
Happy Growing everyone
Cariboo_OG


Likes
3
Share


@Bread_n_Buds
Follow
Our Zamnesia Super Boof is a brand new strain, Zamnesia brought it out before anyone else in Europe and now it's the others who are chasing it. I'll show you that the Zamensia one is the best of all, of course also the American ones.
Remember that we are growing a plant worked with the techniques indicated and another left to grow without pruning to preserve its speed; in the previous/next diary you will find the other plant of the same variety.
In this diary you will find the planta left to grow straight, just a little LST at the bottom on these plants but then I often decided to cut away the lower branches. In fact if you leave the plant free to grow you will notice that the branches that do not get light are not very good so it is necessary to clean very well at the bottom and let only the parts of the plant that see a sufficient amount of light flower well that you must learn to evaluate.
Comparison is the salt of experience, so the plant in the other diary will be treated very differently, go and see it to compare.
We have started the Plagron fertilization program, we are in 100% organic configuration, the soil is recycled Promix + 1/3 fresh soil + 10% Perlite + RQS Mycorrhizae Mix (4 g in the mix, 1 g under the small fiber pot).
We start bloom time now fertilize with: 1 ml/l Power Roots - 1 ml/l Pure Zym - 1 ml/l Sugar Royal - 1 ml/l Power Buds - 4 ml/l Alga Bloom
We sprayed 3 ml/l Vita Race foliar fertilizer once a week.
https://plagron.com/it
We always have the excellent mycorrhizae from RQS flowing in the soil.
https://www.zamnesia.io/it/5778-mix-micorrize-easy-roots.html
Leafy's strain of the year ---- // https://www.zamnesia.io/en/13317-zamnesia-seeds-super-boof.html
Zamnesia Short Description // Here's your chance to grow one of the most sought-after strains of recent years: Super Boof, crowned Leafly's strain of the year 2024, and for good reason. Descended from Black Cherry Punch and Tropicana Cookies, this indica-dominant hybrid (70%) takes the already exceptional characteristics of its predecessors to new heights. Grow it at home to find out for yourself.
The whole world of growing and much more is at Zamnesia: just take a look at the site and you will find "all the best that nature has to offer" in various shapes and colors.
The new strains are fantastic and the old ones are no exception...
-- // www.zamnesia.com

Likes
168
Share


@BudBoutique
Follow
Welcome to Bud Boutique Grow Diary - really appreciate all your love and support :)
Dont forget to check out my other current grows!
🗓️ This Week:
- LETS CHOP IT ✂️✂️✂️
- beautiful big bud structure - smelling amazing
- last trichome check again after 48hrs Darkness - looking perfect!!
- Now lets dry inside the tent for 12-14 Days - Trimjail soon
Thank you for still staying with me 💚
___________________________________________
--- 🌱 Strain ---
🏷️ OG KUSH by Barney's Farm
https://www.barneysfarm.com/og-kush-646
---💡 Lighting ---
💡LUMATEK ZEUS PRO 600
https://lumatek-lighting.com/zeus-600w-pro-29/
--- 🥗 Nutrients and Feeding
* 🍸 PLAGRON Algae Baseline grow/bloom + Additives: Power Roots, Sugar Royal, Pure Enzym, Silic Rock, Power Buds, Green Sensation
* 📅💪 baseline grow/bloow: 4ml/l & additives: 1ml/l each
https://plagron.com/de/hobby/produkte
--- 🏭 Grow Setup ---
* 🏠🌿 Indoor: Homebox 120x120x200cm (4x4)
* 📐🌀 PrimaKlima exhausting Fan 1180m3/h (running on 60-80%) & Can Light Filter 800m3/h & 1x Fanbox 1x Dyson fan for Air circulation
https://primaklima.com/de/shop/ventilatoren-de/ec-ventilatoren/pk160ec-tc/
https://canfilters.com/products/filters/
All Likes and comments are highly appreciated!!!
don't forget to check out my Instagram: budboutiquee <3
- Bud Boutique
Likes
13
Share


@LocoMarco
Follow
The clone is in 1L pot and the godfather og in 3L pot
Just experiment in small aquarium 🤭
Also its first indoor grow for me.
Any helps/ good tips?

Likes
30
Share


@WeWantItToGrow
Follow
This week has been such a gift! I have learned so much about proper care for a plant I had no idea how little I knew sitting down and observing these majestic trees produce such a potent flower has really humbled me. Premium cultivars strain has shown resilient and self sustaining easy to grow traits that it is hard to mess up. (Which I’ve done a few times lol) Notice the trichomes (I put the zoom lens on and got up in there so they could be better seen the bud itself is slathered in them ! This is going to be an amazing smoke! Also looking at the structure of the bud it’s self it has volume very full bodied bracts with pistils throughout It’s just an all-around beautiful thing to observe

Likes
11
Share


@thevaporino
Follow
Entramos en la 9 semana y seguimos con heladas en el exterior , las mínimas con luces apagadas son de 15º y las máximas con luces encendidas


Likes
4
Share


@GreenForMiles
Follow
This strain was a mystery from the beginning. I planted 6 plants and got 4 drastically different phenos. Surprisingly they all have similar aromas but visually they’re much different. She stretched a lot and needed two layers of the sCrog net. One plant had 2 random seeds so I’ll probably be planting her again. Next time I’ll use a low stress method to see her at her full potential!

Likes
3
Share


@MrPipi
Follow
Mr. Pipi defoliated a bit after the topdress last week. just some old leafs here and there, not much. And Frost is building up, terps are coming. Mr.Pipi is happy :)
AND the colors BOI oh BOI. thats what Mr.Pipi dreamt of.
Day 46: Heights : Frank 47cm , Pedro 44cm and Lance 34cm.

