Check the winners The Grow Awards 2026 🏆
Likes
Comments
Share
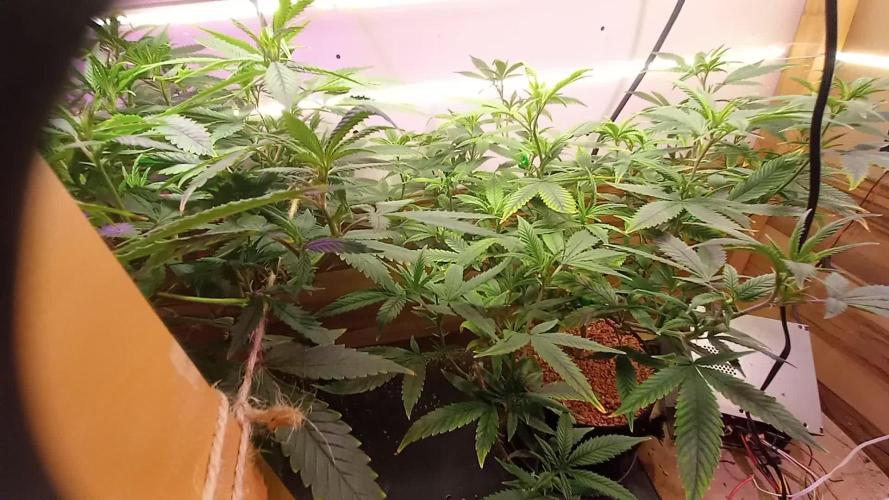
Man it’s so hot these girls are drinking up so much water!!! Watering everyday. Might be Sweet skunks last nutrient dose, gonna start flush for harvest after today. Plants are starting to fatten up nicely, hopefully we keep this same progress!
Likes
28
Share
@tislam95
Follow
As I was planning to harvest this week, I started flushing Mishka with PH 7.5 water and no nutrients as per guidelines.
Likes
27
Share
4/1/2023 Week 7- Day 1 of Veg (Day 59 overall) Water Change Day!!! Water was really low it was just above the hump in the Res cutting it close to not having enough water in the system to keep it going. They drank a lot making it close going the full 14 days. I am still going with the previous grows and adding 36 Gallons but even looking at the root I think the SILICA is working and the roots are further along at this point than in previous grows. This next two weeks will watch how much they drink and how low my Res starts getting, and will make a decision on changing the water weekly from here on out or still keep on the plan of every other week until Week 4 of Flower. Added 36 Gallons Mammoth SILICA= .5Mil/Gal = 18Mil CALMAG= .5Mil/Gal = 18Mil Root Drip= 1Mil/Gal = 36Mil FloraMicro = 5.4Mil/Gal = 194Mil FloraGrow = 4.2Mil/Gal = 151Mil FloraBloom = 4.6Mil/Gal = 166Mil ORCA = .5Mil/Gal =18Mil PPM= 536 PH=5.84 PPFD=500 Tent Temp= 76.5 Water Temp= 71.4 Humidity= 58% 4/2/2023 Week 7- Day 2 of Veg (Day 60 overall) Not much today, PH was at 5.81, I brought that back up to 5.90. I took care of some badly needed defoliation in each of the back sides .. I was able to see some really good clone material to use on the lower backside of each of the plants. I will be taking two clones from each to breed over the next few weeks depending on when I am going to flip them. 4/3/2023 Week 7- Day 3 of Veg (Day 61 overall) A little FIMing, A little Topping, and a Little bit of defoliation. Might have to take my clones during the week this week, I am trying to wait until Saturday to hit week 8 but again they are getting all over the place and I need to trim some of the sides and lower areas. 4/4/2023 Week 7- Day 4 of Veg (Day 62 overall) I decided to take my clones and clean up the lower half of the plants. I took 2 clones from each plant to go into the cloning machine. 4/5/2023 Week 7- Day 5 of Veg (Day 63 overall) Water Temp is sitting at 73. Right in my ideal range for my setup. Ideal range 70-74 My Temp Tent is my ideal zone75.6 Ideal for this grow 70-78 The lights are still waiting the switch to flower to get maxed out... The Humidity is coming in right at 60% I love it.. I took so much off yesterday I figure it was a good day to let them rest. 4/6/2023 Week 7- Day 6 of Veg (Day 64 overall) I needed to Defoliate some and I topped a little. The plants might force me to flip them soon. Next Wed is the 10 week mark half way through the 20 weeks. The net is Bingo... Which means that If/when the plants hit the net I will have to flip them. The Net is set to the max height that I can let them get based on the Breeders Stretch report 75%. 4/7/2023 Week 7- Day 7 of Veg (Day 65 overall) #3 is 22 inches Tall, #2 is 19 Inches Tall. Net is set at 24 inches. Net is also set as my Bingo point, if they hit the net then I have to flip no matter what to account for the Breeders recommended 75% Stretch allowance. I think I am going to have to flip right at the 10 week mark of the Competition which is Wed 12 Apr. I topped a little, I de-foliated a lot to start getting it ready for the anticipated Flip.
Likes
37
Share
@Borberad
Follow
Im Laufe der Blüte hatten wir bei Nr.1 schon die kleineren Buds von unten entfernt (ungefähr 3/5 der Pflanze), damit die letzte Kraft hier auch wirklich nur in die Mainbuds geht. Bei Pheno Nr.2 welcher noch ein paar Tage stehen bleiben durfte haben wir es nicht gemacht um einen Vergleich zu haben, wie es sich auf die Mainbuds auswirkt. Jedoch wird der Vergleich etwas hinken, da Pheno1 Foxtails gebildet hat und somit eine komplett andere Blütenstruktur aufweist als Pheno 2. Tag 73 und die erste der beiden Blumen wurde geköpft. Ein paar Tage hätte man sie aber noch stehen lassen können. Unser Wunschziel welches bei 5-10 % Bernsteinfarben liegt werden wir aber erreichen, da die Trichome noch etwas nachreifen. Im Laufe der Blüte hatten wir bei ihr schon die kleineren Buds von unten entfernt, damit die letzte Kraft hier auch wirklich nur in die Mainbuds geht. Das Ergebnis kann sich sehen lassen. Tag 75 Erntetag von Blume Nr2. Farben und Geruch von diesem Pheno gefallen uns extrem gut. Wir nehmen außerdem diesem Run jedenfalls mit, dass kräftiges lollipoppen zu ordentlichen Mainbuds führt. Da wir Pheno Nr 2 aufgrund von Platzmangel im Canatrol, an der Luft aufhängen müssen bleibt abzuwarten in wie weit der Ertrag sich hier unterscheidet, da wir ganze Äste und nicht nur "Mainbuds" geernetet und gewogen haben.
Likes
265
Share
Grow Report Week 15: The Calm Before the Harvest Hello dear grow friends, I hope you'll forgive the brevity of this update, as I am very busy this week and don't have a day off. I'm looking forward to Sunday when I will finally have more time for my ladies. **Trolmaster Contest** Firstly, I would like to express my sincere gratitude for the incredible support provided by TrolMaster, whose contest concludes tomorrow. Without their assistance, this endeavor could have taken a very different course. I am not only thankful but also thrilled by this amazing product, which I highly recommend to all of you. There’s no need to worry about high temperatures anymore, and the ability to check your values on the go is truly invaluable. The Tent X Controller may come at a price, but it is an investment you will never regret. It offers the possibility of endless expansion with additional sensors. A heartfelt thank you once again to the support team and the representatives on Instagram. With love ❤️ **Development and Harvest Time** Everything is going according to plan, and the ladies are developing well. I estimate that they will have a harvest time of about **3-4 weeks**. Overall, I am satisfied with the progress. **Time-Lapse and Conclusion** The next few weeks will probably show hardly any noticeable changes, so the time-lapse will be finished next week. It was a great grow with many ups and downs. **Looking Forward to the Harvest** I'm looking forward to testing the ladies soon and am excited about the results. I will, of course, keep you updated. See you soon and thank you for sharing this journey with me! Your budz_bunny
Processing
Likes
13
Share
@GrowGuy97
Follow
Everything is going great, just waiting on flower tent to finish & these ladies will be going straight into flower😍✌️🏼🌱 Day 40 first day of flower, everything seems to be going ok so far! Day 41 Can see they are starting to stretch!😍
Likes
28
Share
@cyberkyd
Follow
Okay So still only 2 Plants are truly in veg. OG Kush Seedsman #1 Gelato Auto Fastbuds. The Run OFF came at 6.3-6.4 during week 6 So I'm still feeding at 5.5. Feeding every 2-3rd Day only with the Nutrients. Feeding Nutrients only with every feed because plants were stunted already. And I already flushed them in the midway because of crazy ph and TDS, And since using only Cal-mag ph water is like 4-5 days of wait for the nutrients feed and this is flowering time plants like as much feed as possible. Maybe I'm wrong. But I'll flush again if needed but I don't think I'll be needing that anymore. So.
Likes
21
Share
It's been another easy week in the Fastbuds tent. I've spent most my energy preparing my outdoor grow space for a wild summer. At this point, there's not much I can do except water and watch my plants grow. I've added videos of other plants in relations to the mimosa cake just for visual aid. I also added a photo of my cheese auto.. it's still drying! With the Mimosa cake auto I've been taking fan leaves off slowly for weeks now. This is a very busy plant. She is also going to run later than I expected. She's on day 76 and I suspect 95 to 100 days to finish time. I'll have to keel feeding her bloom nutes for the next few weeks; her 3 gallon bucket ran out of nutrients already. Feeding schedule: water, feed, water, feed Step 1- I'll take an aeration stone and use it to remove the chlorine residual in the water... this only takes 8 - 12 hours depending on water temperature. (I'm a water treatment process operator, I have checked several times in the past with my own Cl2 meters). Step 2 - add Calmag Step 3- add bloom nutes Final step - pH the water accordingly (very important that this is final step) A TDS residual of 500 ppm equals roughly 1 E.C. (I just double it)
Likes
3
Share
Still haven't trans set 1....gonna jus wait till I get to move them out the green house so it will be new home new atmosphere....set 2 amma jus top dem up for a week or 2(only using half the pot with soil) other than that everything else seem to be on point(2 that were struggling condemned one and put the other with the new set coming up... Trans new cutting to some small pots all (30) lived...they are coming along well Mother tree doing her thing putting on some fat iced out nugs scent is hitting n she is mad sticky jus dense up time now and wait for dem trichomes to reach
Likes
26
Share
@DrRobeRt
Follow
Another great week, They are both enjoying the new nute schedule. Keeping the light 18" from the canopy is proving tricky as they grow. Its approx 16" and Im gonna try to tame the crazy branch at the back of Nancy. But im feeling good about them so far.Im wondering how long the flower will take ;-)
Processing
Likes
13
Share
Today's the beginning of week 2 veg, Plants are under 600w MH lights now. Roots are growing and spreading out nicely as you can see them popping out the bottom of the pots. By the end of this week when all plants have roots popping out of the bottom they will be transplanted into 20ltr fabric pots. Feeding upped to 400ml per 3 days on average.
Likes
20
Share
Here we are again ready to start again, always under the sign of Zamnesia, we make our fantastic plants and we show you what we are capable of. We have 5 autoflowering strains and 5 photoperiodic ones and now we present them to you. The fourth autoflowering that we present to you is our version or rather of Zamnesia forgive me if I start to feel at home, it is the Northern Lights. Here we are talking about a classic of classics naturally in the Zamnesia version as I said above with the right ruderalis it really promises big harvests in a short time. There is great competition on this plant and I have grown some very good ones let's see what the home one is like. To explain my germination method which is a combination of experiences acquired in the field and readings of the right advisors, I have chosen to divide it into phases so whoever wants can follow them and understand better step by step. - Preparatory Phase ---- Check the average temperature in the room, humidity status to understand if it is the case to start or wait, I decided for the end of August because the temperatures start to drop towards the 22-25 degrees recommended for germination. Then another thing more or less credible depending on the sensitivity is the control of the lunar phases. I believe in it a lot, it is a method that ancient farmers used to understand when it was best to plant depending on the attraction of the moon. To make my life easier I use a simple app that advises you on the right time to plant, harvest and put in the jar (depending on the lunar phases). - Phase 1 --- Soaking in water. There are many authoritative friends who advise against this method due to the risk of drowning, but I have always been fine and I follow the rule if it opens in water the seed is almost certainly healthy and will come out of the ground 90% normally. - Phase 2 --- Opening the seed in water. As soon as the seed opens and the root comes out a little, you have to be very very careful not to leave the seed in the water open for too long. This is why there is a risk of drowning. So as soon as the root comes out, it must be planted. Do not wait for it to stretch out a lot, you can wait a little longer in the absorbent paper, but not in water. - Phase 3 --- In the meantime, while I soaked the seeds, I prepared my pots: I use small biodegradable pots (choose the ones with holes underneath for drainage). A few hours before working with the opened seeds, I moistened the soil with water adjusted to the right pH (5.8 - 6.2) and Plagron Power Roots. The small root is now open and we can make a little hole with a toothpick, widen it and insert the seed. Not too deep with the root facing downwards. From Serious Seeds we learned the dome technique: if you put a small dome of soil on the seed the water will settle on the sides avoiding overwatering problems. - Phase 4 --- The plant emerges from the soil. So far I have not put the light, now I turn it on at minimum after half a day of soil to give direction to the seedlings. The first week the light will be gradually brought from 40% to 60% to go to 70% - 75% in the remaining weeks of veg. During the first week maximum, I keep the cycle of 24 hours to avoid stretching. Be careful not to exceed the first week at least with photoperiodic plants. - Germination % --- In water 20/20 seeds have opened for good luck I'm waiting to talk when they come out of the ground but it seems that we are going towards an excellent percentage of germination..."Not too bad"... - Soil and Food --- The soil used is entirely organic in its entirety and is the Plagron Promix that will be used with the 100% organic pack provided by Zamnesia complete with all the main fertilizers for your plant buy it at the link -- https://www.zamnesia.io/it/11457-plagron-easy-pack-natural.html // Strain Description // Born from the rib of a classic, Northern Lights Automatic is a weed from the past, but with a futuristic update. This feminized version sees Northern Lights hybridized with a ruderalis to create an extra sweet variety, that all fans are sure to love. Growers can expect abundant results in just 9 weeks, from seed to harvest! - - Get a seed of this fantastic strain --- https://www.zamnesia.io/it/3324-zamnesia-seeds-northern-lights-automatica-femminizzata.html - Soil and Fertilizers entirely organic --- https://plagron.com/en - Growbox --- https://www.secretjardin.com/ - Music and sound --- I made my girls listen to 432hz frequencies and music from www.radionula.com - Z --- You can find these seeds, much more from the world of cannabis, mushrooms and an incredible series of accessories and gadgets on the reference site not only mine but of many growers ---- https://www.zamnesia.io
Likes
62
Share
So this is how things are looking for both the Cheese at the end of Week 7 of Flower, I have uploaded a video for you guys with all the information. Any questions just ask away 👊🏾🌱💚
Likes
24
Share
I found out that my ph was off too, so the plants look ok if we take all my f ups in count.
Likes
16
Share
@Dunk_Junk
Follow
Only 1cm vertical growth this week, but she's been pushing out some leaves! She seems happy so far.
Likes
18
Share
June 7 - We ordered some new lights last week, they are 240w kingbrite samsung lm310h with uv/ir, 3000k, and meanwell drivers. We setup the new room and moved the girls into there. After a bit of LST and a watering (with nutrients) at roughly 7ph, they were ready to go under the 2 new lights and the same SF-1000 we have been using in this grow. The new room is a 12 ft enclosed trailer. I moved everything from the small tent into this. I put clear poly on the walls, floor and ceiling. I put poly on the shelf I am going to be keeping in there as well. I bought 50ft of 6mm mylar and lined the floors, roof and sides with it. I plan to get some reflective tape to seal everything and to cover the wood. I did not get much of a chance to watch temp's today as they it was later in the evening after all was said and done. The inline fan blowing in air from outside. June 8 - 9 AM i checked the plants, they were at 25.2 and 50% RH. Late through the day I had checked and we had gotten up to around 32 degrees. So I moved the inline fan to the closer vent, hooked up to that, and had the air blowing out of the trailer with the inline fan sucking it from above the lights. I then added oscillating fan and had it blowing air on the left side of the room so it would somewhat circulate once I closed the doors. I then checked at about 9pm and we were at 22 degrees. Definitely noticed a decent amount of growth already. I have the lights on a 22/2 cycle as I was worried about the heat at night time. June 9 - Some great growth from the girls, still having problems controlling the temps in the afternoon. I decided to prop the door open a bit to have a constant breeze throughout the day while I am at work. Decided to do some more LST and also a bit of defoliation. I took about 25% of the leaf's that were blocking the new growth as it was getting a bit bunched up. I was then told the leaf's are almost solar panels for them. So from now on I will be trying to just do some tucking unless needed. The leaf's I removed were most of the damaged leaf's, I am not to sure if that makes much of a difference. I gave them a watering with only water as there is a potential I am getting a bit of a nutrient buildup along with the PH problem. Or potentially the reason for the ph problem is nutrient buildup. After watering with A PH of 7 I got some run off and tested it. The smaller plant gave me a PH of about 5.5 where the bigger one is around 5.0. June 10 - Plants are looking happy and showing tons of growth. Seems to be trying to stretch outwards. Not a ton of sign of PH issues showing so potentially getting it under control. Still a bit of damage to previous leaf's but it is what it is! The last few days I have been leaving the door open a bit in order to keep the temps down. I decided to test something and turn the lights off (automatically) at 11AM and back on at 5PM so light schedule has now changed to 18/6 and it seems I may have figured out the issue. We haven't had lots of sun the last couple days so it hasn't been to hard and I have yet to know if it truly fixed the heat issue for now. (I will be looking into a ac unit as well since it typically gets to around 30-35 around here. June 11 - Pulled some of the branches back down and added a few more LST spots. Seems we have a good amount of growth from the smaller plant out of the 2 topped spots. Unfortunately it looks like I fucked up on the bigger plant and only one of the nodes seems to have new growth. I will continue to monitor that but I think I cut the node to low and also to soon. Other then that, the girls are doing great. They seem to be absolutely loving these new lights. I gave them some nutrient water today as well. roughly 3L each. They seem to be A hell of A lot more thirsty under these new lights. June 12 - The girls are doing great , they are still just doing growing away. Lots of progress everyday. I am going to be getting a go-pro so I can set-up a time-lapse for the rest of this grow. I received my new inline fan, I got A ac infinity CLOUDLINE T4 with the temperature humidity controller. I am going to be having one fan pushing fresh air in and one fan pulling out the hot air. I will be doing that tomorrow since I have to work today. June 13 - I ordered another 50ft of mylar and that showed up today. I have decided to remove the shelf and add another 3+ feet to the grow space. So today I installed more poly, mylar, the ac infinity fan. I have it set-up to pump in air if it gets to warm. I am thinking of switching it to the output that way if it gets to hot or to humid I can have that air pulled out of the trailer. Right now my other inline fan is the outtake and I just have it set on full. Overall I think everything is set-up a bit better and more accessible. I will be putting my 2x2 tent in there at the left of the doors so I can have a veg room when these 2 are in flower. I plan to have 4 in veg and 4 in flower for the next grow. Still waiting on JOTI seeds, ordered 3 weeks ago and still have not been shipped. I will be getting those going the moment they arrive. The girls seem to be happy still, did a bit more LST to try to keep everything even, mainly I'm just pulling down on the spots I already have tie wire on.
Likes
57
Share
Week 8 of flower is in the books and this show is quickly coming to an end. I said last week we had about 7-10 days and I was spot on at the 10 day mark. I was only wrong about the order. The cheese is ready to chop before the rest and the gorilla cookies, cherry Bomb and lemon haze will follow in due course. The cheese is a beast and it’ll take a little time to get it all run through the bowl trimmer. At least the big one goes first. Her tallest colas have foxtailed like mar, despite the late supercrop. You can tell where the sweet spot for the light is at about 10” distance from the canopy. Any closer than that and the tails begin to show prominently. It’s a good example of just how close you can get to these fixtures with a little bit of prior experience. It’s been noted for the next run😎👍😎. The res. is on an h2o2 only flush for the remainder until the rest are ready to come down. Not a moment too soon either - the pollen chucking project has stalled out waiting for these girls to finish and now that we’ll have a little extra room, we can start running our cuts in the aerocloner🤟. Not long at all now folks. Thanks for tagging along through all this. Learned a bunch about this system and we’re back to hardware mode to make some serious improvements for the next run🤙😎. I love hardware mode😉. Background/Repetitive Nonsense The strain line up on this grow is look’n quite saucy 😈. We’ve got 2 FB strains this time around - Gorilla Cookies (seems we always have some GSC cross in the works). Mainly because the colours look stellar and remind me of a sugar breathe we did last year that was 🔥. The other FB is their original Cheese strain... because we already smoked all our cheese... and we really like our cheese...😉. Emerald triangle was kind enough to include a freebie of Lemon Haze. Wasn’t really big on the list but we haven’t done a haze strain to write home about yet so worth a go👍. The last is a Cherry auto from Bomb seeds that we’ve been trying to get to for months. Let’s just hope that she’s not a dud like the last bean. The new digs for this run are courtesy MarsHydro👊. Their 2x4 single grow tent, paired with a shiny new 240w QB courtesy ViparSpectra. These folks were kind enough to discuss a collaboration and as a result, here we are to test out the gear with an inaugural run of autos. Each week, we’ll try to expand on some of the benefits of each, as well as any limiting factors or considerations that need attention when pondering purchase. Already I can say that both are high quality products in terms of overall craftsmanship. MarsHydro 2x4 Grow Tent: Excellent construction in terms of durability. Reinforced stitching on the zippers and corners ensures zero tearing. Conveniently placed screen vents and intake/exhaust ports. The ceiling exhaust port only exists on the right side. Perfect for me but not great if you’re running exhaust from the top on the left side (left side wall port makes up for this however). The aluminum frame is rigid enough to support the weight of the lights and accessories. Once you have some weight in the tent, she’s go’n nowhere and you can assemble and break it down in record time if moving or stashing the grow op. Only limiting factors I’ve noticed is that temp. Control will be an issue for a tent. It just doesn’t have the same insulating ability as a wood cabinet or other permanent enclosed space. No worries, this is offset by a small desktop heater and keeps the environment exactly where desired. The other issue was a production problem - the ceiling vent was accidentally stitched into the corner seams on the assembly line. Again, no real issue - just pulled it out with no damage or fraying to the tent or port👍. Website link here: https://www.mars-hydro.com/grow-tent/buy-mars-hydro-grow-tent-24x48x70-2-x-4-cabinet-closet-grow-box-upgraded-diamond-1680d-mylar-for-sale ViparSpectra 240w Quantum Board: This thing is sleek and slick in terms of design. Closest comparable to it that I’ve seen would be spiderfarmers line of qbs. They feature the same top-o-the-line components and roughly similar spectrums. Where VS takes the advantage is in the convenience of the dimmer nob which is easily accessible and works great at 50% with no strobing👍. The heat sink is also larger which contributes to lower temps. That’s not a good thing in my case but beneficial for most folks. I can already say that this will be a great fixture through all stages of growth. Where I know this light will excel will be in the veg. Stage for sure. Dimming function gives seedlings a much better chance of success with the ability to use lower lighting levels early on and the coverage area on a 240w is great. The average grower will find this panel suitable and fitting to their needs in a 2x4 grow space although I’d suggest 2 units if going any larger than that. The total output in this space equates to about 30w/sq.ft. Which is a decent amount of coverage based on power vs. Growprint. Ideal for veg. Certainly but, in flower - I tend to run closer to 50-60w/sq.ft to achieve higher yields. Again, similar fixtures have performed admirably in the past and while this wouldn’t be considered an “entry-level” fixture, I’d recommend that any grower new to the game not skimp on lighting and start with one of these. The price points are a great value for quality LED tech. These days, so there’s little reason to even consider a lesser fixture👍. I have no detail on limiting factors for this light as yet but have heard that stock branded fixtures don’t necessarily incorporate enough red diodes. I’ve seen no issue myself but confess - I’m no lighting guru. Website link: https://www.viparspectra.com/collections/xs-series/products/xs-series-xs2000 ***8% discount when using code: “ItBudWhisper”*** Happy to have you along for the ride if you made it this far through my opening rant!!😎🤟😎🤟😎