


Likes
Comments
Share


Likes
3
Share


Likes
25
Share


@EBxAH
Follow
Well, this week has been iffy! I have to make a correction...the lights I used before were my headlights, documented in my previous grow. It seems the green lights kept my plants in veg. I have since removed them and continued forward as scheduled. We'll see what happens from here. If they correct, I'll have a mess on my hands and a lesson learned, lol.
Happy Growing Everyone
✌️❤️😁🍀🎶👽
EB

Likes
35
Share


@DudeGrowsWeed
Follow
Happy New Year!!!
Over the past week I did some HST bending. The branches are starting to recover and straighten out after the HST now. I still have some issues with pale leaves and a few spots here and there. I’m going to try adding some Dolomite Lime with the next watering and think that should help with the paleness. I’m also going to up the amount of CalMag and Mammoth P to see if that helps with the spotting. I’m not sure if I should see the spotted leaves recover or if the spots will remain. I suspect the spots will remain on the existing leaves regardless of what I do at this point, but hopefully no new spotting will develop.
The lights went off before I was done taking pics, so some pics will look a little different. The pics with the lights on I had to color correct, they still look a little more on the yellow side than in reality, but much closer to reality than the pre-color corrected versions. Once the lights went off I turned the flash on for my camera, those pics did not need any color correction. You can see the differences in the pics of all plants, the first 2 are color corrected with the lights on, the last 2 are taken with a flash and no color correction.
I read several books on cannabis over the past few days, some good, some not so much. One that I liked was “Marijuana Cultivation Reconsidered: The Science and Techniques For Huge Indoor Yields” by Read Spear. This book is available on Amzon’s Kindle Unlimited service, which costs $9.99/month, but they offer a free 30 day trial (which is what I’m using at the moment). Reed’s book is broken down into 3 sections, the first and third go fairly deep into the science behind growing, he does a pretty good job at breaking it down in easy to understand terms, but I had to read several sections 2 or 3 times to really get it (or just move on with as much understanding as I could digest). The second section is the nuts and bolts of growing. Most was a review but there were several topics he touched on I hadn’t thought of in a while. And again its well written. He also offers the section only in a separate book called “Small Spaces, Big Yields”. If you are not interested in going deeper into the science behind growing, “Small Spaces, Big Yields” is what I would recommend (if interested in reading books on cannabis).
I took some notes while reading and I’m going to add some of these notes in my dairy updates over the next few weeks. This week I’m going to include a note on electrical, this should be a fairly basic concept, but it is super important IMO…
“Electrical Items In a sealed grow room or in a tent, you will have water pooling on the floor from time to time. There is no avoiding this. Mop it up when you see it, and never put your electrical gear directly on the floor. Never. Not even for a moment. In fact, let me stress this point in bold capital letters. ALL ELECTRICAL GEAR MUST BE MOUNTED SECURELY ON A WALL OR TENT POLE.”
-Read Spear
I’ll add more did bits like this in my diaries over the upcoming weeks.
If anyone has any good book recommendations please let me know in the comments. I’m looking for books that might not be as popular as the ones by Jorge Cervantes or Ed Rosenthal (I’ve read those). I did just order “True Living Organics” by The Rev which I’m looking forward to reading. But I’m looking for more. I really want to step it up and learn as much as possible. Your comments, feedback and recommendations are very much appreciated!
Until next time, Happy Growing! Stay Positive! And have an amazing 2019!!!

Likes
3
Share

@Daddy_farmer
Follow
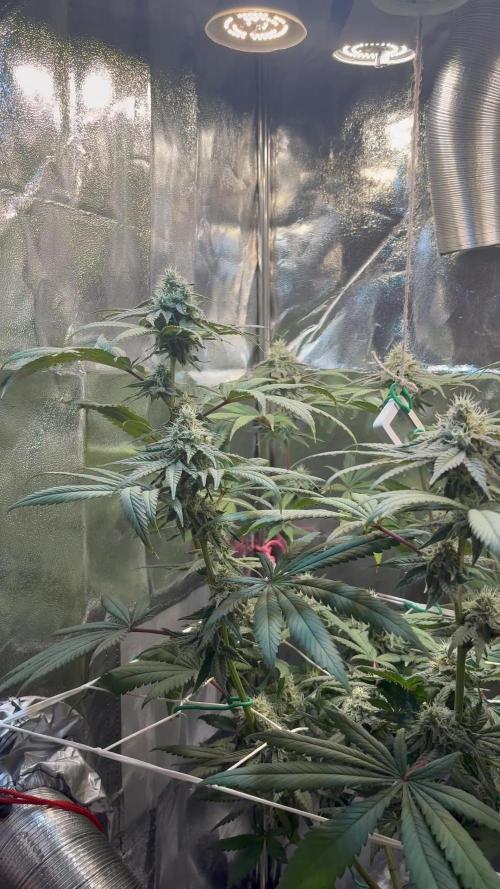
No action required. Autopilot mode on.
Dechlorinated tap water + autopot works great so far.
Genetics are brilliant to be honest- trichomes grows on the fan leaves😳
Start to smell herb candy a bit, no lemon yet.

Likes
2
Share


@eldruida_lamota
Follow
Venga familia que ya viene la cosecha de estas Pink Runtz de RoyalQueenSeeds , que ganas que tenia ya de darles machetazo.
No veas que pinta que tienen estas plantas.
Las flores aparte se ven bien resinosas, y con unos tonos muy llamativos.
a sido una genética con la que disfruté mucho cultivarla, es algo complicada cultivarla pero merece la pena si eres cultivador con experiencia no te será problema cosechar.
Hasta aquí es todo , espero que lo disfrutéis, buenos humos 💨💨.

Likes
11
Share


@GREENPHOENIX6262
Follow
*01/24 - Week 3 Veg - Snapped a cola when adding bend clips, All clips have been removed - Uptake in nutrient feeds - Lite LST training - Lights running 18/6 - She shot up quickly in a week and 2 days - grew 6.5 inches ( 10 Inches total )
*01/27 - Mid Week 3 Veg - Uptake in nutrient feeds - Normal LST training - Lights running 18/6 - Retied up her main cola - increase in CAL-Mag feed.
Likes
2
Share


@R_atata
Follow
Läuft gut soweit. Lichtstärke der Lampe auf 60% gestellt. Ein paar Blätter entfernt, die Nebentrieben das Licht genommen haben. Ich habe das Gefühl die Lemon Haze wächst etwas langsamer. Eventuell braucht die Sorte wärmere Temperaturen.

Likes
5
Share


@johnwill
Follow
Pleased that both seeds germinated and sprouted. The fascination is just beginning.

Likes
4
Share


@Filiaes
Follow
26.05
Cleaned the Tank and changed the water. Beside that nothing special to say about that grow - everything is just beautiful and developing suiper well.
Likes
24
Share


@DeepRootsGrowTrees
Follow
COLOMBIAN JACK by KANNABIA
Week #17 Overall
Week #6 Flower
This week she's doing good as she continues to flower no issues this week to report. She's smelling great!!
Stay Growing!!
Kannabia.com COLOMBIAN JACK

Likes
6
Share


@LoganatorDude
Follow
I’m a couple days behind on my posting of this girl. But here she is! Growing strong and healthy. I am getting ready to transplant her into a bigger pot soon enough. Then hopefully I will be able to get a picture of a stellar root system.
On another note, the field peas in the “400” are coming along, slowly but surely! I plan to transplant into the “400” in approximately 2 months (8weeks).
Day 26, I’ve got a larger pot (2.7 L) with my fancy soil, lots of greensand, I checked the pH and it seems stable at 6. I did add a lot of lime. Maybe the lime takes time to raise the pH too? Anyhow, I have potassium silicate to help raise pH if needed. I hope this isn’t a mistake putting her into that. In fact I’m going to add more lime to the top half and then the potassium silicate to water in.
Fingers crossed for stable, beautiful, warm and sunny weather!!
Happy Growing 💪🌳

Likes
41
Share

@GermanGrow182
Follow
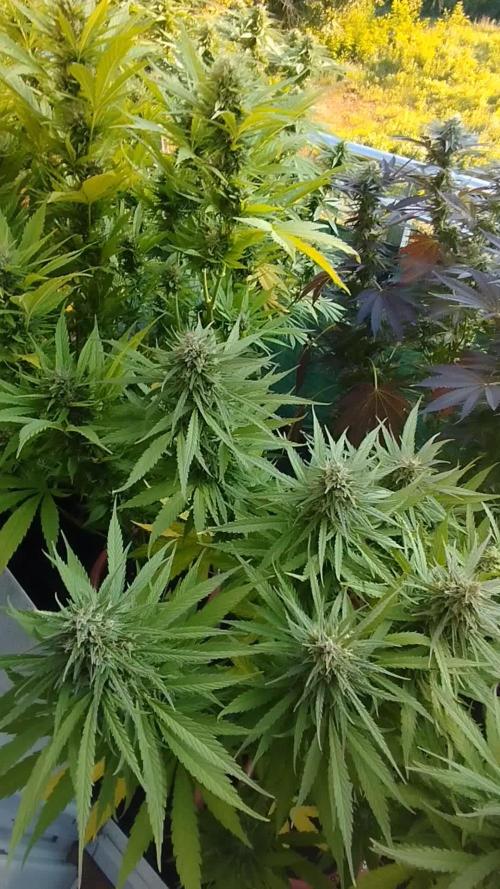
War ne gemischte Herbstwoche. 3 Regentage, 2 warme Tage, 2 kühle Tage und 3 Nächte unter 5 Grad.. AK zeigt ihr Herbstkleid in dunkelviolett.
Die Blüten beim Larry og sind nicht mehr weit von der Reife entfernt. 2 Wochen noch. Ak braucht noch mindestens 3. Lemon kush ist die kleine (neben fat banana) fast fertig. Nur noch milchige trichome, keine Bernsteinfarben. Die andere Lemon braucht noch etwas länger. Banana auch noch mindestens zwei, wenn nicht 3 Wochen. Das Wetter soll kalt werden. Bis zum Gefrierpunkt.. die Hoffnung stirbt zuletzt.
Noch läuft es gut 👍
Bis nächste Woche ✌️


Likes
14
Share


@Momgrowsthechronic
Follow
So it’s the end of Week 5, Day 35 for the Sweet Seeds Gorilla Girl XL auto flowering grow. I have come to the conclusion that these four plants are not going to be XL after their pre-flower stretch. Overall the plants are healthy but the prolonged low humidity and temperatures have robbed them of the vigorous growth documented in my previous Sweet Seeds diary (Cream Mandarine XL Autos). I am disappointed that this will most likely be an XS harvest but a tiny quantity of quality bud is better than nothing. I gave them their first feeding of GHE FloraNova Grow fertilizer at a rate of 1.25 ml/gallon and this is 1/4 of a full dose that would be given to a photosensitive strain. I am still watering every fourth day at a rate of 2.8 litres per plant or 0.7 of a litre per plant per day. I will only be using the fertilizer every other watering or every eight days. That’s about it for this update and on to…
Mom’s Tip for Week #5- To Tuck or Take? The when, where, why and how to defoliate Autoflowers successfully…. Lets start with some basic Biology- Photosynthesis is the process by which green plants take in sunlight, water and Carbon Dioxide and transform it into energy in the form of sugars that feed the plant and make it grow. So essentially, every fan leaf on your plant is a solar panel collecting light and therefore valuable in it’s own right. I always try to tuck my leaves if possible before considering removal as my plants need all the energy they can get to power through until harvest. But sometimes tucking isn’t enough or just isn’t an option anymore so here are my suggestions for taking the fan leaves from your Cannabis plants if needed.
When- defoliating Autos can be done anytime throughout the grow although it’s generally not done within the first 3-4 weeks. The plants are usually quite small and those early weeks are valuable growing time that these plants simply can’t afford to miss. This is when I find leaf tucking to be most valuable, allowing the plants to keep what few solar panels they have while also allowing the grower to position the leaves so that they are out of the way. I personally find that I defoliate my plants the most over the final 3-4 weeks of the grow as foliage is dying off on it’s own by that point and a few less leaves at harvest time is always a good thing! Of course anytime you see dead/dying or diseased foliage, it should be removed as needed throughout the grow.
Where- defoliating Autos is a delicate balance due to their small size and short lifespan. If my plants are healthy, thriving and tucking is no longer an option, I will only remove fan leaves if they are covering/blocking new growth or potential bud sites. As the plants age and the foliage begins to die off naturally, I tend to remove the oldest, lowest growth first working my way up the plant as needed until harvest.
Why- defoliating Autos is done for a few basic reasons but only as an extreme in my garden when all else fails. Removing certain large leaves will allow more light into the lower portion of the plant’s canopy reaching young branches or potential bud sites. As the plants age, it also helps with increasing airflow around your swelling buds thus reducing your risks for mold and fungi in humid grow environments. Removing any and all dead/dying or diseased foliage is absolutely necessary in keeping your plants healthy and the grow room clean and pest free.
How- defoliating Autos is simple if you keep it simple. Only remove what you absolutely have to and use a sterilized set of sharp pruners for a clean, controlled cut. As the plants age and the foliage begins to die off naturally, just wait. What doesn’t fall off on it’s own will snap off with a simple twist of the leaf’s stem. If the leaves don’t come off with ease, they’re just not quite ready yet so be patient.
Be mindful that removing the solar panels from your Cannabis plants is always risky business but Autoflowers are even more challenging in their own way. Smaller plants with a lower leaf to bud ratio and a short lifespan means less room for error so paying close attention to the when, where, why and how is crucial for successfully defoliating Autoflowers. Tuck if you can, only take what you absolutely have to and of course- never take more than 25% of your plant’s overall foliage at one time as this can be devastating or deadly to even the healthiest of plants. Allow your plants to take the lead and they will show you which leaves are ready to go- at what time, all on their own just as nature intended.
Processing
Likes
32
Share


@Hawkbo
Follow
Pics taken on day 36. Some, if not most of these are lightly seeded, I've checked for herms but cant find no nuts. Sucks but from what I've read and people I've talked to seems like it wont be too big of a deal in the end, some old school growers even prefer lightly seeded nugget, I've never tried it intentionally. The green buzz nutes are working well. I'm almost out of the more PK so I had to add herculean harvest liquid bonemeal to get the ppm where i want it while trying to conserve the Gbl to last the rest of the run. Didnt have the lady to take my pics today so I was limited and had to take them lefty one handed and was shakey af.
#1 is a little weird and compact but looks like it has potential to fill in pretty good.
#2 is exactly what I was looking for. Showing some purple tint and the nugs are perfect nice and chunky. I like they way shes put together.
Likes
6
Share


@masterofsmeagol
Follow
5/4 I stupidly watered everything this morning. They were pretty much perfect weight for transplant......then I watered them. Oh well. If that's the worst mistake I make I'll be ecstatic. Went back over and found my 1 gal and 2 of those wierd slanty airports that tapers and holds like a gallon and a half and washed them. I mixed up 12 gallons of soil in a garbage bag and mixed it thoroughly with my gloved hands. It's mixed good. Looking at my plants in sadness thinking, "today could've been the day" and noticed a Special Kush of average size I didn't water that weighed in the 220's. I was happy. I filled the pit arpund a cup before removing it leaving the perfect hole. Mykos and water were poured in. Plant came out of the cup REALLY easy. Suprisingly easy. This wasn't totally dry. I was amazed it came out so easy so I kinda rolled it around looking at the roots. I started lowering it in the hole and I felt something break away but it webt DIRECTLY into the hole made for it. I tucked some soil around it but it was pretty tight from packing it around the empty cup. Didn't take a picture but the plant is fine. That was an average size plant too. So I may have to give some of the strains I popped later a little longer before I transplant. After everything's been transplanted I'll need to change lighting again. I think I'll open the window and use the hps and the l.e.d on the days and nights cThat's these girls won't be hardening off. I so wanna go plant those others but my intuition tells me to wait until morning and it's been serving me well. A couple can stay in cups longer. Not much longer but still.
5/5 Transplanted everything but two this morning into 1 gals with 1/2 happy frog half ocean forest. Mykos and water used during transplant. Found put the l.e.d was on for 24hrs for a while. I made sure the timer switch was ON but it was a different cord plugged in. Oh well. All transplants went perfect. I'm picking up an adapter for the outlet so I can plug the power strip into the timer and only use one timer. I had to hang the 150watt hps back up with the 1,000 watt equivelant 105 true watts. I hope this lighting setup works. Chemdog #4 and One MK Ultra will be transplanted later today or later in the morning. I also opened the shade to the south facing window. Shits getting real.
EDÌT: I FINISHED TRANSPLANTING THE LAST TWO PLANTS AND PICKED UP THE ADAPTER SO I COULD HANG THE HPS NEXT TO THE L.E.D. THEY WERE FIBE WHILE I WAS GONE. EASIEST TRANSPLANTS EVER. THEY ALL LOOKED PERKY AND HAPPY SIX OR SEVEN HOURS POST TRANSPLANT. I OPENED THE CURTAIN TO (SOUTH FACING WINDOW) BUT I MADE SURE THE PLANTS WEREN'T IN THE DIRECT LIGHT. EVEN THOUGH IT WOULD PROBABLY BE FINE. LAST TIME I HAD SEEDLING IN DIRECT LIGHT. I'LL PLAY IT BY EAR BUT IM HAPPY.
EDIT 2. Went back over to meditate by the stream and do my qigong. It's 75 and BEAUTIFUL today. The girls will be going out for a few hours on days like this. Anyway when I went in I was surprised to see everything looking nice and happy with praying leaves. Nothing is in direct sunlight but damn that window let's in a lot of light.
5/6 Girls LOVED the transplant! They seem to be all happy. No stress. Easiest transplant I've done. Leaves are praying upwards so I think the lights are approx tje right distance. They'll be going outside soon to harden off. It's been in the 70s but it's rainy now. I'll play it by ear according to weather. I'll continue to monitor lighting and I may lower the hps.
5/7 The soil was super dry when I went over this morning. Everything looked awesome though. I used about a half gallon watering. I don't want to water to run off. I want to keep the nutes IN the soil. It's also easier to fix an undet watered plant than an over watered one. It came out to about a half gaterade bottle on the biggest and half that on the smallest. I'll gradually increase water after I monitor the response. The water sat on the soil for quit a while so they definitely needed it. Looking good so far.
5/8 Soil lookeddry this morning. I think I'm going to up the water. Last time I dod seeds I gave like a pink. Some plants still had a little dampness where I watered that I could see. Others looked dry but happy. I gave the REAL dry bigger ones a small circle around the rootball. Just in case. I'm thinking of lowering the hps slightly so it's at least level with tje L.E.D. That window being open gives tons of light. If u moved them slightly left they'd get DIRECT sun most of the time. I'll be bringing them outside soon to start hardening them off.
EDIT: WENT TO CHECK THE GIRLS AT 5 TO MAKE SURE THEY WERENT DRIED OUT. THESE GIRLS ARENT JUST GETTING BIGGER BY THE DAY THEYRE LOOKING BIGGER FROM MORNING TO NIGHT! ITS BEEN RAINING LIKE CRAZY BUT WE WILL HAVE GREAT WEATHER NEXT WEEK AND I'LL BE BRINGING THEM OUTSIDE. I'M SUPER HAPPY WITH GROWTH SO FAR. ILL PROBABLY HST (TOP/FIM) AT THE NEXT NODE. I WANT THEM TO SETTLE IN NICELY BEFORE STRESSING THEM.
5/9 I may have stupidly uploaded doubles of pictures from today. Soil LOOKED real dry. I gave the plants their first real watering. I still went light. Almost a gallon with all plants. I know many say I should be watering to runoff but I want to keep the nutes in the soul as long as I can I don't want to overwater. I always start out careful. Once they show they xan tolerate it I'll increase water next time. This weekend it will be raining but after that we are getting some real good weather and I'll he taking the girls out to begin hardening off. I also need to take a look and top/FIM the plants now that they are settled. Also need to wash grow bags and sanitize outside.
5/10 It's pouring out. Horrible night and morning but this is about cannabis. After the watering ALL the plants shot up in size! Substantially. Leaves are over the sides of containers. I think I'm somewhere close with the watering schedule. I may bring the hps light down a little. I also NEED to start HST. I need to FIM and/or top these girls. Unfortunately I've been dealing with medical problems of my wife so I haven't got to it. If I get some sleep I may do something this morning or in the afternoon.

Likes
18
Share


@BudXs
Follow
Hot damn this is a pretty plant. Enormous fan leaves, tight nodes, and LOTS of em. This plant continues to impress, however, some of her daughters are blowing past her in height, surprisingly.
Room is on point, mother is happy and healthy. 55 days or so till harvest:)

Likes
7
Share


@Zuppler
Follow
Vegetation Phase - Week 5
Week 5 marks a bittersweet milestone. RIP to the Marienkäfer homie — gone but never forgotten. Their watchful eyes and pest-snacking legacy will forever live on in the tent. Meanwhile, the Donutz gang is thriving and about to hit the next big step in their journey: the 7-liter pot upgrade.
Updates & Changes:
RIP Marienkäfer: Nature giveth and taketh away. The tent feels a little emptier without our little guardian, but pest pressure remains nonexistent thanks to their diligent work.
Transplant Time: The plants are moving up to 7L pots this week, giving their roots the room they need to expand and thrive before flipping to bloom. This upgrade will ensure a strong foundation for the explosive growth coming soon.
Watering: Still sticking with reverse osmosis (RO) water for maximum control and cleanliness.
Plan for Flower Transition:
After the transplant, the plants will chill for the rest of the week in their new homes to recover and adjust. Week 6 will cover the flip to flower. With the clean lollipopped structure and solid root development, these plants are set to focus all their energy on producing hefty main colas in the Sea of Green setup.
Observations:
The Donutz are stacking beautifully, with healthy green leaves and strong stems.
The SOG canopy is filling out, and each plant is shaping up to deliver a uniform, productive grow.
Next Steps:
Monitor the plants closely after transplanting to ensure they adjust smoothly to the 7L pots.
Maintain stable environmental conditions to avoid stress during the final veg phase.
Prepare for the flip to flower in Week 6 — the real show is about to begin!

Likes
9
Share


@JustGrowWithIt420
Follow
Was a pretty nice strain and decently easy to grow.
The end product came out better than I expected!!🔥👊💯
