




Likes
14
Share


@Lazuli
Follow
the plants look like they will be ready in 2-3 weeks
i only give bloom booster and calmag from here

Likes
Comments
Share

@BalconyBoy
Follow
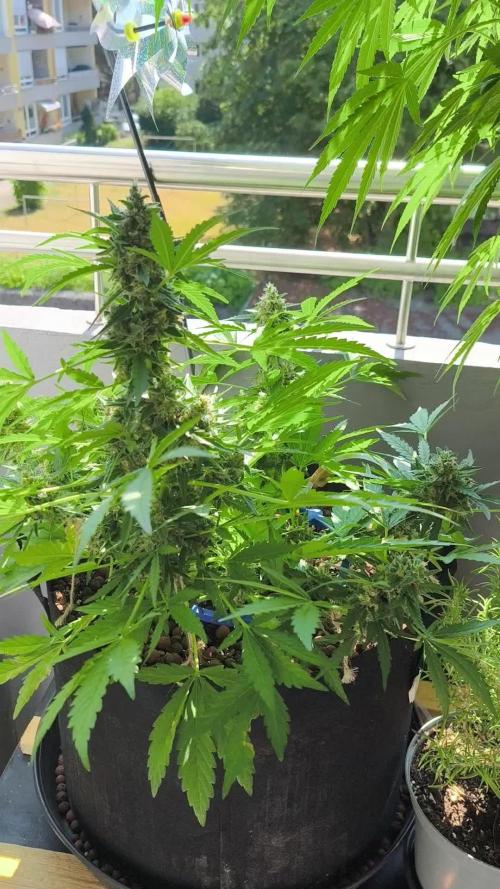
03.08.26 eine weitere Woche in einem episch heißen Sommer bricht an für die kleinen Autos auf meinem Balkon. Ich möchte an dieser Stelle die Gründe dafür teilen, warum ich in Zukunft keine Autos mehr auf diesem Balkon anbauen werde. Auch beste Genetik, wie diese Saison wird beschränkt durch den halben Tag direkte Sonne die der Standort bekommt. Bei einer verkürzten Zeitspanne für vegetatives Wachstum ist die Chance einfach gering, am Ende für mich zufriedenstellende Ergebnisse zu erzielen was den Aufwand angeht. Aktuell sehe ich, das die Hubbabubba Haze auf jeden Fall schöne und auch zahlreiche Buds liefert, die weiter anschwellen, gut riechen und mir für meinen Bedarf ausreichend Ertrag liefern werden. Selbst im Schatten der Großen in dem sie nun die meiste Zeit sind ist das gegeben. Dennoch möchte ich unter den geltenden Regeln für den Eigenanbau in Zukunft lieber drei ordentliche Tannen haben. Davon abgesehen von ich mit der Genetik zufrieden, es riecht nun schon deutlich auf dem Balkon und ich freue mich auf Haze aus eigenem Anbau. Ich schätze das die kleinen Ende August reif sein werden und bin entspannt im Hinblick auf den Urlaub, da die Bewässerung nun gut funktioniert.
Ich bin nun von Zitronensäure auf Phosphorsäure umgestiegen da ich hoffe den Ph Wert im Wassertank damit länger stabil zu halten (und keinen Biofilm zu bekommen) während meiner Abwesenheit in der das Reservoir drei oder vier Tage halten soll bevor es aufgefüllt wird.
Happy growing allerseits!

Likes
33
Share


@pHilosophy420
Follow
This strain smell is best. It's sweety orange smell and the buds looks nice and frosty


Processing
Likes
49
Share


@biggreens420
Follow
Critical is nice and healthy had a good stretch before starting sidebranching but she's doing her thing now 3rd time with this strain so pretty use to how she goes normally rockets in these next few weeks sidebranching like mad she's been fed just water and is doing ok decent root formation compared to some of the others but a bit smaller putting it down to the autos been quicker in general was hoping to put outdoors next week but weather is too cold still not much else to report thanks for reading happy growing guys


Likes
12
Share


@Jays_Not_Here_Man
Follow
The girls have survived another week ❤️ I did a light defoliation and have been monitoring the RH closely. We have had a very damp week here, and the RH kept climbing and had my fan working hard.
They are starting to plump up and fill in 😋. They have also started to slow their drinking habits, instead of watering every three days, it has moved to every 4 now. Just a couple of weeks left, I think I will be harvesting these over Christmas 🎄, and will have some great bud ready for the new year! 🎉🎊🍾

Likes
11
Share


@RunWithIt
Follow
Definitely the best smelling stuff I've grown to date. The sweet fruity notes absolutely light up the tent every time I open it. And she's been a great candidate to learn my new phone's camera with. 8 week strain, so less than a month away! Definitely coming down before the others, that's for sure!

Likes
77
Share

@ZariRat_Grow
Follow
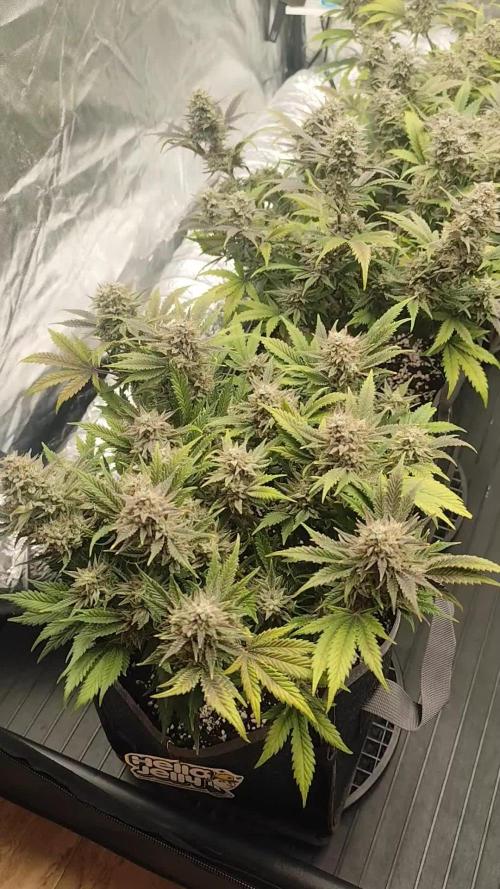
Llegamos a la sexta semana de floración y nuestras tres protagonistas siguen demostrando que el cuento va por muy buen camino. 🍭🌿 Comparándolas con la semana pasada, el cambio vuelve a ser evidente: los cogollos han ganado todavía más volumen, se ven más compactos y la cantidad de resina es espectacular. Los tricomas destacan prácticamente a simple vista y las flores tienen ese aspecto escarchado que ya empieza a ser marca de la casa.
En general, las tres están súper sanas y todo está evolucionando muy bien. La estructura de las plantas está cargada de flores y cada semana se nota más el peso y la madurez de los cogollos. Seis semanas dentro y estas tres no parecen tener ninguna intención de bajar el ritmo. 😏🍬
🌡️ Parámetros de esta semana
- Temperatura: 24 °C
- Humedad: 50 %
- EC: 1.8
- Foco: 70 % a 70 cm
• PK: 0.5
• Calcio + Magnesio: 0.3
• Silicio: 0.1
• Compactador: 0.5
• Sugar: 2
• Plata: 0.3
🍡 Mochi llega a la sexta semana más gorda y resinosa que nunca.
- Comparada con la semana pasada, sus flores han ganado claramente en volumen y densidad.
- La cantidad de resina es brutal, con los cogollos completamente cubiertos de tricomas y un aspecto cada vez más escarchado. ❄️
- Se aprecia una maduración progresiva de las flores y una estructura mucho más contundente que en las primeras semanas.
🖤 Jinx continúa avanzando de forma muy constante y esta semana llega con unos cogollos notablemente más gordos.
- Respecto a la semana anterior, se aprecia claramente cómo las flores han seguido llenándose y compactándose.
- La resina ha aumentado muchísimo, cubriendo las flores con una capa blanca y brillante.
- Mantiene un aspecto general muy sano y equilibrado, con una floración cada vez más avanzada.
🍬 Jellybean tampoco se queda atrás y esta semana presenta una evolución muy bonita.
- Sus flores se ven más grandes, formadas y cargadas de resina que hace apenas una semana.
- Los tricomas son cada vez más visibles y le están dando ese aspecto azucarado que hace que el nombre le venga como anillo al dedo. 🍬
- La estructura de los cogollos continúa ganando densidad y presencia.
- Sigue avanzando a su ritmo, pero lo está haciendo con muy buena salud y cada semana resulta más impresionante verla evolucionar.
⚡ Más gordas. Más compactas. Más resinosas. Esa es probablemente la mejor manera de resumir esta semana.
Las tres siguen súper sanas, con una evolución muy buena y una diferencia enorme respecto a las primeras semanas de floración. Comparadas con la semana 5, el engorde y la cantidad de resina son especialmente evidentes.
Saludos y buenos humos amigos growers 💚🐭

Likes
2
Share


@Vet4weed
Follow
Getting closer to harvest every day. In fact, had to start early with Grace, as all of her leaves turned yellow and the trichomes are starting to cloud up. Decided to try the top bud harvest method and allow the smaller buds on the lower portions of the plant to develop more. Read somewhere that it'll allow me to reap an additional 25-50% more flower.

Likes
35
Share


@eldruida_lamota
Follow
Bueno familia ya finalizamos, estas red hot cookies son una cepa bestial.
La verdad que el secado muy bien 7 días en Malla y a los botes, 45% humedad y 23 grados es la temperatura ambiental que han tenido en el secado.
4 plantas que se cultivaron en un armario de 1.20 pero estos ejemplares solo ocuparon 80x80.
Así que ya está cultivada esta gran variedad que es novedad este 2020, americana de la familia Cookies, la Tropicanna Cookies (Girl Scout Cookies x Tangie) con un porcentaje de thc entre los 17/25%, una bomba.
Que decir de Agrobeta, lo peta 💪 en cuanto a nutrientes. Un saludo y buenos humos.

Likes
4
Share


@Growyourownathome2x2
Follow
Thursday 16th march day 59 Harvested a couple days earlier then planned as my humidity was getting a bit high and worried about risking mold I decided to chop, have to get a good dehumidifier soon, everything looking lovely, nice and dense with very strong fruity potent smell definitely the best looking plants I have grown to date not the biggest buds but they look quality, chopped plants whole gonna do my best to keep the temp and rh% in the dry room as close 60/60 as I can to get a nice slow dry, 🍁😎 I only took the wet weight from 1 plant back left plant was 270g with large fan leaves removed

Processing
Likes
17
Share


@ConradThePeaceful
Follow
10/25 23 days from sprout. All are looking great. Going to wait another week before I start feeding.
10/26 Watered. Probably going to trim some fan leaves before the next watering.
10/27 Few are starting to flower. Switched from MH bulb to HPS.
10/29 Watered. Going to start Fox Farms food at a quarter strength next watering.

Processing
Likes
2
Share


@BigHorn
Follow
Growth has been steady I'm going to start budding coming week 7. I think I'm going to run out of tent room might be a lil late but it is what it is.

Likes
5
Share


@braxat420
Follow
Everything is filling out nicely. The Banana Jealousy is finally catching up to the Black Opal x Zkittles in terms of bud size. She's starting to smell sweet and creamy. I'm very much looking forward to these finishing up. 13 hours on, moving toward 10 hours on over the last two weeks.

Likes
20
Share


@TechDCo
Follow
23/10/2024
Lights On!
I opened the tent this evening but it's her morning 🌄 however you like to picture it!
Strong smell of gas that' smells bitter like lemons, when it hits the back ya sinuses.
After a few minutes taking pictures, the undertones of the nutty earthy leaves prevails and lingers around the room it seems for much longer than the lemons.
24/10/2024
Lights On!
25/10/2024
Lights On!
26/10/2024
Lights On!
Deffo smelling very sharp lemon 🍋
27/10/2024
Lights On!
Yep, there deffo lemons I'm smelling its a Strong Lemon Toilet Fresher kinda' thing!
I'm not saying 'Lemon Toilet Freshers' are my thang! But hey, its a sharp lemon smell!
Reminds me of the smell of apple car Freshers but lemon instead! I do say; it's the kind of fresh sharp citrus smell when you open ya car door with fresh Freshers hanging! 😈 👿
Slite nute burn from the Holland nutes!
"Note to self: next time time add 0.6ml/l instead of 1ml as a low dose!
You'll get it perfect eventually 😌 I'm sure!
"Not all fat hairy girls are dumb and smelly: some maybe the lazyones, but this time of year the crazy ones and lazyones have to go shopping, nowonder its bussy this time of year: cues cues cues, like Jesus Christ put a folk in it or two! 😉KFC should do trollies for a family pack! deffo at x-mas time because the halloween treats have vanished, the snow then falls, the prices go up the portions go down (more recycled junk) you gotta blame "global warming" on some fat b!tch taking up the space!. Jokes aside: Mrs.Clause like playing with Santa's snowballs!
Sorry folks 😞 that's a backwards sexes Mrs.Santa joke 😃
.....Baha well biite mee for spreading laughs this time of year! - Like her egg yolks!
28/10/2024
Lights On!
Sorry uploaded 😔 all the photos from today! Will sort them out later! Cba one of those dayz!
I just wanted to get them off my phone!
I felt like I was going to say "get them off my chest" reading that over again quickly! - Poor English when I'm not running everything through Ai 😕 or is this actually Ai prompted to make mistakes and appear normal! Aye! Makes you question my whole existence within these entries of folklore and mystic magical characters! Baha
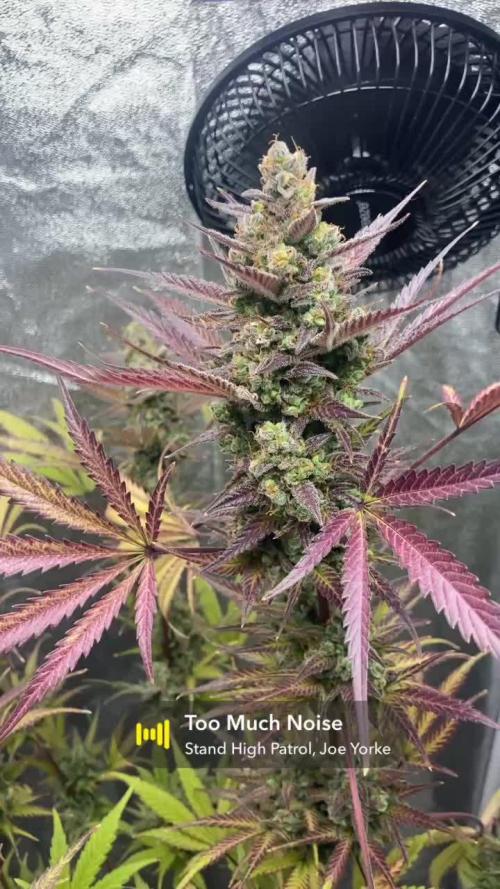
I think it's my eyes - I'm seeing purple 💜 👀 on her pistils!
Blink twice though and the purple hues is definitely there! Oh boy, this is going to be awesome colour show!
I reckon 10-11z give or take!
Counting time ⏲️ is a forever losing battle!
In ones mind it's a peaceful shuffle rattle!
We are just in "Crusing Shuttles"
the brain is a bubble
29/10/2024
Lights On!
Had to supercrop some branches!
Now drinking just over 8.5L/24h.
5L = Day
3.5L = Night
The last 4 days i topped up only with water to balance the nutes out; i clearly forgot to mention this! She seems a lot more relaxed and the NPKs have leveled out!
BG41 indica tent is doing okay she's drinking 4.5L/24h.
"Time for a advocaat!
I could be Dutch at heart! Well, I sure do
speak it 😏 on the double!"
"Reversed Black Joke to a WhiteWoman:
She got smacked of a black guy and never went back 😅"
You ever wonder why hospital lights frequencies make you feel sick! 😬 😫 deffo the street lamps 🔦 now! Too bright! The sun is more blue with its halos 😇



Likes
18
Share


@AZMamaBear
Follow
Monsoon finally hits! Temps have dropped below the 110 mark low 100's! This grow will likely last > 30 weeks. Since GD only supports 30 weeks of diaries, this "week" will actually last two weeks.
Daytime high 95 106
Nighttime Lows 83 87
7/30/2022 - Day 183
7/31/2022 - Day 184
8/1/2022 - Day 185
8/2/2022 - Day 186
8/3/2022 - Day 187
8/4/2022 - Day 188
8/5/2022 - Day 189
8/6/2022 - Day 190
8/7/2022 - Day 191
8/8/2022 - Day 192
8/9/2022 - Day 193
8/10/2022 - Day 194
8/11/2022 - Day 195
8/12/2022 - Day 196
