
Likes
Comments
Share


@Ensign420
Follow
Introduction - Week 14|07 Summary -
Ensign's log, stardate 9437.65,
Great week of growing! Wow what a good week!
Growth in the main tent has all around been incredible!
Submitted my first submission to the Global Grow Cup! Filmed a video of the solo cup container (marked with the ticket/order number) that will be used for the competition. Also had to fill and prove the solo cup holds 2 cups of soil. Now I need to root a clone (for the first time), transplant her into this cup, and submit my 2nd entry before the 30th of this month.
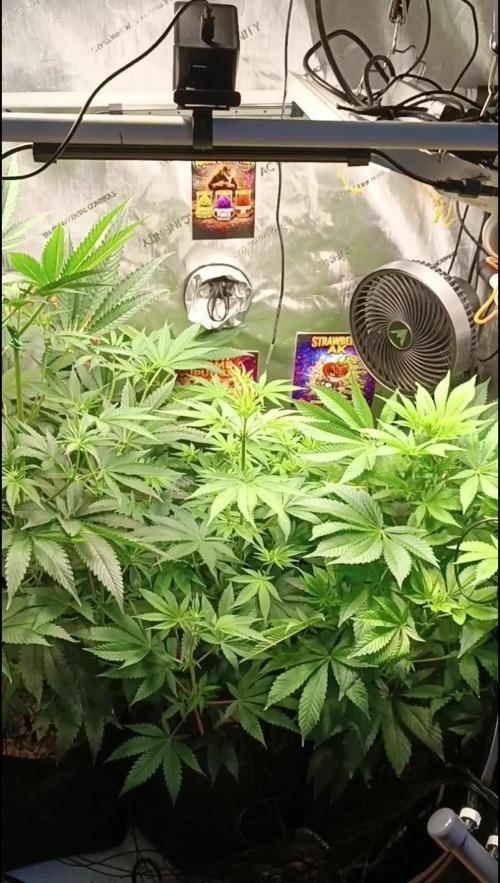
As far as my first attempt at cloning, have already begun the rooting process! Managed to take cuttings from 3 out of the 6 phenos in the main tent (the first cutting was also my first time topping). Soaked the cuttings for two days before planting them into Coco Coins. So far everything has gone surprisingly well! The clones are now rooting under the propagation dome with the vents fully closed. Will check for roots soon!
At the end of the week, growth was just raging! Was planning on flipping to flower in a week, but decided to begin the first week of flower next week! Thus this is the last week of veg. Plan to flip to 12/12 next Monday!
Onwards to next week!
[START OF WEEK 14|07]
==========================================================
Garlic Budder #1 - WEEK 14|07 - Full Veg Wk5
Garlic Budder #2 - WEEK 14|07 - Full Veg Wk2
Garlic Budder #3 - WEEK 07 - Full Veg Wk5
Garlic Budder #4 - WEEK 06 - Full Veg Wk4
06/03/24 → 06/09/24
This Week's Estimated Goals
----------------------------------------------------------------------------------------------
DLI: ~26 mol/m²/d
PPFD: ~400 μmol/m²/s
VPD: ~1.0 kPa
This Week's Meter Readings & Averages [Lights On: 16:00 - 10:00]
----------------------------------------------------------------------------------------------
DLI: 24.56 mol/m²/d
PPFD: 379 μmol/m²/s
VPD: 0.91 kPa
Soil %: [32.7, 37.6, 37.9, 34.1]
==========================================================
Day 01 - Monday - 06/03/24 - Total Days: 098
-----------------------------------
Daily Averages [~23:00]
- Temps: 80.7°F [27.1°C]
- Humidity: 74.4%
- VPD: 0.90 kPa
- Soil %: [31, 34, 39, 35]
-----------------------------------
- [09:57]: Quick morning check!
--- #1 is looking a bit droopy, but almost lights off (at 10:00) so not concerned.
--- Nice! Mainly wanted to check on #4 and she is looking great! She’s perked back up and looking good!
- [23:08]: Evening check.
--- Wow! It’s a jungle in here!
--- #1 has gotten too big? Nah!? Keep on growing girl!
--- #2 is growing and definitely getting bigger! Growth just looking really weird.
--- #3 has continued to get larger and is looking quite uniform in growth!
--- #4 is growing and looking perky again!
--- Even the original #1 and #2 phenos (in the back) are looking good!
--- Wow! #4 is really getting close to the light.
- [23:14]: Checked down both fill tubes.
--- Both reservoirs were completely dry!
- [23:27]: Checked the Ecowitt soil moisture sensor data:
--- 30% - [CH01 EB1 - Garlic Budder #1]
--- 34% - [CH02 EB2 - Garlic Budder #2]
--- 39% - [CH03 GFP - Garlic Budder #3]
--- 32% - [CH04 FPT - Garlic Budder #4]
- [23:32]: Poured 4 cups of distilled water down EB1’s fill tube.
--- Poured 2 cups of distilled water down EB2’s fill tube.
- [23:38]: Checked the humidifiers.
--- Refilled the 4X4’s humidifier with distilled water.
--- Tomorrow, plan to defoliate and start cloning for the first time!
--- Going to take multiple cuttings from both #1 and #4 for sure, but still deciding on the rest.
--- Getting hyped!
Day 02 - Tuesday - 06/04/24 - Total Days: 099
-----------------------------------
Daily Averages [~23:00]
- Temps: 81.4°F [27.4°C]
- Humidity: 74.3%
- VPD: 0.93 kPa
- Soil %: [29, 35, 38, 32]
-----------------------------------
- [11:59]: Time to film the first entry for the Global Grow Cup!
--- Going to be using BuildASoil 3.0 potting soil.
--- Filming the video using a stand and my phone.
--- This video is mainly to establish the container that the plant will be grown in. Also to prove that the container is a 16oz container and that it can hold 2 cups of soil.
--- The ticket (order) number also had to be written on the cup.
- [12:36]: Done!
--- The video had to be done in one continuous shot with no edits (my original submission does not have the logo).
--- There was also a photo that needed to be shot which shows the cup filled with 2 cups of soil (just like the video, the original image submission did not have the logo).
--- I think I did everything correctly, but also sent an email for verification of submission and validation.
--- Getting hyped!
--- [*smokes a bowl]
--- Going to defoliate today along with for the first-time, going to take cuttings for clones!
--- After a bit of online research, decided to split the cloning process into two days.
--- Today going to take cuttings and will soak them in a solution of aloe for 24hrs. Afterwards will change the water out and use straight distilled water.
--- Then in a couple days, plan to transplant into coco plugs (Coco Coins) for rooting.
--- For optimal results, also be using a rooting hormone (Clonex).
--- Well.. Here goes nothing!
- [17:01]: Evening check.
--- Wow! #1 is looking huge! Her main top is stretching above the lower canopy which is continuing to bush out.
--- #2 is growing along. Growth is gnarly and a bit droopy, but she’s getting taller!
--- #3 is looking great! Still a bit small, but she is continuing to get larger.
--- #4 looks like she needs a watering.
--- Both plants in the back are also looking surprisingly great as well!
- [17:05]: Checked down both fill tubes.
--- Both reservoirs were completely dry!
--- As far as today's defoliation, going to leave #2 and #3 alone and will focus my defoliation and cloning on the rest of the plants.
--- This will be my first attempt at cloning, also going to try topping for the first time today.
--- No pressure Ensign. What can possibly go wrong right?
- [17:27]: Time to start the cloning and defoliation process!
--- Filled a measuring cup with 3 cups of distilled water.
------ Added 3/4tsp of Horticultural Aloe
------ Added 1 more cup of distilled water
--- Mixed the solution and poured an even amount into three separate solo cups.
--- Made sure to mark two of the cups (#1 and #4). The unmarked one will be for any other clones from amongst the 6 phenos (if any at all).
- [17:43]: Time to top and defoliate #1!
--- Using a pair of brand new trimmers (AC Infinity),
--- Gently cut the main stalk to even out the canopy.
--- Then trimmed and cleaned most of the nodes leaving the top node or two.
--- Also trimmed the leaf fingers a bit before placing the top cutting into the cup of aloe solution.
--- Now for the rest of the cuttings!
--- [~45 minutes later]
- [18:32]: Managed to finish defoliating and cutting the rest of the clones.
--- Took two more lower cuttings from #1 (3 clones total).
--- Took 3 lower cuttings from #4
--- While defoliating, decided to try and clone the original #2 pheno as well. Took 4 small cuttings.
--- Similar to the top cutting, trimmed and cleaned each lower node for each cutting before placing them into the cups.
--- Before finishing up the 2nd cutting, I noticed the first cutting (the top cut that was also trimmed) was drooping.
--- So I did not trim and the leaf fingers for the other cuttings.
--- In total there were 10 cuttings taken for potential clones.
--- My main focus was to take cuttings and to clean up all the lower growth from both #1 and #4.
--- Defoliated and cleaned up the back original phenos as well (also trimmed back the cover crop).
- [18:35]: Temporarily placed the cuttings onto the floor of the 4x4 tent.
--- Took the trimmings (about 3 cups) and spread them onto the top mulch of #1 and #2.
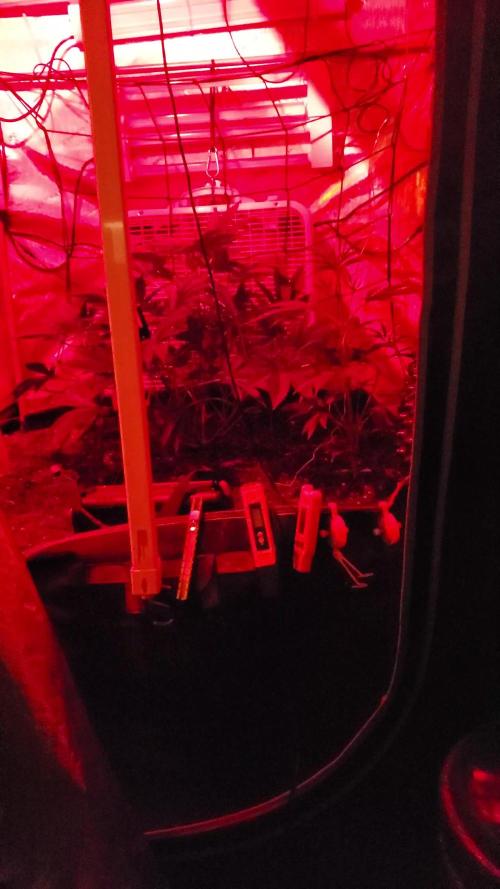
--- Time to set the environmental controls for the 3x3 veg tent.
- [18:43]: Within the AC Infinity App,
--- For the Veg Tent [3x3] controller,
--- Adjusted the 'Vegetative [18/6]' Schedule for the grow light.
------ Set the Mode to ‘On Mode’
------ Set the START/END times to 04:00PM/10:00AM
------ Set the MAX to 1
--- The IonBoard S33 is now utilizing around 60.8W (at intensity 1 out of 10).
--- Adjusted the 'Vegetative [18/6]' Schedule for the exhaust fan.
------ Increased the Humidity’s HIGH trigger value from 81% to 87%
--- Adjusted the 'Vegetative [18/6]' Schedule for the humidifier.
------ Decreased the VPD target value from 1.5kPa to 0.8kPa
- [18:52]: Moved the cuttings into the 3x3 veg tent.
--- It begins! I think.
--- Going to let these cutting drink some aloe for a day before switching to straight distilled water.
--- Hmm. Could be the white floor of the 3x3 veg tent, but have noticed the S33 has a whiter spectrum whereas the FC-6500 seems to be warmer in color.
--- Anyways,
- [18:58]: Poured 4 cups of distilled water down EB1’s fill tube.
--- Poured 2 cups of distilled water down EB2’s fill tube.
- [19:06]: Filled a pump sprayer with 5 cups of distilled water.
--- Focused mainly on the straw mulch of #4.
--- But also misted the straw mulch for the rest of the plants a bit.
- [19:12]: Checked the humidifiers.
--- Refilled the humidifiers with distilled water.
- [19:44]: Going to be using Clonex rooting gel before planting the cuttings into Coco Coins (pre-soaked with microbes and aloe). But before that begins, going to transfer the Clonex gel into a squeeze bottle.
--- Gently peeled back the seal on the original Clonex bottle. Just enough make a tiny opening,
--- Then slowly and carefully poured the gel into an empty squeeze bottle.
--- Also removed the sticker from the original bottle and placed it onto the new one.
- [19:54]: Perfect!
--- Instead of applying the gel to the cutting, going to be applying the gel to the Coco Coin.
--- This squeeze bottle will make applying the gel a lot easier.
--- Will take PPFD readings tomorrow.
--- Also will change out the aloe solution to distilled water.
--- I really hope I didn’t screw things up before they could even begin.
--- Don’t die on me ladies!
--- Please.
Day 03 - Wednesday - 06/05/24 - Total Days: 100
-----------------------------------
Daily Averages [~23:00]
- Temps: 81.9°F [27.7°C]
- Humidity: 75.5%
- VPD: 0.90 kPa
- Soil %: [29, 36, 38, 36]
-----------------------------------
- [09:40]: Quick morning check!
--- #1 is looking a bit droopy, but looking okay. Topping is a high stress technique so going to take some time to recover. Don’t plan on flipping the main 4x4 tent to flower for a good week or so which should be enough time.
--- #4 looks great! The defoliation seems to have no effect on growth. Nice!
- [09:41]: Also quickly checked on the 3x3 veg tent,
--- Nice! The cuttings are looking great!
--- No yellowing and they all seemed to have turned up towards the light.
--- So far so good!
- [22:53]: Evening check.
--- #1 is continuing to dominate this grow! She has spread wide and looking incredible!
--- #2 is looking gnarly, but getting there.
--- #3 is getting larger! But still a runt. By far, her leaves are the darkest of the bunch, but she is still growing!
--- #4 looks happy and growing along beautifully! Wow!
- [22:55]: Checked down both fill tubes.
--- Both reservoirs were completely dry!
- [22:59]: Poured 5 cups of distilled water down EB1’s fill tube.
--- Poured 2 cups of distilled water down EB2’s fill tube.
- [23:05]: Checked on the 3x3 veg tent.
--- Ooo yea! The cuttings are still green! Nice!
- [23:07]: Took PPFD readings.
--- The cuttings were around 121 μmol/m²/s which gives a DLI of 7.84 mol/m²/d
--- Nice! These levels are on the lower range for seedlings (~100-300), perfect! I think.
- [23:14]: Swapped the aloe water out to straight distilled water.
--- Going to let these cuttings soak for one more day before planting.
--- Please don’t die girls!
- [23:15]: Checked the humidifiers.
--- Refilled the humidifiers with distilled water.
--- Ooo yea!
--- Tomorrow is the big rooting day!
Day 04 - Thursday - 06/06/24 - Total Days: 101
-----------------------------------
Daily Averages [~23:00]
- Temps: 81.9°F [27.7°C]
- Humidity: 75.2%
- VPD: 0.91 kPa
- Soil %: [32, 38, 38, 34]
-----------------------------------
- [16:20]: Evening check.
--- #1 is a bit droopy, but growth is looking green and healthy.
--- #2 is looking bigger! She’s also looking sort of droopy.
--- #3 is growing along nicely! Looking good girl!
--- #4 is looking great! A bit droopy but plan to water today.
- [16:23]: Checked down both fill tubes.
--- EB1's reservoir still has some water.
--- EB2's reservoir was completely dry!
- [16:23]: Checked the Ecowitt soil moisture sensor data:
--- 28% - [CH01 EB1 - Garlic Budder #1]
--- 36% - [CH02 EB2 - Garlic Budder #2]
--- 37% - [CH03 GFP - Garlic Budder #3]
--- 30% - [CH04 FPT - Garlic Budder #4]
- [16:30]: Using a pump sprayer,
--- Misted the straw mulch of #4 with 6 cups of distilled water.
--- Focused mainly on the straw mulch.
--- Also misted the straw mulch of #3 (in the grassroots fabric pot) a bit.
- [16:43]: Poured 5 cups of distilled water down EB1’s fill tube.
--- Poured 3 cups of distilled water down EB2’s fill tube.
- [16:52]: Checked the Ecowitt soil moisture sensor data:
--- 56% - [CH01 EB1 - Garlic Budder #1]
--- 44% - [CH02 EB2 - Garlic Budder #2]
--- 40% - [CH03 GFP - Garlic Budder #3]
--- 45% - [CH04 FPT - Garlic Budder #4]
- [17:01]: Took general PPFD readings.
--- #1 was around 379 μmol/m²/s which gives a DLI of 24.56 mol/m²/d
--- #2 was around 333 μmol/m²/s which gives a DLI of 21.58 mol/m²/d
--- #3 was around 293 μmol/m²/s which gives a DLI of 18.99 mol/m²/d
--- #4 was around 378 μmol/m²/s which gives a DLI of 24.49 mol/m²/d
- [17:09]: Took the weekly height and light distance measurements.
--- #1 was about 21" tall.
--- #2 was about 13.5" tall.
--- #3 was about 9.5" tall.
--- #4 was about 19.25" tall.
--- Hmm..
- [17:19]: Adjusted the right oscillating fan a bit.
--- Re-angled the CloudRay S6 oscillating fan upwards. Been noticing that the air has been hitting the tops of the plants so easing off a bit (#1 is still getting hit, but she’s huge so not too worried).
- [17:23]: Back to the measurements!
--- #1 was about 9.5" away from the grow light.
--- #2 was about 17" away from the grow light.
--- #3 was about 17.5" away from the grow light.
--- #4 was about 11.5" away from the grow light.
- [17:46]: Checked on the 3x3 veg tent.
--- Cuttings are still green! They do look a bit droopy but no signs of yellowing.
--- Okay!
- [17:55]: Time to begin the rooting process!
--- For my first attempt at rooting, going to be using Coco Coins pre-soaked in saponins, microbes and aloe.
--- To further help with rooting, going to also be using Clonex rooting gel.
--- Filled a measuring cup with 4 cups of distilled water.
------ Added half of 1/64tsp of Quillaja Saponaria Extract [60]
------ Added 1/16tsp of Horticultural Aloe
------ Added 1/8tsp of Mycrobe Complete
--- Mixed the solution thoroughly.
--- Time for the Coco Coins!
--- 10 cuttings means 10 Coco Coins.
- [18:09]: Dropped 10 Coco Coins into the measuring cup.
--- The coins immediately started to expand.
--- A bit too much.. Oops!
--- Poured the solution and Coco Coins into a pitcher.
--- Added 2 cups of distilled water to the solution (now at 6 cups).
--- Great! The coins are pretty much fully expanded, but going to wait a bit longer to fully saturate each coin.
--- [~20-30 minutes later]
- [18:42]: Great!
--- Took the seedling and flood tray from the AC Infinity propagation dome and placed all 10 Coco Coins into the slots.
--- Gave each Coco Coin a quick shake to remove excess solution. The coins were not dripping with solution but still pretty saturated.
--- Arranged them into 3 groups with the cuttings in mind.
--- Also tried to keep the pre-made holes intact.
--- Time to inoculate the Coco Coins!
- [18:54]: Using a squeeze bottle,
--- While keeping the nozzle from making contact with the coco, gently filled each pre-made hole with Clonex rooting gel. Just enough gel to fully cover the hole of each coco coin.
- [19:00]: Time to plant the cuttings!
--- Gave each cup a misting of distilled water. Focused on wetting the top growth with water.
--- Okay!
--- To avoid mixing cuttings up.
- [19:01]: Starting with the original #2 pheno cup,
--- For each cutting,
--- Using a pair of clean trimmers, made a final 45° cut about 1/2" from a bottom node.
--- Then stripped away and scared the protective membrane below the node before planting.
--- Made sure the node was about 1/2" below the surface of the coco.
--- To help with planting, while inserting each cutting, gave the Coco Coin a gentle squeeze to loosen the coco. This also helped to ensure the coco and gel was in good contact with the cutting.
--- Once the cutting was planted into the Coco Coin, made sure to place back in the same spot (made sure to keep the cuttings in their groupings).
--- Once a cup was complete, made sure to keep the label with the group.
--- Re-misted the top growth as needed to keep it wet.
--- Also wiped the trimmers with isopropyl alcohol in between cuttings (plan to use 10% bleach solution for next time).
--- Repeated this process until all 10 cuttings were cut, planted, and in the tray.
--- The coco coins fit perfectly into the tray and don’t reach the bottom. Nice!
--- The bottom air gap is important.
--- Poured a bit of distilled water through one of the empty slots into the bottom of the tray. Just enough to fill the bottom of the tray, but not enough to reach any of the Coco Coins (~1/4cup).
- [19:35]: Placed the propagation tray with cuttings into the 3x3 veg tent.
--- Placed the first layer of the propagation dome on before giving the sides a misting of distilled water.
--- Also sprayed the top of the propagation dome before covering the cuttings.
--- Vents are all fully closed.
- [19:40]: Placed the bar lights onto the top of the dome before configuring the controller.
------ Set the START/END times to 04:00PM/10:00AM
------ Set the bar light’s intensity to 2 (out of 10).
--- Also made sure the propagation light controller’s time was in sync with the Controller 69 Pro.
- [19:47]: Took PPFD readings.
--- The cuttings were around 136 μmol/m²/s which gives a DLI of 8.81 mol/m²/d
--- The PPFD levels are similar to the floor.
--- Perfect!
--- Going leave the IonBoard S33 on during this rooting process.
--- Will check back tomorrow to cycle the air under the dome.
- [19:56]: Checked the humidifiers.
--- Refilled the humidifiers with distilled water.
- [20:17]: Quick night check!
--- Ooo yea! Growth is raging and looking perky!
--- Mainly checked on #1 and #4 which were looking incredible!
--- Keep on growing ladies!
Day 05 - Friday - 06/07/24 - Total Days: 102
-----------------------------------
Daily Averages [~23:00]
- Temps: 82.7°F [28.2°C]
- Humidity: 76.2%
- VPD: 0.89 kPa
- Soil %: [37, 40, 38, 35]
-----------------------------------
- [10:03]: Decided to increase the ambient temp in the 3x3 veg tent.
--- Within the AC Infinity App,
--- For the Veg Tent [3x3] controller,
--- Adjusted the 'Vegetative [18/6]' Schedule for the heater.
------ Increased the Temp target value from 78°F to 82°F
--- Hopefully this will help to keep the veg tent at a more consistent temp.
- [22:26]: Evening check.
--- Ooo yea! The garden is looking incredible!
--- #1 is looking perky and just bushing out! Wow!
--- #2 is getting big! Growth is weird and leaf fingers are huge! Just going to let her grow.
--- #4 is looking happy and growing along like a champ! Nodes are starting branch out and she is turning into a bush!
- [10:28]: Checked down both fill tubes.
--- Both reservoirs were completely dry!
- [22:33]: Poured 5 cups of distilled water down EB1’s fill tube.
--- Poured 3 cups of distilled water down EB2’s fill tube.
- [22:40]: Checked on the propagation dome (inside the 3x3).
--- Ah yea! Looking great ladies!
--- Lifted the top of the dome to let some fresh air in for a bit.
--- Wow!
--- Leaves still look nice and green!
--- So far everything looks great!
--- Just going to continue on!
- [22:53]: Checked the humidifiers.
--- Refilled the humidifiers with distilled water.
- [11:01]: Decided to adjust the humidifier for the 3x3.
--- Within the AC Infinity App,
--- For the Veg Tent [3x3] controller,
--- Adjusted the 'Vegetative [18/6]' Schedule for the humidifier.
------ Increased the VPD target value from 0.8kPa to 1.5kPa
--- The higher VPD level will essentially turn the humidifier off.
--- I won’t be needing the humidifier for a good week so might as well save the water.
Day 06 - Saturday - 06/08/24 - Total Days: 103
-----------------------------------
Daily Averages [~23:00]
- Temps: 81.6°F [27.6°C]
- Humidity: 74.9%
- VPD: 0.91 kPa
- Soil %: [35, 40, 37, 31]
-----------------------------------
- [07:40]: Quick morning check!
--- #1 and #4 are looking perky and happy!
--- Also checked on the propagation dome,
--- All cutting still look green! Hyped!
- [20:02]: Evening check.
--- Wow the garden is raging with growth!
--- #1 has blown up! She has clearly recovered and growth is ramping up again!
--- #2 is stretching upwards!
--- #3 is now the smallest of the 4, but still getting larger!
--- #4 is looking incredible! Wow! Growth looks perky and happy!
- [20:05]: Checked down both fill tubes.
--- Both reservoirs were completely dry!
- [20:10]: Poured 6 cups of distilled water down EB1’s fill tube.
--- Poured 2 cups of distilled water down EB2’s fill tube.
- [20:16]: Checked the Ecowitt soil moisture sensor data:
--- 35% - [CH01 EB1 - Garlic Budder #1]
--- 40% - [CH02 EB2 - Garlic Budder #2]
--- 36% - [CH03 GFP - Garlic Budder #3]
--- 27% - [CH04 FPT - Garlic Budder #4]
- [20:19]: Using a pump sprayer,
--- Misted the straw mulch of #4 with 5 cups of distilled water.
--- Focused mainly on the straw mulch.
--- Also misted the mulch of #3 a bit (in the fabric pot).
- [20:27]: Checked propagation dome (in the 3x3),
--- To cycle the air under the dome, lifted the top off for a bit.
--- Ooo yea! Everything is still green and looking great!
--- Keep on rooting ladies!
--- Oops!
- [21:45]: Checked the humidifiers.
--- Refilled the humidifiers with distilled water.
Day 07 - Sunday - 06/09/24 - Total Days: 104
-----------------------------------
Daily Averages [~23:00]
- Temps: 81.5°F [27.5°C]
- Humidity: 74.8%
- VPD: 0.91 kPa
- Soil %: [36, 40, 37, 36]
-----------------------------------
- [08:18]: Quick morning check!
--- Nice! The main tent is looking great! #1 and #4 are both raging with growth!
--- Checked on the propagation dome (inside the 3x3) and the clones are still looking green!
--- Wow! Everything is going almost too well! Just keep on growing!
- [19:08]: Evening check.
--- Garden is just exploding with growth! Seems everyone has fully recovered from the defoliation and topping!
--- Wow #1 is bushed out and looking incredible!
--- #2 is growing really starting to get large! Growth still is funky, but stoked none-the-less.
--- #3 is starting to fill in the pot! Getting larger!
--- Wow! #4 is getting taller and looks healthy and green!
- [19:12]: Checked down both fill tubes.
--- Both reservoirs were completely dry!
--- Wow the canopy is really starting to get taller and closer to the light. May need to raise it up soon.
--- Absolutely surprised how low the light levels have been throughout this entire cycle. Barely moved the light and have not increased the intensity past 2 (out of 10). Less is really more.
--- Anyways!
- [19:18]: Checked the Ecowitt soil moisture sensor data:
--- 36% - [CH01 EB1 - Garlic Budder #1]
--- 41% - [CH02 EB2 - Garlic Budder #2]
--- 37% - [CH03 GFP - Garlic Budder #3]
--- 34% - [CH04 FPT - Garlic Budder #4]
- [19:19]: Poured 6 cups of distilled water down EB1’s fill tube.
--- Poured 3 cups of distilled water down EB2’s fill tube.
- [19:24]: Checked propagation dome (in the 3x3),
--- To refresh the air, lifted the top off for a bit.
--- Sweet! Still green! Wow!
--- Using a spray bottle, misted the top growth with distilled water.
- [20:35]: Checked the humidifiers.
--- Refilled the humidifiers with distilled water.
--- Wow what a week!
--- Growth has been just insane in the 4x4 tent! All plants have fully recovered and have just exploded with growth.
--- I think it’s time to flip to flower!
--- Also, I’m absolutely baffled about how well the cloning process has been going.
--- So far no issues!
--- Not complaining, but just surprised. Keep on growing ladies!
--- If all goes well, should have fully rooted clones soon ready for transplanting (into solo cups of course).
--- Absolutely hyped for next week!
--- Maximum warp Ensign, Engage!
[END OF WEEK 14|07]

Likes
50
Share


@Mr_Motalovah
Follow
Hello growers and tokers! 👋 👩🌾 🧑🌾.🔥💨
There has been much change this week!!
First there was a big defoliation done, I cleaned the bottom of the plants.
All the growth that wouldn't amount to anything because the light doesn't penetrate that low.
Also took off the biggest fan leaves to give more room for light.
Then finally switched to 12/12..
After just 36 hours after the defoliation there was a major change.
New growth everywhere, colas started stretching upwards fast.
By far the tallest girls in the tent. Her colas are stacking up nice and tight if she keeps that up we'll have some nice dense colas. 😁
Great reaction to the defoliation and 12/12 switch.
I'm still watering every other day, After the defoliation I watered with only Enzymes 2ml/L to clean the roots a bit then started with the nutrientes again.
I dropped the amount of grow nutrients from 3ml/L to 1ml/L and started adding bloom nutrientes 2ml/L for now.
I'll slowly be upping the bloom nutrientes and after week 2 I'll no longer add grow nutrients.
That's it for this week. Stay tuned to see how they flower.
Stay safe!

Likes
54
Share

@RockoCalenberg
Follow
Tag 56 | Blütetag 12
Der Stretch läuft jetzt komplett auf Anschlag — und langsam zeigen die drei Damen immer deutlicher ihren eigenen Charakter.
Die Unterschiede zwischen den Genetiken werden von Woche zu Woche sichtbarer und genau dafür liebe ich solche Vergleichsruns. 👀
🌡️ Klima & Setup
Die Bewässerung über die Dripper läuft weiterhin stabil und die Pflanzen danken es sichtbar mit konstantem Wachstum und ordentlich Zug nach oben. Die 90×60-Fläche ist mittlerweile gut gefüllt, aber jede Lady hält ihren eigenen 30×60-Streifen noch sauber ein. Genau so war der Plan.
🌿 Chicken & Waffles
Absolute Maschine.
Wird runtergebunden, steht paar Stunden später wieder senkrecht da, als wäre nichts gewesen. 😅
Die Kraft und Dynamik von der Genetik ist echt brutal. Riesige Internodienabstände, aggressiver Stretch und einfach permanenter Vorwärtsdrang. Aktuell weiterhin die größte Pflanze im Zelt und definitiv das Beast des Runs.
🍓 Fruit Bomb Punch
Die Fruit Bomb Punch holt mittlerweile aber ordentlich auf.
Nach ihrem etwas holprigen Start und dem Stress durch Toppen und die frische Erde wirkt sie inzwischen deutlich akklimatisierter und schiebt jetzt richtig nach vorne. Die Struktur bleibt etwas luftiger als bei der Strawberry AK, aber dafür merkt man langsam dieses typische XXL-Sativa-Momentum, das die Sorte laut Breeder haben soll.
🌲 Strawberry AK
Nach wie vor die Bilderbuchpflanze im Zelt.
Untrainiert, extrem sauber aufgebaut und einfach grundsolide in jeder Hinsicht. Sehr kompakt, schön buschig und dabei trotzdem kräftig genug, um problemlos mitzuhalten. Ein richtiges Flächenmonster mit unglaublich ordentlicher Struktur. Bis jetzt vermutlich die unkomplizierteste Pflanze im gesamten Run.
✨ Insgesamt
Der Stretch ist jetzt voll im Gang und das Zelt lebt richtig.
Alle drei entwickeln mittlerweile klar erkennbare Eigenheiten und genau das macht den Vergleich aktuell extrem spannend. Noch sieht alles kontrollierbar aus — aber die nächsten 1–2 Wochen werden wahrscheinlich entscheiden, wer hier endgültig das Kommando übernimmt. 😄
Am Ende entscheidet das Glas. ?
Grow on 🌱
Day 56 | Flower Day 12
The stretch is now running at full speed — and the differences between the three genetics become more obvious every single day.
That’s exactly why I love doing comparison runs like this. 👀
🌡️ Environment & Setup
The drip irrigation keeps everything stable and the girls clearly appreciate the consistent moisture with strong daily growth and steady vertical push. The 90×60 tent is filling up nicely now, but every lady still more or less keeps her own 30×60 lane — exactly how the setup was planned.
🌿 Chicken & Waffles
Absolute beast.
You bend her down and a few hours later she’s standing back upright like nothing ever happened. 😅
The strength and vigor of this genetic is honestly insane. Huge internodal spacing, aggressive stretch and nonstop forward momentum. Still the biggest plant in the tent right now and definitely the powerhouse of this run.
🍓 Fruit Bomb Punch
Fruit Bomb Punch is catching up fast now though.
After the rougher start with topping stress and the hotter fresh soil, she finally seems fully acclimated and is starting to explode with growth. Her structure stays a bit airier compared to Strawberry AK, but you can definitely start seeing that XXL sativa-style energy the breeder talks about.
🌲 Strawberry AK
Still the picture-perfect plant of the tent.
Untouched, extremely clean structure and just rock solid overall. Very compact, nicely bushy and still vigorous enough to keep up without any real training. A true space-filler with an incredibly tidy shape. Probably the easiest and most stable plant of the entire run so far.
✨ Overall
The stretch is fully underway now and the tent feels alive.
All three plants are developing their own very clear personalities and that’s what makes this comparison so interesting right now. Everything is still manageable — but the next 1–2 weeks will probably decide who truly takes over the tent. 😄
In the end, the jar decides. ?
Grow on 🌱


Likes
6
Share


@PoshGrow
Follow
Welcome to Auto Alaskan Purple Grow by PoshGrow!
🍀 Week #4 2020 August 13th - 20th.
General Info:
When planted: 2020 July 23th.
Week: 4
Days: 21 - 28
Last Update Day: 2020 August 18th.
Plants: 5 Alaskan Purple Auto.
Equipment:
Tent: MarsHydro 1mx1mx2m or 39"x39"x72".
Light: HLG 260w V2 Rspec QB Kit.
Exhaust: 4" 322 CFM fan + Viper Carbon Filter.
Intake: 4" 100 CFM Inline Fan.
Oscillating Fan:
Lower: 4" Ram Fan.
Upper: 16" Oscillating Ram Fan.
Humidifier: Taotronics TT-AH001.
Dehumidifier: Pavlit MD750.
Soil: NPK soil 40% Compost, 50% Peat Moss, 10% Agroperlite.
Pot: 7 gallon Fabric Pot x 5pcs.
Nutriens: Fox Farm Trio.
PH Correcton: Chemoform pH-Minus Granulat.
PH Pen: Cheap Chinese one, I callibrate it every time I use it.
Water pump:
Digital microscope:
Comment:


Likes
1
Share


@JoeCNote
Follow
Mites have taken hold bad at this point, vacuuming them off buds everyday, trying to avoid over spraying


Likes
4
Share


@Nookandplant42o
Follow
An immediate feeling of high something relaxing in the eyes, the body becomes active for activities or work. Brings Up Old Thoughts Reflection Watching movies is a great thing to stay focused and better save something sweet to eat. Undoubtedly, the high comes with hunger, something good even for those who have a lack of appetite. Strong sweet and citrus aroma, mild flavor bringing a light guava sweetness. 🤗

Likes
68
Share

@Ultraviolet
Follow
Removed autoflower and put her in her own pot outside the tent.
Foliars applied in strong blue 430nm with 4000Hz tone. 20-minute dose prior to application.
In essence, you're seeing a combination of the infrared light reflected by the plant, which the camera perceives as red, and any residual visible blue light the plant reflects, which results in a purple hue.
I was doing more stretching of the stems, adjusting weights, just a little too much, and it snapped almost clean. I got a little lucky in that it was still connected, wrapped her almost instantly while holding her in place with yoyo's. The core framework is now in place.
If your soil has a high pH, it's not ideal; you want a pH of 6.4, 6.5, or 6.6, which is ideal. If you are over a pH of 7, you have no hydrogen on the clay colloid. If you want your pH down, add Carbon. If you keep the pH below 7, you will unlock hydrogen, a whole host of new microbes become active and begin working, the plant will now be able to make more sugar because she has microbes giving off carbon dioxide, and the carbon you added hangs onto water. Everything has electricity in it. When you get the microbes eating carbon, breathing oxygen, giving off CO2, those aerobic soil microbes will carry about 0.5V of electricity that makes up the EC. The microorganisms will take a metal-based mineral and a non-metal-based mineral with about 1000 different combinations, and they will create an organic salt! That doesn't kill them, that the plant loves, that the plant enjoys. This creates an environment that is conducive to growing its own food.
Metal-based: Could include elements like iron, manganese, copper, or zinc, which are essential nutrients for plants but can exist in forms not readily accessible.
Non-metal-based: Examples like calcium carbonate, phosphate, or sulfur are also important for plant growth and potentially serve as building blocks for the organic salt.
Chelation in a plant medium is a chemical process where a chelating agent, a negatively charged organic compound, binds to positively charged metal ions, like iron, zinc, and manganese. This forms a stable, soluble complex that protects the micronutrient from becoming unavailable to the plant in the soil or solution. The chelate complex is then more easily absorbed by the plant's roots, preventing nutrient deficiency, improving nutrient uptake, and enhancing plant growth. Chelation is similar to how microorganisms create organic salts, as both involve using organic molecules to bind with metal ions, but chelation specifically forms ring-like structures, or chelates, while the "organic salts" of microorganisms primarily refer to metal-complexed low molecular weight organic acids like gluconic acid. Microorganisms use this process to solubilize soil phosphates by chelating cations such as iron (Fe) and calcium (Ca), increasing their availability.
Added sugars stimulate soil microbial activity, but directly applying sugar, especially in viscous form, can be tricky to dilute. Adding to the soil is generally not a beneficial practice for the plant itself and is not a substitute for fertilizer. While beneficial microbes can be encouraged by the sugar, harmful ones may also be stimulated, and the added sugar is a poor source of essential plant nutrients. Sugar in soil acts as a food source for microbes, but its effects on plants vary significantly with the sugar's form and concentration: simple sugars like glucose can quickly boost microbial activity and nutrient release. But scavenge A LOT of oxygen in the process, precious oxygen. Overly high concentrations of any sugar can attract pests, cause root rot by disrupting osmotic balance, and lead to detrimental fungal growth. If you are one who likes warm tropical high rh, dead already. Beneficial, absolutely, but only to those who don't run out of oxygen. Blackstrap is mostly glucose, iirc regular molasses is mostly sucrose. Sugars, especially sucrose, act as signaling molecules that interact with plant hormones and regulate gene expression, which are critical for triggering the floral transition. When sucrose is added to the growth medium significantly influences its effect on floral transition.
Probably wouldn't bother with blackstrap given its higher glucose content. Microbes in the soil consume the sugar and, in the process, draw nitrogen from the soil, which is the same nutrient the plant needs. Glucose is not an oxygen scavenger itself, but it acts as a substrate for the glucose oxidase (GOx) enzyme, effectively removing oxygen from a system. Regular molasses (powdered if you can), as soon as she flips to flower or a week before, the wrong form of sugar can delay flower, or worse. Wrong quantity, not great either. The timing of sucrose application is crucial. It was more complicated than I gave it credit for, that's for sure. When a medium's carbon-to-nitrogen (C:N) ratio reaches 24:1, it signifies an optimal balance for soil microbes to thrive, leading to efficient decomposition and nutrient cycling. At this ratio, soil microorganisms have enough nitrogen for their metabolic needs, allowing them to break down organic matter and release vital nutrients like phosphorus and zinc for plants. Exceeding this ratio results in slower decomposition and nitrogen immobilization, while a ratio below 24:1 leads to faster breakdown and excess nitrogen availability.
Carbon and nitrogen are two elements in soils and are required by most biology for energy. Carbon and nitrogen occur in the soil as both organic and inorganic forms. The inorganic carbon in the soil has minimal effect on soil biochemical activity, whereas the organic forms of carbon are essential for biological activity. Inorganic carbon in the soil is primarily present as carbonates, whereas organic carbon is present in many forms, including live and dead plant materials and microorganisms; some are more labile and therefore can be easily decomposed, such as sugars, amino acids, and root exudates, while others are more recalcitrant, such as lignin, humin, and humic acids. Soil nitrogen is mostly present in organic forms (usually more than 95 % of the total soil nitrogen), but also in inorganic forms, such as nitrate and ammonium. Soil biology prefers a certain ratio of carbon to nitrogen (C:N). Amino acids make up proteins and are one of the nitrogen-containing compounds in the soil that are essential for biological energy. The C:N ratio of soil microbes is about 10:1, whereas the preferred C:N ratio of their food is 24:1 (USDA Natural Resource Conservation Service 2011). Soil bacteria (3-10:1 C:N ratio) generally have a lower C:N ratio than soil fungi (4-18:1 C:N ratio) (Hoorman & Islam 2010; Zhang and Elser 2017). It is also important to mention that the ratio of carbon to other nutrients, such as sulfur (S) and phosphorous (P) also are relevant to determine net mineralization/immobilization. For example, plant material with C:S ratio smaller than 200:1 will promote mineralization of sulfate, while C:S ratio higher than 400:1 will promote immobilization (Scherer 2001).
In soil science and microbiology, the C:S ratio helps determine whether sulfur will be released (mineralized) or tied up (immobilized) by microorganisms.
A carbon-to-sulfur (C:S) ratio smaller than 200:1 promotes the mineralization of sulfate, when the C:S ratio is low, it indicates that the organic matter decomposing in the soil is rich in sulfur relative to carbon. Microorganisms require both carbon and sulfur for their metabolic processes. With an excess of sulfur, microbes take what they need and release the surplus sulfur into the soil as plant-available sulfate
A carbon-to-sulfur (C:S) ratio higher than 400:1 will promote the immobilization of sulfur from the soil. This occurs because when high-carbon, low-sulfur materials (like sawdust) are added to soil, microbes consume the carbon and pull sulfur from the soil to meet their nutritional needs, temporarily making it unavailable to plants.
200:1 C:S 400:1: In this range, both mineralization and immobilization can occur simultaneously, making the net availability of sulfur less predictable.
This dynamic is similar to how the carbon-to-nitrogen (C:N) ratio regulates the availability of nitrogen in soil. Just as microbes need a certain amount of nitrogen to process carbon, they also require a balanced amount of sulfur. Both mineralization and immobilization are driven by the metabolic needs of the soil's microbial population.
Sulfur is crucial for protein synthesis. A balanced ratio is particularly important in relation to nitrogen (N), as plants need adequate sulfur to efficiently use nitrogen. A severely imbalanced C:S ratio can hinder the efficient use of nitrogen, as seen in trials where adding nitrogen without balancing sulfur levels actually lowered crop yields.
Maintaining a balanced carbon-to-sulfur (C:S) ratio is highly beneficial for plant growth, but this happens indirectly by regulating soil microbial activity. Unlike the C:N ratio, which is widely discussed for its direct effect on nutrient availability, the C:S ratio determines whether sulfur in the soil's organic matter is released (mineralized) or temporarily locked up (immobilized).
Applied 3-day drought stress.
Glucose will hinder oxygenation more than sucrose in a solution because glucose is consumed faster and has a higher oxygen demand, leading to a more rapid decrease in oxygen levels. When cells respire, they use oxygen to break down glucose, and this process requires more oxygen for glucose than for sucrose because sucrose must first be broken down into glucose and fructose before it can be metabolized.
In a growth medium, glucose is a more immediate and universal signaling molecule for unicellular and multicellular organisms because it is directly used for energy and triggers a rapid gene expression response. In contrast, sucrose primarily acts as a signaling molecule in plants to regulate specific developmental processes by being transported or broken down, which can be a more complex and slower signaling process.
Critical stuff.
During wakefulness (DC electric current) life can not entangle electrons and protons. During the daytime, the light is sensed as multiple color frequencies in sunlight. Coherence requires monochromatic light. Therefore, at night, IR light dominates cell biology. This is another reason why the DC electric current disappears during the night. The coherence of water is maintained by using its density changes imparted by infrared light released from mitochondria in the absence of light. This density change can be examined by NMR analysis, and water is found to be in its icosahedral molecular form. This is the state that water should be in at night. This is when a light frequency is lowest and when the wave part of the photoelectric effect is in maximum use.
3600
Likes
16
Share


@pHilosophy420
Follow
Day 70 - she is growing well and getting frosty. The buds getting bigger every week. The smell is great and the plant is bright colour when in late flowering I will do colder nights to get out the dark colours

Likes
12
Share


@EmeraldLakeCannabis
Follow
Good week in the tent, finally now seeing the flowers kicking in. Only took about 3 weeks under 12/12, lol. They've stretched quite a bit since the flip, and by the looks of things should yield more than I initially thought.
-10/6- Gave the girls a drink and a defo today, in the interest of airflow mainly. Don't want a repeat of last time. No matter how miniscule the amount of mold, any is a serious issue by my (and anyone resonable's) standards.
Likes
12
Share


@Herbalist7
Follow
Running 4 autos in the same aeroponic system isnt ideal as 2 of my plants need to flush this week.. while the other 2 still have about 2 weeks again... its all good tho.. id take it out an flush them individually before harvesting.


Likes
Comments
Share


Likes
17
Share


@420DeepGrow
Follow
Gracias al equipo de AnesiaSeeds, Marshydro, XpertNutrients y Trolmaster sin ellos esto no sería posible.
💐🍁 Violet Face:
Esta variedad feminizada es como un dream team de la realeza del cannabis, que mezcla la majestuosa Blue Face con las frías vibraciones de la Frozen Black Cherry. Es como el perfecto día de verano: vibraciones soleadas con una brisa fresca.
Blue Face aporta esa refinada magia Z, con notas cremosas de naranja y pastel de plátano que te harán sentir como si estuvieras en un paraíso tropical. A continuación, Frozen Black Cherry entra en escena con su aspecto escarchado y su aroma a cereza dulce y ácida que es sencillamente adictivo.
Sube el volumen porque Violet Face golpea fuerte con niveles de THC que se disparan hasta el 35%. Cada calada es un billete al paraíso, que combina los lujosos aromas de la cereza con una embriagadora mezcla de dulzura y sabor afrutado.
Violet Face no es sólo un estilo de vida relajado; también es una campeona de peso pesado, con rendimientos de 600 g/m² en interior y unos exuberantes 900 - 1200 g por planta en exterior. Esta belleza florece en 8-9 semanas, y está lista para la cosecha a finales de septiembre. Tanto si la mantienes acogedora en interior como si la extiendes bajo el cielo, Violet Face se extiende con alturas de 80-120 cm en interior y 160-200 cm en exterior.
🌻🚀 Consigue aqui tus semillas:
💡TS-3000 + TS-1000: se usaran dos de las lámparas de la serie TS de Marshydro, para cubrir todas las necesidades de las plantas durante el ciclo de cultivo, uso las dos lámparas en floracion para llegar a toda la carpa de 1.50 x 1.50 x 1.80.
https://marshydro.eu/products/mars-hydro-ts-3000-led-grow-light/
🏠 : Marshydro 1.50 x 1.50 x 1.80, carpa 100% estanca con ventanas laterales para llegar a todos los lugares durante el grow
https://marshydro.eu/products/diy-150x150x200cm-grow-tent-kit
🌬️💨 Marshydro 6inch + filtro carbon para evitar olores indeseables.
https://marshydro.eu/products/ifresh-smart-6inch-filter-kits/
💻 Trolmaster Tent-X TCS-1 como controlador de luz, optimiza tu cultivo con la última tecnología del mercado, desde donde puedes controlar todos los parametros.
https://www.trolmaster.com/Products/Details/TCS-1
🍣🍦🌴 Xpert Nutrients es una empresa especializada en la producción y comercialización de fertilizantes líquidos y tierras, que garantizan excelentes cosechas y un crecimiento activo para sus plantas durante todas las fases de cultivo.
Consigue aqui tus Nutrientes:
https://xpertnutrients.com/es/shop/
📆 Semana 1:
Ha sido una buena semana, ella ha dado otro gran cambio en su lugar definitivo 😎.
La carpa está ocupada al 75% y comienza una floracion explosiva gracias a @Marshydro y @Xpertnutrients y @Trolmaster con esta gran genética 💪.
A partir de ahora se riega manualmente con las dosis recomendadas por el fabricante.

Likes
8
Share

@MadeInGermany
Follow
Hey guys :-)
The lady has developed very nicely this week 👍.
They were planted in their 8 liter pot where they can now really take root again.
Depending on what time is left in the vegi phase, you might be trained :-) .
Otherwise everything was cleaned and checked.
Have fun and stay healthy 💚🙏🏻
👇🏼👇🏼👇🏼👇🏼👇🏼👇🏼👇🏼👇🏼👇🏼👇🏼👇🏼👇🏼
You can buy this Nutrients at :
https://greenbuzzliquids.com/en/shop/
With the discount code: Made_in_Germany you get a discount of 15% on all products from an order value of 100 euros.
👇🏼👇🏼👇🏼👇🏼👇🏼👇🏼👇🏼👇🏼👇🏼👇🏼👇🏼👇🏼
You can buy this strain at :
Clearwater Seeds
Water 💧 💧💧
Osmosis water mixed with normal water (24 hours stale that the chlorine evaporates) to 0.2 EC. Add Cal / Mag to 0.4 Ec Ph with Organic Ph - to 5.8 - 6.5
MadeInGermany
Likes
31
Share


@THCpapa
Follow
Week 14 marks not only the completion of the first week of flowering but also a remarkable stretch in the growth of my green companions. It's like they've hit a growth spurt of epic proportions, reaching for the stars with leafy determination. They're like botanical skyscrapers, standing tall and proud in their green kingdom.
Each week, these plants become more beautiful, like nature's own masterpiece unfolding before my eyes. The best part? There's no more discoloration on the leaves, and they're gobbling up nutrients without any negative side effects. It's like they've discovered the fountain of leafy youth, and they're thriving like never before.
But amidst the leafy triumphs, there's a slight hiccup in the form of temperature. Throughout the day, the temperatures can reach a toasty 83 degrees. I have a Vivosun controller that's supposed to kick in the exhaust at 79 degrees, but it seems to be struggling to keep up. Looks like it's time to bring in the big guns and get an AC unit for my green haven.
As I reflect on the journey so far, I can't help but feel a sense of awe and gratitude for these amazing plants. They've taught me patience, perseverance, and the true beauty of nature's artistry. Here's to Week 14 – a week of stretching, flowering, and the promise of a bountiful harvest. Cheers to my green companions – may they continue to grow and thrive in their leafy paradise! 🌿

Likes
21
Share


@Rollex420
Follow
This week flushing the wedding cake i thought that was the problem was an excess of nutrients, but instead the water was quite clean, around 1100ppm at the first drain, after several flushes water is now on 600ppm..
It seems that the others are starting to have the same deficiency that hit wedding # 2 .. now I'm treating them with 0.5ml of cal-mag adding it to the other nutrients for once a week (except wedding # 2)
I will wait for the soil to dry out, to give her only clean water since the final harvest is not long.
⚠️ UPDATE DAY 45 ⚠️
Yesterday flush for dos si dos and today flush for (wedding cake 1) they are having a nutrient lockout too..😪 The (wedding cake 1) is clearly healthier than her sister (wedding cake 2) by looking at her color, but unfortunately she had excessive PPM / EC too.. So i did the same procedure by using only tap water, but this time added only 0,5ml of cal-mag. Water was at 6.5 ph until I got a better runoff, it went from 5.7 to 6.0 PH and from 1800 to 700-600ppm 😬 I have never thought of overdoing nutrients so much.. I will certainly learn a lot from these mistakes 🙌🏻

Likes
19
Share


@Jokerdab13
Follow
Muy contento con los resultados unas flores con un aroma sorprendente y una genetics bastante productiva
Likes
14
Share


Likes
14
Share


@Cannabot
Follow
Flowering now awaiting the stretch.Looking foward to growing these out as the smell really dank.Side branching has been minimal.

Likes
3
Share

@deseed_uy
Follow
Espectacular esta gelato esta bañada en tricomas, en breves ya le toca cosecha porque no tengo techo y parece que se viene tormenta y calor no nos vamos a arriesgar con hongos