
Likes
Comments
Share


@BudGardener420
Follow
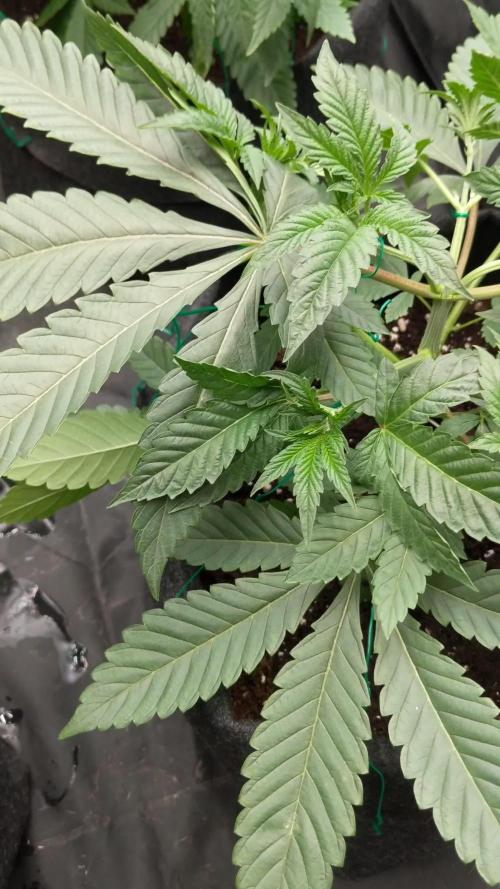
Currently checking daily and tying away branches/leaves to give the buds more light and watering when the soil is dry. Currently my plants drink exactly 1,5L a day. I have the feeling that the right plant is lacking a bit of potassium. I'll leave everything as it is for now because the left plant (fresh new soil) is growing well. Since the right plant is quite bushy anyway, I'll defoliate it again later and remove any lower shoots. I started adding the Bio PK booster towards the middle of the first week of flowering, 2ml per liter of water; as the pH value drops too much, I correct it upwards with Biobizz pH up - from pH 5.5 to 6.5 for 3L, I add a total of 39 drops. My water is mixed as follows: 3L osmosis water, plus 6ml CalMag, 6ml BioPK 5-8 and 39 drops of pH + BioBizz.

Likes
24
Share


@TerpTurtle
Follow
White Truffle x Red Pop by Detroit Seed Co
BuildASoil 3.0 LOYAL TO THE SOIL
Strawberry truffle | Vivosun 2x4 | Mars hydro sp3000 | 7 gallon pot
Chem 91 x Red pop | AC infinity 2x3 | AC Infinity Iongrid 24 | 5 gallon pot
Likes
14
Share


@Chedderbob112
Follow
Question time decisions decisions hav put some photo periods into flower yesterday now I am looking at a budding autoflower that’s on full 24 hour light cycle and is flourishing am thinking would swapping her to a twelve n twelve light cycle he now increase the buds am Goni get coz they say a photoperiod buds and produces trichinae n thc in the dark are autos different dae a need tae try this method for maself n find oot the hard way again lol

Likes
13
Share


@Oyziphar
Follow
This week wasn't as bad as last week 😊 Nights were cold 😰, but not to much rain 😿 and a few hours of sun 😍
Temperatures in the greenhouse were medium : during the day 20°C 💀; min temp 3.5°C ; max temp 31,7°C 😤
Cookies Gelato has turned completely purple 👍👍👍
I defoliated the plants 😙 and had to remove budrot (especially in the Cookies Gelatoes)😨
I took the prettiest Cookies Gelato outside for a photo session in my garden 😍
Probably these will be the last pictures of the plans, before harvesting ! 👍😄

Likes
10
Share


@extraterrestrial1
Follow
-------------------------------------------------
Day 36
Water: N/A
Humidifier: 50% (LOW-MIST)
Dehumidifier: On
Fan Speed: High
Light on @ 19:00 (27.5° celsius @ 49% RH)
Light off @ 13:00 (22.6° celsius @ 51% RH)
-------------------------------------------------
Day 37
Water: N/A
Humidifier: 50% (LOW-MIST)
Dehumidifier: On
Fan Speed: High
Light on @ 19:00 (26.8° celsius @ 48% RH)
Light off @ 13:00 (23.6° celsius @ 50% RH)
-------------------------------------------------
Day 38
Water: 0.5 Gallon TT Water w/ 2ml/L Alaska Morbloom + 4ml/L Remo VeloKelp
Humidifier: 45% (LOW-MIST)
Dehumidifier: On
Fan Speed: High
Light on @ 19:00 (26.9° celsius @ 49% RH)
Light off @ 13:00 (22.7° celsius @ 48% RH)
-------------------------------------------------
Day 39
Water: N/A
Humidifier: 45% (LOW-MIST)
Dehumidifier: On
Fan Speed: High
Light on @ 19:00 (27.5° celsius @ 45% RH)
Light off @ 13:00 (22.6° celsius @ 49% RH)
-------------------------------------------------
Day 40
Water: N/A
Humidifier: 45% (LOW-MIST)
Dehumidifier: On
Fan Speed: High
Light on @ 19:00 (27.6° celsius @ 47% RH)
Light off @ 13:00 (22.2° celsius @ 46% RH)
-------------------------------------------------
Day 41
Water: N/A
Humidifier: 45% (LOW-MIST)
Dehumidifier: On
Fan Speed: High
Light on @ 19:00 (27.6° celsius @ 42% RH)
Light off @ 13:00 (23° celsius @ 49% RH)
-------------------------------------------------
Day 42
Water: N/A
Humidifier: 45% (LOW-MIST)
Dehumidifier: On
Fan Speed: High
Light on @ 19:00 (28.4° celsius @ 48% RH)
Light off @ 13:00 (22.5° celsius @ 48% RH)
-------------------------------------------------
Likes
19
Share


@AutoDevilHQ
Follow
Just a phenomenal plant from start to finish.
For a first grow yielding 160g is just mind blowing.
Very easy to grow long veg period so windows of LST are large enough to have room for error. Lots of Defoliation needed and at its peak was drinking 6 Litres of water a day.


Likes
35
Share


@Fatnastyz
Follow
1-19
Added 2 ml water to the top where planted, sprayed dome. End of the night see a buldge.
1-20
In the am, still no head, 2ml water, keep the top moist. but starting to show more. by afternoon, w have Runtz1. ( As soon as breaks ground, remove RH Dome.)
Shortly after we have Runtzs 2. She seems to have pulled a leaf off getting her head out. My other told me to scrap her, but I figured she will be fine.
So for the tie break, I called apon @valiotoro . Told him he would be the tie breaker. SHES A KEEPER! 💪
I do not like to give up on any of my girls! 💪
Very excited to get this ball Finally Rolling!
Preparing the Rocket ship, Lift Off Soon!
Someone said, are you sure? There is some big dawgs in it.
Well they better eat their Wheaties EVERY DAY, Fatty is coming! ( Guy Approves this Message 😻)
1-21
250 ml ph 6.0 water. Shes going. Humidifer arrives tomorrow. RH is 30% and temp hovering 70F. Every 2-3 hours I spray the tent walls to help with the RH. Holds between 55-65%.
1-23
Moved to big tent temps everything's normal now.
1-24
Loves her forever home, not pot. Getting 250-260 ppfd. The green mykos is showing on the dirt. All going smooth 💪
Well thats it for week 1. Moves will pick up soon.
Again ty Zamnesia, Plagron and The Eternity Grow Cup


Likes
43
Share


@Growshh
Follow
I added another 4 tablespoons of pridelands bloom top dressed after defol. Still watering in brix, green aminos, armor si, calmag and great white everyday till max saturation


Likes
31
Share


@BigBadLion
Follow
Happy new year everyone! I hope everyone had some amazing festivities! 😃
Regarding my babies I think I might be underfeeding them and one might be shocked thanks to the heat and the lack of nutrients I gave them, last week's runoff water scared me and the plants might be suffering because of that! Most of the issues starts to get more noticeable later during the week! 😖
I started giving them few nutrients to see how they would react and at the end of the week it's clear that I had to give them waaaaay more 😵 Besides that I also moved them to their final pots and I topped Pistachio, out of the two she's the one that looks the best. I also defoliated them a little. I also believe they didn't get a transplant shock (I mean, they would've been worse if that was the case haha) and I added more mycorrhizas during the transplant (I heard they help a lot with hot climates and I need help with that badly)
Anyway, thanks for reading!
Stay tuned for the next update! 😉
Likes
33
Share


@dutdut
Follow
Put the girls in a new tent. It’s 5x5 with a
1k hort and xxl air cooled hood. The are getting their lean on, had a few branch casualties but every is looking good, started to flush the plant with Ph’d water and 1g maxibloom per 1 gallon.

Likes
19
Share


@Ferenc
Follow
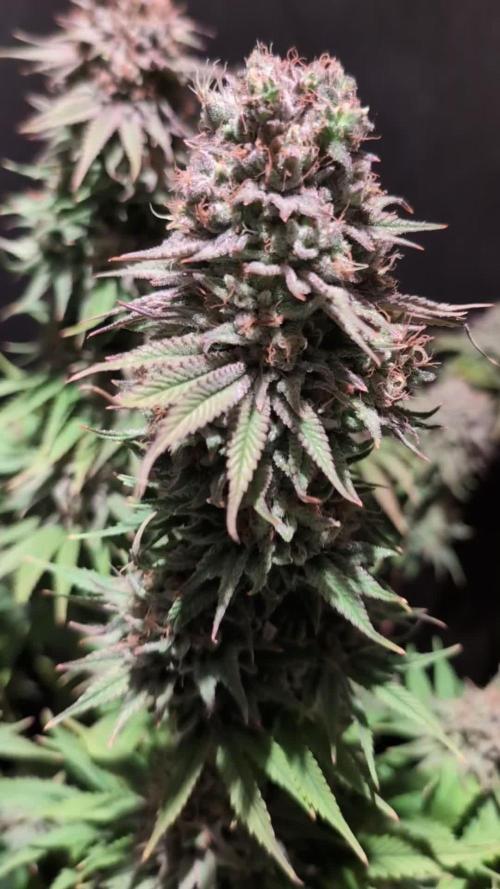
Really nice plant. Very strong smell, Well THC coated buds and very nice effects. Lovely.


Likes
1
Share


@Zugzug
Follow
just water no food
Here is a link to where you can find this
https://2fast4buds.com/us/seeds/gorilla-cookies-fast-flowering
Likes
9
Share


@fanofCalvert
Follow
22 days of Flower done, all pots have stabilised except the Small Ghost, I don't think it is genetically 'Small' as it's cut is just as vigorous as the other clones. Never recovered as quickly from the lockout as the others I suppose.
Now, I will start slowly increasing E/C . How high I go for each plant? We shall find out together.
I have begun to lolly-pop the plants, a process I will continue to do right up to flush, If its gonna be larf it's coming off!
These plants are a lot taller than I had planned, the lockout and full recovery took longer than I expected, + days lost due to a quest for new coco. It will only cost me time in the end, and with big root systems only feeding 1 .77 sq ft of canopy after thinning, bending etc.
It should not hurt my yield. I also realise there will probably be a large, 4 or so week window for these plants finishing, I can open up the space a bit then to help finish late bloomers. (I have a UVB lamp at the ready, to Speed it up at the end.( In more ways than one?)
After more bending I will add some doses of silicone over a few days. Help repair the branches that I have Crush Bent. The silicone also toughens up the plants against Insect attack. When using Silicone I dilute before use to prevent precipitation of elements.
Day 24 -
Maltezerz This plant is most advanced into flower, plenty of resin being produced. Smell is forest fruits and berries first, then Afghan Hash with a distinct chocolate finish. If it keeps a similar flavour profile to the end and has the promised hit of THC, Wow.
Orangesicle. This plant is a lot more stretchy than French Cookie parent. (Tangie influence) The smell is powerful and a distinct Orange but a bit on the sharp synthetic side of the profile. Probably change and mellow with maturity.
Blue Sherbalato, Tons of resin with a distinct sharp citrus sherbet smell.
GTH 1, The smell is complex 'Dirty Lemon floor polish' then Diesel, then underneath a musty mushroom type smell. Not unpleasant, but not that inviting.
GTH 2 and 3 Clean fresh lemon scent very pleasant and lifting.
GTH 4 This is also dominated by a lemon scent, but different, Sticky Sweet Lemon, like Drizzle Cake, an oily thick heavy lemon aroma.
Scotts OG. This is weird, in the morning this plant smells like a custard slice, by lights out, the smell has a tinge of sour milk or yogurt to it . No hint of the Ginger and Spice of the grow phase stem rub! This plant is quite slow out of the blocks and stretched as much as the GTH's. No real resin production up to now.
Wedding Cake. Beautiful complex aroma. It smells like a Panattone with a touch of Black Hash underneath. Different to the US cut I have grew before, which was high yielding and very potent but lacked much aroma at any stage.


Likes
2
Share


@UrbanBoer
Follow
This Gorilla, has went ape.
All I need to do now, is nurse it to harvest, to get bigger buds,I want dense nuggets. But more than having nuggets, I need it’s potency to be on deadly level, I want smokers to crash after smoking. Or I would only get that if I was growing Gorilla Glue.
Likes
8
Share

@Samsationalseeds
Follow
For some reason, it's been difficult to upload any video on here.So I can only do the stationary pictures
Likes
9
Share

@GoodTimesOrganics
Follow
Welcome Back!💚
In der achten Blütewoche, genau nach Blütetag 56 ist Erntezeit!
Die Trichome sind durchgängig milchig und nun gibt es ein paar Bärensteinfarbene! Zeit für die Schere ✂️
Es zeichnet sich eine schöne, Dichte Blütenstruktur ab, mit immer weiter ansteigendem Trichom Anteil.
Das Aroma ist ziemlich fruchtig und süß.
———————
🌞 Temp: 24°C
🌚 Temp: 20 °C
💨 RH: 56%
VPD: 0,97kPa
😎PPFD: 830 mqm
———————
Stay Tuned! 💚

Likes
15
Share


@MR_FLEXOPONIC
Follow
Nutrition change today:
15ml Micro
15ml Gro
15ml Bloom in 3gal. tank
Stepped-up to mild vegitative growth.
Seedling is looking healthier and stronger every day.
