


Likes
Comments
Share


@AestheticGenetix
Follow
4/28
Day 35 I wish this plant was bigger. Could be my fault. Her transition to flower was at such an odd time(3weeks) and that’s when her last feeding was coming to an end but should I give her flower nutes early? Do half an half? Or just wait and then give flower? I waited and I shouldn’t have considering that organic inputs take time to feed your plants. Depending on what you’re using. First time trying Gaia green. I do like the ease of it but it would take some adjustments for me to utilize it best. A month between feeding is too long for my impatient ass and it gives me too long of a commitment to not fuck up. I’m also using roots organics with some other plants and I’m really liking the weekly feedings. It makes more sense than a month. What if I have a strain that’s like 10 week flower? Do I just do another dose at week 7 and 8 and then because it’s “organic you don’t need to flush” thing. Probably over thinking it but yeah here’s my plant yall 😂

Likes
6
Share

@Mraady
Follow
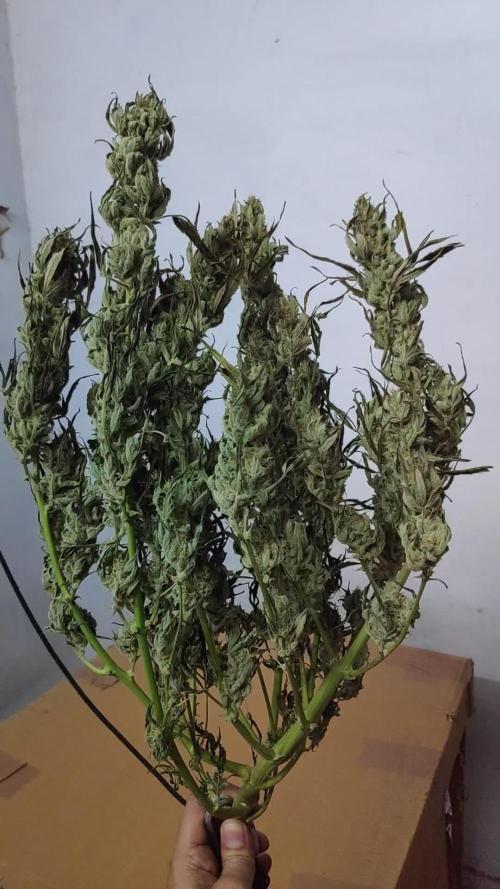
It was my first grow and got 80G dry thanku to everyone who helped me it was outstanding thanks again


Likes
11
Share

@TrickzGrowz
Follow
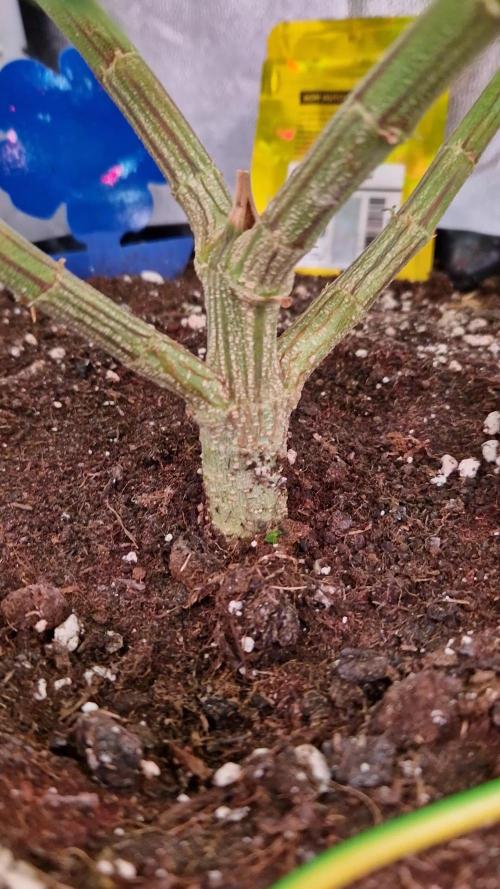
Die Dame hat ein super Wuchs hingelegt. Um den unteren Trieben für den Stretch nochmal die Chance zu geben, habe ich die großen Fächerblätter entfernt.
Präventiv Neemöl gesprüht, weil ich ein paar Freunde gesehen habe.
Spraymix alle 2 Tage.
Heute wird auch die Lampe auf 12/12 umgestellt.
Likes
16
Share


@SAC87
Follow
Day 1 Veg
All 3 Fast Buds Afghan Kush Auto seeds popped and are looking good. I chose this strain because it’s fast, an 8 week autoflower. This will allow me to dry during the hottest part of the summer.
I chose this strain because I think it’ll give me a good heavy indica in my availability. My wife loves it too.
The Vipar Spectra XS2000 is set at 36” at 40% ish. I’ll be adjusting it as I see fit for the plants as they are indica dominant, they may need less light. This light preformed well with the GHS Super Lemon Haze Photos I did last round. Excited to see how they produce with an autoflower.
I’d like to thank FastBuds and Vipar spectra for providing the seeds and the XS2000 for me to review.
Happy Growing 🌱
Likes
10
Share

@THcHunteR23
Follow
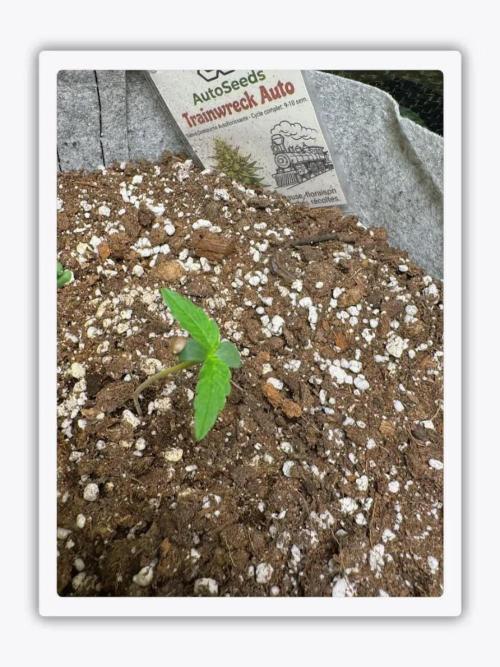
Un départ un peu difficile pour la Trainwreck.
La plantule a connu une première semaine moins vigoureuse que prévu, avec un développement encore assez lent. Rien n’est joué cependant : les prochaines semaines permettront de voir comment elle récupère et prend de la force.
On garde le suivi et on avance. 💚🌱
💚💚💚
A big thank you to the team @AutoSeeds for their kindness and for sending these beautiful seeds!
💚 💚💚Thank you to everyone who will follow this adventure with ‼️https://growdiaries.com/grower/squalino/diaries ‼️For those who want to order these amazing seeds safely, you can find them directly on the official shop: https://www.autoseeds.com/shop/seeds/


Likes
11
Share

@Salokin
Follow
Week 5 | LSD Auto | Vegetation
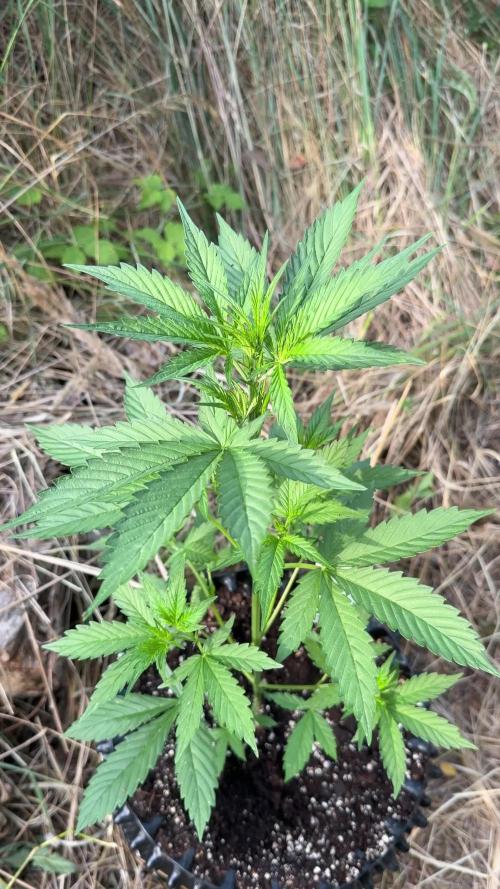
One week outside and she’s made her feelings very clear. From 18cm at transplant to 50cm this week — the combination of full sun and the freedom of the 12L airpot has lit a fire under her. Structure is strong, internodes tight, canopy spreading well in all directions.
Temperatures have been running hot with 35°C during the day and dropping to 18°C at night — a wide swing, but she’s handling it without complaint. Humidity holding at 60%. Natural light schedule at 17 hours for now.
Watering is up to 1L per plant per 24h to match the increased demand in the heat. EC stepped up to 1.2 mS/cm, pH steady at 6.2. Nutrient stack adjusted to meet her new pace: CANNA Aqua Vega at 3 ml/l, CalMag Agent at 0.9 ml/l, Aptus Regulator at 0.1 ml/l.
Updates every Sunday. Stay tuned.


Likes
28
Share


@Chubbs
Follow
420Fastbuds
FBT2307/Week10
Weekly update on these three lovely ladies. All seem to be growing great especially this far into flower. Definitely getting three different colors on the plants but no complaints at all. The darker one is an awesome shade of black which to me is really cool. I've stopped nutes and just giving ph'd water from here on out. I did a mild defoliation this week on the shorter two taking off a couple of the bigger fan leafs. All in all Happy Growing
Likes
15
Share


@Rinna
Follow
I would have let her go for another week but the other plant was more than done and I had no other drying space left. Amazing grow, should be a solid harvest and the buds smell and looks amazing. Very sweet, creamy and gassy artificial cherry terps. Very excited how they smell and taste after drying and curing!

Likes
14
Share


@nine666
Follow
These Autos have grown like crazy but i've made a rookie mistake!!!
I've been using Plant Magic Soil Supreme along with their Old Timers Organic Nutes and the recommened feeding chart.
Week 1 i just gave the plants water, on week 2 i gave them 2ml per liter of nutes and as recommended this week i have given them 3ml per liter.
The next day after watering with 3ml per liter i noticed slight nute burn marks on the FastBuds BlackBerry so i've flushed the pot with PH nuteral water and it has seemed to stopped the burning.
I've dropped the nutes back down to 2ml per liter and they seem much happier!
I've been planning on LSTing the plants next week but when i watered the plants today on day 19 i have noticed little pistills as shown in the photos above so i may LST sooner.
As ive said this is my first grow so does anyone have any advice when it comes to LSTing my plants?
Happy Growing!

Likes
19
Share


@Dunk_Junk
Follow
Only had chance to do photos on day 41 guys, apologies for that.
She seems to be growing well this week. Only 11cm vertical growth but another top (from the FIMing) has caught up! Still very bushy structure. She has not entered flowering yet.
For nutrients I'm using 15g of 20-20-20 mixed with 10L of water. Also added 4ml/L of both Cannazym and Terpinator. This brings it to around 1600ppm including ~300ppm for my clean water.
Timelapse sequence:
Blue Dream
*** Auto Jack ***
Pineapple Express
CBD Compassion Lime
Blue Dream
Pineapple Express - Top Shot!
*** Auto Jack ***

Likes
28
Share

@Chubbs
Follow
420Fastbuds
FBT2307/Harvested
These 3 got the chop this past week and Wow are they beautiful. Over all these plants grew relatively easy and resistant to pest and mold I'd say is strong as it never presented itself. They all turned purple/reddish at the end of flower and saying they smell pungent would be an under statement. The flowers are simi dense with trichs all over. Smells sweet/fruity with hints of earthiness. A total wet weight for all three came to 1,088. I ended up trying out a nug smasher mini with one if the plants and all I can say for a first time ever pressing anything what a blast it was. Would highly recommend this strain for rosin as I got about 20% return on flower to rosin. All in all fun to grow, beautiful smelling flowers, and high yields so what more could one ask for. Happy Growing
Likes
13
Share


@Bryankush
Follow
Bene finite le 3 settimane di fioritura ha dei calici ben gonfi e con un profumo tropicale spettacolare😁🤤
Giorno 2 la sera viene annaffiata con 2L di acqua a 980ppm
Giorno 7 viene annaffiata con 2L di acqua a 1000ppm

Likes
30
Share


@SwissKush
Follow
Day 78 - these gnarly buds are so dense!
a. will be using Ripen blend now
b. going the distance with this lady, there are many little solid calyx like buds all over the place
c. still about 20+ days to go
d. the smell is INTENSE, the resin production is incredible
Day 79 - she loves Ripen
a. buds grew everywhere
b. will be getting 2 full weeks of ripen, then flush with FloraKleen
e. changed to an 18/6 light schedule to generate even more resin
Day 80 - swelling
a. all the little buds are swelling up
b. the top buds are gnarly as hell on this plant, the smell though is so intense
Day 81 - buds are still growing
a. growth occurring all over the place
b. like Dinafem says, the buds will become too heavy for the branches and you MUST tie them up, they will bubble out and grow like crazy
c. I captured some video of the sativa calyx jungle today
d. this plant LOVES GHE Ripen!
Day 82 - explosions everywhere
a. the calyx like buds are exploding all over the place
Day 83 - smells great
a. love this classic haze smell!
Day 84 - this plant is a MUTANT MONSTER!


Processing
Likes
88
Share


@No_Clout
Follow
08/08/18 - Day 22 looking good especially after the minor bump in the road, the wire I bought for the LST is doing it’s job for the time being but I will be buying some proper stuff on the weekend. ✌️🏻
10/08/18 - did more LST last night and their responding well except one, I did some minor defoliation of some fan leaves hogging the 💡
11/08/18 - plant #3 is finally getting into feel of the LST and is looking a lot happier, but girl #1 & #2 are just going with the flow and killing it, my first time doing LST like this and I wish I started doing it two harvest ago 😂👌🏻
13/08/18 - watered each plant with 2 litres each 💧plant number #3 has a slight kink in it from the LST it has been a pain for it the main stem has hardly any flexibility but the other two are 👍🏻
Likes
14
Share


@ClydeGrows
Follow
Have lost momentum with this little one, not gonna lie! Seeing her next to the same cultivar doing way better (no surprise) is a bit of a bummer haha! That being said, her bud looks more compact already, and more colourful. The proof is in the pudding anyway, and I look forward to sampling 😌
Likes
1
Share


@Raddawg
Follow
She’s a beautiful girl! Super healthy and filling out nicely! Nose on her is incredible and only getting better!

Likes
13
Share


@BigDaddyK
Follow
Watered today ( Monday ) 5L of solution then 3 L of plain water to lower the runoff down from 2.8 to 2.3 (EC) , had a defoliate to open out the branches a bit , smells very naughty...
Thursday - Watered 5 litres of 2 ml per litre Terra bloom caught runoff at 1.8 EC
