


Likes
Comments
Share


@Terp_Djiny
Follow
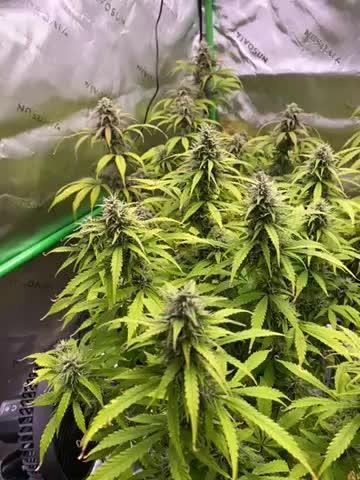
Diesmal habe ich mich dazu entschieden nur die Sonnensegel rauszuschneiden und die Zuckerblätter zum trocken an der Pflanze zu lassen. Vom ersten Eindruck her, ist der grow sehr gut verlaufen. Die Bude sind Fett und mit Trichomen überzogen.. Freue mich schon aufs Trimjail.
Nach 14 Tagen Trocknen habe ich mich an den Feinschnitt gewagt. Von den zwei Pflanzen konnte ich 155g feste dicke Buds und 110g Trim ernten. Die Buds sind zum curen in einen Cvault mit einem Boveda Pack (67g 58%) gekommen.

Likes
2
Share

@Theycallme_nips
Follow
All 3 are maturing at different rates. Probably chopping one later this week, another over the weekend and the last sometime next week.
Likes
4
Share


@GODAXE
Follow
2024.09.12 D64
Its been two busy week,
as i trim the 1 pond mother, get aknowledge that my wife use my grow sniper two pruned is badly infested rose bush, since 2 week and never proper clean it whith alcool.😱😱😱😷
in result a massive PM & mithe contamination in my grow tent... 😱😭😷😭
all plant have been shoot with H2O2 at 0.5% and set ouside for 2 day, wich turn to be rainy as f***, until i clean and serilized everything, twice and run the hepa filter .😷😰
the plant look ok, lightly over wartered, but no more pest or PM sign as they return in the tent..
3 days later PM hardly bonce back, no choice to use more agressive treatment so they all have been shoot with saffer's defender 3 in 1.
after 3 shoot in 24h and another tent desinfection we should have get rid of it 🙏
8 day laters everything look fine👍, all damage leaf have been removed, i also prune some unrelevant lower and inner grow

Likes
422
Share


@Crashoverite
Follow
Hi all 🧑🌾
Welcome to my 🍌💜👊 week update.
Hope everyone keeping well and having a great week😁
Thank you so much for so much support on this bananas ride 🙏💜💚💜💚
Everything still going pretty well. Girls are developing and stretching like crazy. Athena currently Dec 14 90cm and main stem of Xena is not far of this height either. Unfortunately noticed first signs of calcium deficiency(my opinion) on Athena. Thankfully started feeding both girls with calmag weeks back but the dosage wasn't not enough for Athena. Started small treatment very next day on Dec 11 (see description below) I belive got my baby back on right track.
Week 9
Dec 11-17
Dec 11
Watering was planned for Tuesday but due to calcium deficiency decided for a little treatment. Watered both girls with mixture of reduced content of growth nutes by 50% calmag at 1.2 ml per ltr. Reduced solution PH to 6.2 as apperently it's ideal for calcium consumption. Over period 4h I have watered Athena with 5ltr with couple runoffs. Xena 3ltr. Total of 7-10 leaves affected mainly at top colas close to the light.
Dec 12-13
Purely observation and all looking well. Of course all affected leaves will progres of showing signs but good news is that growth and development booming and don't see any new leaves with symptoms.
Very nice trichomes development in recent days and more and more colours.
Dec 14
Second watering for this week 6.5l Increased calmag to 1.4ml per ltr and if still things will be looking well reduce to 1 or 1.2 on next feeding.
Dec 15
Very nice respond on yesterday feeding. They definitely fatten over night and getting more and more frosty. Will need to remove some foliage soon as getting extremely bushy again.
Dec 17
Xenas main stem top cola almost touched the light today. Tied her to left side of the cabinet, applied selective defoliation on both girls, tied few branches to netting and on the end of this busy day a third watering for this week. 7 ltrs beetwen both. Runoffs Xena PH6.4 Athena 6.3.
Very nice week have to say. I belive that calcium deficiency on Athena is no longer a case here and both girls developing very nicely. Both are still stretching, buds are gaining in size and both girls started exploding with trichomes,
Thank you all again for such amazing support 🙏peace and love brothers and sisters ✌️💚💜💚💜💚
Stay tuned for new week update 😉🧑🌾✌️💚

Likes
20
Share


@Bertoxxulous
Follow
Hey folks, I'm finally back at it again. It took me a while for a couple of reasons:
1) I usually only grow in the winter.
2) I completely revamped my grow room after the issues I ran into with the last setup.
3) It took me a while to brainstorm exactly what I wanted to do.
I bought these seeds from D.C. Seeds and was very pleased with the experience. I'm very happy to give business to a fellow American and Veteran. I've only ever purchased seeds from the UK in the past and that experience has been "dodgy" to say the least (not the vendors fault, but the transit).
I've only ever grown photo's, but chose to go with all auto's moving forward. After calculating the intensity of my current light, with it being on a 20/4 rotation I'm very close to hitting 40 moles per day, at least directly under the light. It doesn't quite cover my 2' x 5' trellis. I'll eventually upgrade my light, but auto's should get me the best bang for my buck with this light. Also, I spent a pretty penny building this new grow room. The other obvious reason for growing auto's is their shorter seed to harvest time. I've got a small grow area, and never plan on expanding. Theoretically, auto's will allow me to produce the most out of my room.
A few things about my grow room:
1) I lined the whole closet with 1/2" plywood and put that piece of ply the air intake/outtake/power as the divider between each side of the closet
2) The grow room itself has ply on all wall surfaces so I could mount stuff to it and paint it
3) The other side of the closet is my storage/prep/power distribution/etc. area. Maybe I'll take a pic one of these days
4) My last grow my carbon filter/fan was venting into the other side of the closet. This created a headache for a number of reasons. I tapped a 4" hole through the floor and am now venting into my crawl space below the house.
5) I moved to bubbleponics to speed up my grows even more. I will be removing the drip system once the roots hit the water in the res.
6) The larger res. will hopefully make my life much easier. Late in the last grow I could only fit 3 gallons of water in the bucket and that sucker was pounding down at least a gallon a day. That required too much micro-managing for me (both ph and refills).
7) I no longer have a fixed trellis with chicken wire. The trellis is held in place by dowels that I can pull out by hand. The short sides of the trellis have hinges on the bottom, so I can fold it and pull it out easy-mode. Lastly, I'll be using string for the trellis so come harvest all I have to do is cut the string instead of dealing with trying not to destroy buds pulling them through chicken wire (it takes forever).
8) I built a light diffuser on the other side of the air intake
9) My res. is on a motorcycle lift I'm using a drill to move up and down
I have now started using Jack's as my primary nutes. They tell you the full break-down of each macro and micro nute, giving me more control and understanding. I think House & Garden is a good product, but when stuff goes bad it's more difficult to troubleshoot when you have no idea what each piece of their full lineup contains. I'm assuming it's kind of a proprietary type thing, which I understand, but knowledge is power. I am still using their Drip Clean (while the bubbler is going) and Roots Excelurator Silver, both excellent products. I'm still using Hydroguard, and will FOREVER. I'm a true believer now of why Hydroguard is necessary for any hydro application, IMO. I also purchased water soluble fulvic acid, but have decided not to use it for this grow....or at least while the bubbler is going (I'll elaborate below).
Ok...now that all that is out of the way....
I really wanted to use my well water instead of R/O to make my life easier. Soooo....I filled up my res., and put two seeds in the system immediately. Nothing happened after 1 1/2 weeks. I finally opened up the cubes and saw that the beans had popped, but it looked like maybe I drowned them, or they ddin't grow straight up or something. For round two, I didn't change the water out, and decided to soak the beans for 24 hours in R/O water first. I had the exact same problem. I'm still not really sure what happend, but I suspect it was the well water. My PPMs were sitting at ~500 with the well water, which was probably too spicy for the beans just starting. Also, my well water is questionable (even though it's at 165ppm), but I won't elaborate further....it's a long ass story and I've spent an absurd amount of money on it. Lastly, I did put the Fulvic acid in, and it was very messy. I really want to avoid having to clean my res. Once the roots get big it will be a real pain in the ass to clean. I'm leaning towards not using the Fulvic acid this grow just to see how things go.
I had 10 beans total of the Sour Apple and have already ruined 4. So here's hoping third times the charm.
So, I went back to my tried and true method:
0) R/O water for everything. Ditching the well water idea.
1) Soak beans in R/O water for 24 hours
2) Paper towel method between plates on a heating mat
3) Once the roots pop, I place them pointed down in the hole of the rockwool cube
4) Hand water once a day by dipping the cube in the pre-mix of 1/4 strength Jack's and everything else I've listed above. This put my PPMs at 300...a way more reasonable value for starts.
It's been exactly 7 days since I followed the above. It's probably hard to see but the cotyledons came up, and multiple roots have come out the bottom of the cubes....way faster than I've ever seen since I started growing. That means even though I'm doing my old process this already shaved at least a week off of when I'd normally put it in my bucket in the past.

Likes
50
Share


@deFharo
Follow
Bienvenidos cultivadores de marihuana clandestinos, y también, a los que tienen la fortuna de no serlo!🖐️👨🌾
Segunda semana desde el paso a floración, la planta ha dado un buen estirón, lozana y vigorosa ya muestra los primeros signos de la preflora... comienza el gran juego!
Dos riegos profundos esta semana, hago mezclas muy variadas de Bio Fertilizantes caseros para que la planta no eche nada de menos, ahora, en la etapa de floración aumento la presencia en riegos, de fósforo, potasio y magnesio principalmente, continúo en cada riego con la inoculación de Microbiología al sustrato, esta semana he añadido mulch de hojas verdes picadas, está funcionando muy bien este tipo de mulch, retiene mucha humedad en superficie y es una comida excelente para los microorganismos, es significativa la proliferación de micelios de microorganismos entre estas hojas en proceso de descomposición.
Llegan momentos sublimes para esta cepa... a jugar!! 🌼🌼🌼
==============
Info de la cepa Jelly Bananen: https://en.seedfinder.eu/strain-info/Jelly_Bananen/Exotic_Seed/
- Genética: Strawberry Banana x Hippie OG (Selección OG Kush)
- Madura tras unas 9 semanas de floración.
- Floración Interior: 60-65 días.
- Su efecto es muy fuerte, completamente indico.
==============
Hasta pronto... 2023 happy new year from peace!
SALUDOS A TODOS!!
=================================

Likes
22
Share


@Weedbadk
Follow
Día 1 y todas germinaron súper rápido 3 días
Día 5 desde puesta en sustrato
Ya todas están arriba
Estoy solo pulverizando el sustrato
Temperatura 23c humedad 75%
Likes
44
Share


@RakonGrow
Follow
Note :
+ jegliches Zubehör wird in der GermniationsWoche aufgelistet . Zeitraffer Videos folgen immer nachträglich.
+ videos werden so geschnitten das nur ein geschlossenes Zelt erscheint , ergo Fehlen paar reale Minuten (ca 1 Std) .
Day 57:
+ 2.0 Liter Flaschenwasser
+ + Dünger für Blühte
+ + + Canna Terrar Flores (Achtung wirkt wie PH-)
+ + + Canna Boost
+ + + Cannazym
+ + + Canna PH+
+ + PH 5.91
Da es heute heiss ist , wird wie Gestern laufen . Bis 19:00 Uhr wird das Licht reduziert und dann DLI nachgeholt.
Day 58:
Da es immer noch heiss ist , wird wie Gestern laufen . Bis 19:00 Uhr wird das Licht reduziert und dann DLI nachgeholt.
Day 59:
+ 2.0 Liter Flaschenwasser
+ + Dünger für Blühte
+ + + Canna Terrar Flores (Achtung wirkt wie PH-)
+ + + Canna Boost
+ + + Cannazym
+ + + Canna Rhizotonic
+ + + Canna PH+
+ + PH 5.91
16h jetzt mit 1000 PPFD und jeweils 1 Stunde Sonnenaufgang und Sonnenuntergang.
Day 60:
Mal ein bissel Größenvergleiche gemacht .Das Clipper Feuerzeug ist 7.5 cm hoch .
Day 61:
+ 1.75 Liter Flaschenwasser
+ + Dünger für Blühte
+ + + Canna Terrar Flores (Achtung wirkt wie PH-)
+ + + Canna Boost
+ + + Cannazym
+ + + Canna Rhizotonic
+ + + Canna PH+
+ + PH 6.01
Day 62:
Das Wetter bleibt stabil, damit bleiben die Growwerte auch stabil. Bisher Läuft das 1000 PPFD Spitze und 750 PPFD Sekundätriebe ganz gut . Ihre Freundin die leider ein Wasserschaden erlitten hat (tja da war wohl irgendwas im Wasser was ein Regenbogenfilm erzeugt hat , im schlimmsten Fall Waschmittel) nimmt der einen Seite zwar licht, aber geht halt nicht anderes bei nur einer Lichtquelle . Ich fahr halt gleich ein doppel Experiement mit dem Licht. Bisher aber holt sie ganz gut nach mit 900-1000 PPFD auf die ziemlich gleich hohe Krone .
Day 63:
+ 1.75 Liter Flaschenwasser
+ + Dünger für Blühte
+ + + Canna Terrar Flores (Achtung wirkt wie PH-)
+ + + Canna Boost
+ + + Cannazym
+ + + Canna Rhizotonic
+ + + Greenhouse Feeding BioEnhancer
+ + + Canna PH+
+ + PH 6.01


Likes
52
Share


@DogDoctorOfficial
Follow
I am absolutely in love with my Cosmos Girl from Royal Queen Seeds! She's growing beautifully and it's amazing to see her develop day by day. I was surprised to see that she's developing 3 branches per node, but it's clear that she's adapting well to her surroundings and growing strong. Her inter node space is great, which tells me that she's receiving the right amount of light and nutrients to grow properly.
I'm a big believer in using quality organic nutrients, and that's why I trust no other brand in organics than Aptus Holland. Their products have never let me down, and I know that I can rely on them to provide my plant with the best possible nutrients for her growth and development.
I was thrilled to see that Cosmos started her pre-flower stage on day 28. This is a crucial time in her development, as it marks the transition from vegetative growth to the flowering stage. I can't wait to see her produce flowers and eventually develop into beautiful buds!
Overall, I'm so passionate about this plant and I'm putting all of my love and attention into her growth. It's an amazing experience to see her thrive under my care, and I'm excited to see what the future holds for my Cosmos plant!
As she is entering the flower stage i did apply for the last time , may be lets see, NutriSpary, a must for me in all my gardens . NutriSpray from Aptus is a fantastic product that provides a range of benefits for plants during their growth and development. This product is designed to be used as a foliar spray, meaning it is applied directly to the leaves of the plant.
One of the main benefits of NutriSpray is that it contains a range of essential micronutrients that are necessary for plant growth. These micronutrients include iron, manganese, zinc, and copper, which are all crucial for healthy plant development. By providing these nutrients directly to the leaves of the plant, NutriSpray helps to ensure that they are absorbed quickly and efficiently, which can lead to faster growth and better overall health.
Another benefit of NutriSpray is that it can help to increase the plant's resistance to stress. This is because it contains plant extracts that are known to have anti-stress properties. By applying NutriSpray regularly, you can help to protect your plants from a range of environmental stresses, such as temperature changes, drought, and pests.
NutriSpray is also easy to use and can be applied at any time during the plant's growth cycle. Simply mix the recommended amount of NutriSpray with water and spray it directly onto the leaves of the plant. This product is especially useful during periods of rapid growth, when plants may need an extra boost of nutrients to keep up with their development.
Overall, NutriSpray from Aptus is a fantastic product that provides a range of benefits for plants. From providing essential micronutrients to increasing stress resistance, this product is an excellent choice for any grower who wants to ensure that their plants are healthy and strong.
Man so exited hahaha lets stay tuned on this one, i know i will hihihi she promises great things
As always thank you all for stopping by and for supporting me on this journey, i am super passion about growing and fell blessed to have you all with me on this new journey <3 <3 <3
Genetics - RQS COSMOS F1
Ligth - LUMATEK ZEUS 465 COMPACT PRO
Food - APTUS HOLLAND
All info and full product details can be find in can find @
https://www.royalqueenseeds.com
https://aptus-holland.com/
https://autopot.co.uk/
https://lumatek-lighting.com/
With true love comes happiness <3<3<3 Always believe in your self and always do things expecting nothing and with an open heart , be a giver and the universe will give back to you in ways you could not even imagine so <3<3<3
<3 <3 <3 Growers love to you all <3 <3 <3
Cosmos F1: The World's First F1 CBD Cannabis Variety
Cosmos F1 is the largest autoflowering cultivar in RQS catalogue of F1 hybrids. With her tall, typical Christmas tree structure and bright green foliage, Cosmos F1 is a testament to the beauty and vigour of Cannabis sativa. Plus, thanks to her pure genetics, which descend from Oregon CBD, she boasts the highest CBD concentration in our entire F1 seed selection.
Aromas, Flavors, and Effects of Cosmos F1: A Vibrant CBD Super Variety
True to the pure lineage from which she descends, Cosmos F1 boasts a delicious aroma that combines the freshness of crisp pine with the full-bodied, almost creamy aroma of modern Cookies varieties, and an unmistakable peppery bite. Thanks to her high concentration of CBD and low levels of THC, Cosmos F1 offers a balanced effect without intoxication. Cosmos F1’s terpene profile is dominated by myrcene, farnesene, limonene, pinene, and caryophyllene. Combined with high concentrations of CBD, Cosmos F1 produces a clear, meditative effect that relaxes the body while leaving the mind functioning and focused. Her effects help unite the mind and body, creating a state of cosmic order.


Likes
4
Share


@OttomanEmpire
Follow
End of week 6 flowering
From this week to end ROW only, that will enough for flush the soil. 2 or 3 weeks

Likes
16
Share


@Cannabis_carlitos
Follow
Scrog netting is becoming a challenge, I am trying to fill bottom right corner but the plant continues to grow in all directions.
The areas that are filled keep growing, I have stopped topping and keep tucking.
I have put 4 clones in the corner because I do not want to wait anymore as my 2x4 will get too big during the flower cycle of this tent.
Turned off light and will keep off for 48 hours, officially starting the flip into flower cycle. Plants look good, no issues so this is the perfect time for me.
Wish me luck, I hear this strain loves to really stretch.
Fed nutes at 50%, they just got off a lockout so taking it easy, they'll tell me when to up the feed.

Likes
160
Share


@GrowingGrannie
Follow
11/29 - At this point in the game, plants don't ever look much different day-to-day! I'm wondering, though, if this one is showing her starting to fade... it's either that or she's needing some stronger PK nutes... any thoughts?
12/2 - I'm going to start winding her down... gotta pick up some Ripen and some Flawless Finish ... Probably going to have to shorten the period of time I use these products but hell, she's pretty used to me screwing up - LOL!
12/03 - so my local grow store was out of Ripen - so I guess I'm going to forget that one... I'm going to let her go until Tuesday when she will be exactly 13 weeks old and start a 3-day flush using General Hydroponics FloraKleen (they also did not have Flawless Finish!).... Planning to chop her next Saturday unless the amber hasn't really made its presence known... We'll see.... I'm just going to go by what she tells me... but it really IS time, old girl... it really is.
12/04 - Doing a bucket change today, she's going to an EC of 0.2-0.4 or thereabouts and I'm not going to worry about the pH - my tap water is about 7.5 so that's what she's getting unless I relent and drop it to the upper 6's - I'm just not going to overly concern myself with it. I think her bulking has finished and SHE needs to finish up. Found a few amber on leaves in the middle of the plant and I know those can really be rather ignored .... but I'm still concerned about the trichs on the main cola - haven't seen much change between milky and clear for a while now... so it's puzzling to me. Maybe the drop in EC will kick her into truly finishing... if it doesn't, I can always bring the EC back up, the pH back down and keep her going... She's always been my "experiment" - always been my "tester" - so why not experiment at this stage of her life as well?!
Likes
41
Share


@WolverineGreens
Follow
The stretch came in with a bang. Gonna have to stay up on my training. Ladies look lovely no complaints as of yet. Smell pickn up quickly. I think the new amendments and bigger pots are payin off. Cant wait.


Likes
144
Share


@TOTEM
Follow
*** About the question I sent: that “crazy” EC I was talking about last week was 3100 PPM, not the one you see on this week. ***
This week I’m enlarging the plant as much as I can to prepare her for the scrOG.
Day 40: LST + defoliation

Likes
25
Share


@Chubbs
Follow
What up fam. This girl has absolutely exploded into a beast. It's probably the one of the biggest Autos I've ever grow and definitely drink more then any I've grown. She's drinking a gallon a day and not showing any signs of slowing down. The flowers are definitely forming and looking phenomenal. Happy Growing


Likes
5
Share


@RastaRick
Follow
Full on flowering. Gave first 10ml dose of bio pk 5-8 on day 37 with 1tsp bactrex in 1L water. Triton Biscotto Lime Auto is a bit behind but looks ok. All got massive defoliation and still tons of leaves... Natural form maybe was a mistake hahahah
