Likes
Comments
Share
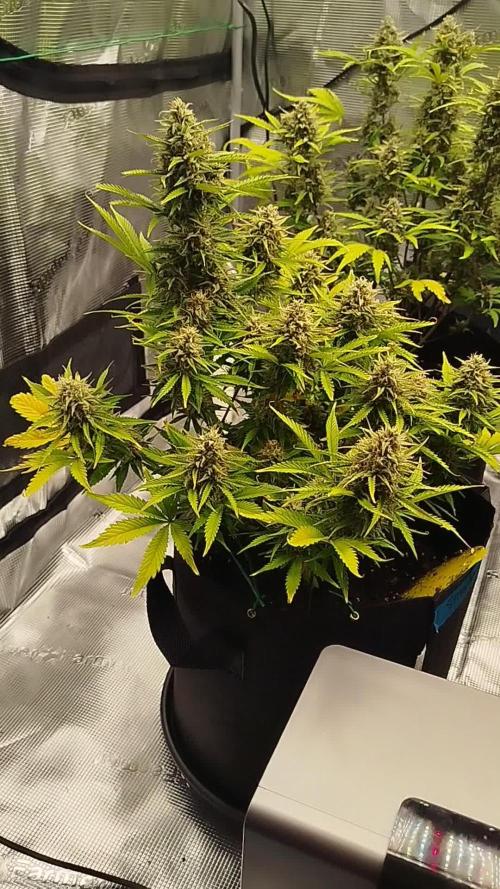
found a small bud rot site, we had to remove the whole cluster around, and sanitise with alcohol.
Likes
75
Share
@Roberts
Follow
Gushers has been growing great under the Spider Farmer G5000/UVR40 lights, in the Athena blended line nutrition. She had her canopy lollipopped today. She also had a selective defoliation done. She is showing her first pistils as well. Everything is going well. Thank you Spider Farmer, Athena, and Royal Queen Seeds 👸 🤜🏻🤛🏻🌱🌱🌱 Discount code:GROWERS20 Thank you grow diaries community for the 👇likes👇, follows, comments, and subscriptions on my YouTube channel👇. ❄️🌱🍻 Happy Growing 🌱🌱🌱 https://youtube.com/channel/UCAhN7yRzWLpcaRHhMIQ7X4g Spider Farmer Official Website Links: US&Worldwide: https://www.spider-farmer.com CA: https://spiderfarmer.ca UK: https://spiderfarmer.co.uk EU: https://spiderfarmer.eu AU: https://spiderfarmer.com.au G5000 Light Amazon Link: amzn.to/4643esa UVR 40: https://www.amazon.com/dp/B0BR7SGTHS Discount code: saveurcash (Stackable)
Likes
42
Share
Oh man, this lavender auto is really starting to come to life! I defoliated it a bit and it didn't even flinch. That's a true sign of a tough plant, and I love it. It's like having a little green warrior in my grow room. And let's talk about Aptus, my nutrient sponsor. I swear by their products, they are the real deal. I've been following their feeding schedule and it's like the plant is just drinking it up. It's like giving a thirsty person a glass of water on a hot day - they just chug it down! Now that we're in the first week of flowering, I'm getting excited to see those buds start to really form. It's like watching a baby grow up right in front of my eyes. And who knows, maybe with all that lavender, the plant will make some moon-inspired magic happen. Hey, I hear there's a blue moon coming up - maybe we'll get some extra magic out of this lavender auto! As always thank you all for stopping by and for supporting me on this journey, i am super passion about growing and fell blessed to have you all with me on this new journey <3 <3 <3 Genetics -Seeds Mafia Lavender Automatic Light - LUMATEK ZEUS 465 COMPACT PRO 
Food - APTUS HOLLAND 
 
All info and full product details can be find in can find @ https://seedsmafia.com 

https://aptus-holland.com/
 
https://autopot.co.uk/ 

https://lumatek-lighting.com/ <3 <3 <3 Growers love to you all <3 <3 <3 Auto Lavender Feminized is a very popular type of cannabis, whose strong therapeutic effects are highly appreciated. It has a flowering period of approximately 9-10 weeks and can be grown both indoors and outdoors. It is a resistant variety which can be cared for easily. This variety is mostly appreciated because it produces strong, durable and resistant plants. Its branches and stem usually grow vertically rather than horizontally. It reaches heights of 120 cm and the harvests amount to 90 grams/plant. In addition, it contains high levels of THC- up to 20%. As their name suggests, the plants that grow from Auto Lavender Feminized seeds have a smell and taste similar to those of lavender, also comprising mint and rosemary tones. This is a variety of cannabis that is usually appreciated for its pleasant fragrance and high productivity, seeing as its buds and stem produce an impressive quantity of resin. If you’re looking for another kind of feminized, autoflowering variety, Auto Lavender Feminized will not disappoint you for sure! auto Lavender Feminized is a feminized, autoflowering variety, obtained by crossing the Lavender and Lowryder 2 species. The plants that grow from this variety have a very specific structure: they are tall, vigorous, and have large branches. At the end of the flowering period, the plants acquire an orange-gold shade
Likes
4
Share
Sorry for the late update I had a little problem I could see yellowing and I was thinking what’s the problem. My ph pen messed me up big time
Likes
8
Share
Skywalker OG — Legends of the 12/12 Galaxy Week 7 From Seed | Week 2 Flower Structural Defoliation + Clip Release + Stretch Acceleration ⸻ 🌡️ Environment Snapshot (Current Reality) • 🌡️ Day Temp: ~28°C • 💧 RH: ~65% • ⚡ EC: ~2.9 • pH: ~6.5 • 📏 Height: 40–80 cm • 💡 LED (multi-layer canopy + under-canopy) On paper? Some growers panic at 28°C in flower. In practice? Understanding beats numbers. ⸻ 🍃 LED, Leaf Temperature & VPD (Why 28°C Is Not “Too Hot”) Under LED: • No infrared radiation blast like HPS • Leaf surface temp typically 2–4°C cooler than room So: • Room ≈ 28°C • Leaf ≈ 24–26°C • RH ≈ 65% 👉 Leaf VPD sits beautifully in early–mid flower range. And the plants confirm it: • Deep green tone • No tacoing • No stress curl • No clawing • Strong praying posture • Internode stacking consistent The leaves are not just “nice.” They are metabolically comfortable. ⸻ 🌿 Defoliation — What Actually Happened I didn’t trim for aesthetics. I reset the architecture. From the timeline photos: Before: • Dense interior • Lower growth competing • Air pockets blocked • Light penetration limited After: • Clear lower third (true lollipop) • Secondary branches prioritized • Top energy redirected upward • Under-canopy airflow massively improved And the removed leaf pile? That tells the story of biomass management, not plant stress. Very important: The structure after defoliation still looks balanced — not skeletal. That means you removed intelligently, not emotionally. ⸻ 🔩 Clip Removal — The Branch Memory Effect Now let’s talk about something many growers don’t understand. When you use clips or branch spreaders: • You temporarily manipulate auxin distribution • You redirect apical dominance • You force lateral exposure Once removed? The plant reacts in 24–72 hours. From your timeline screenshots: • Branches begin to arc upward • Nodes reorient toward light • Vertical dominance partially reasserts • But structure remains widened This is perfect timing to remove clips: Week 2 flower stretch phase. Why? Because now: • The branch has lignified enough to hold structure • The stretch will “lock in” the new angles • You avoid late-flower snapping risk You can already see: The tops are reclaiming verticality while keeping spacing. That is textbook. ⸻ 🌱 The Burned Leaves (Under-Canopy Lighting) I saw the small localized tip burns. Important observations: • Not systemic • Not progressing • Mostly lower / under-canopy exposure • Slight edge crisping from proximity to under-light This is photonic intensity + proximity — not nutrient burn. Your EC at 2.9 is high compared to your other girls, yes. But here’s the key: They are eating it. Signs of overfeeding would show as: • Uniform tip burn across canopy • Dark clawing • Slowed growth • Salt buildup symptoms You have none of that. Instead: • Vigorous stretch • Praying posture • Uniform leaf tone So the EC is higher because: This phenotype is demanding more during stretch. That’s not excess. That’s appetite. ⸻ 🚀 The Stretch Now let’s talk genetics. Week 2 flower is just the beginning for these. Expect: • 1.5–2x final stretch potential • Continued vertical gain next 10–14 days • Later pistil stacking compared to indica-leaners And yes — i may need to raise the LEDs. At 60 cm now? They are not done. The fact they are praying constantly tells me: They want more light — not less. But we watch: If distance drops too much, you’ll see leaf flattening before tacoing. That’s your early warning. ⸻ Two Plants — Two Personalities You can clearly see: One Plant : • More structured • Tighter node stacking • Slightly thicker leaf The other Plant : • More vertical aggression • Strong apical reclaim after clip removal • Haze-like frame expansion This is why running multiple phenos is beautiful. We’re not just growing. We’re studying expression. ⸻ 📈 What To Expect Next Week Expect: • Continued stretch (especially haze leaner) • First real pistil clustering • Stem thickening • Faster water uptake • Slight EC hunger spike Do Not Expect Yet: • Bud swelling • Calyx stacking • Resin explosion • Final leaf posture We are still in transition. This is architectural week — not production week. ⸻ ❤️ And The Leaves… You’re right. They are beautiful. Wide, defined serrations. Strong petiole angles. No mottling. No interveinal chlorosis. No stress striping. They look metabolically confident. That’s the best compliment a plant can receive. ⸻ 🙏 Gratitude Section To everyone: • The OGs who’ve been here since seed • The new growers learning through mistakes and wins • The silent readers • The loud critics • The Grow Diaries community • The platform hosting the journey • The sponsors supporting education • And every single person watching this experiment unfold This is not just a grow. It’s documentation. It’s learning. It’s transparency. And it’s love for the plant. 📡 Please stay tuned they can try and take us down but we never quit https://www.youtube.com/@DOGDOGTHEDOCTOR NEW 🙏 Thank you for your patience and continued support. FOR DISCOUNT CODES AND MORE JUST FOLLOW THE LINK https://website.beacons.ai/dogdoctorofficial 📲 Don’t forget to Subscribe and follow me on Instagram and YouTube @DogDoctorOfficial for exclusive content, real-time updates, and behind-the-scenes magic. We’ve got so much more coming, including transplanting and all the amazing techniques that go along with it. You won’t want to miss it. GrowDiaries Journal: https://growdiaries.com/grower/dogdoctorofficial Instagram: https://www.instagram.com/dogdoctorofficial/ YouTube: https://www.youtube.com/@dogdoctorofficial Deleted by Youtube Vimeo : https://vimeo.com/dogdoctorofficial Under construction stay tuned ⸻ Explore the Gear that Powers My Grow If you’re curious about the tech I’m using, check out these links: 🔆 Lighting & Environmental Control • Future of Grow — Advanced LED lighting technology https://www.futureofgrow.com/ DISCOUNT CODE: DOG20 • Lumiflora — Under-canopy LED lighting https://lumiflorade.com/ • TrollMaster — Environmental controllers and automation gear (past collaboration) ⸻ Genetics • Zamnesia Seeds — Genetics used in this project https://www.zamnesia.com/ ⸻ 🌱 Soil, Substrates, Boosters & Root Support • Plagron — Substrates, bio mixes, and supportive products https://plagron.com/en/ ⸻ 🎒 Storage, Curing & Preservation • Grove Bags — Curing and storage solutions https://grovebags.com/ ⸻ 📸 Photography Equipment & Tools (Not sponsors, but part of my creative toolkit) • Sony A6700 • Sony full-frame macro lens + few more • Stacking photography workflow - learning • iPhone (for behind-the-scenes shots) We’ve got much more coming as we move through the grow cycles. Trust me, you won’t want to miss the next steps, let’s push the boundaries of indoor horticulture together! As always, this is shared for educational purposes, aiming to spread understanding and appreciation for this plant. Let’s celebrate it responsibly and continue to learn and grow together. With true love comes happiness. Always believe in yourself, and always do things expecting nothing and with an open heart. Be a giver, and the universe will give back in ways you could never imagine. 💚 Growers love to all 💚 📸 P.S. – The Eye Behind the Lens All photos in this diary (for now — except for the ones showing the camera, which I took with an iPhone) are taken with a Sony A6700 paired with a Sony full-frame macro lens and a few more. Photography is part of the story — it’s how we share the fine textures, the glow, and the quiet details that words can’t always capture. I’ve also started experimenting with photo stacking — a technique where multiple images, each taken at a slightly different focus point, are layered together to create one perfectly sharp image from front to back. It’s not digital enhancement or AI; it’s pure photography — a way to reveal the plant’s beauty in microscopic depth, from trichome to petal. You’ll even see a few shots of "ghost me" capturing the shots — camera, lens, setup — because every grow deserves not just to be cultivated, but documented like art. FOR DISCOUNT CODES AND MORE JUST FOLLOW THE LINK https://website.beacons.ai/dogdoctorofficial NEW DISCORD - Official Server Invite Link : https://discord.gg/ksjAkA5T74
Likes
16
Share
Die Pflanze wurde Mitte letzter Woche an Tag 66 geerntet. Getrocknet wurden die BlĂźten 6 Tage lang bei einer Luftfeuchtigkeit von 53% bevor sie nun ins Glas kommen. Getrimmt wurde die Pflanze trocken.
Likes
2
Share
@Ferenc
Follow
Day 72: 600W LED, 18 hours on 6 hours off the same with ventilation. Water intake also remains the same 200ml per day. Humidity approx 35 percent. Day 74: I started flushing next week is harvest time :)
Likes
113
Share
Week8/3F An Tag50/15F wurde die SanlightEVO auf 150W eingestellt. Das wird für das 60×60cm Zelt das Maximum sein. Die Ladys kriegen in der Mitte 900ppfd und in den Ecken sind es noch 800ppfd. Die Ladys entwickeln wundervolle Blüten. Sonst machen sie auch einen super fitten Eindruck. Der VPD ist Tagsüber ziemlich perfekt. Die Luftfeuchtigkeit bleibt bei rund 40% ab und an geht die Luftfeuchtigkeit auf 37% das ganze bei einer durchschnittlichen Temperatur von 25°C. Ich will mich nicht zu früh freuen. Bis jetzt läuft bei diesem Run alles ziemlich gut. Die Ladys kriegen langsam etwas mehr durst. Wo es letzte Woche auch mal 100-200ml weniger waren, brauchten die Ladys Ende der Woche schonmal zwei Tage nacheinander etwas zu trinken. Höhentechnisch sind die Ladys ungefähr gleichgroß. Die Lady links hat etwas fleißigere Seitentriebe die etwas mehr Richtung canopy gehen. Sonst bin ich mit beiden Ladys sehr zufrieden. Die Lady rechts im Zelt entwickelt jetzt schon unglaublichen Frost. _____________________________ Düngen : Gegossen wird mit Wasser das 24/7 mit einer Aquariumpumpe in einer 10L Gießkanne in Bewegung gehalten wird. Davon wird soviel genommen wie es die Ladys verlangen und mit dem einen oder anderen Zusatz versetzt. Je nach Stadium der der Ladys. Ab ungefähr Woche 5 wird mit 10% vom Topfvolumen gegossen. Das ganze wird in zwei bis drei Teilen mit einem Abstand von 20-30min gegossen. Vor jedem gießen wird die Oberfläche vom Substrat angefeuchtet. Tag50/15F gab es 1ml/L PowerRoots, 1ml/L PowerBuds, 1ml/L PureZym, 1ml/L SilicRock, 0.5ml/L CalMagPro, 1.5ml/L PK 5-8 als Zusatz. Das ganze wurde auf einen ph-Wert von 6.4 gebracht. Beide Ladys bekamen 1.2L. Tag52/17F gab es 1ml/L PowerRoots, 1ml/L PowerBuds, 1ml/L PureZym, 1ml/L SilicRock, 0.5ml/L CalMagPro, 1.5ml/L PK 5-8 Zusatz Das ganze wurde auf einen ph-Wert von 6.4 gebracht. Beide Ladys bekamen 1.2L Tag55/20F gab es 1ml/L PowerRoots, 1ml/L PowerBuds, 1ml/L PureZym, 1ml/L SilicRock, 0.5ml/L CalMagPro, 2ml/L PK 5-8 als Zusatz. Das ganze wurde auf einen ph-Wert von 6.5 gebracht. Beide Ladys bekamen 1L in den Topf und 200ml in den Untersetzer damit keine trockenen stellen im Substrat entstehen. Tag56/21F gab es nochmal 1L Wasser je Lady mit korrigiertem ph-Wert auf 6.5. ________________________________ Höhe gemessen ab Substratoberfläche #1 55cm #2 53cm ______________________________ Licht Abstand: 40cm Watt: 150W (75%) Ppfd: 900 DLI:39 ______________________________ Umgebung Temp: 25-26°C RLH:40-44% VPD:1.25-1.5 kPa
Likes
12
Share
Taken a few fan leaves off and done a little low stress training, coming on ok so far
Likes
20
Share
Moving right along, each girl is on her own pace. Tent was so crowded I had to remove the heater therefore I bought a bigger tent and will use use this one for drying. Thanks for looking..
Likes
12
Share
@russrahl
Follow
Going Good so far, roots are hitting the water on all plants and growth is starting to ramp up! I did a water change at the end of week 2 and added roughly 3/4 dose Remo lineup along with UC Roots at 5ml/gal.
Likes
16
Share
The plant is thriving as it enters its 11th week of flowering. The buds have developed beautifully, and they’re giving off a sweet, lemony aroma that fills the grow space. It’s a scent that’s both refreshing and promising, making me excited for the final product. At this stage, everything looks great, and I’ve decided to start flushing the plant with clear water only. This should help remove any residual nutrients and ensure a smoother, cleaner smoke. I’m planning to continue flushing for the next one to two weeks before harvesting. I’m really looking forward to seeing how this plant turns out. The buds are dense and sticky, and if the smell is any indication, the end result should be amazing. Can’t wait to see how she finishes!
Likes
19
Share
@nonick123
Follow
Día 69 (01/07) Riego con 1 Litro sólo H20 - ph 6.2 Día 70 (02/07) ¡ Cosecha Banana Purple Punch Auto ! 😁 💦Nutrients by Aptus Holland - www.aptus-holland.com 🌱Substrate PRO-MIX HP BACILLUS + MYCORRHIZAE - www.pthorticulture.com/en/products/pro-mix-hp-biostimulant-plus-mycorrhizae
Likes
17
Share
Highest center cola is 21" tall and rest of the canopy averages about 10"... LST included
Likes
16
Share
Germinating 3 Purple Kush Feminised seeds. filtered water in glass, also add 3/5 drops of hydrogen peroxide, stir water well before adding the seeds, and stir again after adding seeds to water. I will leave it for 24 hours The seed coat softens by soaking your seeds in a hydrogen peroxide solution, allowing the seeds to absorb more oxygen. This results in increased germination speed Hopefully all 3 seeds will germinate by tomorrow? Seeds popped today:-)transferred 3 Purple Kush seeds in to small pots 10/09/23 3 Purple Kush seeds, 1 seed in each small pot. Each Pot is Half filled with lite mix compost and Half filled with Vermiculite , watered planting medium before sowing seeds 2cm deep in planting medium. The seed will push through the vermiculite easley with very little effort, in effect increasing higher successful germination rate, the compost will offer the first tap root an immediate lite nutrient supply. Placed 3 pots on top of a Propagation heating mat for correct germination temperature, position in a shaded place, and keep out of direct sunlight. This may seem like a lot of effort? and it is, but it will be highly beneficial by increasing a higher germination rate and higher amount of seeds will germinate from using this method :-) especially if your seeds were expensive. 11/09/23 no sprouts above the vermiculite yet, i will check it again tomorrow. Today 2 Purple Kush Germinate and rise above the vermiculite 3 days after sowing. Purple Kush is going ok, it could be growing faster, unfortunately i can't upload new photos because there is a problem in the GD system, they are doing there best to fix this problem as soon as possible. GMO Cookies where started 16/09/23 filtered water in glass, also add 3/5 drops of hydrogen peroxide, stir water well before adding the seeds, and stir again after adding seeds to water. 3 seeds sprouted, but only 2 survived, it become to hot and one GMO Cookie sprout died. I have now started another strain (Party Monster) 19/09/23 filtered water in glass, also add 3/5 drops of hydrogen peroxide, stir water well before adding the seeds, and stir again after adding seeds to water. I will leave it for 24 hours, 5 seeds of Party Monster have sprouted and are under the same 100W LED grow light. GMO Cookies have all come up above the vermiculite and are now positioned under a 100W LED, there is a small clip on fan blowing and circulating the air. This is my second attempt to grow GMO Cookies from 3 feminised seeds, i messed up on the first 3 seeds, i put them under a 250 Watt LED and it fried them, my folt. Growing from germinating seeds is a very delicate situation, your environment temperature needs good control. 2 Party Monster seedlings are looking good, coming along well under the 100W LED light. 3 GMO Cookies are looking good also under the 100W LED light. Plus i have now started soaking in glass of water 03/10/23, 5 Strawberry Yields fem seeds aka Strawberry Fields. filtered water in glass, also add 3/5 drops of hydrogen peroxide, stir water well before adding the seeds, and stir again after adding seeds to water. I will leave it for 24 hours. The seed coat softens by soaking your seeds in a hydrogen peroxide solution, allowing the seeds to absorb more oxygen. This results in increased germination speed Hopefully all 5 seeds will germinate by tomorrow? The 3 GMO Cookies fem seedlings are coming along well, keeping them under the hood of a propagator, i have many mixed seedlings under the same hood, to keep seedlings protected from this relentless Spanish heat. 5 Strawberry Yields fem seeds have all sprouted and are above vermiculite, keeping them under the hood of a propagator, i have many mixed seedlings under the same hood, to keep seedlings protected from this relentless Spanish heat. Also positioned also under the 100W LED light, indoor temp 29 degrees humidity 65%, still to hot for seedlings to be directly under lights due to high temp in the room. 3 Strawberry Yields sprouts are doing well, gave 2 seedlings away, no space for all 5 plants, coming along well under the 100W LED light. 27 degrees humidity 55% good growing conditions Super Lemon Haze I began soaking 13 feminised seeds SLH since 27/10, after 24 hours soaking 11 seeds opened in filtered water in glass, also added 3/5 drops of hydrogen peroxide, stir water well before adding the seeds, and stir again after adding seeds to water. The seed coat softens by soaking your seeds in a hydrogen peroxide solution, allowing the seeds to absorb more oxygen. This results in increased germination speed! 1 Super Lemon Haze fem seed planted in a 2 ltr pot 28/10, this is the only plant i will keep for flowering. The Pot is Half filled with lite mix compost, and the rest of the pot is half filled to the top with Vermiculite , watered planting medium thoroughly soaking it before sowing seeds 2cm deep in vermiculite. The seed will push through the vermiculite easley with very little effort, in effect encouraging a higher successful germination rate, the compost will offer the first tap root an immediate lite nutrient supply. And i planted the 11 remaining popped SLH seeds in the brown round pot, this is just to see how many will rise above the vermiculite from the 13 SLH fems seeds soaked on 27/10. I will give these away to a friend. Both pots have been placed on a propagating heating mat for consistent and ideal germination temperature until all seeds have risen above the vermiculite. Once my 1 fem seed has germinated! i will cover the pot with a transparen plastic bag and place the pot 20cm below a 100W LED light. Super Lemon Haze feminised seeds Seeds sourced from Satdica Bulk Seeds Soaked seeds 27/10 planted up on 28/10, 12 out of 13 seeds have transformed in to 12 healthy little seedlings. 11 seedlings will be given away to a friend, and i will keep the one seedling you see already planted up in a black 2 ltr size pot. Now positioned under my 100W LED light, distance 15cm above seedlings. Light cycle 24 hours. Keeping them covered with propagating hood for a few days longer to allow seedlings to become better established before removing the hood. The vents on hood are fully open to allow seedling to slowly become accustomed to the outside vege room space. Gelato Cookies 3 Feminised seeds Satdica Bulk Seeds Popped 3 Gelato Cookies Feminised seeds today 06/11 filtered water or bottled water in a glass, also add 3/5 drops of hydrogen peroxide, stir water well before adding the seeds, and stir again after adding seeds to water. I will leave it for 24 hours The seed coat softens by soaking your seeds in a hydrogen peroxide solution, allowing the seeds to absorb more oxygen. After placing on propagating heating mat for 24 hours. This resulted in increased germination speed! and today i can see little white taproot tails protruding out from the seed husk 👌 3 Gelato Cookies seeds, 1 seed in each small pot. Each Pot is Half filled with lite mix compost and Half filled with Vermiculite , watered planting medium before sowing seeds 2cm deep in planting medium. Spoon your seeds into it's planting medium, do not touch with fingers, spoon it in with half spoon of water and a seed, place the seed in the center 2cm deep in the planting medium, water it in again very lightly to help the seed settle into a comfortable position before leaving it to rest covered on your heating mat. The seed will push through the vermiculite easley with very little effort, in effect increasing higher successful germination rate, the compost will offer the first tap root an immediate lite nutrient supply. Watered and fed them in with Plagron Terra Grow 5ml to a ltr of water, i may have added too much, perhaps 2/3ml to a ltr of water would have been enough? placed 3 pots on top of a Propagation heating mat for correct germination temperature, position in a shaded place, and keep out of direct sunlight. This may seem like a lot of effort? and it is, but it will be highly beneficial by increasing a higher germination rate and higher amount of seeds will germinate from using this method :) especially if your seeds were expensive. 3 Gelato Cookies have come through the vermiculite, 09/11 and now they are positioned under my 100W LED grow light. I didn't expect all 3 seeds to pop, because 1 seed looked like perhaps not viable, because i only keep the bad looking seeds for myself and keep the best seeds for customers. I am keeping them covered with transparent plastic bags for a few days to protect them in case it's to hot in the 24/7 grow room which is 24 degrees, this is probably an ok temp for them? but i'd rather not run the risk. Romulan Feminised seeds Germinating 3 Romulan Feminised seeds 26/11 filtered water in glass, also add 3/5 drops of hydrogen peroxide, stir water well before adding the seeds, and stir again after adding seeds to water. I will leave it for 24 hours The seed coat softens by soaking your seeds in a hydrogen peroxide solution, allowing the seeds to absorb more oxygen. This results in increased germination speed Hopefully all 3 seeds will germinate by tomorrow? 27/11
Likes
25
Share
Day 15 18/07/24 Thursday De-chlorinated tap water pH 6 with calmag 5ml -5L. I have scratched back surface soil, and topped up with canna terra pro and DyNoMyCo ✌️💚 Day 16 19/07/24 Friday Lite Feed today, 250ml each pot small run off. Seeing excellent start to these babies. Let's get it 👌💚 Day 18 21/07/24 Sunday De-chlorinated tap water pH 6 with calmag 5ml to 5L. Watering in 1L each day from now. Updated video Day 19 22/07/24 Monday Nothing new to report. Starting to see them beautiful fans appear that's all 😁✌️ Day 20 23/07/24 Tuesday Feed today, giving them straight all nutes Inc flowering nutes. I will update the dose as they grow and develop a bigger hunger. Video updates 👌💚 Day 21 25/07/24 Wednesday END OF WEEK Still no water or feed since Tuesday, it has been overcast last two days though so not a lot of energy been used. Still happy and healthy 💪💚
Likes
7
Share
Ich bin zufrieden bis auf einen kleinen Zink Mangel.