


Likes
Comments
Share


@Black_Widow
Follow
Привет садоводы!
Вегетация в полном разгаре
я удаляю некоторые побеги, чтобы она не была слишком густой

Likes
29
Share


@Rangaku
Follow
The BM has stretched hard the last week putting on some incredible size , just keeping up the defol and minor lollipop to her as she starts fully going in to bud . Already getting a faint fruity smell , the leaves are tasty as we actually had some in a salad the other night 😂

Likes
145
Share

@yan402
Follow
🌸🍊✨🍭🌸🍊✨🍭🌸🍊✨🍭🌸
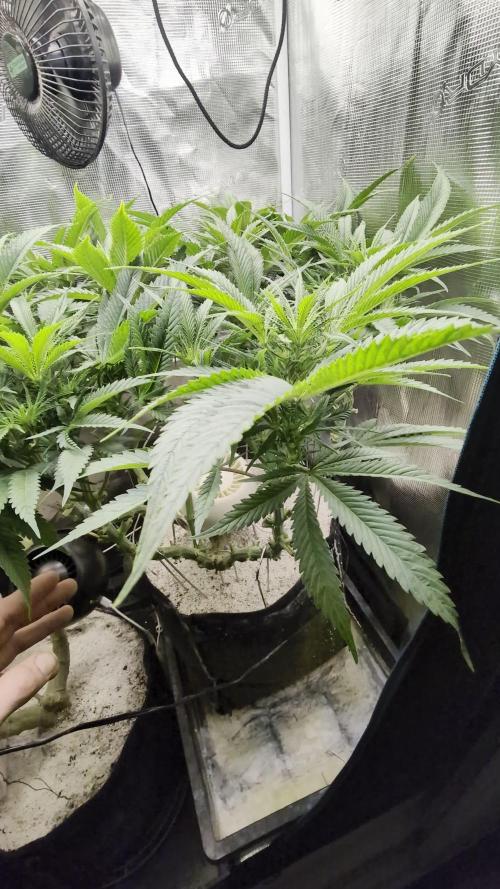
Back at it with Kannabia — huge thanks for the NEW EXCLUSIVE Upcoming Kannabia's seed Launch 🙏🍨🍊
Grateful for the trust and for everyone following along, I’ll run her clean and showcase what she can do.
Dessert-party goals: berry–citrus sherbet terps, creamy finish, tight stacks, easy trim, zero drama.
Veg 24/0, clean manifold + LST, flip on a happy, even canopy.
Coco’s fresh, seed goes in now. 🚀
Added on 12.10.2025
🌞 Light conditions: Limited direct light for the first 4 weeks — ~4 h/day on weekdays and ~10–11 h on weekends due to tent sharing and work schedule.
🌸🍊✨🍭🌸🍊✨🍭🌸🍊✨🍭🌸
💭❗💭❗💭❗💭❗💭❗💭❗💭
❗Events & thoughts worth noting❗
💭❗💭❗💭❗💭❗💭❗💭❗💭
10.08.25 GW1 Sowed seed, soaked starter pot with #1
12.08.25 GW1 Seed popped hip hip hurray
28.08.25 VW2 Stopped using GreenBuzzBloom, took it out of the schedule.
01.09.25 VW3 TriPartMicro 10→30ml, TriPart bloom 10→30ml
12.09.25 VW4 Applied nemadodes against thrips and fungus gnats.
20.09.25 VW6 topped and trained for first time, decided against a full manifold as I lost a few weeks already.
26.09.25 VW7 Topped her one more time for 8 mains
27.09.25 VW7 Topped up the pot with perlite instead of clay pebbles this time, just trying things out, TriPartMicro 30→40ml , TriPartBloom 30→20ml
10.10.25 VW9 have her a haircut, umm be trimming the side shoots tomorrow, rest in the video 📹
12.10.25 VW9 done some extra trimming to clean up a bit and chose two extra side shoots to nurture info mains, so kept the 8 original mains plus 2 rest in the video 📹
17.10.25 VW9 FfJ/fpj fish mix 30 → 60 ml
20.10.25 VW10 Feed tweak: added 3 g Calcium Nitrate/ 30 L (≈ 15 ppm N + 10 ppm Ca)
24.10.25 VW11 did a defoliation and trimming session 📹
27.10.25 VW11 Epsom Salt 0 → 2.5, Calcium Nitrate 3 → 9 g
01.11.25 VW12 CalMag 60 → 30ml, TriPartBloom 20 → 30ml, Magnesium 2.5 → 3.5g
02.11.25 VW12 Did a cleanup in preparation for flowering, rest in the video 📸
13.12.25 VW13 Did another cleanup in the tent 🎥, also switched to the FERMAKOR PK Micro schedule,(I'll update later)
🌱💦🌱💦🌱💦🌱💦🌱💦🌱
🌿 Day to day tasks & actions 🌿
🌱💦🌱💦🌱💦🌱💦🌱💦🌱
14.11.25 VW13 – Fed 5l of FERMAKOR PK → 2l runoff
15.11.25 FW1 – Fed 5l of #1 → 2l runoff
16.11.25 FW1 – Fed 5l of #1 → 2l runoff
(*RUNOFF reused for tomato plants)
💧💦💧💦💧💦💧💦💧
💧 Nutrients in 30 L #1 💧
💧💦💧💦💧💦💧💦💧
💧 TriPart Micro: 10 → 30 → 40 ml
= 0.33 → 1.00 → 1.33 ml/L
💧 TriPart Grow: 0 ml
= 0.00 ml/L
💧 TriPart Bloom: 10 → 30 → 20 → 30 ml
= 0.33 → 1.00 → 0.67 → 1.00 ml/L
💧 Cal-Mag: 60 → 30 ml
= 2.00 → 1.00 ml/L
💧 Home-made FFJ/FPJ (new batch): 30 → 60 ml
= 1.00 → 2.00 ml/L
💧 Calcium Nitrate (Calcinit): 3 → 9 g
≈ 15 → 45 ppm N + 20 → 60 ppm Ca
💧 Magnesium (Epsom Salt / MgSO₄·7H₂O): 0 → 2.5 → 3.5 g
≈ 0 → 8–9 → 11–12 ppm Mg
💧 pH Down: Citric acid (BuxXtrade) — adjust to ~ pH 5.8 – 6.0
📦 TOTAL: ≈ 110 → 180 → 170 → 190 ml liquids
+ 3 → 11.5 → 12.5 g solids per 30 L
≈ 5.9 → 6.4 ml/g active mix per L
💧💦💧💦💧💦💧💦💧
⚙️✂️⚙️✂️⚙️✂️⚙️✂️⚙️
✂️ Tools & equipment ✂️
⚙️✂️⚙️✂️⚙️✂️⚙️✂️⚙️
✂️ 2× MarsHydro SP3000
⚙️ MarsHydro 150mm ACF Ventilator
✂️ Trotec dehumidifier (big unit)
⚙️ Mini no-name dehumidifier
✂️ Kebab skewers (LST – stainless)
⚙️ Wire + roast skewers (LST assist)
✂️ Scissors (HST)
⚙️ Vacuum (for spills & cleanup)
✂️⚙️✂️⚙️✂️⚙️⚙️✂️⚙️✂️⚙️✂️⚙️
---
🍊🍧🌬️🍬🍊🍧🌬️🍬🍊🍧🌬️🍬 Mystery seed (Kannabia Seeds) — NEW EXCLUSIVE
🍊🍧🌬️🍬🍊🍧🌬️🍬🍊🍧🌬️🍬
Species: Hybrid (GF / swift-flowering line)
Genetics: TBA (breeder sheet pending)
THC: TBA
Effect: Euphoric, relaxed, creative (target profile)
Flavor: Berry–citrus sherbet, sweet candy, creamy finish
Flowering (indoors): ~6–7 weeks target (GF)
Resistance: High (aim: no drama)
Indoor yield: TBA
Outdoor yield: TBA
Structure: TBA
Notes: Brand-new exclusive from Kannabia’s GF line — I’ll update specs when the breeder card drops. Goal is rich sherbet terps (berry–citrus + cream), low leaf-to-calyx, easy trim. Stage harvest stays on the table if tops finish early.
YouTube Link: https://youtube.com/-m8h?si=A7x4Zlr2kj-_ga31

Likes
40
Share


@MrHightimes
Follow
So much bud I had to leave a plant up an extra week b/c i was out of room in the dry tent!!!!
Glorious glorious bud! i'm in love with these girls!!!!!

Likes
9
Share

@TKCS_Pinoy
Follow
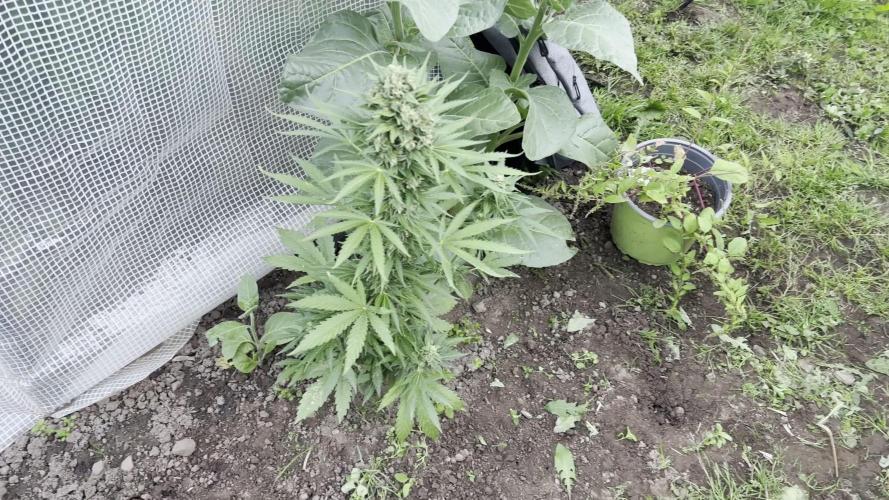
🌿 Woche 14 – Week 14 Gorilla Zkittlez (Fast Buds) – Outdoor Summer
🌡️ Wetter: Regen-Overkill mit ein paar Sonnenblitzen 🌦️. Und natürlich immer dann Sonne, wenn ich gerade nicht in den Garten schaue .
📏 Wachstum: Höhe bleibt gleich, aber die Buds fangen an, sich schön zu strecken.
💡 Licht & Energie: Jede Sekunde Sonne wird sofort aufgesaugt – Hardcore-Solarpanel-Modus 😎☀️.
🌿 Blattgesundheit: Tiefgrün, null Anzeichen von Stress.
💧 Wasser & Nährstoffe: Regen übernimmt fast die ganze Arbeit, nicht mal Dünger dazu. 100% Mutter Natur.
🔄 Entwicklung: Blüten verdichten sich weiter, sehen schon richtig kuschelig aus – fast zu schade zum Ernten .
✅ Fazit: Wetter nervt zwar, aber die Dame lässt sich nicht beeindrucken. Läuft stabil! 💪🍃
----------------------------------------------------------------------------------------------------------------------------------------------
🌡️ Weather: Rain, rain, and more rain 🌧️. Sun only shows up when I’m not watching .
📏 Growth: Height is stable, but the buds are slowly stacking up.
💡 Light & Energy: Running in “solar panel mode” – every sunray is fully absorbed 😎☀️.
🌿 Leaf Health: Deep green, zero stress.
💧 Water & Nutrients: Rain handles most of the watering, and the nutrients.
🔄 Development: Flowers getting denser, looking fluffy and beautiful – almost too nice to cut .
✅ Overall: Weather’s a pain, but she’s not bothered at all. Solid progress! 💪🍃


Likes
4
Share


@TS_Greens23
Follow
So ,,I had managed to snap a couple branches early on in this grow of the Orange 🍊 Sherbet,,but I’ve managed to train her back to a respectable canopy and she has started to reveal her bits,!!!! She’s looking kind of skinny and scarce after her defoliation,,but I’m content that she’s going to finish up strong 💪 and produce some nice flowers
Likes
2
Share


@CuriosityWebster
Follow
Loving how these girls are growing
Fastbuds mystery #1 finally catching up, and may possibly in the end being a better producer than the RQS plant, which is surprising to me because of how badly I stunted this plant. Got me curious how good this plant could’ve been

Processing
Likes
3
Share


@Kushizlez
Follow
Day 42-49 (June 11th - June 18th)
(Day 43) I need to work on my early veg times. Things are just too slow in the seedling stage. Next round I will use a coco/Destiny blend for the better aeration and lower EC. Even with my indoor plants. I notice plants started in coco root way faster. Not just with weed either. All plants seem to like it better. Coco is far superior to peat imo.
(Day 44) I’m pruning off the lower branches on my rooted blackberry clone. It’s cool to see it’s weird reveged structure. Lots of the fan leaves have trichomes on them.
(Day 45) Something really weird is happening to Grapefruit #3. The leaves are browning and starting to gnarl. It could be an insect of some sort as it’s the only plant looking like that.
(Day 47) It just hailed super badly and the leaves on some of the plants are pretty damaged. In my neighboring town the hail caused multimillions in damage so we got lucky here.
I’m going to spray some method 1 pps prevention spray today to help keep pests at bay. I will try to do it in overcast or shade. I’m seeing what looks like thrip damage but there is no way they can survive the cold nights here. Dog shit in my yard is attracting flies which then land on plants spreading god knows what.
(Day 48) Autos are still really stunted. I wasn’t able to find out how big they will get so I will just wait and see. I would guess they’re in their flowering stretch because their growth is unusually fast right now. I will probably just end up with 6-10 inch ornamental plants for autos. Definitely should have started them around mid summer in coco then transplanted. Time is of the essence with autos it seems.
(Day 49) Photoperiod plants are looking really happy but growth is stunted from the cold and lack of light. I was hoping for bigger plants by now. A lot of growth can happen in 2 weeks so we’ll see. I’m definitely not transplanting on the 21st but the sooner I do it the better. The bbb clones are struggling hard to root but I can see new growth on them starting to push out.
My clones are taking a really long time to establish. Every plant here, I don’t care how stunted, must be flipped by July 15th.


Likes
5
Share


@Johnblaze420
Follow
3rd week in looking really nice love how the buds are just growing all up the stems gonna be a lovely turn out heres hoping ill keep u posted on her progress thanks growmies happy smoking 💯👍💪


Likes
4
Share


@adam_pawloski87
Follow
@twenty20mendocino Ateam R&D Update ~ Let’s Go Day 97 , and day 4 since we did the flip an these girls are looking so amazing! We are shooting pistols an showing signs of female sex! Let’s go Y’all let’s build some big juicy buds!! Hope you all enjoy an have an amazing productive day as well as rest of the week! Peace love positive vibes to y’all Cheers a blaze on 😶🌫️💨💨💨💨 Keep them eyes peeled for next weeks update!!

Likes
17
Share


@ArtisticGrown
Follow
This week has been a breeze! I've been giving light water with the sprayer keeping it moist not too dry! Allowing that top feed to soak in time! This plant is happening, and happy! I'm loving this living soil let me tell you! It's been so much easier on me!!
Much love and happy growing

Likes
20
Share


@TheGourmetWeed
Follow
Nice plants
2 totally different phenotypes, as one was already harvested, and the other isn't even half way of flowering after 10 weeks.
Nice trichome production, great fresh and fruity smell, this plant is a pleasure to smoke in the end of the day.
Dried her upside down hanging in a tent I have for the purpose, at 25c, 30%RH -
Only removed fan leaves, no manicuring, been doing that as I smoke, noticed the bud lasts longer and with a better smell and you end up saving loads of time.
Really happy with this smoke, smells like proper weed. Maybe was the best time I dried and cure(ing).
Only problem is that I'm smoking more as it's so tasty ahaha.
Good stuff, thumbs up!
PS - I'll start looking for the "original" Zkittlez to try out and check the differences between them.
Update: 12 April 2021 - Chopped down Plant #2
So, finally Saturday I chopped her down. She looked now ready and delicious, although I only notice yesterday how many seeds she has allover the place. She hermied in front of me without noticing, not good at all and need to start looking much better and in detail into the plants.
Feel like an idiot now.
Anyways, it was a full week!
Emptied the grinder collector and pressed it down a little, makes a very nice smoke, light but pleasant, the kind of stuff it keep you going all day without the dumb effect.
From all trimming made the bubble hash. Got a little too green as the 220micron bag's stitches slightly opened letting some contaminants in the final mix, hence the green color.
This was a hit. in opposition to the grinder stuff, this sent me straight to the moon, really heavy stone effect, even thinking was hard. Reminded me those afghan/ moroccan balls we used to get back in the early 2000's.
The weed itself it's still drying so the smoke report will be updated in there.
715g of fresh cut plant is good, let's see the potency and the seeds. Might turn it all into bubble hash, if I see it'll be an hassle to remove seeds.
On an earlier bud I've cut and dried, smoked it and you can see pure white ashes in the bong. Ain't that a beauty?

Likes
36
Share


@Hempface86
Follow
Day 35 is here and we are at the start of week 5 and as you can see this girl is in flower! She is crowning nicely and look super healthy.. I implemented silica and recharge into the feeding regimen and today was the first day I gave the girls recharge so I'm hoping tomorrow I see that they are happy about it.. big shout out to Zamnesia Seeds for the opportunity to make this diary.. their website has absolutely everything and is one of the coolest websites I've come across and I'm not just saying that.. they have everything from seeds to almost everything you can find at a head shop and all your mushroom 🍄 growing needs as well.. awesome website awesome genetics awesome people can't get better than that.. thanks to everyone for stopping by and hitting a like and saying hi it's much appreciated. Good luck to everybody and happy growing ✌️ code zammigrow2024 for 20% off!!!
https://www.zamnesia.com/us/authentication?SubmitCreate=1&ref=j1up85x0

Likes
5
Share


Likes
8
Share


@Cadman
Follow
So the nuggets are dense and doubling in size every few days, the trichomes are cover the plants and they are sticky.
The Girls are thirsty, I'm topping them off every other day with 1.5 gallons of nutes, at this point I feel like all i'm doing is mixing nutes in the reservoir.
By the time I switch over season two to the grow room, i'm going to increase the size of my reservoir to 10 gallon so I can spend less time mixing.
I'll be flushing out the buckets in 2 weeks to give the girls fresh water for the final 2 weeks!
My Burp bucket project worked out great. Thanks to several youtube videos those videos are much appreciated!
I made a few modification to what I saw online.
so here's the parts list:
(1) 3.5 gallon Menards Bucket
(1) Gamma Bucket Lid
18" Black Irrigation drip tubing
12" Fish tank air hose
(2) Fish tank check valves
(1) tee for air line
(1) small fish tank pump
I started out modifying the input, most of the videos I saw had a hose with a check valve just poked in the lower part of the bucket with pin holes and end tied off.
What I did is I took the black tubing and circled the bottom of the bucket, then I took a small drill bit and drilled holes through the tubing about every 2 inches to disburse the air all the way around the bucket then I used a tee to connect the 2 ends of the circle and connected that to the tube entering the lower portion of the bucket.
the next change I made was instead of having a short hose poke through the upper portion, I drilled a small hole and hot glued the check valve inside the bucket with only the top of the valve sticking out of the bucket.
After you get all the hoes and check valves in snap on the Gamma Lid, Tighten it up and turn on the pump. I added the hoses going into the water so you could actually see that its working
I plugged the pump into a smart outlet and set it to run for 20 min 3 times a day, so no need to manually burp your nuggets while they are curing.
You'll also need to put a 62% boneva 2 way pouch in the bucket with the nugs to keep the humidity correct and optionally have a small hydrometer to verify, I'm going to mount one on the lid to be able to check it without having to open the bucket. unless curiosity gets the best of me....


