


Likes
Comments
Share


@Hattiwatti
Follow
Hi. Nothing special this week. Seems to be bit slow start but what i was looking from other diarys im not the only one. Roots are growing nice

Likes
84
Share


@Van_Terpen
Follow
LIVING SOIL & TCO
DEMETEARTH SYSTEM
⚡CODE PROMO : VAN-TERPEN420⚡
-15%+2 Seeds THE HIGH CHAMELEON 🦎
https://linktr.ee/vanterpen

Likes
82
Share


@BigBadLion
Follow
Heeeey all!
Sorry for the extremely slow update! The past few weeks have been crazy for me! 😱
This week I made a lot of defoliation and decided to be somewhat greedy. I'll let the plants grow a bit more so they'll stretch well during flower! So while I defoliate I'll allow the plants to recover properly! 💪
Near the end of the week I also made another mistake with Roko (poor baby! 😭). I broke another of the stems (the one that divided the plant in two, right in the middle) and I feared the worst! But so far the plant kept growing without any problems.
I'm still thinking a name for my 4th baby, she has surprised me greatly and I didn't notice how many new branches had grown until I defoliated her and I'm sure she'll deliver some great buds! 😍
Anyway everyone, this is all for now.
Thanks for reading this journal and soon I'll update the next week! 😃


Likes
3
Share


@JeyGanesha
Follow
Quarta settimana di fioritura anche queste runz layer cake sta venendo very strong 😂🙏💪

Likes
35
Share


@Master_weeda
Follow
Bonjour à tous les padawans et les maîtres jedis
Pour cette semaine je prévoit de pratiquer comme technique spéciale le LST et juste un arrosage.
Pour cela comme à mon habitude j'attend le cinquième noeud ou que je juge la plante robuste.
Je profite que cette semaine qui va être relativement calme pour faire un LST appliqué et vous faire un rappel de ce qui est pour moi la meilleure technique pour arroser une autofloraison et la façon dont je pratique le LST.
En suivant ces quelques simples conseils vous obtiendrez un résultat optimal tout au long de votre culture :
Le cannabis est une plante qui n’aime pas recevoir un léger arrosage en continu. Il est impératif de l’arroser en grosse quantité, puis d’attendre que la terre soit bien sèche avant d’arroser à nouveau!
Pour calculer la quantité d’eau nécessaire à chaque plante, suivez cette règle :
Le volume d’eau à donner lors de chaque arrosage doit représenter au moins environ un quart du volume du pot !!
Exemples :
pour un pot d’1L, donnez 0,25L d’eau à chaque arrosage pour un pot de 4L, donnez 1L d’eau à chaque arrosage pour un pot de 12L, donnez 3L d’eau à chaque arrosage pour un pot de 30L, donnez 7,5L d’eau à chaque arrosage !etc…
Pour donner un tel volume d’eau, il est souvent nécessaire d’arroser en deux (voir trois) fois, lentement et uniformément sur toute la surface. Disposez de bonnes coupelles sous les pots, celles ci se rempliront d’eau qui remontera dans le pot par capillarité en moins d’une journée. Il est également très important d’utiliser un bon terreau de qualité, avec une bonne capacité de rétention d’eau mais qui assure également un bon drainage (celui ci doit contenir de la perlite, et/ou de la coco, etc..)
Il vous faut alors maintenant attendre quelques jours en sous-pesant régulièrement les pot avec vos bras. Quand ils seront redevenus très légers, vous pourrez arroser à nouveau !!
En effet, comme l’eau pèse beaucoup plus lourd que la terre, un pot gorgé d’eau pèse plusieurs fois le poids d’un pot d’une plante prête à être arrosée. Avec un peu d’entraînement, vous apprendrez donc très rapidement à sous-peser vos pots pour savoir quand une plante a soif.
C’est une technique à la fois très facile et très efficace, et qui peut être appliquée à toutes les plantes en pots !
En arrosant de cette façon, en général vous devrez arroser vos plantes tous les 3 à 6 jours.
Pour cette semaine 3 au jour 17 ma plante fais 12 centimètres et son cinquième noeud apparaît je décide donc de pratiquer un LST sur ma plante.
Pour ce j'utilise du fil de fer galvanisé que je plante directement dans le substrat en faisant attention de ne pas endommagé les racines car n'oublions pas que ce qui pousse dessus pousse aussi dessous.
Jour 17 je pulvérise du une solution composé d'une cuillère à café de savon noir mou dilué dans un litre d'eau en prévention d'éventuels nuisibles.
Je corrige mon LST suivant la pousse de ma plante ...
Pour ma par c'est la manière dont je procède. Comme promis petit rapel de:
Quand commencer à appliquer la technique LST
De nombreux cultivateurs commencent la manipulation dés que les plantes possèdent entre 3 et 6 nœuds ou une paire de feuilles. Durant cette première étape de la croissance, le tronc encore flexible est pliable sans risque qu’il ne se casse, même si au fur et à mesure du développement de la plante il sera de plus en plus difficile de le plier. Nous pouvons continuer à guider la croissance des branches durant toute la culture, même durant la floraison, ce qui pour cette étape représente un grand avantage face à la taille, qui n’est pas du tout recommandé une fois que la formation des têtes commence, cela stressera en effet la plante, ce qui aura pour effet de retarder la récolte.
Comment appliquer la technique de guidage LST
Si nous sommes prudents, la flexibilité naturelle des fibres du cannabis permet de plier leur tronc et branches avec une relative facilitée, même durant la floraison des plantes.
En utilisant une corde fine, nous pouvons accrocher la pointe de la plante à la base du pot par exemple ou à un tuteur que nous aurons planté dans le substrat. Nous plierons le tronc avec précaution et nous le fixerons avec la corde, à partir de là, nous pouvons augmenter progressivement la tension de la corde, chaque jour un peu plus, jusqu’à obtenir la position souhaitée. Soyez attentif à la réaction de la plante, essayez de ne pas appliquer trop de pression sur la corde et rappelez-vous que la flexibilité des branches peut varier d’une plante à l’autre.
Pour obtenir de meilleurs résultats, il suffit de suivre quelques règles simples. Pour commencer, nous devons choisir une corde fine mais pas trop pour ne pas blesser les troncs au fur et à mesure qu’ils grandissent et qu’ils deviennent plus gros.
Nous pouvons utiliser des crochets en plastique souple ou de n’importe quelle autre matière flexible pour éviter d’endommager les plantes. Spécialement en intérieur, utiliser des cordons en plastique de couleur (voir les diaries de @Silky) est très pratique pour voir facilement les accroches et faciliter le travail au milieu du réseau formés par les cordes, les tuteurs, les mailles ou les supports que nous aurons dans la culture. Bien entendu, en culture extérieure et surtout en guerilla nous ferons juste le contraire et nous utiliserons des matériaux de couleur qui n’attirent pas l’attention pour que notre jardin reste discret.
Pour stresser les plantes au minimum, la mieux est de réaliser ces manipulations le soir ou juste après que les lampes en intérieur s’éteignent, ce qui leur permettra de se remettre durant la nuit. Normalement, le jour suivant nous pourrons observer comme les pointes des branches que nous avons pliées se dressent de nouveau vers le haut à la recherche d’une source de lumière.
Que la force soit avec vous

Likes
15
Share


@superskunkyfunk
Follow
Canopy has began to fill in very nice, actually a little surprised given how lanky the one pheno was looking. My bag seed plant I was holding out hope of being female has let me down, she or should I say HE, showed his first little plant nuts a day or two ago. SMH 🤦♂️. Oh well, that's what we got the feminized seeds for anyway 😂. Hopefully we have some little flowers to show you guys in the next week or so! Thanks for dropping by, and will update pics again later in the week : )
HAPPY GROWING EVERYONE!!! 😃


Likes
1
Share


@Krissci
Follow
Day 2 - light LST to expose the nodes and even out the canopy..
Always looks messy but the results are consistent.
Likes
9
Share


@OS_Farmz
Follow
Took out second Gator Breath plant which is even more incredible in terms of crystallization smell and buds size then previously cutted same strain plants. For the Total eclipse i am completely disappointed on the results: The plant may look quite potent but in real yu simply have no buds after trimming, tons of small leaver but no good material. I knew this was sativa hybrid but still.. You can see the comparing of two strains on the photos down here...Maybe I did something wrong during the growing, gonne ask expert-brothers on forum later.


Likes
145
Share


@Salokin
Follow
Hello Growmies,
The final chapter of this incredible journey has unfolded, and it's time to share the bountiful harvest and reflections on the entire cultivation process. Trimming the plant was a joy, and with gentle fingers, I removed all the large fan leaves. The precision in this process revealed the true beauty of the buds, setting the stage for a smooth harvest. With care and gratitude, the plant was chopped, and the buds were hung to dry. The anticipation for what lies ahead only adds to the sense of accomplishment. The wet weight, excluding fan leaves, stands at an impressive 782 grams. The buds are massive, a testament to the efficacy of the nutrients used, particularly the Power Buds. The name seems apt, as the result is a collection of sticky, dense buds with subtle lemon notes and sweet pungent undertones. In the final moments, the plant unveiled some delightful purple hues. While I wish I could have allowed them to intensify further, it's a reminder that each grow is a learning experience. In hindsight, a slightly longer fading period would have accentuated those beautiful colors. We live and learn, and that's the essence of this journey.
A heartfelt thank you to Plagron and Zamnesia for hosting this amazing contest. The quality of the products and the support throughout the journey have been invaluable.
As this chapter concludes, I'm left with a sense of fulfillment and gratitude for the collective experience we've shared. The plant's growth, from seed to harvest, has been a testament to the art and science of cultivation.
Feel free to check out my other adventures in my bigger environments, until then...happy growing!
Stay Lifted
Salokin


Likes
Comments
Share


Likes
57
Share


@Secretflower
Follow
Hello my friend,
...March 12, 2022..Day N°22..
First day of the fourth week.
My Feminized Tatanka Pure CBD is fine. She's growing fast.
I gave her water with a tablet of RQS Easy Grow Booster and a tablet of RQS Easy Plus Micronutrients.
She's under a Mars-Hydro Tsw 2000 at 30% of power and at 60cm of the canopy.
www.royalqueenseeds.com
www.mars-hydro.com
That's all for now my friends, thx for passing through here.
Wish you the best with your green projects.
See you soon..💨💨💨
Likes
21
Share


@NSABND
Follow
Der Start in Woche 8 ist regnerisch und bewölkt bei kühlen Temperaturen und hoher Luftfeuchtigkeit 😳
The start of week 8 is rainy and cloudy with cool temperatures and high humidity 😳
Day 62 "Haircut" for "Hilde" 😏😉
Likes
9
Share


@SlickCityOrganics
Follow
Now I see why they call it "Fat Bastard." It's now the tallest after being the smallest in the tent. Sheesh! Black Strap colors are just amazing. Peach Crescendo needed some more light cause of its height. Had to put it on a bucket so it's canopy can reach the other girls. My mistake. But we gotta keep mo along.


Likes
Comments
Share

@SubliminalSociety
Follow
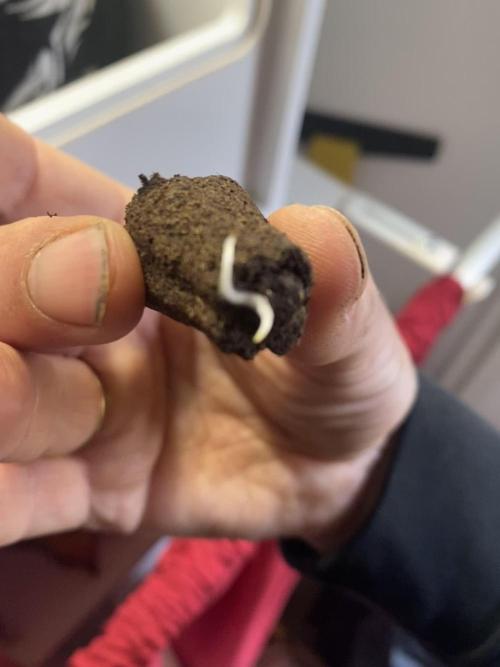
Used RQS propagator. 100% success as always,
sprouted after 2 days. the top root was a bit exposed but she doesnt mind.
tap rrot nice and long and strong.
will wait a day until i move her to the growbox.

Likes
14
Share


@ggiolla
Follow
so far fully satisfied. the plant has officially entered flowering and the first buds are starting to appear. the plant begins to take on the purple aspect that corresponds to it. I notice signs of some parasites on the leaves, up to now I have only found about 4 small spiders clearly visible to the naked eye, and perhaps some other specimens of whiteflies. I accept advice on how to prevent an infestation in the best way.
Processing
Likes
10
Share


@Calarok
Follow
hey guys! I decided to baptized my two ladys and add some visual markers to see wich is witch easily!
Batman = CBDurban / black bucket
Robin = Afghan / white bucket
After watching a tones of videos i finally decided to apply some prunning techniques. Batman received a topping to have for cola's, and Robin was FIM and i remove 2 big leaves that was doing lots of shadow!
You can see the hole process by picture and videos!
Thanks for following! And please subscribe!

Likes
12
Share


@Cannibalgardens
Follow
Well I decided to transplant this one as she was holding to much water in that smaller container and she wasn't liking the soil so much so I put her into a more balanced soil no nutrient additives . She will hopefully be doing better by the end of the week and if not I'll still keep plugging away at her and here's to the best cheers ...