


Likes
Comments
Share


@HippyHemulen
Follow
She is chopped at day 56 from pistils. I think its top 3 maybe best trichomes production what ive grew. Very beauty lady with nice orange hairs appearing behind glitter. Not big buds, lets say pretty small sized but quality over quantity. Smell is like orange/mandarin with sourness from citrus.
Better information in harvest report when dried and tested!

Likes
2
Share


@Saintvicious
Follow
Keeps going. Etsy seeds coming through. I think soon in the grow a cal mag problem comes up. Chime in when you see it.
Processing
Likes
6
Share


@Jack_Greenstalk
Follow
bouncing back from defoliation as they continue to stretch. sour 76 finish stretching at 22-24 inches (flipped at 10-12 inches) plat yetis keep stretching for another week or two
Likes
6
Share


@GanjaFarmer101
Follow
I don't think it too well to the heat/downpours - something clearly went wrong early in the flowering stage.

Likes
22
Share


@DunDerma
Follow
Growing very beautifuly and as intented. I changed the nutrition line to a brand where you feed it Once a week, and rest of the time use Phd Water.
Im also adding a secret bloom booster! (Hint: It makes the water purple)
More pictures from Week 12 are incoming.
I have been busy harvesting my first plant ever(Cream Caramel in my diary)
To avoid Caterpillar(Larvae) damage, I remove any fan leaves that has Damage, a larvae or larvae poop/eggs on it(black dots). Fortunally this plant has been much better than my previous one, I used Neem Oil treatment and it seems to work better, also I have fresh Peppermint, Lavender among other plants now in the garden that helps against different kinds of outdoor damage.
As a precaution I am massively defoliating the plant, and on my other photoperiod plant, as an experiment I decided to remove big fan leaves of some of main bud sites, the ones I removed fan leaves on, had denser and bigger buds when harvesting. I also tried doing it 50/50 experiment on the plant last week of bloom, and even there I could see a difference in harvest weight. So I might continue with this, depending on how future harvests go.
✌️🏽💚

Likes
1
Share


@Redweasel
Follow
10/10/26 8am-11am
Pulled coco coir mulch rings & set them to soak in reservoir water mixed with quillaja.
Removed any & all fan leaves with a petiole & any and all small branches or growth points that were not going to reach the top 1/3 of the canopy.
75% of removed plant material was salad chopped, tossed with an equal weight of brown sugar, packed tightly in a 64oz mason jar with brown sugar packed on top, 1 tbsp of LABS, and airlock lid to begin a FPE.
Top dressed with a blend containing 1 cup Craft Blend, 1 cup house-made mineralized bokashi, 1/2 cup DTE Flower Garden, 1/2 cup insect frass, 1/4 cup DTE prilled gypsum, & 1/4 cup glacial rock dust.
Spread remaining chopped plant material over the top dress & capped it all with a mix consisting of 2 cups each CoM Quoddy Blend & worm castings.
Hand watered with 1 gallon plain 6.0ph/30ppm reservoir water mixed with 1 tsp each of coconut water powder, aloe powder, & Build a Flower, 2 tsp each house-made LABS & banana FFJ, & 1/2 tsp quillaja powder.
Replaced saturated coco coir mulch rings & reactivated Autopot XXL.
Plant height-34"
DLI-45
VPD Target remains 1.10

Likes
69
Share


@TOTEM
Follow
When you show love to a plant, she will do the same to you. That’s what’s happening! This gorgeous Euphoria is a gift from nature (and RQS 😄). Not much to say about the ferts, which are doing their job. Flowers are getting bigger, so yeah, cool!
Processing
Likes
7
Share


@jeffrey420
Follow
Plant is looking good 😊, fully recovered from defoliation, I set the lights closer, switched them to 12h of light per day, and did some spraying to control pests with neem oil and organic Marseille soap, everything good so far . Can't wait to see the flowers forming.
I used a net to open up the branches, and get more colas, it worked but I think stressed out the plant a bit and the fact that I did it in the flowering period didn't helped, so next time I'll do it way before, but I recently bought the net so.. anyway I kept the net on for three days, and now I decided to remove it cause was getting me lot of troubles accessing the setup in general, watering, basically made impossible any movement inside the tent.
Still did is thing and now I have not the best even canopy but many more top colas for sure.
Please give me any advice, I've noticed it is drying out lot faster, humidity is still at 58% but I believe the roots are much more developed.
I will leave home for 2 or 3 weeks, my sister will have the duty to just water, can't ask her more, hope for the best. So updates will be very rare but she'll take pictures for me and for us :D .
Likes
92
Share


@SwissKush
Follow
Day 43
Extreme growth, she is expanding all over
I gave her the final 6L of preflowering nutrients, and I think I will be changing over to the full flower blend. I will change and clean the DWC before.
PH solid yellow always, really great smell
Day 44
Expansion everywhere, main grew about 5cm overnight
the stretch is starting, her side limbs are reaching upward
she is growing very well
Day 45
Today she gets a huge haircut, 90% of those lower leafs and little larf branches were removed
Her bud sites are forming very well
She is consuming 3.5 litres a day right now
The foliar health is incredible, you will notice she is at her max for nutrients, 700ppm is the ceiling it looks like
Day 46
extreme expansion overnight after haircut
The resin is already growing on the sugar leafs
Day 47
The smell is so strong, I have never smelled something this strong from an auto in a tent before... smells like a photo grown outside
Flowering is starting very nicely, her bud pistils are shooting out everywhere wanting pollen.. not gonna happen, no pollen anywhere nearby!
PH dead on 6.0, yellow always
The bud sites are stretching, like fastbuds said in their write up, this one takes a bit longer to veg, but is worth it! I can tell because the resin smells like straight diesel fuel
Day 48
she is just exploding all over, her bud sites are doubling in size every day right now
the legs are stretching, its amazing to see, grew 6cm overnight, she is drinking more, almost 5 litres gone in a day
this is the most exciting part of the grow im my opinion, each day you can see real development. The resin is already growing so thick on this one.
Day 49
Whenever Fastbuds gives guidelines on their strains, I make sure to read Sebastian's write up every time, multiple times. They always include beneficial grow tips that are facts. The reason why this plant is growing exceptionally well is because of Fastbuds strain specific advice on the website.

Likes
37
Share


@Rangaku
Follow
Green crack is deffo the little weirdo in the tent but she’s showing signs of healthy growth so she gets to hang around , transplanted into 15L pots midweek for the next week or so then I’ll transplant again into 28L pots for the run home
Likes
5
Share


@MilkBagg
Follow
So happy with the autopots and how well they plants are thriving. Instead of top dressing i decided to switch nutrients to cronks bonnie and Clyde for autoflowers. Did a half does to see how well it does at first. I make water in 2 gallon batches, 2 gallons with food, when empty, 2 gallons of with calmag.

Likes
3
Share


@Chubbs
Follow
Weekly update on these big girls. They're in full flowers now but wow are they some bushy plants. The stems are solid and the flowers are everywhere. I'll be doing a defoliation on them this week to allow those lower sites to mature with the tops hopefully at the same speed. The smells is super citrus with hits of sweetness. All in all Happy
Likes
11
Share


@rold8388
Follow
Strong week. Finished at 2.2 ec. Clean water. Flora flex nutes are top notch. No dirty brown water. Ph fluctuates a bit. If you check on daily you are good.

Likes
92
Share


@Roberts
Follow
Well finally got a seed germinated. This batch was pulled for quality control. At least I got 1 plant. Hopefully she does well. She has a late start compared to others. I will be using a Spider Farmer SE5000, and a New Level Hydro 5 gallon bucket system links below. Thank you Spider Farmer, New Level Hydro, the Amsterdam Marijuana Seeds. 🤜🤛🌱🌱🌱
SE5000
https://amzn.to/3qFpAML
Spider Farmer Official Website Links:
US&Worldwide: https://www.spider-farmer.com
UK: https://spiderfarmer.co.uk
CA: https://spiderfarmer.ca
EU: https://spiderfarmer.eu
AU: https://spiderfarmer.com.au
Coupon Code: saveurcash
Thank you grow diaries community for the 👇likes👇, follows, comments, and subscriptions on my YouTube channel👇. ❄️🌱🍻 Happy Growing 🌱🌱🌱
https://youtube.com/channel/UCAhN7yRzWLpcaRHhMIQ7X4g
www.newlevelhydro.com
www.hygrozyme.com

Likes
Comments
Share


@n1mbu5
Follow
Ok guys so wet weight is 220 off the strong girl and the other one when I took her apart was 80g wet.
Obvs the one that is 80 is the one with bad root rot, basically no root she just fell over.
The other one had an amazing root very strong and she survived the newbie abuse.
Anyway, it's a shame these two didn't reach their full potential but I've definitely learned a lot with this grow and hope I do better next time round!

Likes
13
Share
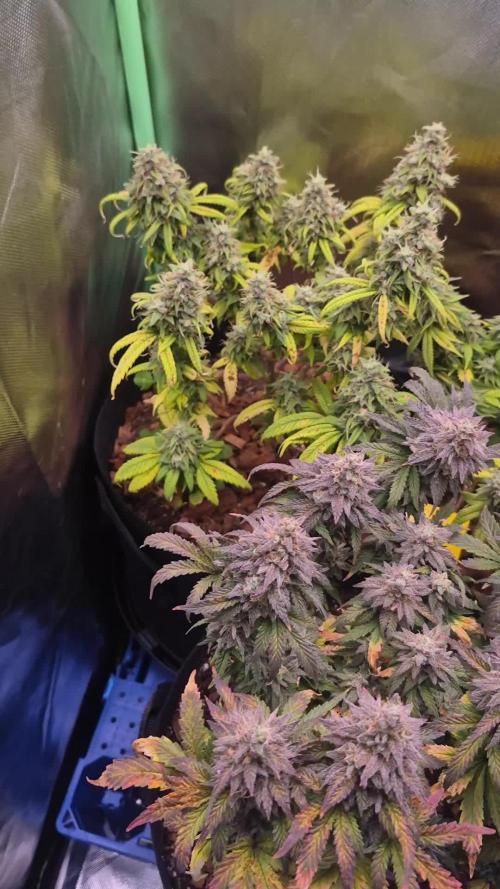

@3rnest
Follow
Die Pflanzen kommen in die 8. Blütenwoche und haben sich gut entwickelt, die Blüten haben letzte Woche noch etwas zugelegt und sind praller geworden.
Auch sehen die Blüten jetzt schön frostig aus und glänzen schön im Licht.
Ich werde noch abwarten, wie sich die Trichome entwickelt, der Gorilla könnte Ende kommender Woche fertig sein.
Chocolate Rainbow XXL brauch auf jeden Fall noch etwas länger hat diese Woche aber auch schon mehr Trichome gebildet. Amnesia Haze liegt irgendwo dazwischen und kann evtl. schon mit Royal Gorilla geerntet werden.

Likes
6
Share


@Young_agronomist
Follow
22.08.2023- на этой неделе боролся с засолами у обеих девочек и было принято решение добавить flash clean ,затем подождав сутки дать питательный раствор меньшей концентрации 900 ppm. До этого вход был 1200 , а выход 2000.
Сейчас они очень счастливы и наращивают цветы 🌹

Likes
16
Share


@WerebackFlat
Follow
The plant has become really massive and the fruity smell it gives off is perhaps one of the most pleasant I've ever smelled. The plant drinks almost 2L of water per day. I changed the fertilizers by removing those not strictly necessary for the flower's energy, in order to make the plant use the vital lymph of the leaves, which will lose them further favoring the growth of the inflorescences. At the same time I added ADV Overdrive, a magnesium, phosphate and potassium based fertilizer which stimulates the weight gain of the flowers. For the hundredth day I decided to make a video, I'm definitely satisfied! I expect to cut the plant around the 10th week of flowering.
Processing
Likes
8
Share


@Highclass
Follow
2nd week of flowering, just showed the sex almost 80% of the plants. Pruning time, alga bloom time.
Try to solve the height problem betweem the using some plates.

Likes
30
Share


@eurorack
Follow
Growing well, I'm going to switch to 12 hours of light now and get these plants budding up.
I'm noticing that these two don't like drying out and are happier when kept fairly moist, the pots don't even have to feel light like they need a water for the leaves to droop like they are thirsty.

Likes
11
Share


@Chuckwaggon420
Follow
This week has been time to put on weight!! They are getting so heavy glad put in secondary scrog net.
Have only been doing water so plants can just pull what they want our the soil they are starting to fade on their own. They have some amazing kinda blue tent to the buds. They have a gassy sweet smell to them!
This will be the last week I feel but still see some clear heads and no amber so shall see over next week!!
