




Likes
34
Share


@Salokin
Follow
Grow Diary - Week 1: Germination of Watermelon Candy F1 Hybrid Automatic
Introduction:
Greetings, Growmies! Salokin here, thrilled to share the exciting germination week of our newest addition, Watermelon Candy F1 Hybrid Automatic. A special shout-out to Patricia from the Zamnesia family for granting us the opportunity to be among the first to cultivate this fantastic strain. Our journey begins as we prepare these seedlings for their future home in the controlled environment of Tent X.
Germination Process:
On January 24th, the Watermelon Candy F1 Hybrid Automatic seeds were carefully placed in the EZ-Plug germination setup. After a brief 1 1/2 days in these nurturing plugs, the seeds sprouted, marking the commencement of their growth journey. The uniformity in their germination is impressive, showcasing synchronized and promising starts for each seedling.
Growing Environment:
While they're not yet in the Tent X environment, our Watermelon Candy seedlings are thriving in their current setup. We're preparing the optimal conditions for their transition into the controlled environment.
Observations:
The seedlings exhibit a thriving and lush green appearance, though slightly trailing their tent mates. This expected difference in early-stage growth is carefully monitored, and adjustments are made to ensure optimal conditions.
Acknowledgment:
A special thanks to Zamnesia Seeds and Patricia for the sponsorship and the opportunity to cultivate this exciting strain. We eagerly anticipate observing the Watermelon Candy F1 Hybrid Automatic's journey from germination to harvest.
Stay tuned for more updates as we nurture these promising seedlings through their growth stages.
Stay Lifted, Salokin

Likes
27
Share


@RDWCGrowing
Follow
5/23/2023
Week 7- Day 1 of Flower (Day 110 overall) (Day 49 of Flower)
There was a couple of small super small sucker buds on the lower stocks that needed to be cleaned off but that was it. Just watching them Flower!!
5/24/2023
Week 7- Day 2 of Flower (Day 111 overall)
Tucked a few fan leaves below lower buds but didn't see any blatant offenders that needed to be removed. I typically do start my checks in Week 8 but since this is a new strain I decided to go ahead and do a Trichome check just to see what was what.. Just as I thought nothing but clear glassy Trichomes. I will check again in one week....
5/25/2023
Week 7- Day 3 of Flower (Day 112 overall)
Just letting them grow today!! Smell is getting stronger I would say it is a hint of Pine and a heavier fruity smell.
5/26/2023
Week 7- Day 4 of Flower (Day 113 overall)
I did Nothing but took some pics and I enjoyed it!!!! It is nice to be able to just sit back and watch them on auto pilot.. :-) Tomorrow Water Change Day!!
5/27/2023
Week 7- Day 5 of Flower (Day 114 overall)
I admit it.. I had to defoliate a little bit.. I looked in while changing the water today and there were just a couple blatant offenders blocking the light from lower bud sites and those leaves they just had to go. Other than that I changed the water and this week is where I drop everything and start preparing them for this last phase of the grow. Loving a few of these buds they are starting to beef out very nicely.
I added 36 gallons
Mammoth Silica = .5Mil/Gal= 18Mil
Root DRIP = 1Mil/Gal= 36Mil
CalMag= .5Mil/Gal= 18Mil
FloraMicro = 3.8Mil/Gal= 137Mil
FloraGro= 2.8Mil/Gal= 100Mil
FLoraBloom= 4.6Mil/Gal= 166Mil
LiquidKoolBloom= 2.5Mil/Gal= 90Mil
TPS SIGNAL= 4.0Mil/Gal= 144Mil
ORCA = .5Mil/Gal= 18Mil
Water Temp= 70.1
Tent Temp= 76
Humidity =64 ** I have two dehumidifiers running on Ink bird controllers to try and keep the humidity down, In late in flower I like to keep the humidity above 45 but below 60.
5/28/2023
Week 7- Day 6 of Flower (Day 115 overall)
Opened the back of the tent today and boy did she need some defoliation love in the back. Other than that I took off a few little sucker buds trying to form. I did start to setup my Dry space as well as did a Trichome Check today and the brown tips are coming in nicely.
5/29/2023
Week 7- Day 7 of Flower (Day 116 overall)
Found a few baby sucker buds trying to form so I removed them. Other than that I am enjoying watching her mature.
I also started my Reverse of the Clone I took 6 weeks ago in Apr from #3. I am uploading footage of the reversing process for your viewing pleasure.



Likes
3
Share

@Samsationalseeds
Follow
Day fifty, they're all looking pretty good.I'm doing a ph check every couple days
Likes
7
Share


@gablmo
Follow
I had a long week and a lot happened in the garden. The plants were growing too slow and their leaves were closing like they were trying to protect themselves, some of the leaves ends were dropping downwards, purple stems and I also had tecnical problems; the GoGro ( auto feeding equipment ) valve didn't work and I ended up with a flood twice, which brought a few freaking little flies, and the lights were disconnected for 7 hours on sunday morning by accident. To solve this issues I had help from the folks here and some research online, I raised my lights up because it was cooking the plants, i adjusted the ppm giving more food to stop the leaves tip dropping, got Calmeg for the purple stems, pest control spray, I fixed the valve a gave a pretty good cleaning with Clorox in the tent. There were good things too. I did fimming technic to make the plants shorter and to get a more even canopy to get more ligh to them and more flowers. The girls are doing great, they are 4 feet taller now. I learned more about how they work and how to take care of them thanks to some free online books and lots of youtube. It has been hard work with lots of hours of dedication. I'm loving it. Thanks people from here. Thanks GrowBoss.


Likes
25
Share


@KivzBudz
Follow
In the end I’m very happy how this first Grow went. Tomorrow I’m gonna finish the other half and update some pictures. Curing begins now, can’t wait to smell and taste the full cured terpens! 😋🌱


Likes
4
Share


@PatriciaGant
Follow
Celebrate Mike Tyson's comeback with the exclusive RQS & Tyson collaboration: The Jawbreaker. Limited to just 2,000 units, this special edition blends Gelato #41 and Kosher Kush, delivering 27% THC with pine and earthy aromas. Housed in a bold black and red box, it’s a cannabis collector’s dream, capturing Tyson's strength and vigour.
The Jawbreaker Limited Edition
Gelato #41 x Kosher Kush.
All Nutrients and adding Information in Ger-Section.
Finaly start of her Life, see Ya soon.
One day i wil have my one strain:-)
Likes
7
Share


@LittleBigTrees
Follow
Potted then up to 4ltr pots ready for flowering ✌️ switched to 12/12 on day 35
Likes
4
Share

@SWITCH420
Follow
Hi folks,
I'm coming here to start the process of ending this grow journal. I harvested about three months ago and the weed is definitely cured. Photos are about to come — I'm doing a real studio photo shoot for those buds, they deserve it!
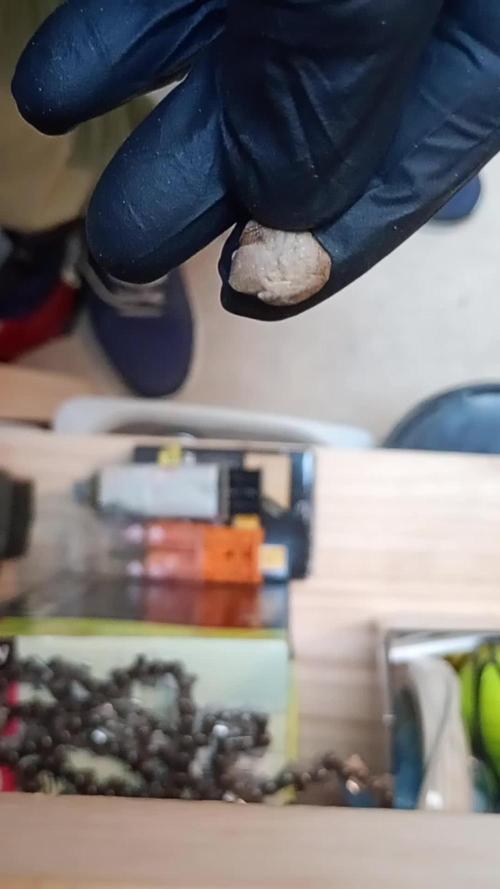
While waiting for the shots, I made some pretty damn dank hash temple balls using the iced water extraction method (solvent-free) with my little washing machine. It's a mix of the 8 strains I grew here — never ideal to mix different kinds of resin... but man, this is some serious dedicated work, so I'm making myself happy with that 14g shiny temple ball in the end 😉
Here are a few details about my process for you guys (and don't forget — you can do it with fresh material! Fresh frozen is always tastier. Also, the drying process is much more efficient and faster with a freeze dryer, but... you need the budget for that. I don't, so I go with the air drying method — check it out below):
1. Get your dry trim, then cure it properly for at least a month (I did 3 months). Smell it — mmh, sweet, dried to perfection. ✅
2. Freeze it, delicately wrapped in a freezer bag.
3. Let a large amount of tap water sit for at least 24h to remove chemicals like chlorine, then use it to make plenty of ice cubes — don't be shy, especially if you're not working in a cool environment.
4. Prep your washing machine: add trim between two layers of ice, fill up with clean water (as much as you can, large vortex is better than a smaller one), then make it seat for 30 min (45 min for thicker buds) the time that the dried green material gets wet again.
5. Prep your filtering tools: catch bag, different mesh bags, spoon, etc.
6. Wash as many times as you can before green contaminants appear, as these lower the quality of your hash — don't hesitate to go up to 8 to 12 washes if the resin still looks clean! Important: each wash has its own specific duration, and they get progressively longer as you advance through the process. Frenchy Cannoli (a true hash legend) provides a detailed timetable for this — from as little as 30 seconds to 1 minute for the first wash, all the way up to around 25 minutes by wash 8. Make sure to follow that schedule rather than using the same duration for every run or running it too long the first wash !! It could breaks to quickly your precious material before you collect all the trich's and the quality would be lower in the end.
7. Collect the wet resin in the mesh bags with a frozen metal spoon, make patties with the resin, and let them sit over some towels in order to drain as much water as possible (place a tissue made for hash collecting over the towel).
8. When the patties are a little dry to the touch, wrap them as they are in the tissue and place them in the freezer for 48h or more.
9. With an iron strainer, microplane your patties over the biggest flat surface you can get! It's important that your micro pieces of hash dry widely and don't get too compacted. Any failure in the air drying process will nucleate rot, ruining your hash in the end and making it a poor product — eventually something to throw away. Sad when you think about all the phases of the process to get to this point!
10. So, in order to air dry properly, you must — it's not optional — lower the RH of your dry room to 35% or slightly below, never above and let it dry as long as needed until the material feels like dry sand. For myself, I found 10 to 15 days is ideal. The room must be very lightly ventilated (not directly on your resin!) and in complete darkness — the goal is to preserve all those delicious terpenes! Ideally, temps around 60°F or 16°C
11. Now that it's dry, collect your resin with a large thin spatula! Make a little mound between two layers of PaperHash, boil some water, and fill up a wine bottle with it!
⚠️ From this point on, to avoid exposing your carefully dried resin to a more humid environment — which could ruin all your hard work — everything must happen in the same drying room. Keep working at 35% RH until your temple ball is tightly and airtight wrapped in PaperHash. (And don't forget to drink water — it's dry in there! 💧)
12. Start to slowly press your resin. Magical moment. Finally....
13. Press 3 times for 10 to 15 minutes in order to really decarb your hash — because that's what it's all about! Between each press, try as best you can to shape a patty... until the final press, when you'll be able to form that magical shiny temple ball (it only shines with gloves on, guys 😄)
14. You are now allowed to try it — for quality control purposes only, of course!
15. Because you want to age your hash for the sweetest 5-star smoking experience: wrap your temple ball in a large piece of PaperHash — if you can get that brand it's ideal, or another kind (check https://thepressclub.co) as long as it's organic!
16. Place the wrapped temple ball in a glass jar and store it in a dark, cool place.
17. Wait a minimum of 3 months before opening it.
18. Open, smell, touch — you'll be amazed. Roll it up with some weed or tobacco or both (I do both) / Or get a Hooka... you are smoking some true primo aged hash made by yourself! Taste the difference and realize all the path from choosing the seeds online until this first amazing puff ... 🙏
I want to credit my inspiration for making this kind of hash to the great Frenchy Cannoli, who has shared all his knowledge through amazingly rich tutorial content that you can find online with a bit of searching. 😉 Peace Frenchy 🕊️☮️




Likes
8
Share


@Easygrower
Follow
Hello growers day 14 with the blue monster ok I’m have troubles the poxy stinking police have been raiding people on my estate great (it’s illegal we’re I live)now my wife has told me it’s got to go so what do you do I packed them all up And put em in the in-laws garden 😂 there not doing to bad the weather has been banging lately there just getting a bit of a bashing from the wind so I’m going to finish the blue monster outside now hopefully she does well until next be safe and happy growing ✌️
Likes
22
Share


@DogDoctorOfficial
Follow
Week 10 Veg – The Art of Clipping & Training
We’ve officially hit Week 10 Veg with our White OG from Seedsman Seeds, and this week has been all about training and sculpting her into the beast she is meant to be! 💪🌿
🌱 Training & Clipping – The Path to Perfection
This week, I went full hands-on with her structure, bending, clipping, and securing her branches into the exact shape I want. Each branch was carefully attached and adjusted, allowing her to spread out and open up beautifully. This method encourages even light distribution and maximizes bud sites for the upcoming flowering phase.
She’s been responding amazingly to the training, showing strong recovery and explosive growth in return. It’s taking longer than usual in veg, but patience is key. I believe this will pay off in the end, rewarding us with a massive, structured mama ready to produce some stunning flowers.
📸 The Photoshoot – Showing Off Her Beauty
By the end of the week, after letting her settle and stretch from all the training, I decided to do a proper photo shoot to capture all her beautiful details. There’s something about seeing her structure under the perfect lighting that makes all the work worthwhile.
Feeding & Conditions
Still rocking the Aptus Clean Line, keeping things simple yet powerful with:
✅ Regulator
✅ RO Water Conditioner
✅ All-in-One Liquid
💦 pH – 6.02
⚡ EC – 1.12
Lights are still FOG LED, controlled by TrolMaster, ensuring she gets the perfect spectrum and intensity for this crucial phase. The climate remains stable, allowing her to keep thriving and adapting to the ongoing training.
🙏 Shoutouts & Gratitude
Big thanks to the sponsors, the community, the platform, and everyone supporting this journey! Special appreciation to:
🔥 Seedsman Seeds
🔥 Aptus Holland
🔥 TrolMaster
🔥 Future of Grow LED
🔥 Pro-Mix Soil
🔥 CannaCan
Much love to all growers, followers, haters, supporters, and everyone in this amazing journey! 🚀🌱
🎥 Join the Journey!
Don’t forget to catch more action on Instagram & YouTube, where I’ll be sharing exclusive content, updates, and insights. Let’s keep learning, growing, and having fun together!
Stay tuned – flowering is just around the corner! 🌸🔥
#GrowDiaries #WhiteOG #ToppingMadness #AptusHolland #Mainlining #PlantTraining #GrowersLove #SeedsmanSeeds
As always, this is shared for educational purposes, aiming to spread understanding and appreciation for this plant.Let’s celebrate it responsibly and continue to learn and grow together!
💚Growers Love 💚 🌿
DISCOUNT CODE - SeedsmanSeeds - DOGDOCTOR 10% off
As always thank you all for stopping by, for the love and for it all , this journey of mine wold just not be the same without you guys, the love and support is very much appreciated and i fell honored and so joyful with you all in my life 🙏
With true love comes happiness 💚🙏 Always believe in your self and always do things expecting nothing and with an open heart , be a giver and the universe will give back to you in ways you could not even imagine so 💚
Friendly reminder all you see here is pure research and for educational purposes only
💚Growers Love To you All and remember to keep that smile big and alive 💚

Likes
7
Share


@Jezbong
Follow
Bad start of the week or end of last week, not sure..
The middle cob led died so had to order some new lights.
Also having a lot of issue's with fungus gnats. The fly traps are packed :/
Update: Fugnus gnats are getting a big problem. Guess it is because of the pots. Hung some sticky traps and ordered nematodes.
Update; nematodes arrived and have been added to the pots. Also gave them another feeding.
New equipment has arrived so will probably install tomorrow
Update: new grow room installed! they seem to like their new home.

Likes
25
Share


@GangbudsGenesgdl
Follow
19/01/21. segundo dia de sesunda semana de floracion, hoy le pode algunas hojas grandes para que le pegue mejor la luz en las partes bajas
le aplique un poco de insecticida organico para araña roja encontre algunas hojas con la plaga
22/01/21. hoy se aplico riego con nutrientes organico de Rootz.mx se aplico magnaflor y forzasilicia
MagnaFlor. Estimula la floración.
100% orgánico.
Contiene biocatalizadores que serán rápidamente absorbidos por las raíces de tus plantas. El comienzo de la floración será explosivo.
24/01/21. le puse un poco de insectisida organico por que le e notado muchos acaros araña roja, cierre de semana

Likes
7
Share


@Holy_dog_farm
Follow
3 weeks curing and i think its done now very strong and sweet smell.
Really enjoy my first autoFlowering harvest with this strain.
Likes
31
Share


@Tweak
Follow
So I finished my slow transition to flower yesterday, I increased “night” by 20 min everyday over 21 days to get from 18/6 to 11/13. She’s def stretching but less then would be expected with this strain if it was an abrupt switch. Enjoy and give me a like!!

Likes
8
Share


@Organic_G
Follow
Einfach wunderbar, noch ne Woche würde ich den Tops geben, dann kommen die wahrscheinlich noch ab, werde wieder stufenweise ernten… oh Mann kein Bock auf Trimm Jail… Aber wieder ordentliche Beute für 3 Pflanzen

Likes
6
Share


@StoneyNugs
Follow
6/21: Topped off buckets and adjusted pH to 6.2
6/22: Removed growth that was not getting light. Topped off buckets, adjusted pH to 6.2
6/23: Topped off buckets and adjusted pH to 6.2
6/24: Defoliate Canopy a bit and Topped off buckets, adjusted pH to 6.2
6/25 Trim up canopy again. Topped off Buckets, adjusted pH to 6.2
6/26 Trim up canopy again. Topped off Buckets, adjusted pH to 6.2
6/27: Changed Buckets, adjusted pH to 6.2, Trimmed up canopy again.

Likes
24
Share


@MrPott
Follow
Really surprised with how everyone turned out! Everyone is starting to flower but Kayla definitely got the lead in terms of pistils and bud sites. These ladies still need to be LST every other day. Looking forward to an early harvest!

