
Likes
Comments
Share


Likes
105
Share


@Coopmc
Follow
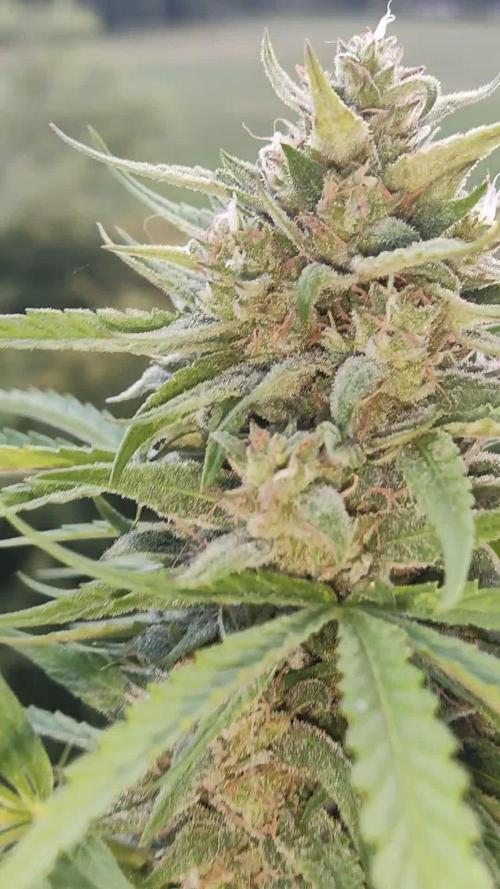
Looking good Id say about 3 weeks left
Booming!!
This plant is blowing up!!!
5 foot tall exactly


Likes
44
Share


@RakonGrow
Follow
Note :
+ jegliches Zubehör wird in der GermniationsWoche aufgelistet . Zeitraffer Videos folgen immer nachträglich.
+ videos werden so geschnitten das nur ein geschlossenes Zelt erscheint , ergo Fehlen paar reale Minuten (ca 1 Std) .
Day 64:
Die Nacht war kalt und die Ventilatoren an . Ergebnis , der Hauptrieb der viel ventilation abbekommt ist wunderschön dunkel geworden.
Bilder hinzugefühgt um mal den Vergleich zu haben , beide haben die gleiche Bedingung , sowohl Dünger als auch Licht . Nur das Zoe mehr Wind abbekommt und damit halt eine kältere Nacht erhalten hat .
Wir sehen das es wohl keine wirklichen defiziete. Es ist ein verhalten auf die Kälte.
Day 65:
+ 1.75 Liter Flaschenwasser
+ + Dünger für Blühte
+ + + Canna Terrar Flores (Achtung wirkt wie PH-)
+ + + Canna Boost
+ + + Cannazym
+ + + Canna Rhizotonic
+ + + Canna PH+
+ + PH 5.91
Day 66:
Das viele Licht zeigt wie es aus allen Seiten der Buds wächst . Das ist nicht gerade ein Qualitätsmerkmal , eher ein Quantitätsmerkmal . Aber ich möchte auch wissen wie stark sich das auf die Qualität auswirkt .
Die Schwester hinkt zwar kräftig hinterher wegen ihrem Wasserschaden, aber zum Rauchen allemal gut .
Leichte Cal-Mag Probleme werden sichtbar .
Day 67:
+ 2 Liter Flaschenwasser
+ + Spülung
+ + + Canna Boost
+ + + Cannazym
+ + + Plagron PH-
+ + PH 6.0
Day 68:
keine besonderen Anzeichen , die Luftfeuchtigkeit ist so zwischen 60% bis 64% . Geht gerade nicht anders . Ist jetzt aber zum abreifen auch nicht Schlimm . Dafür sind die Temperaturen bei konstanten 26°C
Day 69:
Alles läuft nach Plan. Kein defizit, ergo , es wird nur rest Dünger in der Erde abgebaut.
Day 70:
+ 2 Liter Flaschenwasser
+ + Dünger für Blühte Generative Phase III
+ + + Canna Terrar Flores (Achtung wirkt wie PH-)
+ + + Canna Boost
+ + + Cannazym
+ + + Canna Rhizotonic
+ + + Canna PH+
+ + PH 5.91


Likes
9
Share


@BudXs
Follow
Super busy with a move and a big garden reno. Sorry, this is the only update for this week
Likes
5
Share

@Chubbs
Follow
Weekly update on these lovely ladies. This week has been fun to watch the flowers form and swell. They definitely are starting to smell, as soon as you open the tent it hits you like a ton of bricks. I'll be doing my final dedoliation this week taking off some of the bigger fan leafs allowing more light to the lower flower sites. All in all Happy Growing
Processing
Likes
19
Share


@LockDownGrow
Follow
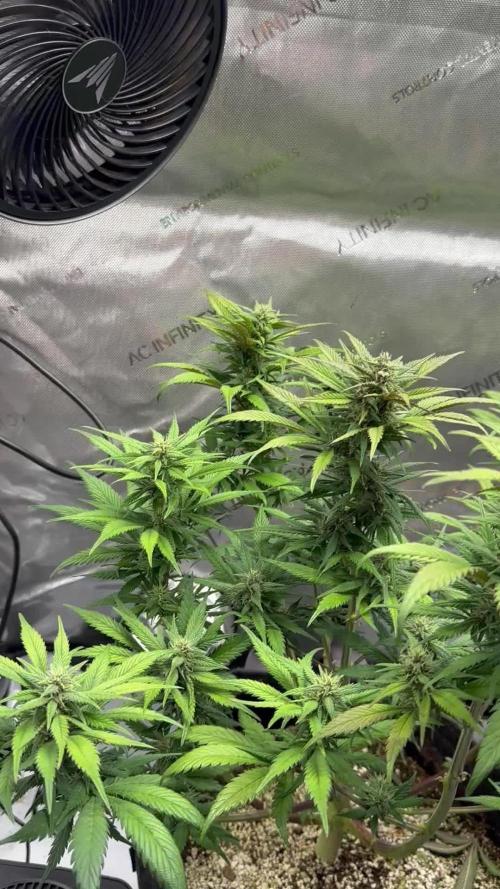
So these ladies are in full swing of flower and the stretch I have tucked any branches I can under my netting too spread out the plants and too fill the tents canapy they are growing about 1 or 2 cm every other day at the moment so tucking under is the order of the week
Really into the massive stretch now I am having too move the climate control probe and thermostat every day now and these girls will soon cover the WiFi camera too , probably growing around 2 or 3 cm per 24 hours at this stage , " day 4 of week 5 "
The tent is filling up nicely but the fbt7 is a clear winner so far , be is my cock up of snapping the main stem and fixing it ? The ftb7 is double the size of all the other 3 plants and is a very nice little bush , the smoothie has been very consistently healthy and vigorous and is around 22cm now and is one I did not lst , the BlackBerry has finally woken up and is now the same height as the others another plant I didn't lst , the c1 started very vigorously and was strong , them week 3 started too show signs of very early flower , she is now is fully fledged flower at week 5 and looking fantastic , and I was lucky enough too get all the side branches out and bend over the main cola too the netting and has made up for in lst what it lacked in size due too the early flowering ,
Likes
1
Share

@GrowdadGage
Follow
Well one is finishing strong and the other is coming back strong. Currently have one on its last week of nutrients and will be starting the flush this coming week!
The one that is a little behind still taking nutrients the base as well as bud candy and big buds. Next week the slow plant will switch from big bud nutrients to overdrive.
Very fun grow with lots of great lessons learned on this one. Almost finished now I’m getting excited for harvest and the next grow already 😂 anybody else get eager to crack the next seeds this deep into harvest?
Likes
16
Share


@Mudballs
Follow
Bring the heat. Seed sprout tea every weekend. LST 6/19/21. Splayed them out like busted watermelons.

Likes
333
Share


@Terp1
Follow
04.01.2024
Tag 65 - Woche 10 / Tag 2
Licht: 40cm – 90%
Lichtzyklus: 12/12
Luftfeuchte: 65%
Temperatur: 27°C
VPD: 1,3 kPa
Höhe:
Apple Fritter - 45cm
Purple Punch - 65cm
Gelato - 75cm
Bemerkungen:
Die Apple Fritter sieht perfekt aus.
Die Purple Punch sieht aus, als hätte sie einen leichten Brand UND einen leichten Mangel. Allerdings werden die oberen Zuckerblätter auch schon langsam lila... muss ich beobachten.
Die Gelato hat auf jeden Fall was. Ich sehe einen leichten Kaliummangel und einen Calcium-Überschuss. Zusätzlich verdrehte Blätter, was auf PH-Schwankungen deutet - aber bei Living Soil eigentlich nicht von Bedeutung sein sollte. Ich lasse das CalMag erst einmal weg. Und pegel den PH die nächsten Gießvorgänge ein. Mal sehen, wie sie darauf reagiert.
Ich denke insgesamt ist der VPD zu hoch. Ich wollte die Pflanzen ein wenig pushen aber das ist zu viel. Ich gehe wieder runter auf 1.2 kPa
Terp 💪😎
##############################################################################################################################################################
www.zamnesia.com
Gelato - abgefahrene Qualität hat noch nie so köstlich geschmeckt. Zamnesia Seeds präsentiert Gelato, eine stattliche indicadominierte Sorte, die im Grow Room eine tolle Figur macht und ein episches High hervorruft, das perfekt ausgeglichen ist. Im Unterschied zu anderen Gelato-Varianten auf dem Markt, wurde die ultra-potente Wedding Cake in unsere Version eingekreut, die Gelato das gewisse Etwas verleiht.
Apple Fritter - wird Deine Laune heben, Deinen Körper entspannen und Deinen Geist aktivieren. Oh, und haben wir erwähnt, dass sie wie warmer, selbst gebackener Apfelkuchen duftet? Falls Du nach einer potenten, ertragreichen Sorte mit solider US-Genetik suchst, solltest Du in Deinem Grow Room Platz für Apple Fritter schaffen.
Purple Punch - von Zamnesia Seeds ist eine traumhafte Indica, die mit einem exquisiten Geschmack und einem unglaublich entspannenden Effekt glänzt. Trotz ihrer kompakten Größe steht diese pure Indica für einen einfachen Anbau und großartigen Ertrag.

Likes
2
Share

@Oldwied
Follow
Light Power: 60%
To slow down the faster growth compared to strawberry cola. I filmed it at the beginning of the week. Five days later, it was topped and repotted.
Every other day I sprayed and watered with fresh LAB. I store the LAB in the refrigerator for over a week and dilute it before use.
Thanks to budtrainers, your budcups work great.
Day 20
Photoshooting
Fimming
Day 22
Photoshooting
Topping
Day 25
Photoshooting
Transplantation
Likes
113
Share


@Skunky
Follow
Update from last week that I forgot: I gave her a final feed at 75%...
WEEK 25 DAY 1 ... omg... 😂😂😂
It really took me half a year to finish this one... unbelievable... 😅
Well, so far I'm still super happy. Everything seems to go just fine but I'll never do this again..haha.. (vegging under a 50W bulb xD)...
Soooo... looking at the trichs, I think the harvest window has just opened. There's still a lot of clear but the cloudy ones are starting to come and there's already a little amber on the leaves. I suppose I'm really close to harvest now. I'll be flushing her next time for sure.
First, I'll feed her a low nutrient solution, maybe around 25% and half of the usual water quantity because I'm not that sure about when she really finishes so she dries out more quickly. Next, I'll use Grotek Final Flush right before I'll chop her down. I don't want to use this right away because last time my plants were dying a bit too fast so.. not to be repeated ;)
Getting impatient now. Hopefully it will be a White Christmas...haha!
DAY 2
Gave her one last feed at 25%. Poured only half of the usual water quantity. Left the BloomComplex totally aside because she seems like she's doing a little 'clawing'. Maybe there's too much Nitrogene? Trichs are beginning to get cloudy, with a little amber in between.
I'll flush her with plain ph'd water tomorrow probably or should I wait some more days? What do you think? I'm never sure when the time is right... :/
DAY 3
I just took some more pictures with a macro lens attached to my iPhone. Seems like the buds in the middle do have way more amber than the other ones around which have swollen more compared to the ones in the middle but have less amber. The last days, I didn't check the ones in the middle so I changed my mind. I just flushed her with Grotek Final Flush. I'll wait for some hours for the solution to break down the salts and then I'll flush again to get rid of the flushing solution.
I'm also gonna switch the timetable to 8/16. (16 hours of dark) and I'll drop the temperatures some 2 more degrees.

Likes
10
Share


@DaddyPrime2
Follow
9/11/24
sadly the sun isnt hitting these girls as much as i wish. theyve got a decent smell and some decent trichome coverage for only being the begining of week 4. hopefully they chunk up and arent too far behind because of the lack of sun/ light penetration. ive had half a mind to move them indoors to finish

Likes
2
Share

@Naujas
Follow
3 weeks :) The girl looks healthy and happy, now I'm looking forward to her rapid growth and she will get bigger :) Everything is going smoothly :) it will be an interesting experience, because this time I probably won't use LST at all, I haven't tried letting her grow naturally :) good luck to everyone.
Likes
22
Share


@GoldenWeedGrower
Follow
D15/V13 - 07/09/23 - She's ok now, new home and lot of space 🏠
D16/V14 - 08/09/23 - I cutted the lower branches and leaves ✂️✂️
D17/V15 - 09/09/23 - Added a CO2 dispenser. The set up is ok 🛠️🛠️🛠️
D18/V16 - 10/09/23 - Added some nutes 🍗
D19/V17 - 11/09/23 - Waiting to start bending her down 🧠
D20/V18 - 12/09/23 - Added water 💦💦 and nutes 🍗🍗 - pH is too low, I added some pH+ 📒
D21/V19 - 13/09/23 - Started LST, one worker is bending her properly 🌿🌿🌿
Likes
4
Share

@carlitoshaze44
Follow
Comenzamos la semana de floración con una gran poda de bajos dejando estas con forma de palmera o Chupa Chups.
En el día de hoy le bajé dos horas al horario de vegetación de 18/6 a 16/8 en los siguientes días bajo dos horas así hasta alcanzar el 12/12 de manera gradual.
Hoy se aplicará un riego de vitaminas y entaizante.
17/3/26
Aquí seguimos con las pequeñas algunas mejor otras peor.. pero todas sanas.
Seguimos controlando el espacio de cultivo de la mejor manera posible.
Una ec 1350 un ph 6,2
Forman el esquema de alimentación de esta semana a partir de la siguiente pegaremos una subida gradual hasta llegar al tope de las niñas.
20/3/26
Seguimos con un avance espectacular!
Las niñas crecen de una manera espectacular!
Muy contento con los avances en este cultivo!
Esperemos que la floración sea igual de vigorosa ..
Pero ya sabemos que hay mil factores,que pueden alterar el producto final,aquí seguiremos mejorando con cada uno!
Likes
5
Share


@mobbly
Follow
"Hi, I received my pH meter this week, so from week 6 onwards, I'm aiming for a pH value of 6.0 - 6.5. This week, I noticed that the plant in the small pot received too much fertilizer. The other two 7.5-liter fabric pots also received double the recommended amount according to the feeding schedule, but they don't show any signs of over-fertilization."
Likes
7
Share


@OwlGang_Uk
Follow
Weeks 15 - It’s Ready - The 1st Gorilla Glue Is Ready To Be Havrest, I Gave It 3 Weeks Of Flushing And The Trichomes Of The Top Heads Are Most Cloudy With A Few Clear And A Little Amber Trichomes And The Bottom
Buds Are Mostly Cloudy With A Few Clear And The Sceny Is Still At It’s Peak But You could Tell It Was About To Head Over The Morning And Start To Take A Downright Spiral I Will Be Hanging It To Dry For 7-9 Days At A Temperature Of 70 Degrees and 60% Humidity. The Slower It Dries The Better.
Likes
4
Share

@JVKdopegrow
Follow
Overdue diary as I was away and it showed. Another data point for me that i am a poor ourdoor growmie. Leaf miners and white flies decimated these plants. One plant actually "self topped" as the pests killed the top node. She recovered a bit after I relocated them both inside to a tent. I am doubtful they will have a full life (autos) but perseverance is my strength.
Likes
19
Share

@DogDoctorOfficial
Follow
🌙 Week 12 from Seed / Week 8 Flower — “The Dark Lady Rising”
What a journey this has been. From that single seed born under a 12/12 rhythm, she’s proven that beginnings don’t define limits — they define character.
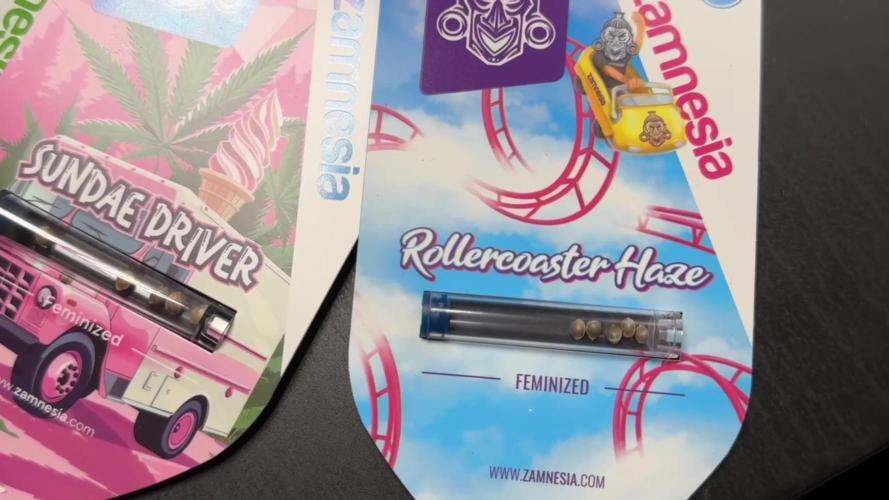
If you’re just joining us, this White Widow from Zamnesia started life under an 11/13 shuttle — a true from-seed flower cycle. While most plants grow before they bloom, she began her story in full awareness of time, learning to balance energy from day one. The 12/12 rhythm teaches a plant to optimize every second of light — to focus not on size, but on efficiency, structure, and density.
🌿 This Week — The Transformation Deepens
We’re now in week 8 of flower, and this girl is simply breathtaking.
Her buds are dense, coated in frost, and carrying tones of deep green to near-purple, whispering that a darker finish is coming. The trichomes look like they’ve been dusted in starlight — thick, sticky, and reflecting light like ice in a warm glow.
The aroma is growing stronger, rich with that unmistakable 90s soul — earthy, spicy, and nostalgic. Every breath feels like opening a time capsule from the golden age.
The structure remains compact, balanced between strength and grace. Every cola is firm, symmetrical, and promising exceptional development over the final stretch.
💧 Feedings & Care
She continues on her well-calibrated Aptus + Plagron routine:
Aptus Regulator for balance and resilience
CalMag Boost for structure
All-in-One Liquid to sustain her metabolism
Plagron Power Buds, Sugar Royal, and Green Sensation to enhance flavor, weight, and resin
Even with nutrients in her pre-built soil, these light feedings help her push to full potential — especially under the demanding 12/12-from-seed schedule.
🌞 Environment & Observations
The room continues to ride steady despite the season’s warmth — around 28–30°C, with humidity hovering near 55–60%.
The VPD sits around 1.4–1.6, right in the sweet spot for flower stacking and trichome expansion.
Lighting, managed through Trolmaster with Future of Grow and ThinkGrow LEDs, keeps her under a balanced spectrum with Emerson effect red cycles — 15 minutes before and after lights-on for maximum photosynthetic efficiency.
📸 Photography & Documentation
Captured through the loyal Sony a6000, alternating between macro and standard lenses to highlight her best angles — from the full canopy’s dark silhouette to the icy micro-world of her trichomes. Each frame tells a different part of her story.
🌺 What to Expect & What Not
In the coming weeks, we expect:
Even deeper color tones — likely deep violet or burgundy
Continued resin production, especially on sugar leaves
Aroma intensification and the start of natural fade
What not to expect:
Big size changes. She’s already done stretching — it’s all density and maturity now.
Harsh stress reactions — this girl has adapted perfectly to her rhythm.
🌍 Gratitude & Vibes
To everyone reading, following, commenting — the lovers, the haters, the old souls, and the new wanderers — thank you for being part of this journey.
To Zamnesia, for the genetics that bridge generations.
To Aptus and Plagron, for the nourishment that sustains life.
To Future of Grow, ThinkGrow, and Trolmaster, for the precision and control that bring consistency to creativity.
And to this beautiful queen herself — for showing us what happens when you trust nature’s rhythm and let the light guide her story.
Wishing you all a calm, creative, and inspired week ahead 🌿💫
📲 Don’t forget to Subscribe and follow me on Instagram and YouTube @DogDoctorOfficial for exclusive content, real-time updates, and behind-the-scenes magic. We’ve got so much more coming. You won’t want to miss it.
• GrowDiaries Journal: https://growdiaries.com/grower/dogdoctorofficial
• Instagram: https://www.instagram.com/dogdoctorofficial/
• YouTube: https://www.youtube.com/@dogdoctorofficial
⸻
Explore the Gear that Powers My Grow
If you’re curious about the tech I’m using, check out these links:
• Genetics, gear, nutrients, and more – Zamnesia: https://www.zamnesia.com/
• Environmental control & automation – TrolMaster: https://www.trolmaster.eu/
• Advanced LED lighting – Future of Grow: https://www.futureofgrow.com/
• Root and growth nutrition – Aptus Holland: https://aptus-holland.com/
• Nutrient systems & boosters – Plagron: https://plagron.com/en/
• Soil & substrate excellence – PRO-MIX BX: https://www.pthorticulture.com/en-us/products/pro-mix-bx-mycorrhizae
• Curing and storage – Grove Bags: https://grovebags.com/
⸻
We’ve got much more coming as we move through the grow cycles. Trust me, you won’t want to miss the next steps, let’s push the boundaries of indoor horticulture together!
As always, this is shared for educational purposes, aiming to spread understanding and appreciation for this plant. Let’s celebrate it responsibly and continue to learn and grow together.
Friendly reminder all you see here is pure research and for educational purposes only,
With true love comes happiness. Always believe in yourself, and always do things expecting nothing and with an open heart. Be a giver, and the universe will give back in ways you could never imagine.
💚 Growers love to all