




Likes
6
Share


@StonerMike
Follow
Purple lemonade has been looking crazy for weeks smh. I haven’t had time to continuously update. Pics and video are from 7.22

Likes
2
Share


@Easygrower
Follow
Hello growers day 8 with the man bear alien pig plants 1 & 2 are doing fine all is good number 3 is a little slow at the mo but I’m sure she will pick up still just giving her water at the mo 0.5L will start feeding them next week so until then be safe and happy growing ✌️

Likes
3
Share


@Ieiogrow94
Follow
Eccoci qui...
Per problemi di lavoro ho tardato un pò la pubblicazione delle foto, la piccola è molto vigorosa ed emana un forte odore.. Già si può vedere la resina che si inizia a formare sulle cime in alto...
Sono estremamente soddisfatto della sua crescita finora e sono sicuro che mi riserva sorprese, odore veramente intenso.
Grande genetica, nonostante ha avuto una carenza siamo riusciti a recuperare ed ora produce tantissima resina, mi ha alzato le aspettative in lei ed ora si punta al raccolto.
Grazie a tutti per il supporto, NON VEDO L'ORA DI RACCOGLIERLA 🔥🌲❤️

Likes
19
Share


@Hashy
Follow
********************************************
Week 14 Late Flower/Fade (week 10 flower)
********************************************
Light cycle=12/12
Light Power=110w 47%
Extractor controller settings (during lights on).
High temp= 26c
Temp step=0c
High Rh= 46%
Rh step=0%
Speed max=10
Speed min=3
Extractor controller settings (during lights off).
High temp= 20c
Temp step=0c
High Rh= 50%
Rh step=0%
Speed max=10
Speed min=3
Smart controller settings (during lights on).
Lights on=9.00am
Smart controller settings (during lights off).
Lights off=9.00pm
VPD aim=1.0-1.5
DLI aim=40-45
EC aim=1.0-1.8
PH aim=6.0-6.5
💧💧💧💧💧💧💧💧💧💧💧💧💧💧💧💧
NPK= 5-14-20
Method= Automatic
Feed=Late Flower nutes
Neutralise=0.1ml/L
Plagron bloom=2.5ml/L
Plagron Power buds=1ml/L
Green Sensation=1ml/L
Easy Ph down=0ml/L
(1ml=24 drops, 1 drop=0.04ml)
Easy Ph Up=0.0ml/L
(1ml=24 drops, each drop is 0.04ml)
Ec=1.2 PH=6.3/6.0
Runs=10
Run times=3mins (0.75L/0.375L each)
Gap times= 17mins
Total runtime=30mins(6.0L/3.0L each)
Total flowrate= 0.25L/0.125L/min each
Auto start time=10.00am
Auto stop time=1.03pm
💧💧💧💧💧💧💧💧💧💧💧💧💧💧💧💧
********************************************
********************************************
📅10/5/25 Saturday(Day 92)
📋Reduced light power to 110w
📅11/5/25 Sunday(Day 93)
📋
💧
Automatic water
Ec=0.2 PH=/
Volume=5L
Volume left=1L
Volume used=4L
Manually
Volume=1L
Total used=5L
Total runoff=0.5L
Ec=2.0 PH=6.7/6.7
💧
📅12/5/25 Monday(Day 94)
📋 removed a couple of fan leaves.
📅13/5/25 Tuesday(Day 95)
📋
📅14/5/25 Wednesday(Day 96)
📋
📅15/5/25 Thursday(Day 97)
📋
💧
Automatic late flower nutes
Ec=1.2 PH=6.3/6.3
Volume=6L
Volume left=2L
Volume used=4L
Manually
Volume=1L
Total used=5L
Total runoff=0.6L
Ec=2.3 PH=/6.6
💧
📅16/5/25 Friday(Day 98)
📋 Day 70 of flower.
********************************************
Weekly roundup.
📋 This is one Fat bastard. The foxtailing on the main cola is because of the lack of distance between it and the light. Pistils are browning so she's entering the final stage as should bulk up a bit more. She'll probably get the tent to herself soon.
Back soon.
Take it easy.
********************************************
Likes
13
Share


@cookingwithninja
Follow
Day 14, some supercropping
Day 15 .. it’s under control 😂🤣
Day 19 lights almost maxed to tent height unless I zip tie led to the top ceiling frame, last bit of monster cropping. Lost 2 top nugs to physical led burn but it’s ok. Everything is fine. Still going very hard on soluble N, and Pk along with b+, fishsh!t, microbial mass, humic acid. Carbs every day with organic booster
Likes
47
Share


@Freddd
Follow
Turns out the weather was perfect for drying. This is my first time bending the plant waay over instead of topping, so it was all new, turns out to not be a lot of difference except the shape is more rounded. I was a bit worried that it was not going to be a good return, I thought I might struggle to get six zips. eight seemed a bit optimistic but in the end she produced over 13.2 zips. I've just been extracting resin from the lowest quality of the box of larf I have and she is returning what I'd expect from my best buds, so yes, this is probably heavier than she looks because of the resin. Nice and light golden with a spicy delicate aroma. I'll be popping a seedsman amnesia next, but the one following that will be another Lemon Pie but she will be topped. However I can't see that I'm going to improve on 13.2, but you never know. Nevertheless I am very surprised at the yield.
Likes
9
Share


@fanofCalvert
Follow
Two weeks of !2/12 done. Everything is going fine. My lamp is on full whack with the reds switched on, the UVA has always been on. This week I have got to keep a close eye on my run off for PH and C/f. The pond activator starts decomposing any bits of dead root, plant root excretions, even the coco itself. This results in a big jump in C/f and PH. The broad spectrum of bugs push the PH up but I stay on top of it with daily high volume run to waste using light Nutes at PH 5, by doing this the more Acidic tolerant bugs get the upper hand and after a week or so my PH will stabilise and I can cut down on the volumes of liquid I am putting through the pots.
Whatever is in the activator does the job I want it to. It is a bit of a ball-ache to stabilise but after that, it is a dream. Why you may ask don't I use one of the many specific cannabis inoculations. For one Cost, an £8 250ml bottle will last me for a thousand years, cuts out the need for all the crap the industry tries to sell you! Also our little dancing friends, the Fungus Gnats do not like it. I get the odd one but no colony build up. Also I have not had any systemic infections in my pots since I started using it. (at least 10 years).
I have thought about Infecting a glucose solution with it, then stabilising it to favour acid conditions and using that, so I don't have to monitor the first week so closely, but I'm a stoner and I can't be arsed. I have not tried pond activator in anything but Coco. I could see problems in soil regarding control. I would deffo try in full hydo though.
The outdoor plant is a chemdogging S1 it germed out in the garden in a pot I thew in the garden last Autumn. A few had popped up only this one survived the bit of snow and minus temp's of three weeks ago. I lifted it threw it in a 5 litre pot in the greenhouse. I am curious about this plant as I have a number of seed from a reversed CD. I wasn't planning to start germing outdoors for a few weeks yet, but nature has jumped the gun.
Today I have the secateurs out and will start taking out the bottom branches on the plants, also inspect for bollox on everything especially the ghost trains. I did say I would get plants out and photo them, but nothing needs moving, I can leave my bending till the last as my tent is 2.2 mtrs tall so I still have a bit of room to play with.
In vid the back row left to right. Wedding Cake - Bit leggy and twiggy at this stage. Main cola branch is bent over but not tied down. By the time it gets back up, the other branches will have promoted themselves a bit. This plant has good girth and its habit is very similar to a USA cut I have grown. Difficult to clone relative to the others plants in this mother hunt. 14 days every other plant clone is in a pot and feeding, wedding cake is still in the starter blocks showing nothing.
Back and centre, Orangesicle Looks and grows like French Cookies, it's parent ( I have a Mother FC in another universe) A nice looking plant which fimmed well, It is the smelliest plant in the grow with a very distinct Orange aroma. 4 cuts all feeding within 14 days this plant has vigour.
Back right. Maltezerz. I like the look of this plant, Habit is similar to it's GG4 parent, I am expecting a yield of this plant. It has the stem and the right look. It does have a slight chocolat Hashy smell. Easy clone.
Centre left. Blue Sherbelato. Did not like being fimmed or pinched out. Did that Hazy thing where the stem stretches at the node and promotes a main growing tip out of the two or four Meristems. 2nd slowest to clone, I dont have high expectations for this plant.
Centre Mid. Ghost Train Number 2 . A little weed compared to the other ghost trains. Though they are 10 days younger than the rest of the grow 1,3, and 4 have overtaken size wise the other plants in tent. I may have to get it a crate to sit on otherwise it will get swamped. It cut ok . I won't dispose of the cuts just yet. The strongest green I ever smoked came from a little weedy plant.
Centre right. GTH3, Big Skunky looking plant, Long internodes, Massive leaves Another plant that didn't like pinching out.
Front left GTH1 Classic Haze shape it has been bent and topped and weaved in an out of itself. Cut easy.
Front Centre, GTH4, The plant with weird growth. I thought this was male for a long time. It really looks a nice plant Easy cut.
Front right Scotts OG. Nice vigorous plant. 'Well behaved'. It has a smell, Spicy Hash and Cookies, interesting. Easy clone. I have A male Scotts OG, Smells very similar, He's still in a 5 inch pot and getting fed up!


Likes
15
Share


@DRO420
Follow
About a week away from flipping to flower , going to scrog them very soon. Looking super healthy.

Likes
9
Share

@Mimi420
Follow
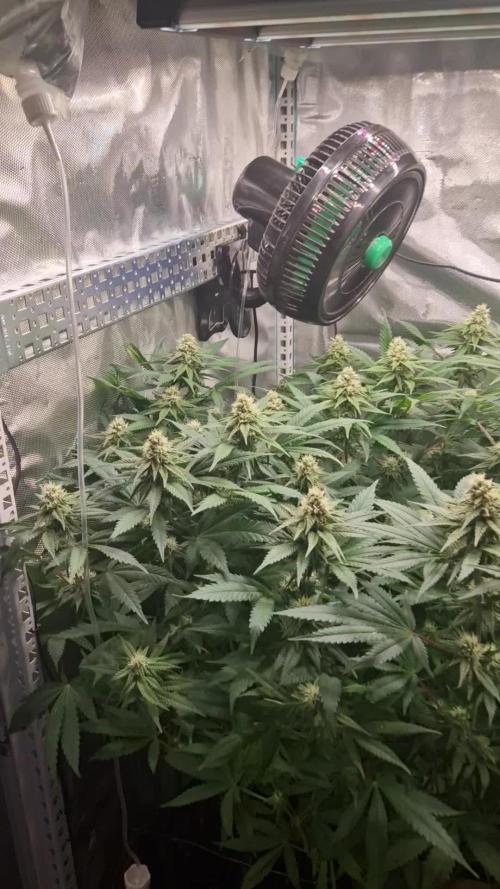
Week 4 of Flowering – Post-Vacation Update & The Auto-Drip Setup
What’s up, grow family!
Just touched down from my trip and I’m buzzing to see the girls looking absolutely fire! Leaving them for a few days is always a bit stressful, but I had a solid plan in place.
The Irrigation Setup:
To keep them happy while I was away, I put together a custom drip system using irrigation bags from Amazon. I used two drip emitters per plant, each dialed in to a flow rate of approximately 25ml/h. To prep, the night before I left, I gave each lady a heavy 4-liter feed with my full nutrient mix (Bio Grow, Bio Heaven, Bio Bloom, Top Max, and Green Sensation). This was the perfect "insurance policy"—it ensured they had enough hydration and nutrients to stay happy and thriving the entire time I was gone.
The Ladies:
The stretch is officially over, and the girls are now entering full-blown "fattening" mode.
Nebula 1: She’s the leader of the pack—the tallest in the tent. She’s really pushing for the light and has some serious, heavy colas starting to form. The vigor on this one is insane.
Nebula 2: On the shorter side, but she’s a dense little monster! She’s packing on mass with super tight, rock-solid flower clusters. She might be the shortest, but she’s making up for it in density.
Caramba: Looking just as healthy and vibrant as the others! She’s settling in nicely with the rest of the crew and responding great to the feeding schedule. She’s got a beautiful structure and is definitely ready to pack on weight.
Did some light maintenance today—trimmed off some of the lower, older fan leaves to improve airflow and direct all that energy into the main tops. The tent is smelling absolute gas, and the structure is looking exactly how I want it for the second half of flowering.
Everything is dialed in, and the Spider Farmer gear is doing its thing. Time to watch these flowers swell up!
Stay growing, fam! 🌴🔥

Likes
12
Share


@Jackweed77
Follow
La ragazza è cresciuta XXL quando è arrivato il momento di allungare i rami lei ha fatto i straordinari anche in termini di ramificazioni secondarie ora è un fottuto albero di natale speriamo scenda tanta neve...


Likes
12
Share


@Bread_n_Buds
Follow
We are almost at the magic moment, it is about to go into flowering and the vegetative phase is practically over in a few days.
Our Purple Urkle by Zamensia is a very beautiful plant with a good internodal distance and is developing very very well.
We have just done the last topping that brings her 16 tops, 16 small clones of the main cola that will come up I hope at the same time and all together and above all I hope that the cold will give us a great resin and a beautiful coloration.
During the topping the use of nitrogen is a very delicate subject. The cuts of the topping slow down the plant and the leaves tend to grow bigger going a bit into over, it happened to her then you detach and it tends to discharge now we are at the moment that we are starting to give nitrogen again to then go into flowering. It is a process that must be nuanced very delicately. Ideally it is to start by preparing the soil with fertilizer and add if necessary. I over-fertilized the plants a bit but it's something I've always managed very well once I got to flowering. Next time we'll add some fertilizer to the soil with this technique it's very suitable.
Wait for the uncle BreadandBuds....
We are always using soil, feeding and all the recommended additives from Plagron 100% organic, we have only lowered the amount of grow in this topping phase for the reasons mentioned above.
---- Decide on the right soil and calculate your fertilizer sheet based on the soil on the official website.
-- www.plagron.com
Try a seed of this strain that drives us crazy..
---- https://www.zamnesia.io/en/11168-zamnesia-seeds-purple-urkle.html
Zamnesia Description // A direct descendant of a Mendocino Purps phenotype, Purple Urkle is a high-performance cultivar from Zamnesia Seeds. This feminized, indica-dominant strain is sure to win over any cannabis grower. With a THC content of 20%, Purple Urkle has a lot to offer from seed to harvest and beyond. A grape-flavored adventure, Suitable for indoors, outdoors or in the greenhouse, Purple Urkle is a very resilient strain. Growers will be impressed by how easy this cultivar can be managed. Purple Urkle can reach 120cm indoors and 160cm outdoors, but if you want more control over the height you can use the LST technique.
Purple Urkle has fantastic flavors and aromas that intensify during the flowering phase. Regardless of the method of consumption, Purple Urkle offers tangy, fruity flavors that lean towards notes of grapes, berries and plums. The effects of this strain are soothing and relaxing, with uplifting sensations that make the experience suitable for any occasion, whether in a social setting or alone.
All the best that mother nature can offer is on ---- www.zamnesia.com

Likes
5
Share


@Cookieandcream
Follow
Nicer weather, strange how different the two plants are. Girl scout cookie is very bushy, but no real flowers yet. Kush is tall and thin with much less foliage, but far more flowers.

Likes
2
Share


@Jahasus_Group
Follow
Used royal queen seed fems popped 4 and 3 where successfully. Through veg stage no problems quite sturdy plants growth rate was the same on all round, had abit of nitrogen deficiency.
Flower stage everything changed plants started to grow at different weeks and need separate feeds which became annoying, think this was done to pheno types being different.
Drying stage: I used this new herb dryer called wedryer for to plants and hung the other in the tent.
Wedryer works if you have small yield as can’t fit a lot, drys within a week though but also looses flavour. Have to wet trim bud and then leaves bud flat in one side due to them sitting on the dryer netting. Has fan with carbon filter which stops smells. (But myself prefer hang drying).
Used trimbag to finish the buds off love this product and recommend to others to buy.
Likes
5
Share

@psychonaut420
Follow
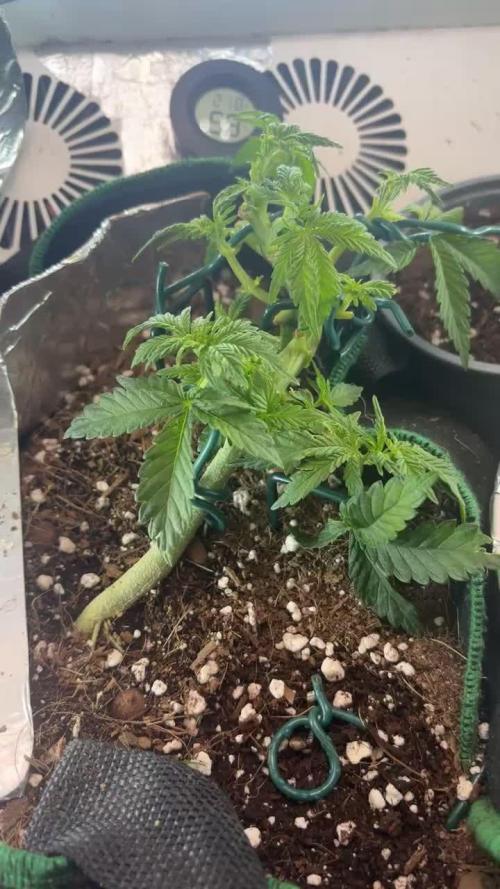
Decided ima leave her in vegataive stage till she recovers some more from the lst/hst been using cannacure to help with the mystery pests and deformed leaves have been seeing her start to regenerate and new growth is visible thinking week 7 or 8 till I switch her to 12/12 light schedule to flower bit streaching side branches and smaller side branches off the side branches are forming

Likes
42
Share


@xs8
Follow
Week 6 started with more growth and more LST 😁
🌱👍🏻
------
Day 38
Amazing how beautiful they are, and until now I'm really satisfied with my first grow 😁🍀🌱


Likes
7
Share


@Drtomb
Follow
Week 2 in the books. I trimmed more lowers to help shape the tops the way I like. Swapped ratios from veg to flower to start the flowering process. One more week until autopilot.
Likes
4
Share

@Hiperdobi
Follow
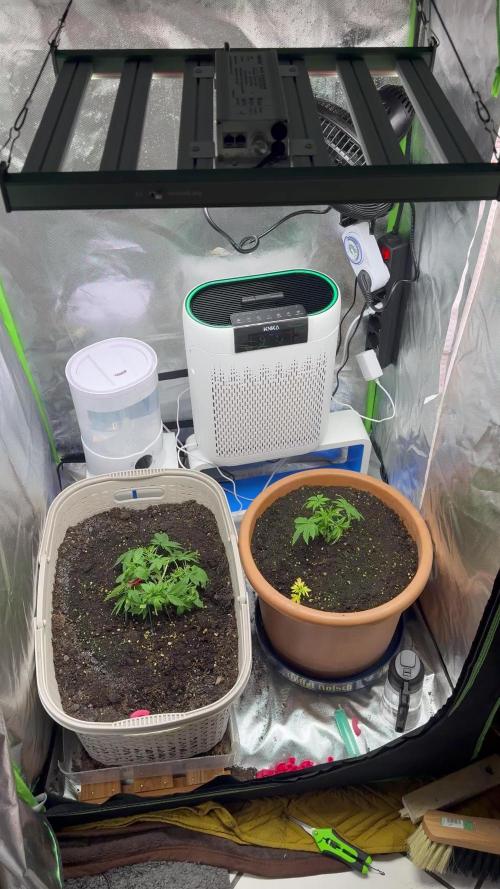
Hallo, wir sind jetzt bei einem Monat, und ich finde, er entwickelt sich sehr gut.
Es ist mir gelungen, eine größere und leistungsstärkere Lampe zu kaufen. (240W)
Sie erhalten täglich 650 ml Vitaminwasser mit einem kleinen Zusatz von Bio Vega.
Jetzt Dec. 12. Blumen 30. Tages (Woche 5. 2.Tag)
Ich hoffe wirklich, dass ich alles richtig mache.
Jetzt Dec 15. Ich habe mein eigenes, einzigartiges Seilnetz hergestellt.
