
Likes
Comments
Share


@GrowPassionItalyChris
Follow
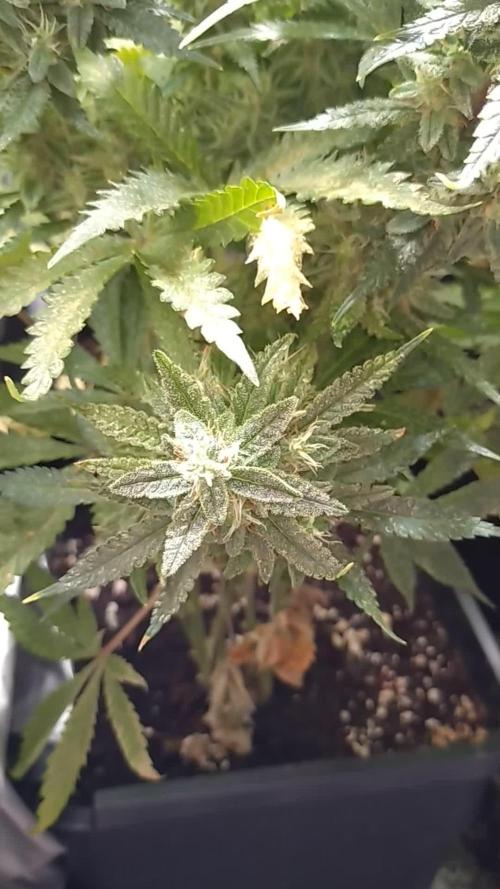
Innanzitutto non siamo più su Instagram e non abbiamo intenzione di ritornare su un social network scorretto e pieno di gente che ha profili non bloccati di spacciatori di ogni tipo, prostitute e troll di ogni tipo, sono giorni che 5 minuti al giorno segnaliamo ad Instagram profili di gente che vuole inquinare la legalizzazione, faccio parte di megliolegale.it e facciamo bene a dedicare un po' di tempo a segnalare gente di merda assieme a chi li difende! Ho ottenuto un contratto lavorativo e assicurato ad un ristorante di un mio amico vero, guadagno bene ed onestamente, con il mio socio di Roma che è un rapper finalmente mi ha inserito nel sito Honiro dove a tempo perso chi vorrà acquistare o richiedere i prodotti di ganjamaticofficial sono disponibili su questo grande sito. Non ho più bisogno di guadagnare dalle mie coltivazioni e non ho più necessità di coltivare grandi quantità, infatti questo outdoor la raccolta sarà tutta dedicata agli estratti! Con megliolegale facciamo un ottimo lavoro per la legalizzazione in Italia e questa mia lotta durerà fino al mio ultimo respiro, gente che vuole usarmi o gente che non sono veri amici possono sparire dalla mia vita non ho alcuna volontà di dedicare il mio tempo a gente che faccia a faccia non ti dirà mai niente o non ti accuserà mai come fanno sui social. Seguite ganjamaticofficial su Instagram se volete altrimenti mangio lo stesso, lavoro lo stesso bene, è tutto in più ciò che sto facendo con le foto e con il rap. Adesso lasciando stare questa polemica sui social network e sulla gente pazza in essi vi voglio parlare di queste meravigliose varietà della dutchfem seeds tutte insieme crescono adesso rapidamente e molto diramate, le prime infiorescenze resinose,colorate e profumate sono sempre più evidenti, vedendo il video e foto caricate vi rendete conto di quanto sono eccezionali queste varietà che coltivo da anni. Alcune sono rimaste piccoline ma la maggioranza sono fuori taglia tipo XXL tutte! Sono felice come ogni anno a parte la battaglia contro gli afidi che continuano ad attaccare le foglie delle piante ma con pazienza ed olio di piretro stiamo vincendo la battaglia! È stata una bella settimana perché il meteo è migliorato molto al centro Italia! Un abbraccio a tutti

Likes
48
Share


@Bread_n_Buds
Follow
Here we are at the harvest of one of the masterpieces of the season, Rainbow Sherbet Automatic by Zamnesia.
** We remind everyone that we have grown two plants per strain, one without the aid of any technique and the other instead worked with the techniques described below.
Technique used // The plant was worked with the MAINLINING technique, particularly successful in this case because I managed to create the main stem parallel to the soil in a truly elegant way. We waited for the second internode and did the TOPPING (at the second to lengthen the vegetative phase in autoflowering plants, it is also better to keep the stem low); from this topping a MAINFOLDING was done cleaning everything that was underneath in the underlying internodes and leaving only the two mini branches to grow as a result of the first topping, the Mainfold precisely (** IF YOU LEAVE OTHER BRANCHES YOU CAN'T TALK ABOUT MAIN LINING THE NAME ITSELF SAYS IT). We lowered the two branches with the arches in LST up to the third internode of each respective branch and we did the TOPPING once again, from here the plant was left to grow directing it with LST as best we could. I probably left a little too much stuff underneath, I could have cleaned a little more.
Better with the techniques or normal? It is a plant with a medium-high distance between internodes, the Mainling was truly perfect. This time I am inclined towards the plant worked with the techniques.
This is another confirmation that MAINLINING on AUTOFLOWERING in my opinion is only indicated in plants with medium-high internodal distance. If the plant is a declared tall plant, in short, this work can be done, if it is short it can be done too but keep in mind that it remains small.
Flower quality // The buds resinified very well, in fact probably something more than very well. I love the resins that are produced in winter. You can see it in the macros at different distances, there is a lot of resin well distributed. The buds are also nice and hard and look much better than the plant left to grow straight which was super resinous anyway. We washed the buds, it is essential, try following the Zamnesia guide and you will see how your buds will taste!
Check the article in your language // https://www.zamnesia.io/it/guida-growing-cannabis/333-lavaggio-delle-ceme
Trichomes // Here we have an absolute majority of milky and cloudy trichomes, still some transparent and some amber, it is not super ripe but for me it is fine.
Fertilizers // I am very happy with how I managed to unload the plant which at a certain point before going to flush was fed for a few days only with additives and then went to flush and we are discolored enough. This is a yellow that satisfies me to go to crop and vaporize a delicious plant with no residue of nutrients inside.
All Plagron fertilizers and additives in the green / 100% organic version have fully satisfied me. Choose your soil according to your style and calculate the sheet on the website www.plagron.com
The fertilizers instead are found in convenient all-inclusive packages on the Zamnesia website.
Try a seed of this variety belive in Zammi i superlove this strain..
---- https://www.zamnesia.io/en/11230-zamnesia-seeds-rainbow-sherbet-automatic.html
Zamnesia Description //A cross between Pink Guava, Sunset Sherbet and a hint of ruderalis, Rainbow Sherbet Auto offers a wide range of flavors, effects and more. This 70% indica-dominant strain reaches considerable THC levels (24%) and is suitable for both experienced growers and those taking their first steps in the world of cannabis cultivation..
Music and frequencies // For about 4/6 hours a day my plants listen to 432 Hz frequencies made especially for their well-being and sometimes a bit of black music to give them those vibrations that only music can give. www.radionula.com
All the best that mother nature has to offer is on ---- www.zamnesia.com

Likes
32
Share

@PhinolaGreen
Follow
12. Woche
Sow wir befinden uns auf den letzten Metern für 4/5 Ladys denke in 9 Tagen kommt der Cut. Die andere braucht wahrscheinlich noch ne Woche länger aber ist okay 😃
Ich gebe schon seit letzten Mittwoch keinen Dünger mehr, nur noch 2L Wasser am Tag. ChatGPT hat mich da mal bisschen aufgeklärt und denke so ist das genau richtig, sie jetzt die nächsten Tage auslaufen zu lassen 😃💚
PS: Sound an beim Video 😅😶🌫️

Processing
Likes
26
Share


@GrowGuy97
Follow
Day 49 - Still giving the ladies just PH water with no nutrients trying to see if I can fix whatever is wrong with them😅 All in all the White Widow & Orange Sherbet plants I took individual pictures of are growing great & should have a pretty nice yield! Thank you for following & make sure to check back for daily updates! Happy growing friends!🌱✌️🏼


Likes
17
Share


@HeartStrong_Garden
Follow
Growing very well. Just add water. Very easy. The leaves look nice even not too dark green. Did some more defoliation on bottom third of plant. Buds starting to fill in. This lady looks much better than the one on liquid organics
Likes
40
Share


@Chronicbastard
Follow
Ok these girls are finishing up and I have been using clean water for a little over a week now I'm using flawless finish for the last 7 days.i have one girl that is definetly done but I'm letting her flush a little longer to make sure I have a clean smoke.i did use water and fish shit for a couple waterings but I don't think that will affect anything with taste.if anything I hope it makes it better.my last harvest is still kinda harsh and more of a black ash still.i started using my burp jars today so hopefully that will help.i just over did it with nutrients.even though they are organic they still need a good flush.im going back to advanced nutrients to see if that helps

Likes
7
Share


@Totogrowuk
Follow
Still slow going but the weather has improved so that’s great. No sign of any bud rot thankfully 😅. A lot of other outdoor growers are having problems and I have had some on other plants.


Likes
151
Share


@PEAKYPLANTERS
Follow
Welcome back to all, brother gardeners!
WE WANTED TO CELEBRATE WITH YOU
OUR 3 YEARS OF AGRICULTURE ON THE PLATFORM.
GREETINGS TO THE FRIENDS OF @GROWDIARIES WHO MADE THIS POSSIBLE!
My sweet biscuits grow beautifully and today we added a containment net as their stems seem to stretch too much under the light
Best regards
LA REINA PEAKYPLANTERS

Likes
Comments
Share

@PapaTerps
Follow
Wizard Fuel - Wizard Trees
Day 34 - I've watered her with 1.5L of RO tap water with nutrients, mixed in order and pH'd to 6.3. This is her last week of veg, which has gone really well and now it's time to prepare her for bloom! I wanted a nice even canopy to work with, so I've decided to top her main stem, to force her to grow more uniform. I've also removed all of her inward facing fan leaves and her lowest most nodes, as they just won't progress when she starts to stretch - kinda like the main-lining technique, but I don't remove the main stem 👍🏻


Likes
120
Share


@DogDoctorOfficial
Follow
Week 10, the second week of flowering, has been a wild ride in our Tropical Tangie Ninja Run. Our girl is on fire!
Talk about growth – she's become a bona fide giant, standing tall and proud. The canopy's like a green sea, and I'm thinking she might outgrow the room soon! I might have to sneak in for that defoliation before day 21 – let's see how ninja-fearless I can be!
And guess what? Her fruits are stepping into the limelight, and they're like little works of art in the making. They're shaping up beautifully and in promising numbers. It's like she's a fruity ninja master!
Now, let's talk numbers: Starting the week at a TDS of 300 and a pH of 6.1, things were looking balanced. But she surprised me with her super hydration skills – guzzling down 6 liters a day! So, as her thirst grew, I decided to amp up her food to 420 ppm. Yeah, the numbers asked for a little humor, didn't they?
And let's give it up for my ninja buddies! They're on ninja-duty, keeping a vigilant watch over everything. The pH's sitting pretty at 6.2, ensuring the perfect conditions for our Tangie to thrive.
And here's something enchanting: Our Tangie's always in prayer mode. Those upward-reaching leaves are like a constant reminder of her strength and the wonder of nature.
Stay tuned for more thrilling ninja updates! Remember, every leaf, every prayer, and every growth spurt is a testament to the incredible journey we're on. Keep cultivating with love and passion, you leafy warriors!
As always thank you all for stopping by, for the love and for it all , this journey of mine wold just not be the same without you guys, the love and support is very much appreciated and i fell honored and blessed with you all in my life<3 <3 <3
#aptus #aptusplanttech #aptusgang #aptusfamily #aptustrueplantscience #inbalancewithnature #trueplantscience #dutchpassion #dogdoctorofficial #legoninjago #growerslove
With true love comes happiness <3 <3 <3 Always believe in your self and always do things expecting nothing and with an open heart , be a giver and the universe will give back to you in ways you could not even imagine so <3 <3 <3
Friendly reminder all you see here is pure research and for educational purposes only
<3 <3 <3 Growers Love To you All <3 <3 <3
P.S.- Caught me in action, huh? Charging up my medicine with my trusty ninja buddies by my side. Gotta apologize for the smoke – looks like they're testing their ninja smoke bomb skills!
But hey, we're all about good vibes and green adventures here. So let's embrace the ninja spirit, roll with the giggles, and keep spreading that herbal happiness!
Oh and i had some photos from her babies this way you guys can follow that along also <3 <3 <3
Remember, even in the cloud of smoke, there's always room for a ninja's grin. Stay lit, my leafy warriors! 🍃💨

Likes
42
Share


@Ganjagrandaddy
Follow
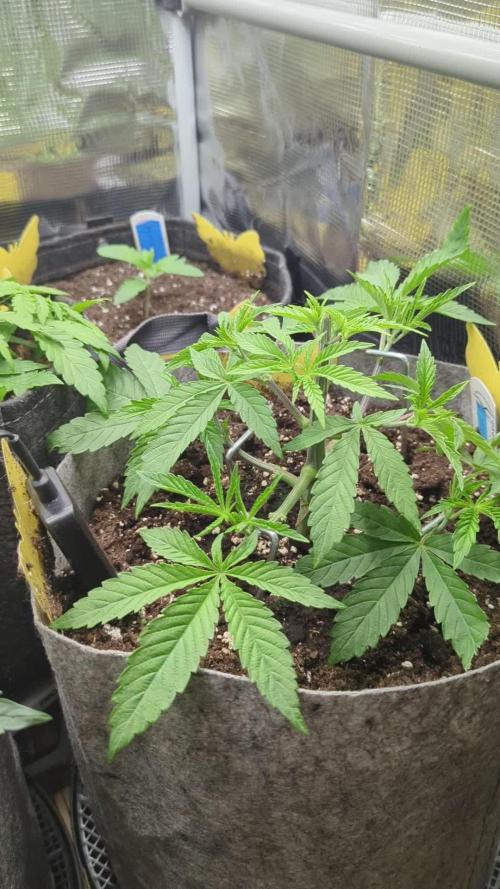
Hi Grow room buddies. Here we have another generous sponsors run of Zamnesia Autos. Ordering was a simple process with a great delivery and after sales welcome to the brand. A nice touch indeed. Rhe pack I recieved was well wrapped and secure with no signs of being tampered with in any way. A really nice package of goodies was found inside from plant labels to grinders and plenty of nice stickers to decorate too.
I chose the 3 strains as 1 I love as a strain in the amnesia haze and the Gsc is one i have fancied growing for a while. The sticky beast looks like a great new strain to sample too.
I used the cup of water soak for 24 hours to soften the seed casing and dissolve any protective coatings they may have . After 24 hours they were still all sealed but had at least sunk so I left them a further 12 hours. I then put them allnjnto a light mix to hopefully germinate under my lights but at a good distance away and in a heated propagator . Within a few days I saw a few heads popping up and signs of most being awake by disturbed soil. Sadly leaving them for a few more days resulted in 6 making the surface but the only Sticky beast that got through , opened a second set of leaves and keeled over with a stragulated looking stem halfway up ??. I recovered her in her fallen state in the hope she may still fight on but it isn't looking good. ( see pics !) With only 5 making it to this point , I have had to fill the gaps with other seeds. A little disappointed to get 4 failures but hopefully Zamnesia will ensure this is looked at ?.
I now have 3 very healthy looking Amnesia Haze and 2 sprightly looking Girls scout cookies to play with. I have now got them into their 30L pots and have done on them to encourage a little moisture while they settle in. Fingers crossed........
Likes
91
Share


@CANNASIM
Follow
GENERAL COMMENT.
This week ran nicely for the two girls, of course one is going slower than the other.
RQS STRESS KILLER AUTO.
Super happy with the results so far, she grew nice size buds, in the surrounding and a big fat main cola, just beautiful.
As we are entering the last week, of last tree days, I choose to lollipop and take do a pre harvest defoliation, the reasons for that is mould and rot, I started to become insecure because she didn’t have airflow and as i was flushing humidity started to raise, all good, and now just approaching harvest!
Flushing with flawless finish and tap water.

Likes
151
Share

@PEAKYPLANTERS
Follow
Hi guys, Welcome back to Queen Peaky's Grasslands
This week we will dedicate it to just rinsing the soil to discard all excess nutrients😎
You can already perceive some excellent smells👻
If you liked my work leave a like 😉
Likes
Comments
Share


@DruidaDeJah
Follow
Este 27 las paso a floración.
Me faltará espacio?
Agregaré un nuevo sistema por goteo.
Likes
20
Share

@Madd_Rez
Follow
Finished out the grow with Florakleen and a simple plain water swap in the reservoir yesterday. I prefer to hang with all the fans removed so did that before chop.


Likes
23
Share


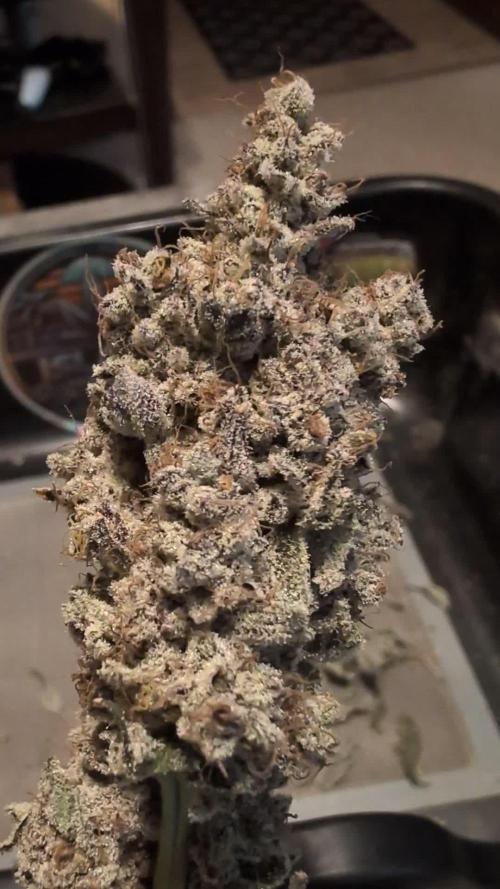
@adam_pawloski87
Follow
This grow was pretty simple ! They went a total of 103 days from seed! Very trichomy dense buds with the smell of Berries vanilla and skunk ! This is a must try for you all Fastbuds has the greats!!!


