





Likes
2
Share

@Leprechauns_Garden
Follow
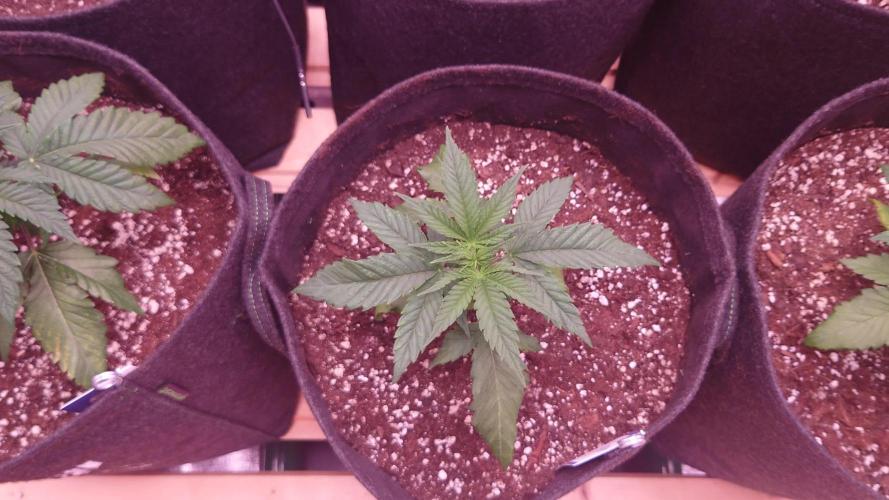
Nach einer Woche Nährstoff Lockout durch zu viel Wasser haben sich die Ladys wieder erholt und trotzdem ca 5 cm zugelegt.
Ich habe jetzt 6 Tage nicht gegossen und morgen gibt es nur 1,5 Liter und am Montag nochmal 1 Liter. Dann dürfen sie wieder 4 Tage davon zehren.
Danach sollten die Wurzeln stark genug und angewachsen sein, um mit den geplanten 2,5 Liter Wasser weiter zu gießen.
Dann ca alle 3 Tage bis Woche 5 und dann gießen nach Plan auf biologischer Erde - ca 1/3 des Topfvolumens pro Gießgang.
Man kann an manchen Stellen den Mg/Ca Lockout gut erkennen.
Bin gespannt wie es weiter geht. 🤞
Stofftöpfe ist eine neue Erfahrung für mich 🌱🌿💚
Keep on growing 💚

Likes
14
Share


@GoldenWeedGrower
Follow
The heat stress is always a problem in my grows but now I have a new climatization system that can really help me !

Likes
24
Share


@el_cultivito
Follow
Middle 2 plants stretched a lot week 3 of flower. They were growing slower in veg so I flipped to flower as soon as their canopy reached the net (barely LST these 2 plants with the net given their slower growth). Then week 2-3 of flower they took off.
Did some defoliating to expose bud sites further down with the intent to increase yeilds.


Likes
14
Share


@Ctrellis90
Follow
So here we are at the end of week 4 bloom!
Check these girls out, they are doing so friggin well with this 3.0 soil mix. I cannot complain or ask for a better grow so far, just amazing. Well done Nupeddler on these X's and we'll done Growing Organic on those ferments! (Discount code CollinT at growingorganic.com)
The big girl is now over five feet tall while her sister is over four. We have lots of flower sights and a good strong structure to hold all those flowers come harvest.
We're now running the frass ferment full strength and I put down a nice layer of compost to help these ladies make it through 😉.
That's it for now, but we'll be back! Thanks for stopping by.


Likes
12
Share


@L_Choppa
Follow
things are still getting thicker things are getting near a finish just watered with cal-mag and alaska fish fertilizer going to be feeding two more weeks or so then start the flushing after the 9 weeks of flower


Likes
4
Share

@Black_Magic
Follow
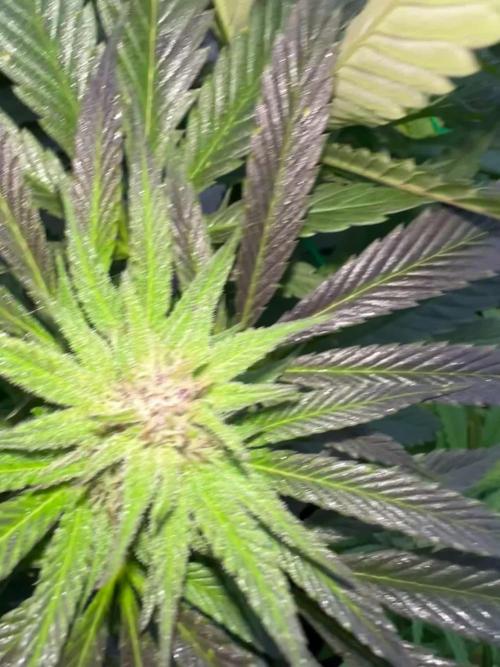
Spayed her with water, baking soda milk mix
To prevent bud ror
It’s getting really cold and we will have rainy day soon
Likes
4
Share


@2x2UkGrow420
Follow
Had to tie up branches to take the weight of these heavy ass nugs, can’t want to taste this smell orangey as f**k! 🔥🔥🔥 started flush midway through the week.
Likes
7
Share


@MrPott
Follow
She's surprisingly short compared to Selena (Super Auto Lemon Haze) but her buds are turning out to be nice, purple, and covered in trichomes so far. Had to cut down the lights to 12-12 cause one of the other plants turned out to be a photoperiod. Sucks but it definitely saves me the electricity bill. As usual, looking forward to next week!


Likes
13
Share


@TrueNorth
Follow
-Strain: Cream Cookies - Fast Buds
-Tent: 5x5 Gorilla Grow Tent
-Lights: Budget LED Grow Lights 2 x 250 Watt
LED Full Spec/Red Spec mixed boards
-Light Cycle: 18/6
-Soil: Fox Farm
-Air Circulation: AC Infinity Cloudline T6 Inline Duct Fan
WECLOME BACK GROWMIES! Week 12 here with our CREAM COOKIES by Fast Buds!
February, 09, 2020 (DAY 78) - YOO GROWMIES! Welcome to week 12 of our CREAM COOKIES! week 6 of flower to be exact! She is so thick it blows me away, i remember how affraid and sad i was when it wasnt working out in the beginning but like everything else in life with patients you will see progress and growth, and you to will succeed. She is stacking and thickening out more daily and im so happy.
purple hues in the buds are appearing and it looks great, trics are everywhere.
February 12, 2020 (DAY 81) - WHAT UPPPPP!!!! here we are folks another update. the purples are getting so VIBRANT!!!!! think she is getting flushed starting this weekend. this will be the last feed then its onto that FLAWLESS FINISH by ADVANCED NUTRIENTS. hopefully im making the right choice......maybe another week wouldnt hurt....


Likes
22
Share


@Bigdreams
Follow
It's been hot and humid all week, so I had to open tent and run big fan to keep temp from going passed 83. Also used only water a few times to try to get some nitrogen out of system it is a bit to green. Hopefully stretching is complete up to 34 inches now from just 12 inches right before flip so this is nearly triple in size. Continued trimming fan leaves on lower 3/4 left as many as I could that were not blocking light which is always so few. Altogether going well.
Likes
1
Share


@Dabcik
Follow
Molto resinosa! Profilo terpenico agrumato con sentori di arancia/mandarino dolcì e retrogusto di frutti di bosco


Likes
25
Share


@Master_weeda
Follow
Stretch 10 centimètres
Jour52 légère defolliation et arrosage avec deux litres d'eau ph6.3
Petit rappel sur le meilleur cycle de lumière pour les autofloraisons
QUEL EST LE PLANNING LUMINEUX OPTIMAL ?
Le cannabis à autofloraison peut survivre avec à peine 5 heures de lumière du soleil par jour. Mais si vous voulez que vos plants s’épanouissent, atteignent le pic de leur puissance et produisent une lourde récolte, ils ont besoin d’au moins 18 heures de lumière par jour. Le planning optimal de lumière pour la culture en intérieur du cannabis à autofloraison est un 20-4 constant pendant tout le cycle de vie. Bien entendu, des plannings de 18-6, 20-2 et 24 heures non-stop ont tous leurs avantages, mais nous avons obtenu les meilleurs résultats avec le planning 20-4.
Les cultivateurs en extérieur peuvent potentiellement lancer la culture dès le printemps. Cependant, nous recommandons toujours de faire germer les graines et de cultiver les jeunes pousses en intérieur sous des lampes artificielles pendant une semaine ou deux pour obtenir les meilleurs résultats. Nous parlerons des options en extérieur plus en détail un peu plus bas.
LE CYCLE DE VIE DU CANNABIS À AUTOFLORAISON
La plus grande différence entre le cannabis à photopériode et à autofloraison est que l’horloge tourne pour une auto dès le moment où la coque de la graine s’ouvre. Le cycle de vie post-germination de la grande majorité des variétés à autofloraison modernes est de 8-12 semaines au total. Au contraire des variétés à photopériode, les autos n’ont pas besoin du planning lumineux courant 12-12 pour faire la transition vers la floraison. Une variété à autofloraison progressera dans son cycle de vie indifféremment du cycle jour-nuit.
CROISSANCE VÉGÉTATIVE ACCÉLÉRÉE
Il est presque impossible de délimiter la phase de la jeune pousse de la croissance végétale avec les variétés à autofloraison de nos jours. De plus, en 30 jours, la plupart exploseront soudainement en phase de floraison. Donner aux autos un bon départ, solide et sain est un facteur critique pour une culture réussie. Beaucoup de choses peuvent se passer pendant une semaine avec un hybride à autofloraison vigoureux en culture. Il n’y a pas non plus beaucoup de temps pour la transplantation. Nous recommandons d’utiliser notre kit de germination ou de planter directement dans les premiers et derniers récipients dès le début. Des pots/récipients en plastique de 10-20 L avec de nombreux trous de drainage au fond sont parfaits. Les Air-Pots sont encore mieux. Beaucoup de cultivateur découvrent à leurs dépens que les petits pots ne sont pas durables pour les hybrides autos modernes plus grands.
Préparez-vous à devoir ajuster quotidiennement votre lampe de culture pour éviter de brûler le feuillage. De plus, tout comme les variétés à photopériode, les conditions environnementales optimales pour les jeunes plants à autofloraison sont des températures entre 20 et 25 °C et une HR dans une fourchette de 50-70 %. En outre, les besoins en nutriments seront considérablement plus faibles que les variétés à photopériode. Il n’y a donc aucune bonne raison de ne pas cultiver bio. Généralement, les autos préfèrent avoir un milieu de culture légèrement fertilisé et bien aéré. Les terreaux légers et/ou le coco sont des substrats fortement recommandés.
La plupart des cultivateurs préfèrent des lampes CFL blanc chaud, LED et MH pour la courte période végétative. Cependant, les lampes HPS à double spectre sont tout aussi efficaces et probablement plus pratiques à utiliser.
FLORAISON RAPIDE ET FÉROCE
Dès que vous pouvez voir les pistils pousser à partir des premières fleurs, vous pouvez vous dire qu’en 45-60 jours, les plants finiront le cycle de floraison et seront prêts à la récolte. Que vous soyez prêt ou non. Mais vous serez prêt, car vous aurez fait les ajustements nécessaires en temps et en heure.
Les apports en engrais de croissance végétative à un dosage faible à moyen seront remplacés par des nutriments pour la floraison et des doses appropriés de compléments et boosters de floraison. Une fois de plus, un régime alimentaire spartiate est recommandé. Pas besoin de changer le planning des lampes, car vous allez suivre votre planning originel jusqu’à la récolte. Mais il faudra vous assurer que les températures ne dépassent pas les 28 °C et vous devez réduire votre HR vers une fourchette plus basse de 40-60 %. Les plants vont s’étirer à des degrés divers. Quoi qu’il en soit, vous devez faire attention et toujours maintenir une distance optimale entre la lampe et la canopée. Un ensemble de cordages ou de crochets réglables rendront la tâche bien plus aisée.
Ne vous imaginez pas que toutes les autos développeront une structure courte de buisson, à moins que le sélectionneur ne donne des données qui le suggèrent.
Naturellement, les deux dernières semaines de floraison devraient être réservées à un rinçage en profondeur du milieu. De l’eau pure, ou une solution de rinçage légère fonctionneront très bien. Quand la majorité des poils ou pistils sur les fleurs auront changé du blanc à l’orange/rouge, vous devriez passer au rinçage. Ne sautez pas cette étape finale critique. Vous méritez les fleurs les plus savoureuses, sans contamination.
COMMENT LES AUTOS RÉPONDRONT AUX TECHNIQUES DE TAILLE ET DE PALISSAGE ?
La réponse courte : très bien ! La plupart des variétés à autofloraison de nouvelle génération répondront très positivement au LST. Et tant que vous taillez tôt, l’étêtage et le fimming peuvent multiplier les tiges de têtes et en plus booster les rendements. De plus, la méthode ScrOG peut être combinée avec toutes ces techniques pour un rendement maximum. Cependant, la culture à grand volume utilisant la méthode SOG est probablement le style de culture le plus populaire à présent. Un nombre croissant de cultivateurs d’autos expérimentent avec les mêmes pratiques courantes de taille et de palissage à haut rendement que les cultivateurs de cannabis à photopériode utilisent.
Les cultivateurs débutants ne devraient probablement pas se lancer dans une taille ou un palissage intensif ou excessif avant d’avoir de l’expérience.
Cependant, plier un peu les pointes de croissance pour créer une canopée plus plate ne peut pas nuire aux rendements. De même, une défoliation minimale pour augmenter la pénétration lumineuse ne stressera probablement pas des plants en bonne santé, tant que vous vous limitez à l’élimination des grosses feuilles nourricières qui font de l’ombre aux sites de floraison.
May the force be with you 💪
Processing
Likes
20
Share


@French__flair
Follow
Dernière semaine de croissance.
Changement de solution fait le dimanche 22/11 car le ph commençait à descendre en dessous de 6.2 et cela faisait 1 semaine que j'avais fais le précèdent changement.
Le PH lors du changement était de 6,8. Il est monté jusqu'à 7.5 mais je laisse le filtre faire son oeuvre. Il est actuellement à 7.1 et continue de descendre naturellement.
carence en fer. Ajout d'une dose supplémentaire de Sensi CalMg
Edit au 25 :
Malheureusement ce que je sentais venir est arrivé, saturation en N.
Le Ph et l'EC continuaient de baisser tous les deux. Les parties basses des plantes étant sombre et ayant une carence en fer sur la partie haute (puisque élément mobile), j'en ai déduit que c'était une carence en fer induite par une surfertilisation en N. J'étais à un EC de 1, je suis revenu à 0,8 le mardi 25 au soir. La bioponie est très capricieuse au niveau de l'azote. Le mercredi 26 le ph remonte ce qui signifie qu'on a stopé le processus de dégradation du N. Je devrais changer la solution mais je dois passer bientôt en flo donc j'ai enlevé de l'eau et rajouter, histoire de tenir jusqu'au prochain changement de solution qui est prévu samedi sauf si la situation dégénere de nouveau avec le PH.
Last week of growth.
Change of solution made on sunday 22/11 because the ph was starting to drop below 6.2 and it's been 1 week since I made the previous change.
The PH at the time of the change was 6.8. It went up to 7.5 but I let the filter do its job. It is currently at 7.1 and continues to drop naturally.
iron deficiency. Addition of an extra dose of Sensi CalMg
Last update :
Unfortunately what I felt was coming has happened, N saturation.
Ph and EC both continued to drop. As the lower parts of the plants were dark and iron deficient (on top because is mobil nutrient), I deduced that it was an iron deficiency induced by N overfertilization. I was at an EC of 1, I came back to 0.8 on Tuesday evening the 25th. Biopony is very capricious in terms of nitrogen. On Wednesday the 26th the ph goes up which means that we stopped the N degradation process. I should change the solution but I have to float soon so I removed some water and added more, to hold until the next change of solution which is planned for Saturday unless the situation degenerates again with the PH.
Ultima semana de crecimiento.
Cambio de solución hecho el domingo 22/11 porque el ph empezaba a bajar de 6.2 y ha pasado 1 semana desde que hice el cambio anterior.
El PH en el momento del cambio era de 6,8. Subió a 7.5 pero dejé que el filtro hiciera su trabajo. Actualmente está en 7.1 y sigue bajando naturalmente.
deficiencia de hierro. Adición de una dosis extra de Sensi CalMg
Ultima hora :
Desafortunadamente lo que sentí que venía, la saturación de N.
El pH y la EC continuaron bajando. Como las partes inferiores de las plantas eran oscuras y con deficiencia de hierro, deduje que se trataba de una deficiencia de hierro inducida por la sobrefertilización de N. Estaba en un EC de 1, volví a 0.8 el martes 25 por la noche. La bioponía es muy caprichosa en términos de nitrógeno. El miércoles 26 el PH sube, lo que significa que detuvimos el proceso de degradación del N. Debería cambiar la solución pero tengo que flotar pronto así que saqué un poco de agua y añadí más, para mantenerlo hasta el próximo cambio de solución que está previsto para el sábado a menos que la situación degenere de nuevo con el PH.

Likes
36
Share


@Natrona
Follow
Strawberry Cadillac – STRNG Seeds
W7 12/21-27
Nutrients:
12/23 1.5 ltr each
Aptus Regulator 1.5ml
Aptus strtbooster 2.5ml
Flora micro 5ml/g
Flora grow 5ml/g
Grow Time 5ml/g
Plant Juice 2 TBSP/g
6.41ph, 931ppm, 62.4
12/24 when transplanting added Dynomyco and Mychoreaza in the planting hole. The soil base is 50/50 Fox Farm Happy Frog and Coast of Maine. I watered the lower portion of the new pot with 1.5 liters then added the plant and more soil.
12/25 1.5 ltr
Aptus Regulator 1.5ml
Calmag 2.5ml/g
Recharge 2.5ml/g
6.04ph, 463ppm, 62.6f
12/27 1.5 ltr each
Aptus Regulator 1.5ml
Atus strtbooster 2.5ml
Flora micro 3ml/g
Flora grow 1ml/g
Flower Time 7.5ml/g
Plant Juice 2 TBSP/g
6.45ph, 831ppm, 62.2
Christmas week was hectic with 5 harvests, 6 transplants and defoliation. The Strawberry’s received 1.5 liters 3 times this week. A big week for defoliation and lollipop. It is evident that topping an asymmetrical plant does create 2 tops. SC1 has 2 tops but at this late week, I wont amount to much. If you have an asymmetrical plant just train and not top.
The 6 Strawberry plants are huge for 7 weeks. Originally, I was planning to wait until January to transplant, however, the roots were showing out of the bottom of the pots, and every plant is over a foot tall and half are over 2 feet any larger they would be unmanageable.. I had to have my husband assist in the transplant to hold the plant as I held the fabric pot open.
These are heavy feeders. All showed some nitrogen deficiency earlier on and I’ve increased feeding. I planned to use grow dots extended for photo period plants when I transplanted them to 5 gal. I asked Santa in early November, and he kept sending notice that the order had been delayed. So, I decided to use TPS1 for this grow. I flipped to 12/12 on 12/28 and will water only this week in hopes of reducing the stretch.
I must admit; I took on more than I can handle. I started these in November expecting them to be much smaller at 6 weeks. But no, these gals have grown with vigor. I had these 6 huge plants and 4 autos in the 4X4 tent. They grew faster and bigger than the autoflowers am used to growing. Christmas week was hectic with 5 harvests, 6 transplants and defoliation. I had to have my husband assist in the transplant to hold the plant as I held the fabric pot open.
I asked a question on a triple leaf set on one of the Cadillac’s. See Pic above. It is a gene mutation. It is not a true triploid as all the nodes are not triple. There is one other location that has one. It looks like there are bud nubs in the crease.
A side note: I’m taking applications for Spring & Summer cabana boy 🧑🌾 positions I need when I go to the beach 😉. Strawberry Cadillac has the big fans needed for the job.
12/28 Strawberry Cadillac #1 36” #2 26“
Strawberry Trop Cherry #1 26” #2 16”
Straw-Lectric Lemonade #1 18.5” #2 18
**Important dates**
11/9 Germination
11/25 Transplant to 1.5 gal,
12/1 Topped, Pinned and removed 2 large center leaves
12/5 Repositioned pins and removed lowest fan leaves
12/16 Topped 4 tops on each plant except Cadillac1 (first topping) and put manuka honey on the cut.
12/24 Transplant to 5 gal
12/27 1st Defoliate all
12/28 Flip to 12/12
Stay green, growers love 💚🌿
💫Natrona💫
Likes
4
Share


@Scottydarkmoonbuds
Follow
She's look really good. Calyx are swelling nicely. They trichs are amazing and cloudy. I'll give her a few more days or a week and see how she is then