
Likes
Comments
Share


@DeepRootsGrowTrees
Follow
GSC BY KANNABIA
WEEK #18 March 15th-22nd
Week #8 Flower
This week she is looking good. Buds continue to gain weight with a tight bud structure that is covered with trichomes.

Likes
31
Share


@ThrashedTV_BakedByGlaze
Follow
NEW HEMPER DAB RIG UNBOXING! https://www.youtube.com/watch?v=OtbngkBE6yw
Lots of @GlazedGrow content coming to the new YouTube channel: THRASHED TV 🙏 https://www.youtube.com/c/Christhrash
Cannabis Content + Metal/Music + Interviews & more!
Two great pheno's of the auto strain. One plant huge with skinny classic sativa bud production and almost MORE weight in crazy frosted sugar leaves. The second plant a little smaller overall but huge fat buds and biggest, densest cola grown so far 🙌
Lights: @ViparSpectraLED XS1000 + P1500
--
Become a @ViparSpectraLED partner for testers and commission here: https://partners.viparspectra.com/create-account?ref=378
Worth the buy: https://www.viparspectra.com/?aff=378&utm_source=affiliate or use discount code GLAZEDGROW.
IG: @GlazedGrow @Glazed_Grow @ChrissThrash @ThrashedShop
YouTube: https://www.youtube.com/c/Christhrash
Twitter: @GlazedTweets @GlazedGrow @ThrashedTV @ThrashedShop

Likes
15
Share

@Sadhus
Follow
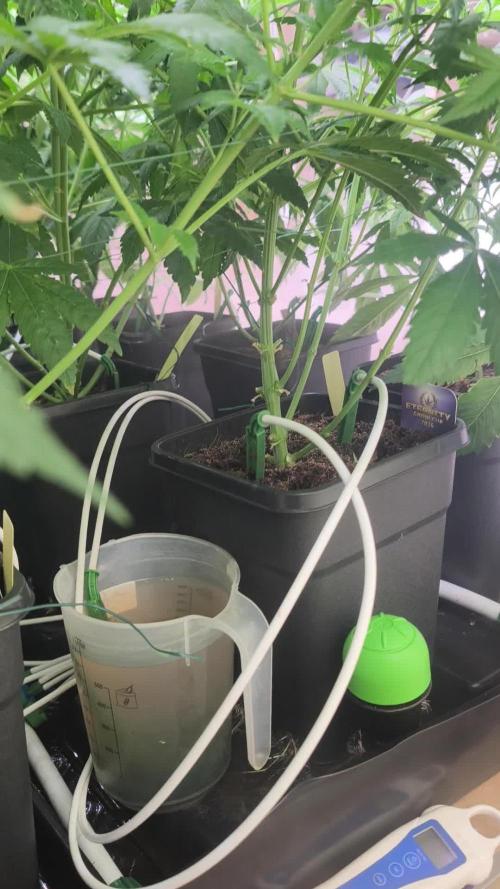
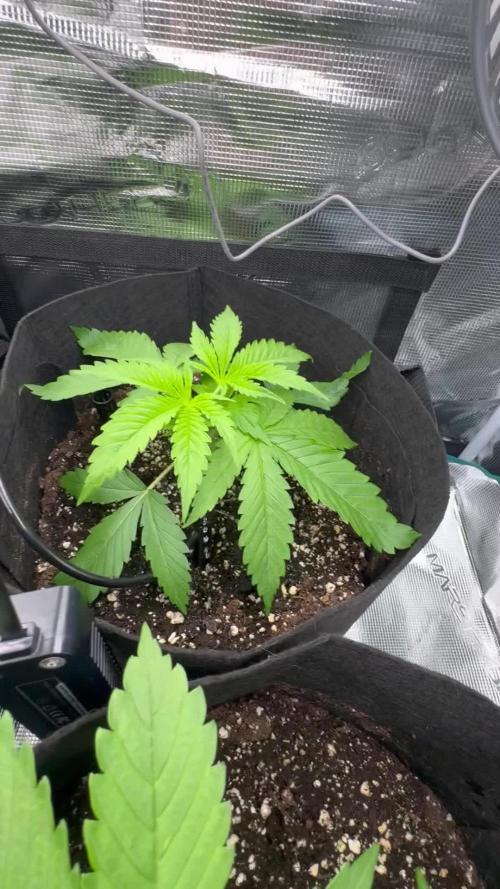
# Journal de Culture Cannabis - Eternity Grow Cup 2 (Zamnesia x Plagron) 2026
**Grower :** @Sadhusfrgrow
**Localisation :** Luxembourg
**Strain :** Sticky Broccoli (Zamnesia Seeds) - Féminisée
**Description de la variété :** Sticky Broccoli est une variété indica dominante (90 %), avec un THC à 23 %. Elle se distingue par ses arômes sucrés, épicés et floraux persistants, des plantes compactes et résineuses, offrant des rendements élevés en culture optimisée.
**Setup général :**
- Substrat : 100 % coco Plagron, pour un drainage excellent et une oxygénation racinaire.
- Pots : Définitifs de 5 litres.
- Irrigation : Netafim Drip automatique, cycles de 2 min/h × 14 (ajusté pour steering génératif : runoff réduit à 10-15 %, VWC bas ~30-40 %, dry back 20-25 % pour focus floraison).
- Contrôle : TrolMaster full setup (climatisation, humidificateur/déshumidificateur, chauffage, extracteur/intractor, ventilateur, pompe à eau avec chauffe/bulleur/agitateur, pompe eau usée, table drain DIY, barre UV/IR).
- Nutrition : Plagron Coco (A&B, Power Roots, Pure Zym, Green Sensation) ; ajout CalMag (début carence repéré sur autres plantes) et silice pour renforcement cellulaire. EC tank 2,0-2,5 mS/cm, pH 5,8.
- Éclairage : 12/12 (20:00-08:00), auto-dimming à 820 PPFD cible, UV/IR intégré.
- Objectif : Optimiser floraison pour rendement max ; clones pour préservation.
- Mises à jour : Intégration de l'app GrowOps (assistée par IA) pour optimisation : Analyse données TrolMaster, suggestions climatiques/nutritives (ex. ajustements VPD, DLI basés sur algos IA), tracking visuel (photos IA-annotées pour déficiences). Photos jointes montrent GrowOps (paramètres flo week 1/2 : leaf temp 25-27°C, temp 27-28°C, VPD 0.8-1.2, hum 68-78 %, PPFD 820, DLI 35), TrolMaster week 6 (PPFD 751.6 avg, VPD 1/0.88), temp/hum (day 25.0/68.75 %, night 20.8/64.31 %), graphs (pH/EC/temp/hum stable avec cycles dry back ; full params incl. CO2/VPD/light).
## Semaine 6 : Deuxième Semaine de Floraison (22-28 février 2026)
### Contexte et Objectifs de la Semaine
Deuxième semaine de flo avec steering génératif maintenu : Runoff réduit, VWC bas pour stress hydrique contrôlé, dry back accru favorisant buds denses. Nutrition stable avec ajout CalMag (0,5-1 ml/L) pour corriger début carence (jaunissement bas sur autres plantes ; préventif ici) et silice (0,5 ml/L) pour robustesse tiges/cellules. Pulvérisation foliaire Boom Boom Spray (Biotabs) au jour 36 pour booster bio-stimulants (acides aminés, hormones naturelles) et améliorer absorption foliaire. Pas d'intervention physique sur plantes (repos post-lollipop). Intégration GrowOps IA : App analyse données TrolMaster en temps réel, propose optimisations (ex. baisse RH nocturne pour VPD idéal, alertes carences via photos). Objectifs : Gérer stretch final (~+20 cm/semaine), observer formation buds, maintenir santé sans pests.
**Tips Éducatifs sur Réglage Hauteur Lampe, PPFD et DLI :**
- **Hauteur Lampe :** Ajustez pour uniformité PPFD (mesurez au canopy avec capteur PAR) ; trop bas = brûlures (feuilles curlées), trop haut = étirement (tiges faibles). Règle : Augmentez de 10-20 cm pendant stretch flo pour DLI constant.
- **PPFD :** Flux photosynthétique (µmol/m²/s) ; cible flo 700-900 pour Sticky Broccoli (évitez 1000 sans CO2). Mesurez multiple points canopy.
- **DLI :** Intégral lumineux quotidien (mol/m²/jour) = PPFD avg × heures lumière × 0.0036 ; cible flo 30-40. Optimisez via dimming/auto (comme TrolMaster) pour efficacité énergétique/santé plante.
### Observations des Plantes
- **Jour 36-38 (22-24 février) :** Stretch vigoureux ; plante strong atteint 80 cm haut × 55 cm large (l'autre ~75×50 cm). Buds sites gonflés, pistils abondants. Pulvérisation Boom Boom Spray : Réponse positive (feuilles plus vertes, vigueur accrue). Ajout CalMag/silice : Pas de carence visible (préventif réussi). Plantes saines, sans nuisibles (IPM efficace). GrowOps IA suggère baisse RH pour VPD optimal ; implémenté.
- **Jour 39-40 (25-26 février) :** Croissance forte (+5-7 cm/jour) ; canopée dense post-lollipop. Clones enracinés ~50 % (vigoureux, prêts repiquage). Pas d'intervention ; monitoring via GrowOps (alertes IA sur VWC bas pour génératif).
- **Jour 41-42 (27-28 février) :** Hauteur max 80 cm ; buds formés, résine précoce. Santé excellente, vert profond ; steering génératif booste densité.
### Paramètres Environnementaux (Analyse des Données TrolMaster)
Basé sur captures week 5/6 (jours 31-35, mais étendu à week 6 via graphs 23/02-01/03). Graphs montrent stabilité : pH jaune ~5.8-6.0, EC violet ~2.0-2.4, temp rouge 19-28°C (drop nuit), hum verte 60-77 % avec dry backs prononcés (drops 20-25 % post-shot). Full graph (temp/hum/CO2/VPD/light/pH/EC) : Cycles jour/nuit clairs, VPD stable, light cyclique. GrowOps intègre ces données pour IA-optim (ex. leaf temp 25-27°C, VPD 0.8-1.2, DLI 35). CO2 non mesuré (ambiant).
- **Température (°C) :**
- Moyenne Jour : 25.0 °C (graphs stable, leaf temp 25-27).
- Moyenne Nuit : 20.8 °C.
- Max Jour : 27.9 °C ; Max Nuit : 22.1 °C.
- Min Jour : 19.2 °C ; Min Nuit : 19.0 °C.
Stabilité : Graphs rouge lisse, adapté flo.
- **Humidité (%) :**
- Moyenne Jour : 68.75 % (GrowOps 68-78).
- Moyenne Nuit : 64.31 %.
- Max Jour : 77 % ; Max Nuit : 72.9 %.
- Min Jour : 63 % ; Min Nuit : 60.6 %.
Observations : Graphs vert cycles irrigation ; baisse progressive pour flo.
- **Intensité Lumineuse (PPFD) :**
- Moyenne Jour : 751.6 PPFD (GrowOps 820 cible).
- Moyenne Nuit : 0 PPFD.
- Max Jour : 835 PPFD ; Max Nuit : 0.
- Min Jour : 9 PPFD ; Min Nuit : 0.
Notes : Graphs light jaune cyclique ; auto-dimming actif.
- **DLI (mol/m²/jour) :**
Calcul : PPFD avg 751.6 × 12 h × 0.0036 ≈ 32.5 (GrowOps 35 ; optimal flo mid).
- **VPD (kPa) :**
- Moyenne Jour : 1 kPa (GrowOps 0.8-1.2, live 0.89).
- Moyenne Nuit : 0.88 kPa.
- Max Jour : 1.34 kPa ; Max Nuit : 1.05 kPa.
- Min Jour : 0.51 kPa ; Min Nuit : 0.6 kPa.
Analyse : Graphs cyan stable ~0.9-1.0, idéal pour flo sans stress.
- **CO2 (ppm) :**
- Moyenne : Non mesurée (---).
- **Nutrition et Irrigation :**
- EC : 2,0-2,5 tank (graphs violet stable). pH : 5.8 (jaune constant). Runoff : EC/pH inférieurs (~1.8-2.2 / 5.7). Ajout CalMag/silice.
- Irrigation : 2 min/h ×14, dry back 20-25 % ; VWC bas (graphs vert drops prononcés). Temp sol ~21 °C.
### Problèmes et Ajustements
- Aucun problème : Plantes saines, pas nuisibles ; CalMag/silice préventif efficace. GrowOps IA optimise sans intervention.
- Ajustements : Pulvérisation Boom Boom Spray réussie ; monitoring stretch.
### Plans pour la Semaine 7
- Légère défoliation ; retrait petites branches inutiles.
- Maintenir steering ; possible PK boost.
- Évaluer clones ; photos buds.
Ce journal sera mis à jour hebdomadairement. #GrowLegendary #Zamnesia #Plagron #EternityGrowCup2
Bonne continuation en flo !

Likes
2
Share


@Chubbs
Follow
420Fastbuds-Week 2
Papaya Cookies Auto
These girls have definitely rooted and started upward. They're about 3in tall and showing daily growth. I stopped watering by spraying the soil and started hand watering 250-500ml daily. I use calmag 5ml/gal every feeding. So far they've responded well and I look forward to the weeks to come.
Happy Growing


Likes
12
Share


@Elk419
Follow
63 days of flower and chopped. Didn't want much amber on this indica. Weight will be determined after dry. Buds are basically dripping in resin and are frosty AH. Pics just don't do it justice.


Likes
3
Share

@Ryanef
Follow
A
Day 20 end of week ready for first topping.
Start Rhinoskin/Sensizym from next week or next irrigation

Likes
11
Share


@Rob691
Follow
Everything is fine ! The plants are resplendent. They grow fast and strong. The future heads are well formed and point towards the sun, which is Lumatek!
I don't have much to say actually. That's the good thing about main lining: all the effort is done during the first weeks, but after that, all you have to do is sit back and watch it grow! Of course, you have to water from time to time, but no more pruning, not even leaf removal. Well yes, I will make a light one when it comes to flowering. Probably in about ten days.... For now I can literally watch them grow because it's going very quickly: 11cm in 7 days!
That's all for today !
Oh yes ! The plant I removed, you know, the 5th. I didn't have the courage to kill her. I just left him in his potty outside. I didn't worry about it at all. Well, she refuses to die. She keeps pushing, she fights. So I let her do it. I think it won't last long because it's 5 or 6 degrees outside here at night. But for now, it doesn't seem to be a problem for her, and she's growing well! I will take a photo this week if she survived.


Likes
10
Share


@Vegetoo420
Follow
Started to flush her hope she will grow a little bit more !
Love this smell and colors !

Likes
60
Share

@Natrona
Follow
FBA2502
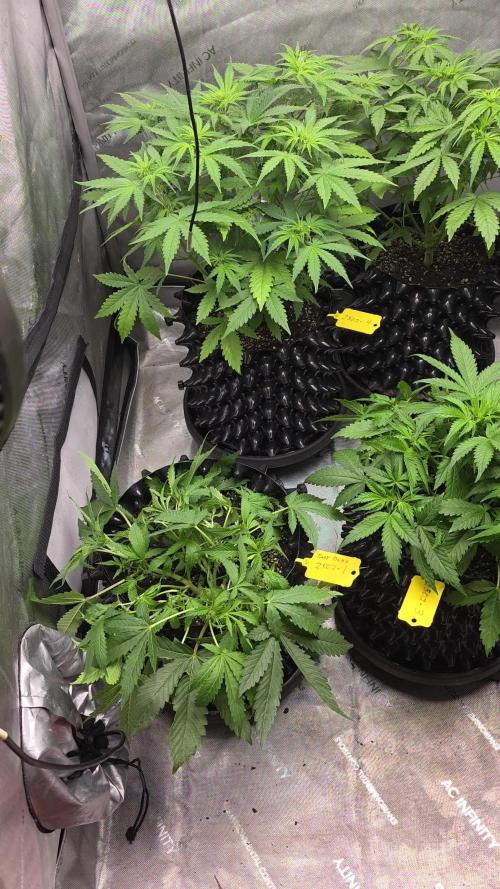
Week 4 April 20-26 Veg 4
Highlights of this week:
I defoliated the large fan leaves from the main stems. After defoliating, I saw that plant #3 has a short, tight node structure like plant #1, so I pinned her down before she goes into flowering. Plants 2, 4, 5, and 6 are taller than plants 1 and 3. The larger plants 2, 4, 5, 6 show pre flowers with thinner new growth and hairs at the nodes. The leaves are wide and thick. Some have a slight blue tinge. This makes me think I’m over feeding. Apparently, the blended soil has enough nutrients for the autos, so I don’t need to feed right now. At the end of the week, I watered with ph 6.5 water with cal mag and recharge. Lights are 20” from tops of tall plants and 30 from 1& 3.
My general thought for the future grows is to wait until the plant is bigger and see its structure before starting training. #1 has many branches coming into the middle. By beginning with pinning and keeping it at the ground, she will not achieve the stretch around the pot.
I pinned #3 to push out the bud sites from being up against the main stem. It is easier to LST when there is more space between the nodes, so a bit of growth or stretch is required. Training to open the top is needed when the plant is short and tight.
If you want to follow what's happening with my other two FBA2502s see my friend's @Susquihanna diary.
4/20 Hairs on 2, 4, 5, 6 and feeding
Micro ½ tsp/gal
Gro ½ tsp/gal
Bloom ½ tsp/gal
CalMag 1 tsp/gal at full strength
4/21 pics & video
4/22 water only ph6.5. I watered with plain water, it looks like over feeding and they are in are transitioning to flower.
4/24 Water with recharge ½ tsp/g & CalMag 1 tsp/g ph 6.5
pics & vid see blue tinges in leaves.
Plants shot up, doubling in height again this week.
#1 6”, # 2 10”, #3 7”, 1 14 “ 5 14” 6 13”
Your likes and comments are appreciated. Thanks for stopping by.
Growers love 💚🌿
💫Natrona💫
Likes
77
Share


@Roberts
Follow
FBT2309 is doing well, and is starting to get her bloom on. She is looking good. I defoliated some leaves in the center and likely will a few more in days to come. Just making sure the main bud sites are open to light and air better. The Medic Grow Mini Sun-2 works great in my space. The Gen1:11 nutrition is a good organo-mineral fertilizer. I have had some great tasting flower with it. Thank you Gen1:11, Medic Grow, and Fast Buds. 🤜🏻🤛🏻🌱🌱🌱
Thank you grow diaries community for the 👇likes👇, follows, comments, and subscriptions on my YouTube channel👇. ❄️🌱🍻
Happy Growing 🌱🌱🌱
https://youtube.com/channel/UCAhN7yRzWLpcaRHhMIQ7X4g
If anyone needs to purchase fastbuds here is a link for my affiliate program
https://myfastbuds.com/?a_aid=60910eaff2419
Likes
34
Share


@pHilosophy420
Follow
Original Auto Amnesia Haze - She is very bushy and growing very well. One more week till flowering so the next watering will be with bloom nutrients :-)
Likes
88
Share


@CBD_Sweden
Follow
Hi all the happy people here in GrowDiaries.
And hello to you who read my diary,
I just want to say that I am pleased that you have chosen to check in with me and in my diary.
I do this for myself and for a steady flow of my medicine.
Everything you read and see in my diary is 100% honest and I will never distort or beautify anything here.
I document my crops so that I can learn from my mistakes and also to look back at those different crops.
I try to update with pictures every day and with text if something special has happened in the garden.
This is my strainhunt for the best medicine and the beginning of my journey with cannabis and the cultivation of it.
This is my second feminised cultivation ever.
First, I'm just going to say something about my grow room.
The room is 2.14 meters by 1.7 meters and has a ceiling height of 2 meters.
It provides a floor area of 3.6 square meters.
I use a 54 Watt Lightwawe T5 for germination and 2 Pcs 400 Watt HPS lamps for bloom.
I have a channel fan that replaces the room air about 40 times an hour to get a comfortable environment in the room, the air enters a fresh air intake from the outside.
The air is purified through a carbon filter to then leave the room to the rest of the basement.
Then I use that heat to heat the rest of the basement.
I will use 15 liter Autopots to grow with and a 100 liter water tank that supplies the pots of water and nutrition.
I will grow completely organically in soil and will watercure my buds to get the best possible medicine for me.
Medical Mass is a new medical cannabis strain with a high CBD content and a low THC level that provides good medical properties without a strong psychoactive effect. This is a mostly indica plant that contains 40% sativa and 60% indica. Critical Mass and CBD rich strain were crossed to create this amazing valuable variety.
The plant suits both for indoors and outdoors, for beginner and experienced growers. The strain grows up to 60 - 100 cm tall and produces good yields for such height of about 500 - 550 gr/m2. The plant demonstrates great results even in small spaces. The flowering time takes only 7-8 weeks and the harvest comes in late September.
The smoke brings very strong, intense flavors with sweet notes of honey and skunk and an intense pleasant relaxation. Medical Mass is the great choice for each medical user due its small height, ease of growing, fast flowering and of course great medical potency.
2017-09-01. Started germinating.
------------------------------------------------------------------------------------------------------------
2017-09-03. 3 out of 3 seeds germinated today after 40 h, i planted them in soil and put them in my humidity dome under T5 lights. Added some pics.
KL 23.00. New video added, 2 of 3 girls is looking up from the soil.
----------------------------------------------------------------------------------------------------------------------------------------------------------------------------------
2017-09-05. New videos of the 3 girls. All is up from soil now and looking fine.
----------------------------------------------------------------------------------------------
2017-09-06. New pics.
-----------------------------------------------------------------------------------------------------------------------------------------------------------------------------------
2017-09-07. Kl 22.30. New pics.
-----------------------------------------
2017-09-09. Kl 21.00. New pics.
-----------------------------------------------
2017-09-12. Kl 12.00. New pics.
Likes
9
Share

@Gonzo_Green_Thumb
Follow
Alright everyone? So this week I decided to flip her into flower. Hopefully she won't outgrow the tent. I haven't heard very many people using Recipe 420 soil, but I don't have any complaints yet.
Likes
21
Share


@NG420
Follow
Same this week. Some stretching and lst as it follows.In the second watering with 1L saw run off for first time. I think that I will lst again in (if necessary) the first days of next week and then stop.
Likes
9
Share


@MMVSS
Follow
So I'm Upset That She Didn't End Up Being A Mutant! ABC AND STEALTH FIGHTER COMBINED AND IT DECIDED TO GO WITH MORE STABLE GENES 😆
Don't Worry Some Mutants Did Pop In Other Parts Of My Garden I'll Make A Journal Soon!
For Now We Will Just Pray This Is A Girl!
She Due For Her Topping Today!
She Exploded Once She Had Some Roots And I Blacked Out The Glass With Painters Tape!
So We Flip Very Very Soon!
One More Week!
This May Not Look Like Much, But Considering Her Constraints, It's A LOT! TERRA POWER!
Likes
19
Share


@HisHope
Follow
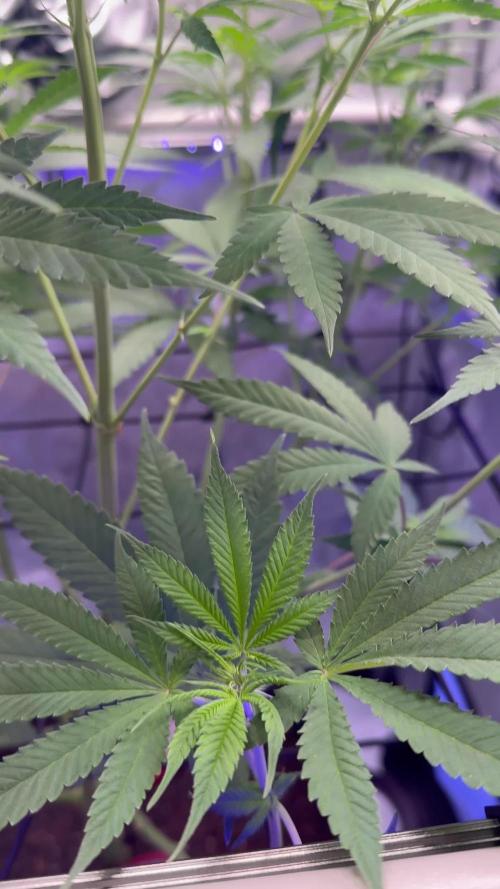
6/7 Week 7, third of flower
She is just getting to be The Beast of CBD Mountain
Nuets are solid and light is plentiful to say the least, watching closely for ANY signs of bleaching, none at all so far.
Light defoliation she is not all that leafy
Keeping a close eye on the PH pens had to recal all three think that was what was responsible for the issue last week and not a double dose of Si.
6/8
Buds growing very fast, increasing PK to 1.5ml/gal
6/10
She is bulking very quickly, so pleased.
Removing Si from feed no longer need to keep dumping it in the pot.
Continue light defoliation
6/11
Showing signs of Phos deficiency,, reddish stems on some branches, lightening in lower leaves with tale tail calcium spotting.
The classic "fade"
All signs point to an advancing condition so we have upped the PK and will begin stepping PH down, 6.1 today , 6.0 from here on.
Give it a few days see what we get
Not looking at flushing until we get signs things are winding down which seems a week or so off at least.
Plan a 10 day flush but we all know about plans.
6/12
Another minor lockout not sure of cause flushed with carefully prepared nuets, gave the full gallon for good run off (about 1.5 quarts) to clean it out.
Eliminating the KoolBloom PK booster, its about time anyway, we want to simplify the feed till we sure about whats up.
6/13
No further issues may have just been a PH variance caused by a wonky pen.
Leaving the base nuets in place till flush
Likes
37
Share


@FlavoursUk
Follow
She’s been in flush around 15 Days now, nothing super heavy. Lower leaves starting to fade slightly and she’s still fattening up. Will let her start to fade before I decide on doing anything at all. Her trichomes are mainly cloudy with an amber here and there.