
Likes
Comments
Share


@IQuSX
Follow
A clone is obtained, in infancy constantly surviving the drought. Water were drunk its neighbours.
What can I say - this is what you need to report to growdiaries!
Of the known, only that genetics ... well, very strong!
Likes moderate feeding and plenty of space for their territory-grabbing activities...
Well, let's start feeding from the 3rd week of vegetative, transplanting to 25l volume, and...and folding the whole length into an "O" shaped format - something that you can see in the next week's report in the video demonstration!

Likes
69
Share


@TOTEM
Follow
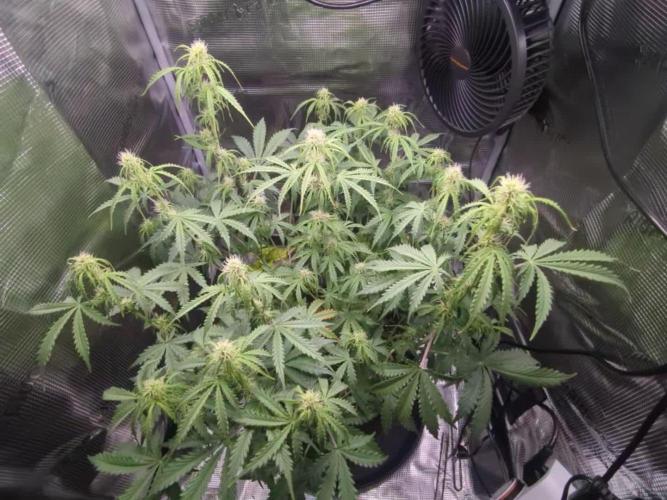
I love all my plants, but this Euphoria has been my favorite since the start of this journey. A REAL MONSTER since the beginnings!!!
By the way, I’ve had a BIG PROBLEM with my digital timer after the 12/12 switch: the led panel didn’t switch off completely because of one defective timer. A little light was always there, like the light of the Moon. This caused the plants not to flower for about two weeks.
The other problem is that I immediately switched to the bloom nuts schedule and completed 3 weeks of it. But the flowering period is about to start now!! Thanks to Mr_Di, we’ve realized it’s better to give these current nuts for the next 3 weeks, just reducing B-52 and Bud Bud by 50% (because it could be a little too much). After 3 weeks, I’ll resume with the normal schedule for week 4. I know it’s a bit tricky, but if you have other solutions, please leave a comment below! I can’t flush now, because it’s risky and I should do it to all my 9 plants. Unfortunately that’s not an option!!
DESPITE THESE PROBLEMS, flowering here is about to start, YAY, and you can see that from the photos!! See you next week, buds! 👊

Likes
24
Share


@m0use
Follow
***Sponsored Grow*** = Medic || https://medicgrow.com || Grow = ***Sponsored Grow***
Ok, so bigger news this week, I got rid of one of the plants in the tent as it was an auto vs fast flower :/ and I performed a bunch of LST and some Defoliation to all the plants. This plant was not to bad in terms of lst needs and defoliating needs as much as the other ones. This will be the last week they are in Veg and switching to flower cycle next week with a 12/12 photoperiod. I was going to try a 13/11 but I wanted to test out the automatic light functions on the Medic Grows Minisun-2, So this will be relieved next week.
Been having issues with PH in the medium again and some nutrient uptake. I am thinking I will switch to another brand I have to use up, trip tonic from my last grow on the balcony. Its a bit more complex and not as easy as mix into water and feed but I think its going to help me solve a lot of the issues I am getting. Given this update is a few days late some of these pics are not from today. the clones in the photos above are from the beginning of the week when I potted them up. They have not done well at all and may not make it. can only hope for the next few weeks they pull through.
Till next week.
***Sponsored Grow***
Official Website:
https://medicgrow.com/
+
https://www.emeraldtriangleseeds.co.uk/
Facebook:
https://www.facebook.com/medicgrowled
+
https://www.facebook.com/OriginalETS/
Twitter:
https://twitter.com/medicgrow
+
https://twitter.com/emeraldseeds
Instagram:
https://www.instagram.com/medicgrow420/
+
https://www.instagram.com/emeraldtriangleseeds/
YouTube:
https://www.youtube.com/channel/UCNmiY4F9z94u-8eGj7R1CSQ
Growdiaries:
https://growdiaries.com/grower/medicgrowled
https://growdiaries.com/grow-lights/medic-grow
+
https://growdiaries.com/grower/emeraldtriangleseeds
https://growdiaries.com/seedbank/emerald-triangle-seeds


Likes
4
Share


@Midge
Follow
Much better harvest to end this first greenhouse grow. 48g dry on this plant. Still quite airy, but resinous and great smell. More relaxed effect than harvest 1.
I could have done with another week or two with her, but the humidity was regularly into the 90s, there was very little sun and nearby tomato plants were starting to grow mold. I cut and ran, I need these meds to get me through the winter.
Final total for both plants 59g. With a bit of luck, this should keep me medicated for a while. Indications are good.

Processing
Likes
113
Share


@Skunky
Follow
Update from last week that I forgot: I gave her a final feed at 75%...
WEEK 25 DAY 1 ... omg... 😂😂😂
It really took me half a year to finish this one... unbelievable... 😅
Well, so far I'm still super happy. Everything seems to go just fine but I'll never do this again..haha.. (vegging under a 50W bulb xD)...
Soooo... looking at the trichs, I think the harvest window has just opened. There's still a lot of clear but the cloudy ones are starting to come and there's already a little amber on the leaves. I suppose I'm really close to harvest now. I'll be flushing her next time for sure.
First, I'll feed her a low nutrient solution, maybe around 25% and half of the usual water quantity because I'm not that sure about when she really finishes so she dries out more quickly. Next, I'll use Grotek Final Flush right before I'll chop her down. I don't want to use this right away because last time my plants were dying a bit too fast so.. not to be repeated ;)
Getting impatient now. Hopefully it will be a White Christmas...haha!
DAY 2
Gave her one last feed at 25%. Poured only half of the usual water quantity. Left the BloomComplex totally aside because she seems like she's doing a little 'clawing'. Maybe there's too much Nitrogene? Trichs are beginning to get cloudy, with a little amber in between.
I'll flush her with plain ph'd water tomorrow probably or should I wait some more days? What do you think? I'm never sure when the time is right... :/
DAY 3
I just took some more pictures with a macro lens attached to my iPhone. Seems like the buds in the middle do have way more amber than the other ones around which have swollen more compared to the ones in the middle but have less amber. The last days, I didn't check the ones in the middle so I changed my mind. I just flushed her with Grotek Final Flush. I'll wait for some hours for the solution to break down the salts and then I'll flush again to get rid of the flushing solution.
I'm also gonna switch the timetable to 8/16. (16 hours of dark) and I'll drop the temperatures some 2 more degrees.

Likes
6
Share


@PlantBasedCookie
Follow
Die Luftfeuchtigkeit ist viel zu hoch und ich kann daran leider nichts ändern, weil es ständig regnet. Ein Entfeuchter ist mir zu teuer, weshalb ich für mehr Umluft sorge und hoffe, dass die Pflanzen die letzte Woche auch noch überstehen. Sie riechen mittlerweile echt stark.
Gedüngt wird nicht mehr, die Pflanzen sollen die restlichen Nährstoffe aus der Erde und den Blättern nutzen.
Likes
6
Share


@field_nigga
Follow
So pretty im genuinely happy and interested. GOD IS GOOD
Haven't started flower mode yet though..maybe at 10 weeks?
Likes
2
Share


@A_Beefy
Follow
Have been demolishing this lady due to its explosive growth. Feeding schedule no changes fan has been going for 24 hrs also on these ladies.

Likes
7
Share


@stonermamba13
Follow
2nd week of 12-12, last massive defoliations and LST before the bloom.
I’ll attend about 10 days and pre flower for others stress.
Let’s do it, let’s flowering!


Processing
Likes
7
Share


@gablmo
Follow
I finally turned 600 watts on, would love to get comments from you folks, so clueless here. If you see something wrong, please let me know.


Likes
Comments
Share


@VeeDro203
Follow
Big day! Moved lights under the Mars Hydro tsw2000 low on the dial. Top feed light

Likes
13
Share

@DutchBarnacle
Follow
Day 31: 2L (PH6.3) with 1ml/L PK13-14
She's definitely well on her way to stretch, and some of the bud sites are already showing signs of consolidation and an increase of mass, not so much as to call it stacking or bulking, but a great early flower nonetheless.
To aid with bud forming, I've started mixing in some flower nutes. I'm starting at half dose and will probably follow up with a regular watering later this week.
Additionally, after taking the pictures, I removed the upper fan leaves of the main cola and the next highest too since it was outpacing the others. I'm trying to not agitate her too much to prevent stunting.
Since she's grown so much, the main cola was receiving 900 PPFD, and the lowest canopy budsite - in the front on the pictures - was receiving about 450 PPFD. Hence, I raised the light up to 30cm above the main cola. I haven't remeasured the PPFD afterwards.
Day 34: 2L (6.5PH) + 0.5mL/L CalMag
Day 36: 2L (6.3PH)
Discovered two her companion plants fostering an army of spider mites so I removed all of the companion plants. The citrus had to move out of the tent for a more natural day night cycle anyway, so that one will reside on the window sill for a few days. The affected pepper plants have received spider mite treatment and are currently outside until they recover.
I'll have to keep an eye out for any webbing on the Northern Light, although I think that the infestation wasn't too bad. Additionally, today was the planned defoliation day so I lollipopped her. Watering is a lot easier now and I hope the lollipop will not be detrimental to her overall yield - it hurt when I removed some branches I'd otherwise keep.
And that about sums up week 4, this week was all about the stretch and the lollipop. She received her first flower nutes and immediately told me she did not need them. She became a bit thirstier and is well on her way to become the biggest yielder I've grown!
Likes
17
Share


@Jknjkn
Follow
4/5
Plants are looking good and putting on some weight. Swell has been nice and stank is getting loud. Kloombloom has been used every other day and I'll run some flower girl in a few days for the last time. Trichs are busting out fierce on tricross strain and skunk is building weight and making trichs at a lower level but trichomes they are. I hope this skunk seed produces some better bud as in THC strength. Last batch grown was imo 10-12% and fine for anyone but me apparently.
4/9
All 3 plants are stacking weight but it's not as fat as 2wks ago. Lower larf on tricross is adding density and weight. Those popcorn buds from last grow with tricross was fire. Introduced some dynagrow 3-12-6 to try another nute for a restack of potassium and carbs for possible growth of buds some more. I figured I will let this grow go another 2 weeks to add some potency to the tricross strain. As far as the skunk being grown with them. She will be cut at same time and frozen for my bubble run with all this dry trim to add some fresh terps.
4/11
Plants looking good and ready for flush time. Decided to start light flush today and plan is to cut by friday. Trichs are at 20% now with tricross and skunk I could give 2 shits about. Skunk will be cut and frozen for bubble run with all the trim from this grow and others.


Likes
16
Share


@GreeneScene
Follow
This week was a good one . Stellar initial growth this round after upgrading lights & using homemade super soil. My 3 day old plants looked like 9 day old plants of my last run to give an idea . I watered for the first time since planting on 5/17 .
I had to itch to test the runoff since it’d only take a sec right? All the ph’s came out almost 2 points lower than when they went in so I decided on a flush even though I’m using Dry amendments.
Honestly I didn’t have the problem of fluctuating ph’s before I added that Peat Moss to my supersoil in hindsight I wish I would have just ordered 1 more 11lb brick of CoCo Coir .
I had the idea that I may need to flush a day or two prior to watering when I noticed all my stems purple.
I get it could be genetics but ALL of them where purple . Here today it is 1 full day since I flushed & all of the stems are now Green with the exception of my Runtz seedling.
3/17 will make day 7 for Runtz & #1 of the GDP
3/18 will make day 7 for Zkittlez & the 3 remaining GDP.
I intended to transplant these ladies day 13 preferably into their forever homes of 3g fabric pots . Fingers crossed day 14 they’ll be ready to start some LST.

Likes
13
Share


@Prozak
Follow
the strain is really strong ,
low temperatures resist , 3 weeks around 12/16º graus and steell growing wel
nice new colos between week 4/6 in flowering.
really good strain to manipulate! 5 stars * * * * *
Likes
40
Share


@dataTwiiix
Follow
10/23: Harvest day. La suite à Noël car je l'ai faite pour en faire cadeau.
Likes
26
Share


Likes
62
Share


@WeedTheNorth
Follow
Week 17
Fastbuds
Cream Cookies
180 watt LED
Coco
Flushy flushy!!
🇨🇦🤗🌴👌👍🙏👊