
Likes
Comments
Share


@Tropicannibis_Todd
Follow
Well growmies ive been looking forward to the MonsterMash 👻 👻 👻
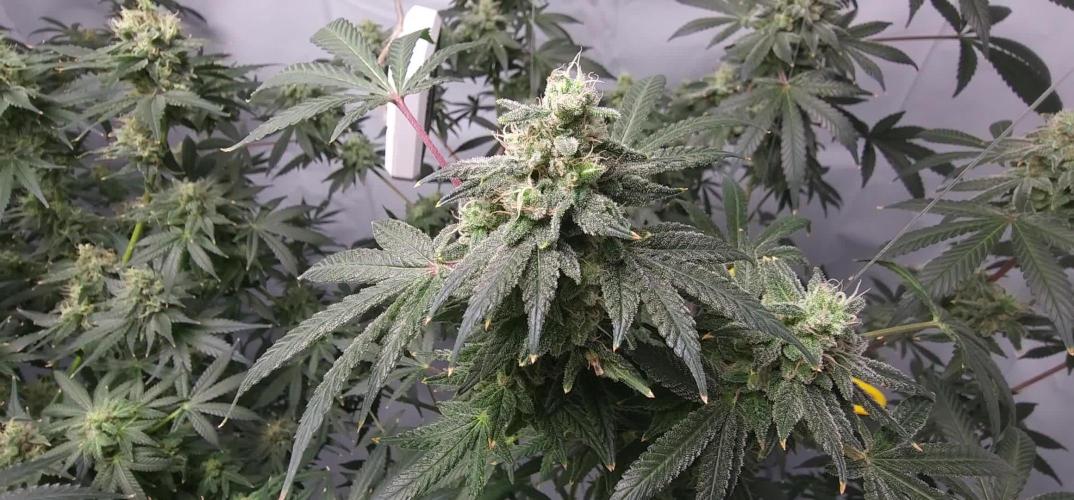
She was a really nice plant to grow , she did her thing and the 👈 Buds are tight and full of frost 👈
She definitely came with the sweet and sour terps , very sweet like candy but with a skunky terpy smell 😁Couldn't of asked for better Genetics 😉
The smell coming from this girl during the entire grow was just dreamy 👈.. 😍
Would definitely recommend 👌
👉 Big thanks to all my Growmies out there in GD land 👈 Much appreciated 🙏
Thanks To MarsHydro for the TS1000 x3 www.marshydro.ca
👉I used NutriNPK for nutrients for my grows and welcome anyone to give them a try .👈
👉 www.nutrinpk.com 👈
NutriNPK Cal MAG 14-0-14👉 All Weeks
NutriNPK Grow 28-14-14👉 Weeks 2 & 3
NutriNPK Bloom 8-20-30👉 Weeks 4 to 8
NutriNPK Bloom Booster 0-52-34👉 Weeks 4 & 9👌👌

Likes
39
Share


@wheedtobeus420
Follow
Day 48. She’s huge!!! Eating like a beast. Drinking like there’s no tomorrow. I’m stoked for her she’s getting hard to move around. Heavy girl impressive.

Processing
Likes
50
Share


@BarrieGrower
Follow
The one plant that has always been under the cobbs is a couple of weeks ahead. They are all fattening up and the smell is great. Humidity in the tent has dropped, this is due to the outside weather changing and running a 6" fan 24/7.
I may start the flush on the one plant, will decide in a few days.
Cheers

Likes
7
Share


@Cogollo_eu
Follow
**Encontrarás la traducción a español al final de la descripción**
From/Desde: 08/03/19 || To/Hasta: 14/03/19
From day/Desde día: 15 || To day/Hasta día: 21
You can find the Gorillas Diary here:
** Podéis encontrar el diario de las Gorilla aquí:**
https://growdiaries.com/diaries/25675-makingmoney-with-gorilla-mm-vs-gorilla
-----IMAGES & VIDEOS-----
Video 1:
7 days TimeLapse, +/- 1 image each 180 secs @ 30 fps, you can see how beauty is the dance of this babies and how are they growing. This is a fast timelapse adjusted to 1 minute for instagram, if you want to see the 3:21 min complete video (1fx60s 30fps) it's uploaded on the gorillas diary named abobe.
Video 6:
An overview video of the babies, moments before i performed the first topping/man-linning/prunning/LST on the biggest gorilla. The other one is recovering at time from those ugly color marks she has on them leaves. As the leaves seems not healthy i decided to not perform the man-lining on this one until it has a pair of healthy main leaves on which i can trust to guide.
-----WEEK SUMMARY-----
I traveled to Venice this week and i have very few photos, also i returned with a terrible flu, so i'm not going to take too much photos for the next week too, i'm so sorry.
The Money Makers are growing healthy and equitative, with very short nodal distances as you can see in photos 4 & 5, i'm not going to perform the same main-lining technique i'm doing with the gorilla, i'm going to test some things. With the Money Makers i'm going to perform something similar to the man lining but with 3 or 4 floors, i'll be twisting the main branch to create a circular horizontal proppagation with 6 or 8 branches. First i will fix the heights of the floors and then i will push them horizontally. Let's see where they go ;).
-----WATERING CALENDAR-----
12/03/19 - 700 ml with all week nutrients @ 0.95 E.C. PH5.9
12/03/19 - FOLIAR - Used about 25 ml of (200 ml water with 1ml Pro Active, 2 ml Plant Vitality + and 0.1 ml Foliar Spray)
*****ESPAÑOL*****
-----IMÁGENES & VÍDEOS-----
Vídeo 1:
TimeLapse de 7 días, +/- 1 imagen cada 180 segundos @ 30fps, observad la maravillosa danza de las nenas y cómo crecen. Esta es una versión rápida de 1 minuto que cree para instagram, si queréis ver el vídeo completo de 3:21 min (1fx60s 30fps), está subido en el diario de las gorilas que nombro en la cabecera de la descripción.
Video 7:
Un vídeo general del armario, está grabado momentos antes de realizar las técnicas de cultivo sobre la mejor de las gorilas. La otra se sigue reponiendo de esas manchas feas que le salieron en las hojas. Ya que las hojas parecen enfermas, he decidido no hacer el man-lining hasta que no tenga un par de hojas saludables en las que poder confiar para hacer el guiado y alimentar los brotes.
-----SUMARIO SEMANAL-----
Las Money Makers están creciendo sanas y equitativas entre si, con distancias internodales cortas como podéis ver en las imágenes 4 y 5, no voy a realizar el mismo man-lining que estoy realizando sobre una de las gorilas, pues voy a probar cosas. Con las Money Makers voy a realizar algo similar al man-lining pero respetando 3 o 4 pisos de las plantas, giraré el tallo principal para crear una propagación horizontal circular de las plantas con 6 u 8 ramas. Primero ajustaré las alturas de los pisos y luego las expandiré horizontalmente. Veamos hacia donde van ;).
-----WATERING CALENDAR-----
12/03/19 - 700 ml con todos los nutrientes semanales @ 0,95 E.C. PH5,9
12/03/19 - FOLIAR - He usado unos 25 ml de (200 ml de agua con 1ml Pro Active, 2 ml Plant Vitality + y 0,1 ml Foliar Spray)

Likes
Comments
Share

@DonvitoGenetics
Follow
this whole grow was decent with a homemade tent i made but i did buy a 4x4 that im using now
Likes
20
Share


@AestheticGenetix
Follow
visually appealing color wise but buds are larfy/ and fox tailing.

Likes
11
Share


@CalGonJim
Follow
1/2/23 she’s doing great I moved a leaf and noticed that she has tan lines. That is amazing. This lights incredible
I took the two bottom branches that I usually trim off. I’m glad I didn’t because I got 1.83 ounces and 1.78 ounces wet. This plant has been the best strongest plant I’ve ever grown it’s really nice and it smells great. I’m gonna give the rest of her, maybe another couple weeks it’s just exciting to watch her grow. I’m not in a hurry to harvest. I do partial harvest as I go along.
1/3 I turned the viper spectra XS1500 light down to halfway which is 82.3 W. And the amount of energy still is more than two of my old spider farmer lights. I had no idea how important brand new LEDs are this is just fantastic. I bet I can grow an entire plant for probably 90 W.
1/4 yum yum omg smells gooooooood..
FYI, Just because a Gamorrean pledges their loyalty doesn't mean they wont eat your weed, lesson learned.
1/4 Just smoked some that had been drying for only 2 days. The smell was so strong like no auto I have ever smelled. This is like top shelf photo from the dispensary. I am totally impressed.
1/6 i’m going to set up a new tent. It starts with the power source. It looked really ugly, so I wanted to try something nicer.
I got one of the TP Link power strips three individual outlet controls for the smaller tent that I will germinate in my use one to monitor the power of the light and I keep switching them around. It’s really nice to have.
1/8 I’m going to plant some seeds today. It’s Elvis’s birthday. I threw away a liter of Purpinator today. I’ve been having nutrient troubles, and I noticed a little that I had mixed up in a small spray bottle had started to congeale. And after I tried 6 mL of it in a gallon twice I noticed some plant damage. I don’t know if it’s that stuff or not but when I add something new it seems to cause damage. So I will never use that again.
it’s taking me a month to set up a small 24 x 24“ tent
I don’t know what’s wrong with me so I have two 27“ x 27“ and one 24 x 24“. The small tent will be for photoperiod also for germination, the other two are going to be for autos only.
I’ve discovered auto flowers need their own tent and their own space, especially the way I train them. I top them after the 3rd node then wait until a couple weeks into flower and I soften the branches pressing them between my thumb & index finger to keep them limber then spread them out so they kind a look like a giant crab, but they grow up very strong and they don’t need support
I was going to go with 5 gallon but I think it would be just too heavy so I’ll stick with 3 gallons. I’ll be starting to gorilla cookies this coming week probably tonight, but I’ll start the diary tomorrow.
If you hold the phone up to the TV, it types out the dialogue . I’m gonna d mad max later don’t you wish you were like me easily amused? You get a lot less brains on your wall that way.


Processing
Likes
20
Share


@UK420
Follow
Been a slow week for root development, but finally witnessing roots moving towards solution. Also been a slow week for height growth. But plenty of sideways and new growth
2/9 Update. Completly changed res today and cleaned system. Added a humidifier and move air pump to under room floor


Likes
4
Share


@Trinidad
Follow
Day 64. 9weeks and 1 day. Defoliated 2 days ago. Still some white pistils on buds. She looks ready, however trichomes are all milk with very few amber. Will continue monitoring before chopping.


Processing
Likes
39
Share


@ParadiseCrew
Follow
well, at the end of week 4 i think she continue racing with her sisters and we definitely have a winner ! 😃, she has bud sites all over her, healthy, strong and smelly girl , i think i will get maybe more 6 to 9 grams just with topping, she responded very well to it.
took one pot out because one little seed germinated with the root upwards , I tried to put it on the right path but without success, she died later... learned that they are so fu***ng sensitive in this fase.
Likes
16
Share


@Cannabis_carlitos
Follow
Let the girls recover, did some heavy defoilatation and put my scrog netting in.
I did cut 4 clones from each plant, I did notice some differences in their growth but only during flower or at harvest will I really be able to see if the two seeds have similar traits.
Fed nutrients at 70% strength and I stopped giving flora micro.
Tent is filling in nicely , going to wait another week or two before flipping to flower, I still see empty space in in the two corners so I want to fill it our first.
I just bought some liquid koolbloom and floracious specifically to add during flower phase.
Thinking of switching to hydro from soil, my and my girl are running our first dwc and it's taking off so fast vs soil.


Likes
Comments
Share

@DogDoctorOfficial
Follow
? Blueberry Muffin – Pheno B
Week 5 | Letting the Plant Choose Her Own Pace
One of the reasons I love growing multiple phenotypes from the same seed pack is that they constantly remind me of one important lesson…
Genetics always have the final word.
Even when plants share the same parents, the same environment, the same nutrition and exactly the same lighting schedule, each one develops its own personality.
Blueberry Muffin Pheno B is proving exactly that.
While her sister is already comfortably stepping into flowering, this lady is taking her time, continuing to build structure before fully committing to bloom.
And honestly…
I’m perfectly happy to let her decide.
⸻
🌱 The 12/12 From Seed Journey
For anyone joining this diary for the first time, welcome!
This entire project is being grown using the 12/12 from seed method, meaning the lighting schedule has remained at 12 hours of light and 12 hours of darkness from the very beginning of the grow.
Unlike traditional cultivation, where growers decide exactly when flowering begins by changing the light cycle, this method leaves much of that decision to the plant itself.
Each phenotype transitions when its genetics decide the moment is right.
That’s exactly what we’re seeing here.
Although the first pre-flower signs are beginning to appear, I still consider this another week of vegetative growth.
She simply hasn’t committed enough to flowering for me to officially change the diary yet.
It’s a perfect example of how two sisters can follow completely different timelines while growing side by side.
⸻
🌿 Building Structure Before Flowers
Rather than rushing her into bloom, this week focused on preparing the strongest possible foundation.
Pheno B naturally grows with an extremely compact structure, producing very short internodal spacing and dense foliage.
That beautiful compactness comes with one small challenge…
Light struggles to reach the interior of the canopy.
To help with that, I spent the week using gentle Low Stress Training together with regular leaf tucking to expose developing shoots hidden beneath the large fan leaves.
Toward the end of the week I also performed a very light defoliation.
Nothing aggressive.
Just removing a few carefully selected leaves to improve airflow and allow more light to reach the inner branches.
Sometimes less really is more.
By the end of the week the results were already becoming visible, with several lower shoots responding by stretching upward and beginning to develop into future flowering branches.
Exactly the response I was hoping for.
⸻
💧 Hand Feeding Continues
Unlike her sister, Pheno B remains completely hand-watered.
For now I want full control over how she receives her nutrients while continuing to observe how this phenotype develops naturally.
Hand watering also allows me to monitor her appetite closely and make adjustments whenever necessary based on her individual needs rather than following the same routine as the AutoPot system.
As always, every plant earns its own management strategy.
⸻
🍽️ Feeding
This week’s feeding consisted of the complete Plagron program, including:
• Terra Grow – 1.8 ml/L
• Terra Bloom – 1.8 ml/L
• Pure Zym – 1 ml/L
• Sugar Royal – 1 ml/L
• Power Roots – 1 ml/L
• Power Buds – 1 ml/L
The introduction of Terra Bloom and Power Buds marks another exciting milestone as the plant slowly begins preparing for reproductive growth.
Although she’s still spending most of her energy building structure, it’s the perfect moment to begin supporting what’s coming next.
Solution parameters remained stable with an EC around 1.78 mS/cm and a pH of approximately 6.02, providing a balanced nutrient profile while keeping the root zone healthy.
⸻
🌡️ Environment
The room continues running under intentionally warm conditions.
Day temperatures averaged around 31.1°C, nighttime temperatures remained close to 25°C, relative humidity stayed around 72%, and atmospheric CO₂ measured approximately 693 ppm.
Those humidity levels are still intentional.
At this stage I’m encouraging vigorous vegetative expansion and allowing the plants to establish as much healthy biomass as possible before gradually reducing humidity later in flowering.
It’s all part of preparing for healthier flowers in the weeks ahead.
⸻
📸 This Week Behind the Lens
This week’s photographs beautifully capture the personality of Pheno B.
She’s noticeably shorter than her sister, yet incredibly dense.
The studio side profiles reveal a stocky plant packed with tightly spaced growth sites, while the bird’s-eye photographs highlight just how compact her canopy has become.
Several close-up images also document the early effects of leaf tucking and the gentle defoliation, showing new shoots beginning to emerge from areas that were previously hidden beneath large fan leaves.
Watching those branches respond over only a few days is one of those quiet victories that makes plant training so rewarding.
⸻
🔍 Looking Ahead
Next week should answer one of the biggest questions of this grow.
Will Pheno B finally commit fully to flowering?
Or will she continue investing another week into structure before stretching?
Either outcome is perfectly welcome.
If she continues vegetative growth, I’ll maintain gentle training and keep opening the canopy to encourage even more secondary branching.
If flowering officially begins, the focus will shift toward supporting the stretch while maintaining an open, evenly lit canopy.
Whatever she decides…
I’ll simply help her become the best version of herself.
⸻
💚 Thank You
Thank you to everyone following this journey and taking the time to grow alongside me.
Every comment, every question, every shared experience—and yes, even every constructive criticism—helps make these diaries more valuable for growers all around the world.
Special thanks to:
💚 GrowDiaries for providing a platform where growers can document every success, mistake and lesson.
Zamnesia for these wonderful Blueberry Muffin genetics, already demonstrating just how unique individual phenotypes can be.
🌱 Plagron for supplying the complete nutrition program that keeps these plants healthy from seed to harvest.
💡 Future of Grow LED for delivering the consistent light that powers every stage of this adventure.
And finally, thank you for following this 8×8 project.
Whether you’re here to learn something new, compare techniques, cheer the plants on, or simply enjoy the journey, I’m genuinely grateful to have you here.
Growers Love and see you next week… where we’ll discover whether Blueberry Muffin Pheno B finally decides it’s time to bloom, or keeps reminding us that nature follows its own schedule. 🌱💙
Likes
4
Share


@4F1M6
Follow
Buds are really putting on weight! Frost is in abundance. Colas have really gained defined shape and structure. The aroma is getting intense. Full blown bloom is a wonderful thing.
Just watching as the sexyness gets more defined. We have hit the major bulking phase.
Do to the new phase of growth the feeding has once again changed. I added bud golem to the mix. To get every drip drop of flowering vigor this lady has to push. Really gives that extra umph for the bulking phase. Will eliminate that last bit of grow outta the mix next feed. Than ride that mix to the flush. Until next update . Happy growing and stay lit fam.

Likes
12
Share


@Staffedition
Follow
Всем привет друзья!
Решил попробывать фотопереодный поднять.
Это будет мой первый опыт с фотопереодными растенями.
Cali Buds очень хороший сидбанк, не знаю почему его нету в списках бридеров!
#Smail_Seeds
Likes
55
Share


@MadeInGermany
Follow
Info:
Unfortunately, I had to find out that my account is used for fake pages in social media.
I am only active here on growdiaries.
I am not on facebook instagram twitter etc All accounts except this one are fake.
Flowering day 22
since time change
to 12/12 h.
Hey guys :-)
A wonderful week goes by and the lady is developing well :-).
The buds begin to develop and give off a delicious smear through the tent.
It was poured 3 times with 1 l each time (for nutrients, see nutrient table above).
Otherwise everything was cleaned and checked.
Stay healthy 🙏🏻
You can buy this Nutrients at :
https://greenbuzzliquids.com/en/shop/
With the discount code: Made_in_Germany you get a discount of 15% on all products from an order value of 100 euros.
You can buy This Strain at :
www.Zamnesia.com
☝️🏼☝️🏼☝️🏼☝️🏼☝️🏼☝️🏼
Strain
Gelato clone from mother (Zamnesia )
☝️
Genetics: Wedding Cake x Gelato x Gelato 33
Vega lamp:
2 x Todogrow Led
Quantum Board 100 W
💡
Bloom Lamp :
2 x Todogrow Led
Cxb 3590 COB 3500 K 205W
💡💡☝️🏼
Soil :
Canna Coco Professional +
☝️🏼
Nutrients :
Green Buzz Liquids :
Organic Grow Liquid
Organic Bloom Liquid
Organic more PK
More Roots
Fast Buds
Humic Acid Plus
Growzyme Big Fruits
Clean Fruits
Cal / Mag
Organic Ph - Pulver
☝️🏼🌱
Water: Osmosis water mixed with normal water (24 hours stale that the chlorine evaporates) to 0.2 EC. Add Cal / Mag to 0.4 Ec Ph with Organic Ph - to 5.8 - 6.4
Likes
18
Share


@Canna96
Follow
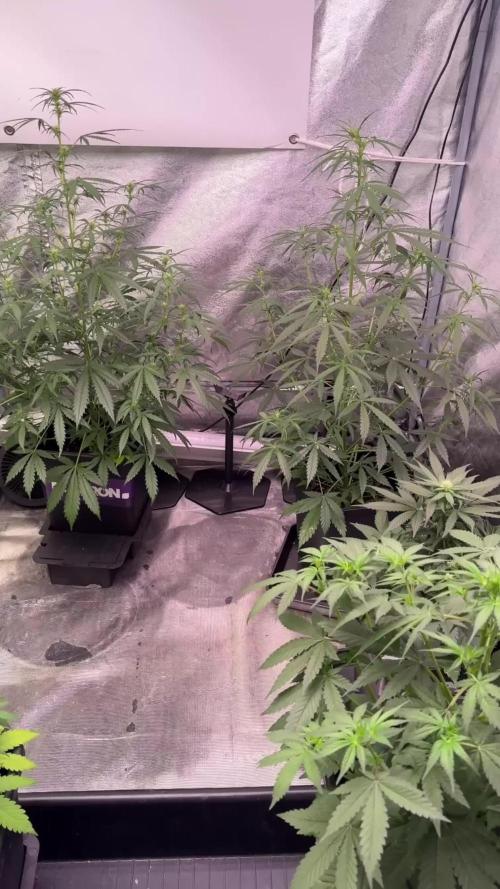
Hey now, hope everyone is haing a great weekend. The Sundae Driver is doing pretty well, she is 2 weeks from getting wet under the Spectrum X which is only cranked up to 30% so she is putting out close to 230 Watts for the 7 seedlings. I will only keep 5 of them and give a couple away as I think even 5 mainlines will be tight in my 5X5 tent. My plan is to transplant them in a couple days, and then top them for the first time at the third node around day 20, and then hopefully top her again around day 27, then again hopefully around day 30, and then flip her to flower by then end of week 6 or 7 at the latest. If i go much past there I think I will run out of room but we will see how it goes.
First time ever running a Royal Queen Seeds Strain, but I have smoked this Sundae Driver before and she was one of the tastiest strains I have ever tried, so very excited for this run.
I hope everyone has a great weekend, thanks for stopping by, Stay Safe and Blaze On!!! 💪
Website: https://medicgrow.com/
https://growdiaries.com/grower/medicgrowled

Processing
Likes
20
Share


@CanadianFillmore
Follow
Start of week 3 of flowering for plants 2 & 3. They are showing signs of heat stress, three days last week temps in the grow room reach 35°c. Aside from some heat stress, the plants still look healthy and the bud sites are developing nicely. Light defoliation of each plant, removing the dying leaves and some of the ones showing signs of dying.
