


Likes
Comments
Share


@Sunofa420
Follow
My plants have been doing well filling out the net a little more I added a second net last week the purple mountain majesty has started showing a bunch of white hairs at but sites also this plant is showing signs of nutrient burn but the other two (Larry lemon and PGC) seem to be in love with the grow dots and I haven’t hands any issues no drooping no discoloration no problems at all I think these grow dots are a good choice so far we’ll see when we flip to flower this week


Likes
11
Share


@Hempface86
Follow
Ladies and gentlemen, today is day 27, and this girl is doing great.. i just gave her a feeding around the rim of the pot .. she's leaning a little bit because my eternity grow plant is taking up all the tent, and this poor little girl is struggling to get light.. She's looking good though she will prevail and I believe end up being a great plant.. Kannabia seeds much appreciated. You guys are great genetics, so far doing great as well.. God bless everybody and happy growing ✌️.
P.s i'm unable to upload the maxibloom nutrients in the general hydroponic silica that she's getting as well..

Likes
2
Share

@Black_Widow
Follow
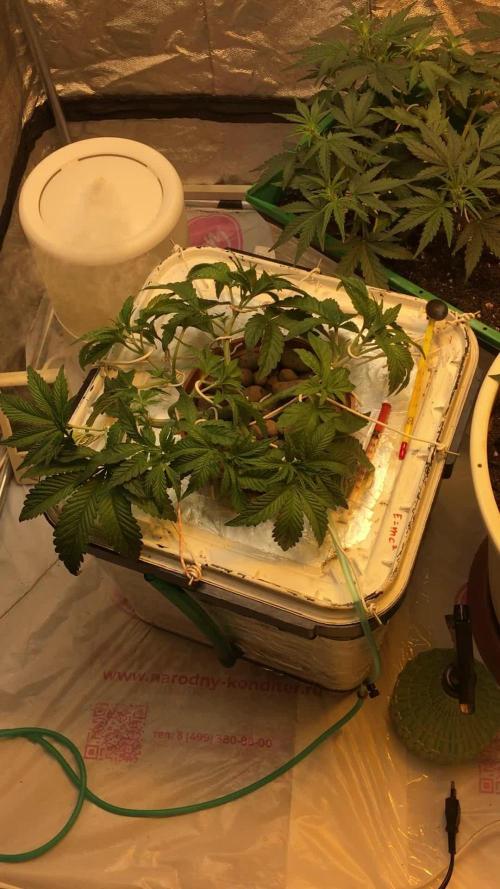
Привет садоводы !
Началась новая неделя
сегодня я заменил питательный раствор на новый и сделал его немного покрепче
все в пределах таблицы кормления
теперь он в значении 700 ppm
а PH также я держу в пределах 5,6
тот цветок ,что в земле после пересадки я пока не поливал
растения выглядят хорошо ,но растут немного медленно
а в общем вроде не плохо
😎

Likes
18
Share


@DaddyPrime
Follow
3/24 start of wk 3 of flowering. This strain has decent internodal spacing. About 1 or so inches in between each bud spot. Looking forward to how the buds progress. There hasnt been too much of a stretch since flowering has started
3/29 starting to produce some smell

Likes
10
Share


@DogDoctorOfficial
Follow
GMO Cookies — Week 8 From Seed
(≈ Week 3 Flower — 12/12 From Seed)
“Served with extra curiosity.”
🌱 Quick Recap (For Everyone Joining Now)
These girls have been running 12/12 from seed from day one.
No traditional vegetative phase. They decided their timing — we followed.
This is not about chasing more harvests per year.
It’s about efficiency, energy management, and less unnecessary labor.
We are now at Week 8 from seed, which we consider early–mid flower transition (Week 3 flowering) based on pistil development and stacking behavior.
⸻
🌡️ Room Conditions
The room is looking strong and stable.
• Temperature: ~28°C
• Humidity: ~70% (slowly reducing)
• PPFD: 800–1300 µmol/m²/s (varies per plant height)
• Airflow: Heavy exchange + vortex + crosswinds
Now let’s explain the why.
We are prioritizing leaf VPD, not just room VPD.
Because of strong airflow and active transpiration, we can run slightly higher humidity at this stage without creating microclimate issues.
Big intake.
Big exhaust.
Vortex movement.
Crosswind fans breaking boundary layers.
This allows us to push intensity safely.
And intensity is where the fun begins.
⸻
💡 Lighting Strategy
We are not just running a top light.
We are using:
• Over-canopy lighting
• Inner canopy lighting
• Under-canopy lighting
Why?
Because photosynthesis doesn’t only happen at the top cola.
Lower sites can remain productive if light penetrates and airflow supports them.
Benefits:
• More uniform energy distribution
• Reduced larf
• Better lower bud development
• Higher nutrient demand (which we are seeing)
This multi-angle light system is part of why we can push EC while still seeing substrate EC remain low.
⸻
Feeding & EC Strategy
Current Irrigation EC: ~2.4
Substrate EC reading: ~0.9
That tells us something important:
The girls are eating.
When runoff/substrate EC remains low despite high input EC, it means uptake is strong and salts are not accumulating.
The moment we see substrate EC climbing?
We reduce feed EC immediately.
End goal:
Final week or so → likely water only.
⸻
Current Nutrient Recipe
• CalMag Pro
• Terra Bloom
• Power Buds
• Green Sensation
• Pure Zym
• Sugar Royal
(No more Vita Race foliar for now.)
⸻
🔬 Why We Switched Additives
We moved from Power Roots → Power Buds + Green Sensation
Power Buds
• Encourages flower initiation
• Supports generative growth
• Helps hormonal shift into flowering mode
Green Sensation
• PK booster
• Adds Magnesium & Iron
• Supports enzyme systems & chlorophyll stability
• Assists in energy transport during early bulking phase
We are now in the stage where roots are established — focus shifts to flowers and energy management.
⸻
⚗️ Order of Mixing (Chemistry Matters)
This is important.
1. CalMag first
Our water is very soft.
We raise EC to ~0.7 using CalMag before adding anything else.
Why?
• Calcium stabilizes solution chemistry.
• Prevents nutrient lockout.
• Reduces risk of precipitation when adding PK later.
• Supports cell wall strength during high transpiration.
2. Base nutrients (Terra Bloom)
3. Additives (Power Buds, Green Sensation, Pure Zym, Sugar Royal)
Mixing order affects solubility and stability.
This is not random.
⸻
🌿 Plant Development
Defoliation was done recently.
Result?
It looks like nothing happened.
The canopy refilled quickly.
Structure is strong.
Stretch is controlled but active.
Stacking is beginning.
They are bigger than expected at this stage, to be honest.
This is where things get interesting.
⸻
🔬 Macro Season Begins
We are entering the phase where microphotography becomes meaningful.
Yes, it’s always interesting.
But now:
• Trichome stalks are forming.
• Resin heads are developing.
• Pistil clusters are stacking.
• Leaf surface gland density increases.
From this week forward, macro and focus stacking will become part of the reports.
Not for hype.
For documentation.
⸻
🔮 What To Expect Next Week
• Continued stacking
• Slight humidity reduction
• Possible EC adjustment depending on substrate readings
• Increased resin production
• Internodal swelling
No drastic changes planned — just observation and precision.
⸻
🤝 Appreciation Section
Thank you to:
• The long-time followers
• The OGs
• The critics
• The silent readers
• The new growers joining
• The Grow Diaries platform
• The sponsors
• And everyone watching quietly
This doesn’t happen because I’m alone in the garden.
It happens because of community.
The girls grow —
but the journey is shared.
📡 Please stay tuned they can try and take us down but we never quit https://www.youtube.com/@DOGDOGTHEDOCTOR NEW
🙏 Thank you for your patience and continued support.
FOR DISCOUNT CODES AND MORE JUST FOLLOW THE LINK https://website.beacons.ai/dogdoctorofficial
📲 Don’t forget to Subscribe and follow me on Instagram and YouTube @DogDoctorOfficial for exclusive content, real-time updates, and behind-the-scenes magic. We’ve got so much more coming, including transplanting and all the amazing techniques that go along with it. You won’t want to miss it.
GrowDiaries Journal: https://growdiaries.com/grower/dogdoctorofficial
Instagram: https://www.instagram.com/dogdoctorofficial/
YouTube: https://www.youtube.com/@dogdoctorofficial Deleted by Youtube
Vimeo : https://vimeo.com/dogdoctorofficial Under construction stay tuned ⸻
Explore the Gear that Powers My Grow
If you’re curious about the tech I’m using, check out these links:
🔆 Lighting & Environmental Control
• Future of Grow — Advanced LED lighting technology
https://www.futureofgrow.com/
DISCOUNT CODE: DOG20
• Lumiflora — Under-canopy LED lighting
https://lumiflorade.com/
• TrollMaster — Environmental controllers and automation gear (past collaboration)
⸻
Genetics
• Zamnesia Seeds — Genetics used in this project
https://www.zamnesia.com/
⸻
🌱 Soil, Substrates, Boosters & Root Support
• Plagron — Substrates, bio mixes, and supportive products
https://plagron.com/en/
⸻
🎒 Storage, Curing & Preservation
• Grove Bags — Curing and storage solutions
https://grovebags.com/
⸻
📸 Photography Equipment & Tools
(Not sponsors, but part of my creative toolkit)
• Sony A6700
• Sony full-frame macro lens + few more
• Stacking photography workflow - learning
• iPhone (for behind-the-scenes shots)
We’ve got much more coming as we move through the grow cycles. Trust me, you won’t want to miss the next steps, let’s push the boundaries of indoor horticulture together!
As always, this is shared for educational purposes, aiming to spread understanding and appreciation for this plant. Let’s celebrate it responsibly and continue to learn and grow together.
With true love comes happiness. Always believe in yourself, and always do things expecting nothing and with an open heart. Be a giver, and the universe will give back in ways you could never imagine.
💚 Growers love to all 💚
📸 P.S. – The Eye Behind the Lens
All photos in this diary (for now — except for the ones showing the camera, which I took with an iPhone) are taken with a Sony A6700 paired with a Sony full-frame macro lens and a few more.
Photography is part of the story — it’s how we share the fine textures, the glow, and the quiet details that words can’t always capture.
I’ve also started experimenting with photo stacking — a technique where multiple images, each taken at a slightly different focus point, are layered together to create one perfectly sharp image from front to back.
It’s not digital enhancement or AI; it’s pure photography — a way to reveal the plant’s beauty in microscopic depth, from trichome to petal.
You’ll even see a few shots of "ghost me" capturing the shots — camera, lens, setup — because every grow deserves not just to be cultivated, but documented like art.
FOR DISCOUNT CODES AND MORE JUST FOLLOW THE LINK https://website.beacons.ai/dogdoctorofficial
NEW DISCORD - Official Server Invite Link : https://discord.gg/ksjAkA5T74

Likes
4
Share


@Osavv_OTGUK
Follow
Wow I am so impressed on how these buds have formed and taken up my whole tent. I really appreciate barneys farm and zamnesia seeds for sending me out to grow. The trichomes are showing cloudy, just waiting for the amber to come through and it will soon be ready for flush and harvest 👀

Likes
8
Share


@I_Identify_As_A_Dan
Follow
Week 7 of flower for Ztrawberry by greenhouseseedco
Shes really looking quite nice, buds are frosty, beautiful leaf fade too.
Shes probably got a week to go.

Likes
11
Share


@CanadianFillmore
Follow
Start of flowering week 1. This girl is already bigger then her round 1 sister and she's starting to stretch after just a few days of 12/12 light. The only nutrient difference this grow, will be the addition of sensizym, hopefully it helps pack on a few more grams per plant.

Likes
5
Share


@Insaniac_0
Follow
Veg Week 3 Day 21 to 27 - 4/17 to 4/23
A lot more to talk about this week. It's topping and transfer week.
I started the week off (day 21exactly) by making sure I had at least 5 to 6 nodes of growth and topped P1 down to the 4th node and P2 down to the 2nd node as a test. (typically I top to the 3rd) I also removed all other node branches and fan leaves and usual. I left a large stump in my tops so the nodes can use it to grow around and help support the larger weight of a mature plant. I gave a couple of days of recovery while I hand spread the nodes daily to train the new waterways through the nodes. I changed my schedule and watered a day after and then transferred the plants into their forever pots/top watered in
Feed this week was .5gal transfer and top feed at 100ppm total before add-ins. I used 100ppm Veg concentrate mix (recipe week 2)
I then also added 1ml/gal of CaliMagic (General Hydroponics 1-0-0) and ph balance this week was for 6.2
Feed plan next week will be a final top feed of .5gallon and then turn the reservoir on.
Videos:
Topping and
Transfer

Likes
12
Share


@LetItGrow420
Follow
Week 2 she's getting bigger and stacking them nodes, having to water more frequent. Also she almost ready for a transplant.


Likes
4
Share


@Hazeterpz
Follow
Still stretching like crazy and no flower or sex showing in site
Had a little fun with the filter 🤪
My ec at that moment was at 0.8-0.9
Likes
24
Share


@MikeyP
Follow
Started the week at 725 ppm which was stronger than I meant to. Remixed on day 38 to 650 ppm. I've been adding the ph up incorrectly. Noticed some calmag deficiency in the last day or two so I'll be upping the calmag to 15 ml. She seems to be doing well. I'm losing the battle against the smell. My whole house smells like dank.she drinks 1 gallon every 24 hours I only add ph'd water between feeds. I cant believe she grew 7 inches this week!
Likes
5
Share


@123Grow
Follow
we just finished 2 weeks are are going into the 3 week. These ladies can EAT!! 1,000 ppm’s and no issues..looks like I have to up the ppm’s for bloom phase
4 out of the 5 are doing GREAT. The 5th one is having issues and I know it’s the media I am using. I had a different brand of soil for 1 of the banana MAC’s and it freaking SUCKS!! I am amending with Iron-Tone by Espoma to get the green back and it has some cal-mag also with sulpher ( hits all suspect deficiencies).
The other 4 are in Mother Earth soil which I have had zero issues with. I will be sticking with Mother Earth for awhile.
11/6 Potassium deficiency in the banana MAC’s…kinda of a good sign. Let’s me know the plant is going into bloom phase and it’s time to change the ratios from 1:1:1 to 1:3:2. The 1:3:2 is flower girl 1 week and fish bone meal with Langbeinite the other week. I will alternate between the two for 4 weeks. Tuesday ( 11/8) will mark 3 weeks. I did defoliation and lollipoping today. This is the second one I have done ( I do the first one the week before flipping).
Likes
5
Share

@Ninjabuds
Follow
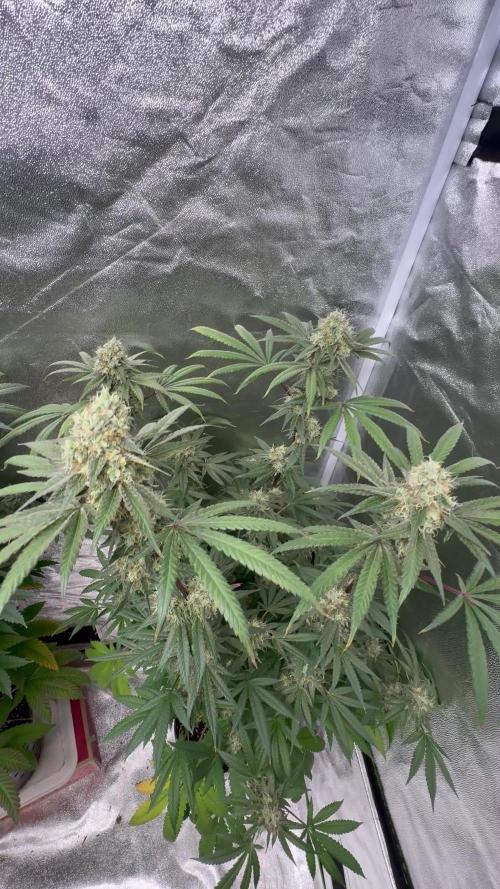
White Runtz from Barney's Farm is a real showstopper. It was the biggest plant in the garden, with strong stems that supported solid, egg-shaped nugs. The buds are practically dripping in frosty trichomes, and the aroma is a mouthwatering mix of sweet and fruity candy. White Runtz delivers a powerful punch of relaxation and euphoria that'll melt away stress and leave you feeling amazing. If you're looking for a top-shelf strain that's both beautiful and potent, White Runtz is a must-try.
I recently upgraded to the GrowPro Solutions Under Canopy lights, and wow, what a difference! The colors on my plants are seriously popping – they look so vibrant. Plus, I think it really helped them finish strong. If you're looking to boost your grow, I'd definitely recommend checking these out.

Likes
3
Share


@Chubbs
Follow
Sorry for the late weekly update. Took a quick family trip. 2 out of the 3 have been chopped and this one i was giving a couple more days before it's finished. The color and smell is wild on this strain. Almost a reddish purple in color. All in all Happy Growing.
Likes
27
Share


@RDWCGrowing
Follow
1/20/2023- So much to do pre grow and over the next 16 days, absolute first order of business is that I have to take down my current Grow---TIMBER-- Then I have a list of things I have to get done in order to be ready to start this grow 1 Feb.
With that said
T - 2 days until start 48 hour Flush
T - 2 days until Start 48 hours of Light
T - 4 days until TIMBER!!!
Items that need to be done before 1 Feb 2023
1. I need to clean the tent out
2. I need to clean the equipment- Proper Sanitization between grows in Hydro is a must!!!
3. I need to get the hole in the ceiling above my tent repaired- For my last grow I had a deep sink installed in my grow room, to make Hydroponics a little bit easier and have a water source in the same room. The seals on the pipes they were installing broke and leaked through the ceiling causing some damage all the way across my grow room, I was already weeks into my grow and couldn't risk them working above my tent and it would have been very awkward positon for them to be working in as well, so have to get this done quickly between chop and germination.
4. I have to install my new light- I was using a Vivosun 4000 and for this grow I am switching up to a Spider-farmer SF 7000.
1/20/23- For this upcoming grow I am working with M/F photo seeds so I ordered 4 Sex determination kits. I recieved my my 4 Sex determination testing kits from Rimrock Analytics today. I will be using these to test my plants at week 2 of Veg so that when/if I take clones I know I am taking them off females. As well as I don't want to accidently pollinate my tent during this grow I am looking for big beautiful buds not seeded buds. :-)
1/24/2023- Harvest of current grow- Started at 2:00pm and finshed wet trim and firt batch into the freeze dryer.
1/25/2023- Next batch into the freeze dryer and cleaning all my equipment for this Grow.
T-1 Day until the workers are supposed to be here to fix the hole in the Grow Room.
T-3 days until I instll my new Gorilla Grow Tent and my New Light Spider Farmer SE-7000 for this grow.
T-7 Days until Start of Germination
1/26/2023- Harvest is done ran through the Freeze dryer and dry tim completed.
1/27/2023- Grow Room repairs completed. Hole is gone Letting the paint dry before I install the new tent.
T-2 days until Install the New Gorilla Grow tent and the new Light
T-3 days until I put the hydro equipment in the new tent
T-5 days until Germination
1/29/2023- Day 0- Final Pre Germination activities
Germination Start T-3 days
The paint on the ceiling was dry and it was time to finish prepping for Germination. I got the following items knocked off my list.
New 4X4 Gorilla Grow Tent is up and ready
New Spider Farmer SE-7000 Light is installed- Thanks Moony Grows for the suggestion and for the Code that got me some money off and free shipping (Moonygrows)!! I turned the lights all the way up to max and set the timer to 18/6 0600-0000. I will keep an eye on the temperature and humidity without my plants and see how hot it gets with the new light.
I put my Hydro system back together and put in 40 gallons of water into it, time to monitor for leaks the next few days.
I Setup my cloning machine for Germination Days 3-11
1/30/2023
let me break down the situation, ROOM in the TENT.. Enough said.. No really I tried putting my exhaust system up in the new tent with my new light, The light is so big corner to corner that it really didn't give me enough room for the lights be be raised, with the exahust hanging the buckets my plants are Starting in are 2 and 1/2 feet off the ground, great for plenty of room for roots but not so great for upwards space for the plant to grow. In a 6' 11 tent with the exauhst in side and hanging that only gave me a little over 4 feet of grow room to play with. My last grow if you saw my diary, anyone could tell I was struggling to keep the buds off the lights. No good, Since space was such an issue I was running my carbon filter inside on the ground but It really needed to be up sucking the heat out not shooting the cool out. With that setup I was sucking air through the filter and pushing it out the tent at a bottom exhaust hole cold out. Wasn't doing me any good for my heat. I was hitting temps of up to 85 degrees. I bought a portable AC unit and have been running it in the grow room to try and keep temps below 85 and I have had to lower the power on my lights during grow also not ideal.. With that said a friend of mine MoonyGrows (Check out his diary) took the time to look at my issue send me a picture of my grow tent setup with detailed instructions on how to suck the air out from the top but putting my filter and fan on top of my tent so no room issue and I am sucking the air out from the top where the heat is instead of pushing the air out from the bottom where the cool is... THANK YOU MoonyGrows For taking the time to help me get this straightened out.. Now I have room and I have the exhausts working right and now my temps with everything at 100% are topping out at 80 this dropped the temp by 5 + degrees at 100% max.
T-2 days until Start of Germination
Prepped my seed tray with humidity dome
Prepped my Rapid Rooter plugs. I Used RO water, and I added a few drops of Hydrogen peroxide to Oxygenate the water. I then PH balanced between 5.7-6.0 the same that they will be getting in the Cloning Machine and when they get to thier final grow pod. I perfere the 5.8x range and I hit 5.84 for these rapid rooters. If you want to see a complete video on the process HowWeedGrow has an amzing video that shows step by step how to do it and explains it better than I ever could including how to plant the seeds. Which I will cover when I get to that step on Wed. https://www.howweedgrow.com/how-germinate-weed-seeds-cannabis-rapid-rooters/
1/31/2023
T-1 day until Germination Start
All set and ready have my Rapid Rooter plugs ready to go have my seeds out.. Have my seed tray warming up tonight. Tomorrow morning right into the Rapid Rooter then strait into the tray. I will spray the dome to start the humidity in there.
2/1/2023
Germination Day!!
Let the games begin!
0600am Put the seeds into the Root Riots. And then put the seeded Root Riots into their first home the Seed tray. I have them under the light 24/7. Sprayed the dome
7:30pm Sprayed the Dome to keep humidity going on the dome.
2/2/2023
Day 1 of Germination
Sprayed the Dome in the morning
Sprayed the Dome in the evening
2/3/2023
Day 2 of Germination
Roots are starting to come out the bottom of the root riot plugs and the heads are slowly popping out of Number 4 just below the surface.
Afternoon- Number 4 has popped up
Evening- Number 3 has popped up as well. Happy Dance!!
2/4/2023
Day 3 - Germination
Surprise Surprise Surprise- all 4 have now poked their heads up.. Happy day!! 100% Germination succeeded.
Now major milestone to track is how many are female and how many are male.
I will take look at the roots this afternoon/evening and see if they have enough root to go into the cloning machine for the next 7 days before they go into their Hydro Pods.
Day 3 - Germination - Evening..
Roots looked good and they were tall enough to make it into the cloning machine.
Now that they are all in the cloning machine I have switched the lighting to veg state 18 on 6 off.
2/5/2023
Day 4 - Germination - Morning
All the Ladies (fingers crossed) looking great stretching nicely and look nice and green, Photo synthesis underway....
UPDATE!! After a very interesting POD cast on FSTS by Dr. Bruce Bugsbee from Utah University, I have shifted my lighting to 24 hours on through seedling and then I am going to shift to 20 hours on the rest of Veg.
2/6/2023
Day 5 - Germination
While Checking on my conditions inside the new tent last night, I found that the Humidity was down to 39 Percent. I added an AquaOasis Cool Mist Humidifier, the reason I selected this humidifier is that I needed one that could be turned on and off utilizing my Inkbird Humidity Controller IHC200 that I have my Pro Breeze Dehumidifier currently running with.
Root structures are starting to get there about 1/4 of an inch.
2/7/2023
Day 6 - Germination
Everything seems on track more roots poking out of each today. They are each getting a little taller as well.
Checked in the evening and number 3 was drooping the Root riot plug on the bottome was dry and the roots were not in the water yet. I raised the water just enough that the longest root that was sticking out is now hitting the water.
2/8/2023
Day 7 - Germination
Everything looked good while checking in on them this morning number 3 is now full up and no droop again.
2/9/2023
Day 8 - Germination
T-2 days until Plant into Forever Pods and we start week 1 of Veg .. :-)
Surprising thing to me is that number 1 and 2 were later in popping then 3 and 4 but the roots are growing longer in 1 and 2.
2/10/2023
Day 9 - Germination
Number 1 and Number 2 are definitely ready for transplant today.. Based on how they were yesterday and where they are today I am hoping by tomorrow 3 and 4 are ready. Today they look to me where 1 and 2 did yesterday.. I really hope 3 and 4 catch up by tomorrow since..
T-1 day until transplant to new/ final home for grow.
Need the roots long enough to have some clay down in the basket to keep the root riot out of the water and only roots in the water..
2/11/2023
Day 10 - Germination
Today they got placed in thier forever Home, 7 days from Sprout and 7 days until Week 1 Start.
PPM- 180 this is water out of the Tap
Temp Water: 70.7
Temp Tent: 77
Humidity: 40% I have a humidifier going 24/7 to try and bring this up.. I also have Humidity Domes on each plant.
2/12/2023
Day 11 - Germination
Sprayed the domes, all are looking good.. Nothing much to do at this phase but Keep monitoring the PH level in the system and making sure they have a comfortable home.
T-6 days until Week 1 start
2/13/2023
Day 12 - Germination
Sprayed the domes, They were looking a little yellow today so I moved the light down to assist. Nothing much to do at this phase but Keep monitoring the PH level in the system and making sure they have a comfortable home.
T-5 days until Week 1 start
2/14/2023
Day 13 - Germination
Sprayed the domes, They were looking a little Florissant yellow today, with what looks like slight burn on the tips, I talked with a fellow grower and we agreed that It was probably that I was drowning them, Yes you can drown you plants even in Hydro, but only early on.. :-) It usually happens with the water being too high, which soaks not only the roots but the medium (root Riot plug in this case). I lowered the water from touching the bottom of the pot to about 1" away. This will probably take 3-4 days to resolve. I will continue my daily monitoring.
T-4 days until Week 1 start
2/15/2023
Day 14 - Germination
Sprayed the domes, continue my daily monitoring they look a little darker green instead of lime green now that I lowered the water levels in the system, so I think that I might have resolved the issue but it will take a few days for recovery to happen.
T-3 days until Week 1 start
2/16/2023
Day 15 - Germination
I looked in on them this morning, 3 and 4 look like they are doing well and recovering nicely. Number 1 not so much it has brown spots on the leaves, this very well can still be a side effect of the overwatering but I decide to go ahead and add Nutes earlier than I was planning just incase. I was going to wait until Saturday but I think intervention is necessary now especially after drowning them early on.
I added 1/2 what I am planning on adding for week 1 start. I also think I am going to adjust my chart to add 1/2 2 days after plant from now on. I don't think it would hurt it to have some Nutes to pull from.
.25ml/Gal Calmag = 12.5ml
1ml/gal GH FloraMicro= 50ml
1ml/gal GH FloraGro = 50ml
1ml/gal GH FloraBloom = 50ml
T-2 days until Week 1 start = I will drain the system and start it over on Saturday with Week 1 Nutes.
2/17/2023
Day 16- Germination
I didn't even want to post today after looking in on them this morning, 3 of the 4 are now showing signs of dronwing.. Brown spots on the leaves, the water levels were still too high.. I drained about another inch out of the tanks.. Will see how quick they recover.. I start week 1 tomorrow and will have to ensure my water levels are at least 1" away from the basket on this round.

Likes
10
Share

@Chubbs
Follow
These beauties are super super frosty and swelling amazing. From the nakedness eye one of them will be coming out this week as it finished fast, the other two still have a week or so. All in all Happy
Likes
21
Share


@pifflestikkz
Follow
Day 50
29/11/24 Friday
Started the week with a feed, going lightly with this Photo. 5ml base nutes to 5L de-chlorinated tap water and calmag to help with the LSt and defoliation weeks.
Only 1L used today
Day 51
30/11/24 Saturday
De-chlorinated tap water pH 6 only today.
1L
Day 52
01/12/24 Sunday
Feed today using 8ml nutrients mix each to 5L of De-chlorinated tap water pH 6 with added calmag at 5ml.
1L today
More LST applied
Picture update 📸💚
Day 53 Monday
02/12/24
De-chlorinated tap water pH 6.4 only today, 1.5L trying the low pH for feed and higher in water to try encourage some colours. (Someone said it helps 🙌)
Day 54 Tuesday
03/12/24
De-chlorinated tap water and calmag today at pH 6.3
Day 55
04/12/24 Wednesday
Feed today using de-chlorinated tap water and 8ml base nutes to 5L. And then 1ml of each additives to 5L.
2L
Day 56 Thursday (end of week)
Ooooooo I went an invested in some hands free 😁💚
** New Spyder farmer automated drip irrigation 50L system installed 💚🙌
Done 15 L of water and a light feed of 9ml base nutes each. And 3ml additives each per 15L in the tank. Test run week see how she goes 🙌
Picture update 📸💚

Likes
28
Share


@Hempcules
Follow
It was truly a dream to grow this strain. I took my time with it, and my patience was seriously rewarded. I trained my plants to the max, and they handled it like champs every time.
What really sets this variety apart, in my opinion, isn’t the growth traits or the yield—it’s the absolutely phenomenal flavor. To me, it has a strong bubblegum vibe.
That said, the growth and yield are still record-worthy. The buds are as hard and massive as I’ve ever seen—practically no fluffy popcorn buds at all. Naturally, that shows in the final yield. Based on my calculations, I got around 2 grams per watt, which translates to a whopping 900 grams per square meter. That result genuinely surprised me, since I wasn’t expecting nearly that much.
My overall verdict on this grow: completely positive. I’m super curious to find out who the parents of this amazing strain are.
Hats off to you, Supersativaseedclub. This is some seriously hot stuff. 😜
Processing
Likes
12
Share


@eldruida_lamota
Follow
Power plant xl, una variedad sativa, es de temprana floración.
3/3 unidades, algo tardías en cuanto al desprendimiento del caparazón de la semilla.
Lo demás todo correcto.
