
Likes
Comments
Share


@deFharo
Follow
Bienvenidos cultivadores de marihuana clandestinos, y también, a los que tienen la fortuna de no serlo!🖐️👨🌾
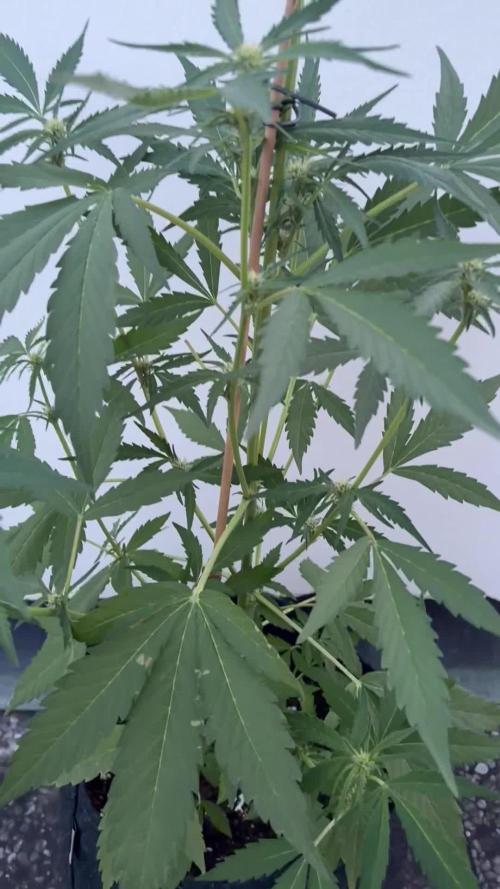
Novena semana de floración para la reina de mi jardín de la alegría, creciendo en tierra sagrada, bendecida con Microorganismos y Minerales, regada con agua pura de montaña, alimentada con pasión y cuidada con fervor... aleluya!
La planta se está deshaciendo de las hojas más viejas, absorbe sus minerales, humedad y nutrientes y luego caen agotadas en el sustrato, las colas se ven con energía, pistilos blancos las coronan, días de engorde se avecinan!
Los cogollos, son largos, densos, pegajosos y olorosos, la proporción hoja/flor es fantástica, la fortaleza del cultivo me hace pensar que todavía puede engordar unos 10-14 días más, quiero sacar la máxima producción, lo que me está pasando también es que el color oscuro de las hojas me confunden al valorar el estado vital del cultivo... pero las colas piden guerra! 🌲🌲🌲🌲
Hasta pronto... 🖐️👨🌾
SALUDOS A TODOS!!
=================================
Info de la cepa Mendo T: https://www.thehighchameleon.com/es/shop/mendo-t-6#attr=202
- 85% Indica, 15% Sativa. THC: 18%. Floración: 8 Semanas. Terpenos: Lavanda picante.
- Genotipo inverso masculino: limon t
Cruce: Lemon Tree x Cookies & Cream F2. 2019 - The High Chameleon - EUR
- Genotipo femenino: Mendocino Purps Reg Selección de THC
1996 - Piratas de CSI Humboldt, California - EE.UU.
==============

Likes
9
Share


@wheedtobeus420
Follow
Day 83 she’s looking beautiful and bulking so fast. The time is coming soon. I can’t wait. She is looking fabulous. Just keeps chugging along. She will begin the ice flushing process soon and she’s so damn heavy she’s being held up.

Likes
Comments
Share


@Dankmark420
Follow
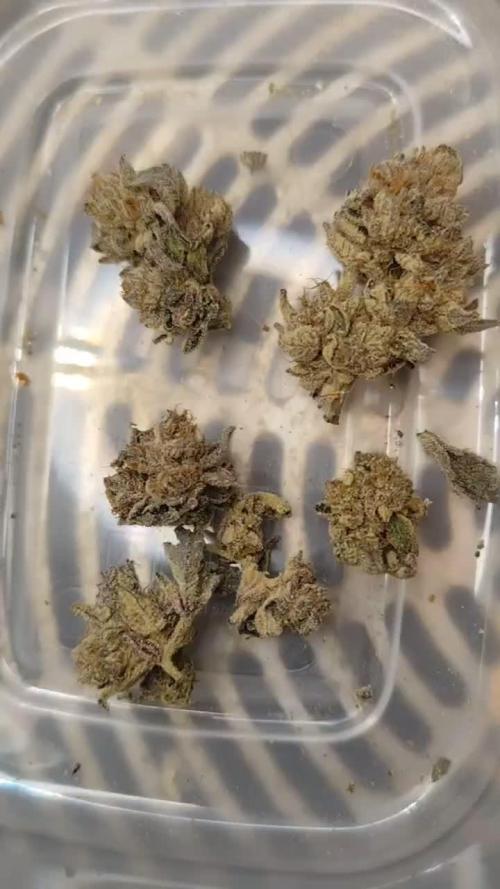
We cut her early due to a block off in the autopot system.. but she was frosty as a mofo for being cut way to early and the taste was surprisingly very sweet with a piney/spicy kind off aroma and taste


Likes
80
Share


@Qlimax
Follow
👉Day49- fixed some LST so plants had the max light possible and did defoliation,i noticated 2/5plants have toooons of tricones but rest 3 olmost nothing 😣....some new yelow leafs start to show on 1plant. Wil make video later today.
👉Day51 Got seeds today from 42fastbuds skittlers and blackbarry for next grow :D and got 4x gratis lemon skunk seedss(some new local breeder)😘😘💚❤️I think i will grow them same as this time same pots with 3xblackberry and 1xskittler 1xlemon skunk 🤝
👉Day53 plants looks good... on some still little calsium deficiency on 2 plants mostly,they are now cca.70cm main one 85cm. +Did the last defoliation and reorganizate them,noticated alot stigmas on buds turning orangeish..🧡
Changed the light from 21h>20h ligh ,owerall flowers flowring rly good all flowers got alot of tricones now,👍cant wait till harvest!!💚✂️💚🔬🧡🛏️🧡😂
👉👉Til next weeek mates!!!stay safe and have fun last days of booring 2020 :D

Likes
Comments
Share

@RooftopFarmer
Follow
Banana Guava – Week 7 (Fast Buds Outdoor 2026)
Another solid week of good weather. Banana Guava is soaking up maximum sunlight and getting regular feeding.
This one has shot up mainly in height again and is now around 60 cm tall. She is looking strong with good foliage and continues to show impressive vertical growth. Definitely one of the taller girls.

Likes
20
Share


@Naujas
Follow
Well, I managed to do something that I really didn't expect :) the yield is small, just like the pot :) it was a wonderful trip ;) but from now on I will only grow it in big pots :) good luck to everyone :) I will add weight when it is ready :)

Likes
5
Share

@Cukito
Follow
Just starting to smell really sweet!! The plant is doing perfectly and I hope it will have at least 8 main colas full of buds!!

Likes
470
Share


@PurpleWorship
Follow
BIG UPDATE THIS WEEK !!!
----------------------------------
FEEDING MISTAKE / TRANSPLANTING THE PLANT
-------------------------------------------------------
Last week, the plant was showing some feeding issue (some burned tips).
After discussing with another grower ( @Asnoriu ) and carefully listening his advices, I decided to transplant the queen to a bigger pot.
16L can be ok, but I had a long veg (10 weeks), and this was getting too small for the lady. So starting from now, I will always transplant before flowering, since I understood & learned how it help the plant to develop good roots network.
The plant probably suffered from too much feeding with Fish-mix. Asnoriu told me He was using it at 50% of the recommend dose, and not at each watering.
This totally make sense, especially when i look back at my first grow : I used no fish-mix during almost all the veg, and she grow verry well. My gardening soil was probably rich enough for my plants!
I transplanted the plant to a bigger pot (16L -> 30L) and filled the new pot with Biobizz All-Mix soil.
I took the plant from the old fabric pot like if it was a sock : what a niiiice and easy technic ! (Thanks again Asnoriu).
Watered with pure water (ph at 6.2-6.5), without any nutrients (All-mix is already rich enough). I will feed again in 1-2 weeks.
BIG ERROR WHEN APPLYING LST BACK IN THE NEW POT
---------------------------------------------------------------
I had to remove my strings (LST) to switch to the new Pot. When I was applying the LST again in the new pot, I went too far with tension... And the main-lining broke 😟
So I fixed it verrry quickly by releasing LST tension, and using a string to tight the stem where it broke. In less than 5 minutes it was fixed.
I was verry worried that it may have killed my queen.... But she didn't shown any sign of stunt, and 48h hours later, I can say that she look verry good. This doesn't slowed her.
She seems to grow faster since transplant, so all good :) So, note to myself : never try to LST when flowering started, or only verry carefully, with just littles adjustements.
SPONSORSHIP ANNOUNCEMENT & LIGHT + TENT UPGRADE
--------------------------------------------------------------------
I'm verry proud to announce that Mars Hydro ( @MarsHydroLED ) decided to sponsor me :)
So I received a TSW2000 (basically 2X the output of a TS1000), and a Mars Hydro tent (100cm x 100cm x 180cm)
That's PER-FECT, since I was already using a TS1000, which I bought because it was the best deal (price/quality) for me.
I'm verrrrry happy about it, and I feel verry lucky to be selected by Mars Hydro 🙌 This mean a lot to me. I still have a lot to learn, but I'm doing my best to improve myself and learn. Learning from the other, and sharing my experience, and being rewarded for that...
Damn, so cool 😍
MENTION
-----------
Once again, thanks a lot @Asnoriu
You are MY grower of the month, for sharing your ideas, opinions, and advices with me :)
WEEK DETAILS
----------------
- Day 79 : Watering 1L (ph 6.2 - 6.5) with feeding (as detailed in the week details)
- Day 82 : Transplanting from 16L pot to 30L pot. Broke stem, and repared it. Upgraded from Mars Hydro TS1000 to TSW2000 (2x more powerfull). Watered with pure water.
- Day 84 : Plant look verry great, and seems to stretch & flower faster :)

Likes
4
Share


@Zugzug
Follow
No food just Water.
Flower 12/12 on 9-12-24 = (44 days) or (6 weeks 2 days)
Likes
14
Share


@Growhome_90
Follow
07-07-2024:
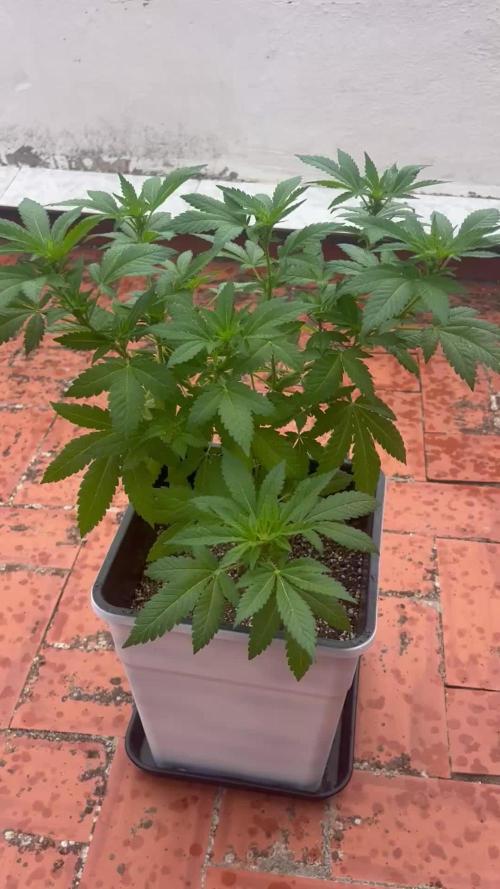
Start von Woche 3 im Endtopf.
13-07-2024:
Die Pflanzen entwickeln sich super und geben seit der Düngung ordentlich Gas.
Sie werden in den nächsten Tagen entlaubt, dürfen sich dann vom Stress erholen und gehen dann in die Blüte 🍃
Likes
8
Share


@Kirsten
Follow
26.4.25:
The plants were watered with 3 ltrs of dechlorinated water PH'd to 6.3, containing the following nutrients:-
♡ 1/2 Tsp Sea K(elp) by Greenleaf nutrients
♡ 1/4 Tsp Ecothrive Biosys.
27.4.25:
I LST'd again by adjusting the tie downs.
For FastBuds Mystery seed auto #1 and RQS Northern Lights autoflower, this will probably be the last time I adjust the fabric ties, as they're now well in to flower.
Hulkberry was LST'd again today, She is looking absolutely beautiful 😍
Retied some branches down and added a couple of clips.
Keeping the canopy as even as possible.
29.4.25:
HulkBerry is looking great. Nice green colour, without being too dark.
The plant has taken well to the LST training.
It doesn't need adjusting much at the moment as the growth hasn't become crazy, just now.
I think next week we will be in to flower, she has 1 pistil on the lower branch. 😅
Nb: I have added this week a couple days earlier, as last week was a couple days late, trying to get back on schedule 😅
Thanks for checking my diary and hanging out 💚✌️🍃😊🌱
Likes
11
Share


@Genussmittel420
Follow
day 2 - the amnesia haze has stretched because of too high temperatures and too much distance to the LED i used. why only one of them, idk but they still stand good on their own, both. still just spraying the soil like 2x a day at the moment.
day 5 - after i took the picture i refilled some soil on top because of the stretch. her sister, wich even stretched less then her, was falling over to the side about 45° after the first time propper watering (not spraying today) and i noticed that she actually had her root system already above soil level. 1 small root (1cm) was going above soil completeley and the stem was very white like 2mm above soil. when i noticed i refilled like 1,2 cm soil and just for safety reasons i gave my own the same help. just in case. at the moment they still go inside over night and also get some extra day time vor vegeing under a small veg LED (about 25 watts or something) just to be sure she does not bloom somehow.
Processing
Likes
8
Share


@CityFarmer
Follow
Hello everyone,
Well the greenhouse is getting really packed to walk in so all I have is a video for you guys to see how everything is going. Hope you guys enjoy...
See you next week...

Likes
Comments
Share


@eldruida_lamota
Follow
Vamos familia, actualizamos la tercera semana de floración de esta Amaretto Tarmac de Seedstockers.
Empezamos abonando ya con varios productos de la gama Agrobeta para la floración.
Temperatura y humedad dentro de los rangos correctos, 12 horas luz, 12 oscuridad.
Una lástima que de todas solo aguanto una, y en concreto tiene un color espectacular aún así seguiremos con el diario hasta el final.
Agrobeta:
https://www.agrobeta.com/agrobetatiendaonline/36-abonos-canamo
Hasta aquí todo, Buenos humos 💨💨💨

Likes
45
Share


@OGBOBBYBUSH
Follow
First week of flower is in the books. All 3 plants stretched about 6" and grew tons of new branched. Really starting to thicken out. Been battling a more problem with sns217 sprayed at beginning of night cycle. 1 confirmed female while it's still to early for the other 2 although they look female. Only problem now is I'm starting to run out of height so hopefully they don't have too much more stretch in them.
From here on I will be doing individual weekly updates on each plant they will be labeled AH1, AH2, and AH3
AH1 30"
topped once biggest and strongest plant
Female
AH2 26"
Kind of a boring one 1 main stem not much other growth
AH3 22"
The mutant! Probably On of the craziest plants I've grown. Has 3 main colas and a bunch of strange leaves with no training. Bushiest of the group
Had a 4th AH that was only about 18" and struggling confirmed male and chopped 10 days into flower


Likes
2
Share


Likes
29
Share


@Twizz
Follow
She's 2weeks into flowering at this point. I decided to stop giving her the 'Power roots' nutrients and start giving her 'Green Sensation' because I calculated that she only has 6 weeks untill harvest. I want to stop giving her extra nutrients after 4weeks from now so she has 2weeks to get a propper flush.
she look healty and strong. For so far i'm really happy about this Power flower seed i got! Big up to RQS and this fine communitie!


Likes
107
Share


@Tropicannibis_Todd
Follow
Well growmies ive been looking forward to the FastBud Tester 2309 , the more she went into flower the more the frost would build up , nice big chunky buds are tight and full of frost 👈 Couldn't of asked for better Genetics 😉
The smell coming from this girl during the entire grow was just dreamy 👈. Of course I have no clue to what she is but I like it......
Amazing Job FASTBUDS 👏 I would definitely recommend once they release this one 👍
👉 Big thanks to all my Growmies out there in GD land 👈 Much appreciated 🙏
Thanks To MarsHydro for the TS1000
👉I used NutriNPK for nutrients for my grows and welcome anyone to give them a try .👈
👉 www.nutrinpk.com 👈
NutriNPK Cal MAG 14-0-14👉 All Weeks
NutriNPK Grow 28-14-14👉 Weeks 2 & 3
NutriNPK Bloom 8-20-30👉 Weeks 4 to 8
NutriNPK Bloom Booster 0-52-34👉 Week 4 to 9