Likes
Comments
Share
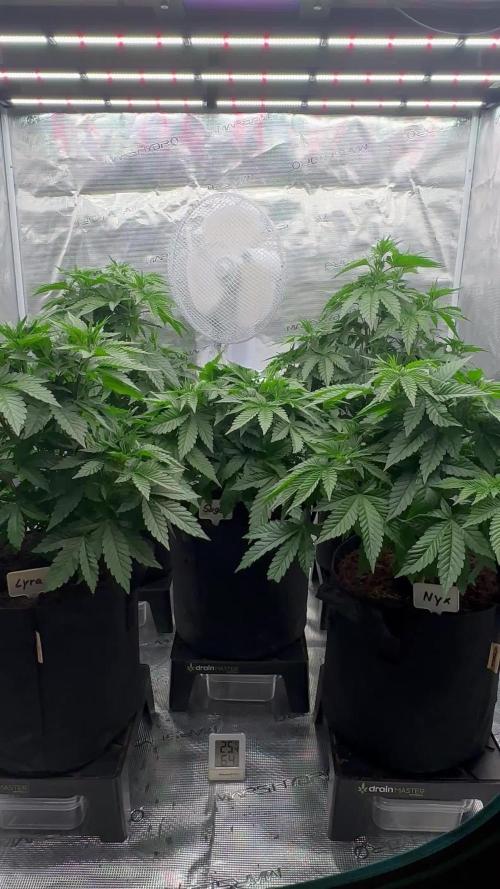
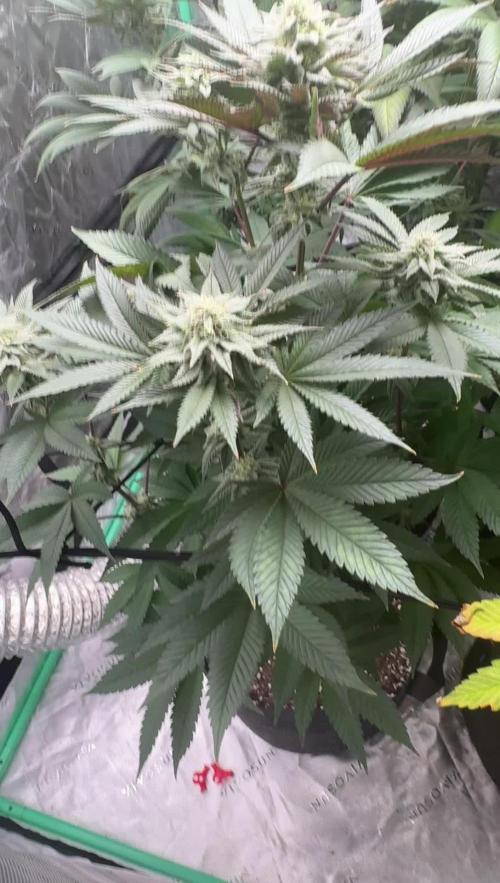
Hi! At the beginning of the week, as planned, I switched the light schedule to 12/12, at the same time reduced the amount of nitrogen - it's time to go to the pre-bloom. Added a lamp with deep red diodes 660nm. Actually, now there is almost no need to do anything, just wait and pray for the energy system of Ukraine😇 Glory to Ukraine! 🇺🇦
Likes
45
Share
- Day 63 of Flower Light reduction to 50% - Day 65 of Flower Last time Watering - Day 67 of Flower Lights out for 3 days - day 70 of Flower Harvest Trichomes are about 15% amber and 80% cloudy with 5% clear Temperatures for drying gonna be 19°C and RH around 55%. She is looking beautiful and her Smell is so intensive you cannot unsmell it. Its Loud! Has Some Fruity (Plum or Tangie like), Soapy and Floral Notes to it. Smokes like a champ and in adition also a purple washer!!
Likes
34
Share
@Birale91
Follow
Start week 7 of flower. No matter how much calcium ill give her with ph 6.2 she wants more. Never grow something like that before. Still, looking very good with lot of trichomes. Day 96. Took good pictures, one of them is the lowest bud on plant. Day 97. Took a cut to check the bud if everything ok.
Likes
27
Share
Hi Growmies Another week of flowering behind us and 3 weeks to the finish post and fruity highs They have all been productive in the flowering this week with plenty of nice fluffy pistils springing up daily now. They are also producing a very sweet smell when I open the tent too. A nice fruity terp indeed. They have been performing excellent from seed and with no concerns at all for their genetics, it is all about what the new additions to my feeding schedule can do. So far the results do seem to support the flower production claim with lots of fresh sites throughout the canopy, thankfully they have also not created wide spacing between the flower sets either so could hopefully become long chunky colas. Using the viparspectra and it's great specs for just the 3 plants has also been a new thing for me to try instead of the crammed in 6 plants. No issues to report around bugs or deficiency still and with the dehumidifier on the case , hopefully no mould spores will show up either. Until next time , be lucky and keep it green
Processing
Likes
15
Share
Likes
55
Share
What's in the soil? What's not in the soil would be an easier question to answer. 16-18 DLI @ the minute. +++ as she grows. Probably not recommended, but to get to where it needs to be, I need to start now. Vegetative @1400ppm 0.8–1.2 kPa 80–86°F (26.7–30°C) 65–75%, LST Day 10, Fim'd Day 11 CEC (Cation Exchange Capacity): This is a measure of a soil's ability to hold and exchange positively charged nutrients, like calcium, magnesium, and potassium. Soils with high CEC (more clay and organic matter) have more negative charges that attract and hold these essential nutrients, preventing them from leaching away. Biochar is highly efficient at increasing cation exchange capacity (CEC) compared to many other amendments. Biochar's high CEC potential stems from its negatively charged functional groups, and studies show it can increase CEC by over 90%. Amendments like compost also increase CEC but are often more prone to rapid biodegradation, which can make biochar's effect more long-lasting. biochar acts as a long-lasting Cation Exchange Capacity (CEC) enhancer because its porous, carbon-rich structure provides sites for nutrients to bind to, effectively improving nutrient retention in soil without relying on the short-term benefits of fresh organic matter like compost or manure. Biochar's stability means these benefits last much longer than those from traditional organic amendments, making it a sustainable way to improve soil fertility, water retention, and structure over time. Needs to be charged first, similar to Coco, or it will immobilize cations, but at a much higher ratio. a high cation exchange capacity (CEC) results in a high buffer protection, meaning the soil can better resist changes in pH and nutrient availability. This is because a high CEC soil has more negatively charged sites to hold onto essential positively charged nutrients, like calcium and magnesium, and to buffer against acid ions, such as hydrogen. EC (Electrical Conductivity): This measures the amount of soluble salts in the soil. High EC levels indicate a high concentration of dissolved salts and can be a sign of potential salinity issues that can harm plants. The stored cations associated with a medium's cation exchange capacity (CEC) do not directly contribute to a real-time electrical conductivity (EC) reading. A real-time EC measurement reflects only the concentration of free, dissolved salt ions in the water solution within the medium. 98% of a plants nutrients comes directly from the water solution. 2% come directly from soil particles. CEC is a mediums storage capacity for cations. These stored cations do not contribute to a mediums EC directly. Electrical Conductivity (EC) does not measure salt ions adsorbed (stored) onto a Cation Exchange Capacity (CEC) site, as EC measures the conductivity of ions in solution within a soil or water sample, not those held on soil particles. A medium releases stored cations to water by ion exchange, where a new, more desirable ion from the water solution temporarily displaces the stored cation from the medium's surface, a process also seen in plants absorbing nutrients via mass flow. For example, in water softeners, sodium ions are released from resin beads to bond with the medium's surface, displacing calcium and magnesium ions which then enter the water. This same principle applies when plants take up nutrients from the soil solution: the cations are released from the soil particles into the water in response to a concentration equilibrium, and then moved to the root surface via mass flow. An example of ion exchange within the context of Cation Exchange Capacity (CEC) is a soil particle with a negative charge attracting and holding positively charged nutrient ions, like potassium (K+) or calcium (Ca2+), and then exchanging them for other positive ions present in the soil solution. For instance, a negatively charged clay particle in soil can hold a K+ ion and later release it to a plant's roots when a different cation, such as calcium (Ca2+), is abundant and replaces the potassium. This process of holding and swapping positively charged ions is fundamental to soil fertility, as it provides plants with essential nutrients. Negative charges on soil particles: Soil particles, particularly clay and organic matter, have negatively charged surfaces due to their chemical structure. Attraction of cations: These negative charges attract and hold positively charged ions, or cations, such as: Potassium (K+) Calcium (Ca2+) Magnesium (Mg2+) Sodium (Na+) Ammonium (NH4+) Plant roots excrete hydrogen ions (H+) through the action of proton pumps embedded in the root cell membranes, which use ATP (energy) to actively transport H+ ions from inside the root cell into the surrounding soil. This process lowers the pH of the soil, which helps to make certain mineral nutrients, such as iron, more available for uptake by the plant. Mechanism of H+ Excretion Proton Pumps: Root cells contain specialized proteins called proton pumps (H+-ATPases) in their cell membranes. Active Transport: These proton pumps use energy from ATP to actively move H+ ions from the cytoplasm of the root cell into the soil, against their concentration gradient. Role in pH Regulation: This active excretion of H+ is a major way plants regulate their internal cytoplasmic pH. Nutrient Availability: The resulting decrease in soil pH makes certain essential mineral nutrients, like iron, more soluble and available for the root cells to absorb. Ion Exchange: The H+ ions also displace positively charged mineral cations from the soil particles, making them available for uptake. Iron Uptake: In response to iron deficiency stress, plants enhance H+ excretion and reductant release to lower the pH and convert Fe3+ to the more available form Fe2+. The altered pH can influence the activity and composition of beneficial microbes in the soil. The H+ gradient created by the proton pumps can also be used for other vital cell functions, such as ATP synthesis and the transport of other solutes. The hydrogen ions (H+) excreted during photosynthesis come from the splitting of water molecules. This splitting, called photolysis, occurs in Photosystem II to replace the electrons used in the light-dependent reactions. The released hydrogen ions are then pumped into the thylakoid lumen, creating a proton gradient that drives ATP synthesis. Plants release hydrogen ions (H+) from their roots into the soil, a process that occurs in conjunction with nutrient uptake and photosynthesis. These H+ ions compete with mineral cations for the negatively charged sites on soil particles, a phenomenon known as cation exchange. By displacing beneficial mineral cations, the excreted H+ ions make these nutrients available for the plant to absorb, which can also lower the soil pH and indirectly affect its Cation Exchange Capacity (CEC) by altering the pool of exchangeable cations in the soil solution. Plants use proton (H+) exudation, driven by the H+-ATPase enzyme, to release H+ ions into the soil, creating a more acidic rhizosphere, which enhances nutrient availability and influences nutrient cycling processes. This acidification mobilizes insoluble nutrients like iron (Fe) by breaking them down, while also facilitating the activity of beneficial microbes involved in the nutrient cycle. Therefore, H+ exudation is a critical plant strategy for nutrient acquisition and management, allowing plants to improve their access to essential elements from the soil. A lack of water splitting during photosynthesis can affect iron uptake because the resulting energy imbalance disrupts the plant's ability to produce ATP and NADPH, which are crucial for overall photosynthetic energy conversion and can trigger a deficiency in iron homeostasis pathways. While photosynthesis uses hydrogen ions produced from water splitting for the Calvin cycle, not to create a hydrogen gas deficiency, the overall process is sensitive to nutrient availability, and iron is essential for chloroplast function. In photosynthesis, water is split to provide electrons to replace those lost in Photosystem II, which is triggered by light absorption. These electrons then travel along a transport chain to generate ATP (energy currency) and NADPH (reducing power). Carbon Fixation: The generated ATP and NADPH are then used to convert carbon dioxide into carbohydrates in the Calvin cycle. Impaired water splitting (via water in or out) breaks the chain reaction of photosynthesis. This leads to an imbalance in ATP and NADPH levels, which disrupts the Calvin cycle and overall energy production in the plant. Plants require a sufficient supply of essential mineral elements like iron for photosynthesis. Iron is vital for chlorophyll formation and plays a crucial role in electron transport within the chloroplasts. The complex relationship between nutrient status and photosynthesis is evident when iron deficiency can be reverted by depleting other micronutrients like manganese. This highlights how nutrient homeostasis influences photosynthetic function. A lack of adequate energy and reducing power from photosynthesis, which is directly linked to water splitting, can trigger complex adaptive responses in the plant's iron uptake and distribution systems. Plants possess receptors called transceptors that can directly detect specific nutrient concentrations in the soil or within the plant's tissues. These receptors trigger signaling pathways, sometimes involving calcium influx or changes in protein complex activity, that then influence nutrient uptake by the roots. Plants use this information to make long-term adjustments, such as Increasing root biomass to explore more soil for nutrients. Modifying metabolic pathways to make better use of available resources. Adjusting the rate of nutrient transport into the roots. That's why I keep a high EC. Abundance resonates Abundance.
Likes
2
Share
@Oldwied
Follow
The enzymes working well, even the hemp weeds in the mulch are starting to decompose. The plant seems to like it too, as the greenery is overwhelming. Light Power: 100% Day 81 Flower day 34 Photoshooting
Likes
23
Share
@cdxxbuds
Follow
New week. Started feeding 2days ago. 2part instead of 3. Managing till i get the last part in. Roughly 2weeks. Currently using. micro and bloom from advanced nutrients. Currently waiting for roots to show under the rockwool then i can move it into the 5gallon bucket.
Likes
12
Share
Week 4 was a very active training week for Apple Gelato. The plant received two topping sessions combined with FIMing to significantly increase the number of main growth tips. In addition, Low Stress Training (LST) was applied to spread the branches horizontally and create an even, open canopy. Despite the intensive training, the plant handled everything extremely well. Recovery was fast, with no visible stress, drooping, or slowed growth. New shoots started developing quickly at all topped and FIMed nodes, showing strong vigor and good genetic stability. LST helped expose lower sites to direct light, improving airflow and setting the foundation for a symmetrical structure. Leaf color remains healthy green, internodal spacing is tight, and overall growth is compact and controlled. This combination of 2× topping + FIMing + LST has clearly prepared the plant for a bushy structure with multiple strong colas going into the next vegetative weeks.
Likes
2
Share
@Sators
Follow
Day 23 – Morning Calm Before the Sunny Surge A calm and promising start to Day 23. This morning, the air temperature was 15°C, and although the sun hadn’t yet reached the plant, the forecast points to a bright, warm day ahead – ideal for further outdoor strengthening. To prepare the plant for a full day in the sun, I provided a fresh watering of 1.3L of clean, pH-balanced tap water. The substrate was moderately dry, and the timing felt just right to keep the root zone hydrated before peak sun hours arrive. Observations: The plant’s structure continues to impress – strong, upright growth with a confident posture. Leaf spread is wide and balanced, indicating steady internal energy and photosynthetic activity. The main stem is visibly thickening, showing natural resilience developing from daily exposure. I’ve chosen a slightly shaded spot to begin the day, allowing the plant to ease into the rising sunlight gradually, preventing thermal shock during the early stages. The full sun will arrive soon, and with it – another valuable training session under the UK sky. Step by step, the outdoor rhythm becomes natural, and this CBD Auto 20:1 continues to adapt with grace and strength. Day 24 – Thriving Under the Heat, Watered with Caution Today brought another burst of sunshine to this outdoor journey – and with it, a true test of endurance for my CBD Auto 20:1. The air temperature in direct sun rose to 40°C, pushing the plant’s limits under intense midday exposure. Despite the scorching heat, she stood tall and open, absorbing every photon with strength and grace. The leaves showed no wilting or curling, which confirms that she’s adapting well to her natural surroundings. Watering: Due to time constraints in the morning, I had no choice but to water the plant in the late afternoon, using 1.3L of clean, pH-balanced tap water. Yes – many would argue that early morning watering is ideal, but sometimes reality calls for flexibility. The substrate had cooled slightly by then, and I made sure to pour gently and evenly, avoiding any root shock from hot soil contact. Observations: Leaf colour is rich and uniform – she’s clearly photosynthesising efficiently. The top growth is vibrant and symmetrical, showing strong apical development. Stem thickness is improving, and overall plant posture feels balanced and alert. Every day is a lesson – and this one reminded me that outdoor growing is about adapting to both climate and life’s rhythms. The journey continues, and so does the strength of “Sators”. Day 26 – Dancing with the Wind, Waiting for the Right Time Today’s weather offered a different kind of challenge – a damp, chilly start with stronger gusts of wind rolling in from early morning. A light rainfall made an appearance too, and although not severe, I chose caution and brought the plant indoors to avoid unnecessary stress, especially with soil moisture still carefully balanced. Later in the day, conditions improved, and the CBD Auto 20:1 is back outdoors, soaking up the afternoon light once again. Growth update: The structure is becoming more defined, with symmetrical leaf spacing and dense apical growth. Stem integrity continues to improve, especially as the plant sways and flexes with occasional breezes – perfect natural resistance training! Colour and texture remain consistent and healthy – no signs of stress or nutrient imbalance. Still waiting… There’s a strong desire to finally leave the plant outdoors full-time, but timing is everything in organic, outdoor growing. Ideal conditions for permanent outdoor transition would be: Night temperatures consistently above 12°C No risk of heavy rain or strong wind without shelter Stable daytime highs between 18–28°C, with gentle sun exposure in the early hours We’re close – but a few more days of caution now can secure weeks of uninterrupted growth later on. This journey is as much about patience as it is about light and water.
Likes
6
Share
@Zebec
Follow
I am open to suggestions and try new things help me out with suggestions and things I should take care from next grow thank you everyone this was a fun learning experience if anyone has some spare seeds or new strains to experiment with I am open please help me out with seeds
Likes
71
Share
Greetings, fellow growers! Week 5 has brought us to a pivotal moment in our Anesia pheno hunt journey as we embark on the transformative process of topping our thriving beauties. Let's delve into the world of topping and explore the magic behind this essential technique. Topping is a fundamental aspect of plant training, involving the removal of the apical meristem, or main growth tip, to encourage lateral growth and bushier plant development. By snipping away the topmost growth, we redirect the plant's energy towards the lower branches, stimulating new growth and increasing overall yield potential. It's like giving our plants a strategic haircut, with the promise of fuller, more abundant foliage in return. But topping isn't just about increasing yield – it's also about promoting a more balanced and uniform canopy, ensuring that light penetration is maximized and no precious photons go to waste. With each well-placed snip, we're sculpting our plants into lush green masterpieces, ready to flourish under the glow of our Future of Grow LED lights. Speaking of lights, maintaining optimal environmental conditions is key to our plants' success. That's why we've raised our TDS to 420 and adjusted our pH to a precise 5.8 using our trusty Blue Lab Guardian monitor. This advanced monitoring system allows us to keep a close eye on nutrient levels and pH fluctuations, ensuring that our plants receive the perfect balance of nutrients for optimal growth and health. It's like having a guardian angel watching over our garden, guiding us towards horticultural excellence. And let's not forget the satisfying sight of water droplets glistening on freshly topped plants. These tiny droplets are more than just a visual treat – they serve as a gentle reminder of our care and attention to detail, ensuring that our plants receive the hydration they need to recover and thrive. It's a moment of zen in the midst of our bustling garden, a testament to the beauty of nature and the joys of cultivation. With each passing week, our Anesia pheno hunt grows more exciting, and I can't wait to see what the future holds. Stay tuned for more updates, more growth, and more green goodness as we continue to cultivate joy and growth together in our Green Oasis! Genetics Red Banana Pudding = RBP Apricot Oreoz = AO Zoomiez = Z Future#1 = F https://anesiaseeds.com/ Plant nutrition - Aptus Holland - https://aptus-holland.com LED Photons - Future of Grow - https://www.thefuturofgrow.com/ Controls - Trol Master - https://www.trolmaster.eu/ Watering - Autopot - https://autopot.co.uk/ Tent - Mars Hydro - https://marshydro.eu/ Love and attention - Me, myself and i As always thank you all for stopping by, for the love and for it all , this journey of mine wold just not be the same without you guys, the love and support is very much appreciated and i fell honored and blessed with you all in my life, With true love comes happiness. Always believe in your self and always do things expecting nothing and with an open heart , be a giver and the universe will give back to you in ways you could not even imagine so More info, the ocasional give-away and exclusive updates from all my adventures can be found - links in the profile description Friendly reminder all you see here is pure research and for educational purposes only Growers Love To you All 💚
Likes
39
Share
Started with a plain water feed. I’ll do a couple nute feeds before I start the flushing.
Processing
Likes
8
Share
Didn't have a lot of time this week so she missed her waterings for a couple of days, also didn't empty the dehydrator so humidity was up a few days. Installed a second cheap blurple led on the side, but doubt this will really help much. Having some trouble keeping temps up as winter is coming and I dont have a heater in my garage
Likes
23
Share
Great week for the little lady in week 2! We have nice steady growth and shoots are starting to come out from the lower branches which is fantastic. Her color and leaves tell me everything is alright as far as her medium and her nutrient uptake, so yeah, I'm really loving this living soil thing. Thanks for stopping in. See you next week!
Processing
Likes
16
Share
@Mrg7667
Follow
Finally moved into tent! Still noticing some weird discoloration/ shriveling and dying of lower leaves. Thinking it could be a ph issue going to start aiming for 6.3-4 Also had a little bit of a crazy fungus knat bloom so maybe they could be affecting my root zone more then i realize going to spray them with some more neem oil and see how they do Need to transplant into 2 gal
Processing
Likes
15
Share
@Dico29
Follow
5th week of flower, the plant has stopped growing and focused on the buds. Both plants look nice, I’m hoping the 3 gallon plant gets fatter before the end though.
Likes
38
Share
Utopia Haze is a rare heavily sativa dominant hybrid (90% sativa/10% indica) strain created through back crossing Brazilian Sativa strains. This tasty little bud took home 1st Place for Best Sativa in the 2008 High Times’ Cannabis Cup and for good reason – with its potent 18-22% average THC level and long lasting cerebral effects, Utopia Haze is one powerhouse smoke. The Utopia Haze high comes on soon after you finish your first toke, hitting you with a strong cerebral lift that infuses you with a sense of hazy relaxation. Type: Feminised/Photoperiod Cultivation: Indoor/Outdoor Flowering Time (days): 70-75 Indoor Yield (g): Up to 650 Feminised Outdoor Harvest Month: October Feminised Outdoor Harvest Month Week: 3rd-4th week Aroma: Citrus, Woody, Pungent, Mint Effect: Cerebral Lift, Hazy Relaxation, Sleepy Welcome Everyone to the Final Entry of my Utopia Haze Grow ! There is so much to discuss ! I have been extremely busy as of late trying to get this Harvest together, but i am happy to have it here for you now ! I Seriously under estimated the amount of time, help from others, and my own necessary skills to pull this off.. and i still kind of screwed it up lol ! But its worth noting i have never actually done this before and trying to document it during....was extremely hard. It is next to impossible to work an iPhone with rubber gloves on ! First I want to discuss everything step by step so before you jump straight into the comments on how the end product is so small in "quantity" Rest assured i am happy with its"quality"...and thats all that matters to me because Life is a journey not a destination! and i have learned so much from this grow that I couldn't be any happy even if i messed some things up :) But at the very least I hope you read through this entry in its entirety with an open mind and focus more on the process, rather than just the outcome! I ran out of Ice & i was only able to wash three times..(normally I've heard you should go sometimes 5-6 washes) Preparation is Key & things will be much better next round :) Photos 1-22 These are pretty self explanatory but for those of you just tuning in now.. this is what happens to a very happy plant when you don't have the necessary tools to monitor key components of growing cannabis.. Ph, as well as EC levels play a very key role in the outcome of your grow lol that being said I was just able to save this plant by purchasing both tools but that doesn't mean the plant didn't suffer because of the prior events.. This was a Huge reason behind me choosing to turn this harvest into what i would consider "Solventless Hash Rosin" from "Ice water extracted Bubble hash". Pictures 23 The idea here is the process of using "fresh Frozen Cannabis" this has been discussed many a time online on such sites as instagram and here on grow diaries as well.. I personally have Never tried the process so i decided to try it out and make a judgement for myself.. Video 24 The Cannabis has now been in the freezer for 72 hours making it very well frozen.. as you can tell i struggled getting it all into the 25u Screen Wash Bag. One thing of note i would do differently is i will de-stem my next batch as i also believe this played a part in the amount of plant matter that escaped through the sieves. Photo/Video's 25-28 The idea here is "ice water Seiving" & especially with the bags that I am using here that are only have screen material on the bottom portion of the bag it is very important to have spaces in-between the screens to allow the water to pass directly through the screens into the bottom bucket with the least amount of resistance.. because the hash is so extremely temperature dependant if it gets warm on the side of the bag.. it will stick there and not make it to the bottom to become use able product.. 29 You do not need to use as much Ice as i used here lol... the idea is to keep everything very cold..i certainly achieved that but at the sacrifice of using so much that i ended up grinding product and producing "contaminants" but in the end they are just plant matter that i would be smoking when i rolled up my joint either way so.. I'm not super disappointed.. But it should be noted that what you want to achieve here is a Layering effect where you have the wash bag between two small layers of ice while the "water current" washes the Trichomes away allowing them to be separated by the screens setup below :) Before Starting the machine you should allow some time (i.e.;10-12minutes pre soak to allow the product to become saturated) before the first cycle. By video 32 I have just ran out of ice lol.. Video 33-34 Here I have a tip for you.. to separate the screens that you sieve through.. cut 5 gallon buckets to stretch them across nice and tight.. it'll make scooping your Bubble that much easier ! i learned this from the many "Frenchy" videos I have watched :) Picture 35 Here in lays the problem for most people.. drying your hash without loosing vast amounts of "Terpenes" whilst also stay ever vigilant against mold ! Thanks to all those videos I've watched on youtube.. id like to think this was one of my most successful parts of this process.. Things to Note; Terpenes start to seriously evaporate at temperatures 68F or 20C you need to stay as cold as possible whilst bringing the Relative Humidity in the space down into the 40-30% to stay away from that nasty mold ! I used my cold storage room in the basement.. with a dehumidifier running to keep the space at 45% RH & staying at a constant 15c. All while spreading the hash as thin as possible across parchment paper, on top of the white screens with a fan moving air across both sides of the paper. Pictures 36-38 These are some macros i took in the middle of my drying session I fell in love with the colour. Yes i know the black spots are plant material but they will get caught when i bag the hash & squish the oil out. Thing to Note; at this stage it is important to ensure you 'micro plane" the hash down as fine as you can whilst staying weary of the temperature... any "chunks" will hold pockets of moisture.. that lead to potential problems..ie; mold ... Picture/Video 39-41 Successfully planed bubble hash ready to be bagged and Squished ! Picture 42 Ive decided to follow Pedro.. from Pedros Grow Room and double bag to be on the safe side so i don't have any blow outs. So thats One 25u bag inside one 160u bag ! :) Pictures 43 This is almost 3 grams of the bubble hash from above, already melting in the bag.. this is where i ran into trouble again lol things started getting to warm in the house and i was only able to get one of the three squish's i did on video :( things started getting sticky. Picture 44 This is basically just a photo of the equipment I'm using; 3x5 LowTemp Cage in the frame I built myself, with a 20Ton bottle jack. Something to note here is this is an older Lowtemp model with only a single heating zone which is which i have it closed here heating Both sides of the press :) As well as the importance of having adequate pressure on your plates.. my rig is very overkill for the size of hash bags..lol Video 45 Here is the lovely press video.. its didn't quite work the way i wanted either lol my directional folding wasn't quite tight enough for a big "drip" :) &the Press was set to 65°c Photo's 46-50 are pretty self explanatory :) I had a blow out.. but still managed to pull an 80% return from the hash once squished...& yes it tasted amazing :) Was it worth it in the end... that could be debated.. for some..i understand..its not your thing, but for those of us that are interested in making our own concentrates.. free from Solvents... I wouldn't make it any other way :) If even ONE of you reading this diary finds it helpful to reference for ANYTHING.....even if its "what not to do" ill consider it a success ! Thanks again for tagging along on this garden adventure.. its been one heck of a journey ! Much Love from B.C. Canada, Until Next time, Cariboo
Likes
65
Share
@Roberts
Follow
Gold Sativa is growing good. Her roots just got out of the basket. Everything is going good. I am growing her under a Spider Farmer SE5000. I am growing her in a New Level Hydro 5 gallon bucket links below. Thank you Quebec Seeds, New Level Hydro, and Spider Farmer SE5000 https://amzn.to/3qFpAML Spider Farmer Official Website Links: US&Worldwide: https://www.spider-farmer.com UK: https://spiderfarmer.co.uk CA: https://spiderfarmer.ca EU: https://spiderfarmer.eu AU: https://spiderfarmer.com.au Coupon Code: saveurcash Thank you grow diaries community for the 👇likes👇, follows, comments, and subscriptions on my YouTube channel👇. ❄️🌱🍻 Happy Growing 🌱🌱🌱 https://youtube.com/channel/UCAhN7yRzWLpcaRHhMIQ7X4g www.newlevelhydro.com www.hygrozyme.com