




Likes
34
Share


@RFarm21
Follow
Olá growmies, espero que tenham tido um bom Natal.
Esta semana a humidade tem estado entre os 60%-65% com as luzes ligadas e pode chegar até aos 75% quando as luzes estão apagadas.. tenho uma boa circulação de ar na tenda, espero que seja o suficiente para evitar problemas.

Likes
15
Share


@Venabr96
Follow
Quaze chegando ao seu fim. Tem sido uma experiencia unica estar me dedicando a essas meninas.
Plantas revigorantes e com otimo crescimento. Cabeças bem duras e com bastante polem.

Likes
8
Share


@ThePiney_grower
Follow
2 week of flower
Not very satisfied for the sensi seed plant
Dutch passion and medical seeds are Amazing



Likes
4
Share
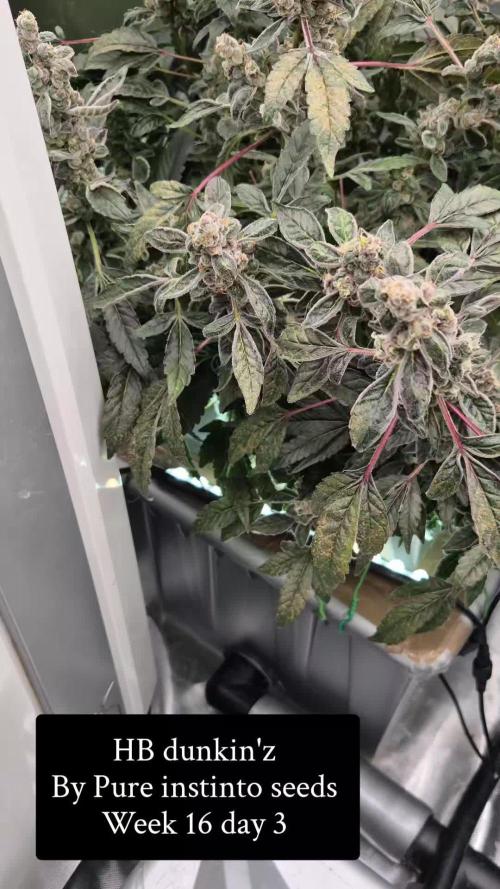

@RBG
Follow
Date: 7/5/26
Week 16
Flower day 2
Going strong, little but of deficiency due to perm bluez ending early but just keeping her on a 1.6-1.9 feed and ween her down now, couple weeks left
Starting to produce purple flickers on her leaves, has a nice bright green/purple contrast and smells absolutely gassy cake batter atm, idk about bananas
Likes
10
Share


@Exotixchasing
Follow
Day 32, I deleafed a couple days ago once I first seen flowering starting.

Likes
9
Share


@Steviestash
Follow
She's doing good should be done soon wish I could put her under the light but she's to tall
Likes
21
Share


@Excalibur
Follow
09 October 2018 -
Day 106
Crystal was trimmed and nugs left for a week to fill out.
10 October 2018 -
Day 107
pH good
11 October - 2018 -
Day 108
Kolas are dense and thick
12 October 2018 -
Day 109
Removed from Tent and hung.
13 October 2018 -
Day 110
Drying nicely , Humidifier added .
14 October 2018 -
Day 111
Further trimmed and added to discs for overall ventilation
15 October 2018
Day 112
Rotating Tiers to make sure we dry evenly


Likes
9
Share


@Scilef
Follow
Daily reports:
Day 1.
Watering - Night: 6.0 pH 636 ppm 3.0 l => 5.95 pH 1120 ppm 0.6 l
Day 2.
Watering - Night: 6.0 pH 596 ppm 3.0 l => 5.6 pH 2250 ppm 0.4 l
Day 3.
Watering - Day: 6.0 pH 596 ppm 3.0 l => 5.95 pH 2110 ppm 0.75 l
Flushing - Night: 5.75 pH 8.0 l => 750 ppm
Day 4.
Watering - Day: 6.0 pH 636 ppm 3.0 l => 6.45 pH 703 ppm 2.3 l
Watering - Night: 6.0 pH 619 ppm 2.0 l => 6.4 pH 833 ppm 0.3 l
Notes: This week goal is to fix my mistakes and return Heracles in the normal state.
Day 5.
Watering - Day: 6.0 pH 636 ppm 2.0 l => 6.1 pH 954 ppm 0.65 l
Watering - Night: 5.9 pH 600 ppm 1.5 l => 6.1 pH 935 ppm 0.25 l
Day 6.
Watering - Day: 5.85 pH 552 ppm 1.5 l => 6.1 pH 950 ppm 0.4 l
Watering - Night: 6.0 pH 416 ppm 2.0 l => 6.0 pH 916 ppm 0.5 l
Day 7.
Watering - Day: 6.0 pH 512 ppm 2.0 l => 5.95 pH 1040 ppm 0.4 l
Watering - Night: 5.9 pH 616 ppm 2.0 l => 5.8 pH 1060 ppm 0.8 l

Likes
46
Share


@Roberts
Follow
Drunken Bitch Slap has been growing great bbn under the Hortibloom Solux 350. I just changed her solution today. She is in the midst of bulking now. Super frosty and sticky buds. It looks like vg it is gonna be a excellent smoke. She probably has about 3 weeks left till harvest. Everything is going great. Thank you Hortibloom, and Aeque Genetics. 🤜🏻🤛🏻💪🏻❄️🌱
Thank you grow diaries community for the 👇likes👇, follows, comments, and subscriptions on my YouTube channel👇. ❄️🌱🍻
Happy Growing 🌱🌱🌱
https://youtube.com/channel/UCAhN7yRzWLpcaRHhMIQ7X4g

Likes
10
Share


@AirDuster
Follow
Day 82 - Added a new nutrient to bulk up on PK from Canna. Guide says to do this only once, so fingers crossed. Still trying to figure out how close I am. I keep seeing other pictures of what look to be near leafless buds, and the buds look absolutely huge. The problem for me as a first time grower is that I cannot figure out what the scale is, and so have no idea if the photos I see are very close up or not. Also, I keep seeing others pictures of what look to be really extended and pointy buds, and mine look nothing like those either. Can't tell if it's the angle or the actual shape. I'm sure I'll learn, and I'm pretty sure I'm on the right track.
Loving the learning though. Such fun.
And macro photography is hard.
Likes
6
Share


@smoking_hills9
Follow
Last final defoliation done, now buds are fully exposed to the lights and the best part, harvest trim will be easier. Still it took me around 8 h altogether to defoliate all of them. Tones of buds and frost , amazing smells. Won't rush will give it a bit more to swell.
Another perfect auto genetics. 💚
Likes
4
Share


@QixxGrows
Follow
Day22: As said in Week3, I will not keep this perspective for the whole grow, as it doesn't really show the size of the plant. But it gives a nice view of how to top leaves grow :) The flashes that you see in the video is the humidifier. It pumps out vapour every hour for 15mins. So basically a quarter of each second of the video will be when the humidifier runs.
Day23: I changed it, as I wanted to see the size as well.
Day24 - Day28: Happy, healthy growth.
Likes
34
Share


@RastaMouse
Follow
Week 7 of flower.
Ro water
Calmag 5 ml per 10l
A+b 30 ml per 10l
Ult pk 25 ml per 10l
Ph 6
Light 100%
Last week before I start flush. They are putting on size nice and have a warm baked smell to them.

Likes
11
Share


@DixTheReal
Follow
É stato il mio primo ciclo di coltivazione e purtroppo ho fatto molti errori che mi serviranno da esperienza. Ho sbagliato inizialmente la distanza della lampada e le piccole si sono allungate troppo, poi ho iniziato LST forse troppo presto e non sono riuscito a orientare bene i rami per farle crescere tutte alla stessa altezza infatti alcuni fiori sono proprio piccolo rispetto ad altri, altro errore quello di non misurare il PH e questo mi ha portato ad avere inizialmente carenze di fosforo e potassio per poi continuare con calcio. Ho sbagliato le dosi di fertilizzanti che dal prossimo ciclo alzerò per provare ad avere risultati maggiori in termini di quantità e infine come ultimo errore riconosco di aver iniziato il flush troppo presto (17 giorni di flush) quando avrei potuto dargli almeno ancora un’altra irrigata di fertilizzanti per far gonfiare i fiori. Nonostante tutto sono contento ed é stato molto divertente e istruttivo, ora le piante stanno seccando e poi le passerò in concia per provare finalmente il sapore. Ho fatto una pesata a umido solo di una pianta perché tutte e due insieme non ci stavano ma credo sia sballata come misurazione quindi peserò direttamente a secco.
A secco sono risultati puliti 68g, ho fatto una concia di 3 settimane e il sapore é davvero buono. Sballo da divano, molto potente come effetto. Sono molto soddisfatto

Likes
24
Share


@DevokeOG
Follow
I got the seeds from a local dealer so I was unsure what type of strain it was but he told me it was a Gorilla Glue Auto flower so I just went with that. That is why in the first few weeks I set my lights on a 20/4 lights on and off schedule. Around 7 weeks in my grow the guy I got it from said that his flowered when he switched his light to 12/12 so I kinda doubt that it's an auto and maybe it is just a photo. I then switched the lights to 16/8 just because I heard it is better to give them more rest and is better on electric. When I thought that the plant was big enough to go into flowering I just flipped the switch to 12/12 and two weeks later it started flowering so I don't know if it was just time for the plant to start flower or the flip. But in the end I got a weight of 1500 grams wet weight with the stems on and a dry weight of 215.56 grams of just straight bud so at the end it was very good considering the light I have and ran into some problems on the way.0000
Likes
6
Share


@GrowingSA
Follow
Hey still hanging in there ...lost a 200w led ...replaced it and lost the replacement due to loadshedding...i also had aphid infestation due to ants ...yea who knew ...but luckily i got rid of them using some dishwashing liquid (it desolves the oily protection layer on their skin) ...so i got my hopes back up...

Processing
Likes
13
Share


Likes
13
Share


@Mrs_Larimar
Follow
2022-10-30
It was pure Joy to Grow them again.
In the Beginning of Flower i was not so happy with them,
but after another Week in the Floweringroom and some Nutrients, they packed up.
Plants loved the Setup with god Temp,VPD, Wind, Nutrients and Light!!
They are colorful and absolutely Pleasing.
a Big Role in this Grow were the new Lights Playing
All the Plants loved the Spectrum of the
HYPHOTONFLUX HPF-4000 (2x)
Plants were growing vigor, looking superhealthy
Harvest was an easy Job!
Bringing me well formed thick and dense Buds with alot of Frosting on them
Just look at the Pictures

Likes
27
Share


@MiyaguiOkPolilla
Follow
Hola cultivadores!
Esta chica está seduciendo mi mente cada día, no dejo de verla y darle cuidados, algunas hojas viejas cuentan la historia de una vida de excesos y mucha luz de cerca, pero hoy es una planta fuerte y segura. Se alimenta con ansias ya que el agua de riego desaparece de su maceta en cuestión de horas (además que hay mucha exposición del sustrato). Su etapa de Bloom ya es más que visible y he decidido no hacer defoliación hasta dentro de 2 semanas si fuera necesario.
Sus ramas son muy fuertes y creo que no necesita nada más de lo que le doy.
Si alguien tiene un sabio consejo se lo agradezco 💐🚵♂️🏄♂️🌹💚
Saludos a todos y gracias por visitar el diario 😌
Irie!
