


Likes
Comments
Share


@FirstTime97
Follow
Done abit of lst this week on a few of the big ones
First timer not really got a clue what to do so trying trial and error
One half the back of tent got a trellise over them the other half have had the fam leaves tucked under and the ones you see under the smaller light have been tied down about 90 degree angle
Also a few showing signs of maybe nutrient deficiency of some sort could anybody give a hand as to what this is also something I’ve noticed over the last week a lot of the leaves look almost chewed off complete fan leaves gone only the stem left this is a indoor grow first time I can’t seem to see anything in the tent or any signs of snails or slugs and I’ve put it down to water landing on the leafs and burning them away completely (pot head conspiracy ) any help would be much appreciated please


Likes
8
Share


@Listening2thestatic
Follow
Welcome to my diary for The Seedsman Tiny Pot Contest
I was left with two difficult tasks. Firstly, what the hell am I going to grow in? It has to be something unique! Can't just be any ordinary small pot..... Secondly, what am I going to grow in it? It also has to be unique! Can't be just any ordinary pot.....
The first obvious choice to me was a photoperiod. Since we are dealing with a micro root system, I would be able to train it like a Bonsai. As the roots get big, it would be easy to cut and maintain the root system before flower. Less chance of root bound and the plant would grow according to its environment. Then I said fuck it..... and chose an autoflower. It's a contest and I love a challenge! I landed on Oasis Genetics Auto Crystal Widow and a little hippo named Herbie! Herbie holds 0.081 gallons of soil. I'm hoping with a 12/12 light schedule it will keep the roots from getting out of control.
Wish me luck!!
GERMINATION:
Day 1, dropped seed in small glass of water. After 12-18 hours the seed will be transferred to a wet paper towel until taproot forms. End of Day 4 taproot had reached 3/4" and it was time for soil.

Likes
9
Share

@Oldwied
Follow
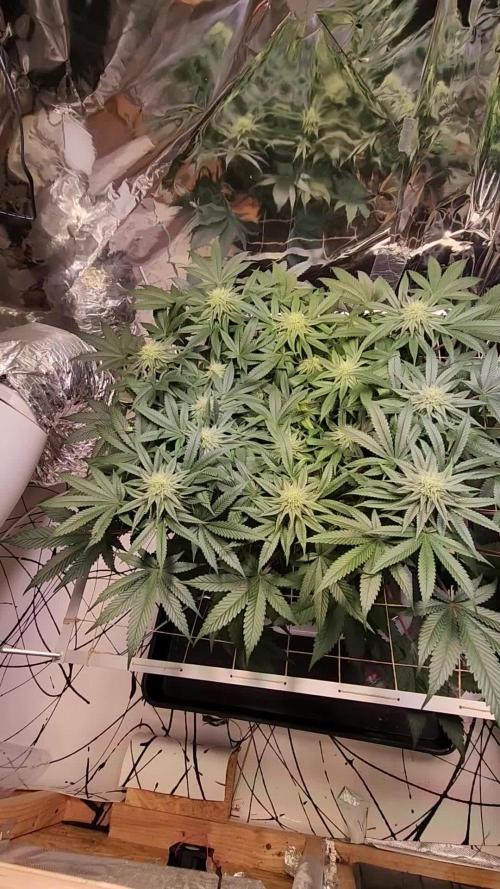
She looks very healthy and buds are forming well. However, I'm a bit skeptical as to whether a 7-week flowering period will be enough.
Over the week I increased the light power to 100%.
I added 10mL LAB (lacto acid bacteria, diy with rice water and milk) and 1 mL CalMg per liter of irrigation water.
Light Power: 100%
Day 79
Flower #28
Photoshooting

Likes
20
Share


@Bread_n_Buds
Follow
Dear friends, this diary tells the story of the development of two Runtz for convenience I divided the harvests, if you want to see the other plant is documented in the week before the harvest.
I'll tell you about the Zamnesia Runtz that you see in the photos and below my general opinion on the harvest and the strain.
This phenotype has been really very elegant since the beginning or at least since the main cola began to take over. The flower has a very kush shape, different from the other main cola a little less resinous but bigger very very beautiful indeed.
The plants are not giants by definition, this is a very stable strain with not very high heights, the yield is always medium high but the strong point is definitely the quality of the flower.
Beautiful plant, beautiful main cola. Mature very red pistils resin overflowing for real. The purple color is really super beautiful I'll prepare a nice video where I'll show it to you.
The trichomes are multicolored due to the presence of purple, here too we have stuff from pink to fuchsia to dark purple plus the classic colors, the maturation is at a point that I don't mind at all.
In weight we will be around 40 - 50 grams but of excellent quality, let's wait for the dry sla and see.
Perfect strain compliments to Zamnesia breeder.
Most likely nowadays those who give the impression of doing Cannabis Industry manage to provide a product of extreme quality much more than the small breeders who are all stealing strains from California and crossing them with their little experiments. It is no longer the era of the flower children although we have to thank them for the anarchic work they did in the 60s and 70s now it's time to work well, cannabis is spreading all over the world and you can compete with the Americans only by working well, like they do in Zamnesia.
How can I prove it to you? In the years in which I was a tester the breeders made me try a lot of good stuff but often, very often, too often I found hermaphrodites. Now always bringing up good luck, touching wood, where the sun don't shine, doing all the appropriate spells of the case we are at
ZERO HERMAPHRODITES.
No seeds, no balls, nothing at all and after all the years that I have heard the "expert freaks" of breeding talk now I feel like recommending the seeds of the industries much more than the small houses.
I thank all the good operators of small houses and I apologize to them but I will never grow their stuff again there is an exaggerated percentage of hermaphrodites. The industries whether you like it or not guarantee success rates much much better. Especially for the wave of beginners arriving.
Zamnesia Strain Description // Guys, we have really reached a turning point! Our breeders have recreated one of the most sought-after strains by Californians: the very powerful and exquisitely delicious Runtz. This cross between Gelato and Zkittlez is everything you could want from a cannabis strain: tasty, powerful, balanced, productive and fast flowering. Buy the seeds and try it yourself!
- Get a seed of this fantastic strain --- https://www.zamnesia.io/it/6000-zamnesia-seeds-runtz-femminizzato.html
The plant has eaten the 100% Organic feeding of Plagron: Alga Grow and Alga Bloom as basic nutrients, the rooting Power Roots, the amino acids of Sugar Royal, the Enzymes of Pure Zym that eat the dead parts in the soil, Power Buds that always gives us immense satisfaction with rapidity of start of flowering and composition of the buds, the legendary Green Sensation that now needs no introduction, a name a guarantee. Also the foliar Vita Race used for the first time with success.
The fertilizer kits that you can find on the Zamnesia website are perfect
for this purpose, there is everything. Choose them based on their mineral/organic composition and the soil you have chosen.
at the link --- https://www.zamnesia.io/it/11457-plagron-easy-pack-natural.html
The quantity was measured using the sheet prepared on purpose on the Plagron website based on the soil chosen: Plagron Pro Mix + Perlite.
at the link --- https://plagron.com/en
The growbox is the DS120w by Secret Jardin as well as the DF16 ventilation system and all the fans
at the link --- https://www.secretjardin.com/it/
The light was supplied in the past by Viparspectra and it went crazy but it came back to me to produce very well too...
at the link --- https://www.viparspectra.com
A fantastic selection of seeds, a headshop and a selection of exceptional accessories on the world of cannabis, many other things about mushrooms, health, well-being and all the beautiful things that nature offers only on the Zamnesia website
at the link --- www.zamnesia.com
Instagram ----
@zam.nesia - @zamnesiawebshop - @zamnesia_usa - @bread_n_buds
Likes
4
Share


@TiRobotProds
Follow
Durant cette semaine elle c'est bien développé toujours aucun nutriments dans l'irrigation.
Likes
26
Share


@HowtoBubatz
Follow
Today marks the end of the seventh week for my cannabis plant, and things are looking fantastic!
The buds are developing beautifully, swelling up with each passing day. It's incredible to see how much they've grown in such a short time. The first trichomes are starting to appear.🌱💚
I'm also happy to report that the nematodes have done their job effectively. The plant is much healthier now, bouncing back from any issues it had before.
I'm feeling optimistic as I watch it recover and flourish. I can't wait to see how the buds develop further as we head into the final stages!💚
Likes
2
Share


@fabialien
Follow
Semana 7 de vida, seguimiento de lunes a lunes.
Lunes 19 agosto 2024, evidencia de una semana transcurrida, en la cual proporcionamos terpinator a todas, purpinator solamente a Purple cherry de Positronics, a las otras 6 alimentamos con Armor Si.
Próximo riego será de Bases PH perfecto de Advance Nutrients a todas.


Likes
43
Share


@420DeepGrow
Follow
Gracias al equipo de Kannabia Seed y XpertNutrients, sin ellos esta magia no seria posible.
🍁💐: Si Runtz se ha ganado su popularidad a pulso, esta versión autofloreciente es digna heredera de sus atributos. No es de extrañar que nuestros criadores hayan acertado con su programa de reproducción, al combinar dos de las cepas más fascinantes de la actualidad: Zkittlez y Gelato.
planta resistente y robusta, de cuerpo esbelto y fuerte ramificación lateral, que se puede cultivar prácticamente en cualquier entorno; pero prefiere los veranos largos y cálidos, tal y como quiere la madre naturaleza, donde bañada por el sol se eleva hasta los 120 cm. para producir unos rendimientos muy gratificantes de 100-150 gramos por planta.
En interior, y tras solo 70 días desde la semilla, también recompensará con cosechas abundantes de hasta 500 gr./m²
Inmediatamente después de encontrarte con ella, lo primero que notarás es su aroma descaradamente afrutado, con un toque tropical cortado con reminiscencias terrosas y amaderadas, que se entremezclan de forma agradable para ofrecer un combo que hace salivar las papilas gustativas.
Ofrece un sabor confitado, refrescante y similar a sumergirse en una piscina de frutas cítricas y flores de fragancia intensa. Al inhalar, obtienes la bondad de la dulzura; al exhalar, el humo se convierte en suave y cremoso, dejando suficiente profundidad en cada bocanada para satisfacer a aquellos que buscan los matices más complejos.
⛽ XpertNutrients: es una empresa especializada en la producción y comercialización de fertilizantes líquidos 🍶y sustratos🐛, que garantizan los mejores resultados y cosechas de la más alta calidad. A través de una cuidadosa selección de materias primas y un proceso de producción avanzado, sus productos son sinónimo de resultados confiables.
🛒 Consigue aqui tus fertilizantes:
https://xpertnutrients.com/es/sobre-nosotros/#:~:text=Xpert%20Nutrients%20es%20una%20empresa,de%20la%20m%C3%A1s%20alta%20calidad.
📆 Semana 1:
Poco que decir, las temperaturas estan siendo algo bajas, se esta desarrollando muy bien hasta ahora, en unos 10 días irá a su lugar definitivo, le estoy ayudando con el TS-3000 de Marshydro para darles un primer empujón, ya que todavía hay pocas horas de luz.
Traducir

Likes
11
Share


@Inceptionist
Follow
The week went really well and we are starting strong into week 3.
The King's Juice Auto #1 is giving me some worries because she's a little bit small.
Also, I saw an aphid on her. Never underestimate green light spectrum guys!
Speaking of light... I raised the light intensity up to 30% (80W) and will keep doing it like this until I end up with a DLI of 40-45. With 19 hours of light that would be roughly 60-65% of light output.
Interesting. From the side view, I think #2 is my favorite but overall it's still #3.
Still unsure what kind of training I should do or if at all.
Alright, I trained them and tried some different strategies. I topped #3 because she was by far the tallest one anyway, I "lollipopped" #1, so that she hopefully pushes more power into the upper part and I just tucked the fan leaves of #2 under the branches. At least as far as I could.
#2 definitely has some lovely growing! She also has the first white hair coming out. Will try to get a photo of that later, hopefully with my new wifi microscope. Should be delivered tomorrow.
Wasn't delivered but how she develops, I don't need the microscope. First set of white hairs is clearly visible!
I'm exited to see how they continue to develop.


Likes
15
Share


@I_Identify_As_A_Dan
Follow
Week 23 for Peyote Zkittlez by seedsman,
Not too much to report shes drinking a hell of a lot of water.. I do think she would have been in a bigger pot at this point you aren't even able to scratch the soil surface because its just roots.. 😂
So im hoping that doesn't effect her too badly can already tell that shes a little light on the nitrogen... May feed some FPJ to boost that up a little otherwise she may fade too early.

Likes
3
Share

@hinterhofgrower
Follow
.
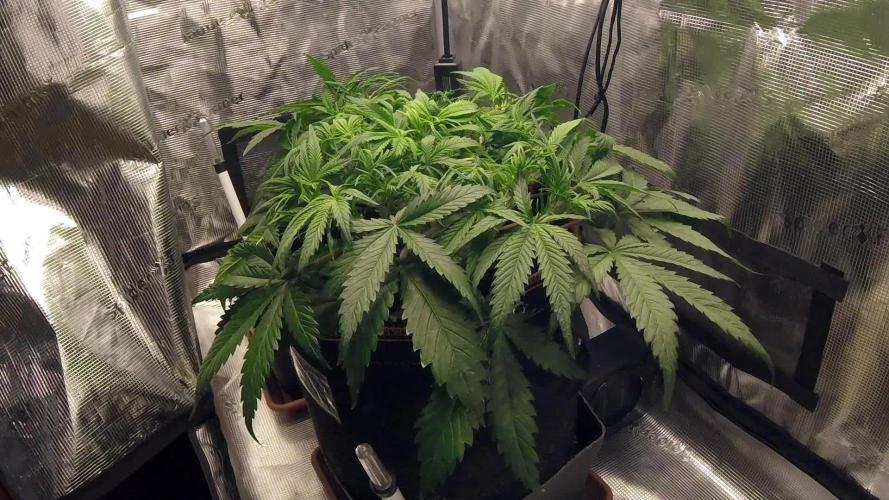
🌱 : Defoliation & LST on day 42, 44
💧 : 4l day 42, 7l day 44
💡 : Dli: 40 mol/m²/d
🤔 :


Likes
15
Share


@bagofbunnys
Follow
This week some of the plants are starting to show a few brown pistils on the calyxes as an indicator that peak bloom period is occurring. I don’t expect them to do much other than fill out a bit at this point with exception of some of the more Sativa phenotypes like the Tangerine Dream. One of the these seedplants failed to bloom properly it may lack the autoflowering genes. I don't want to risk damaging the roots in the system by culling it. I might leave it in to see what happens and transplant it before I clean out the system for the fall grow.
I’m pretty satisfied with the autoflower grow so far but I do have some room for improvement:
1) Next grow I will use CNS17 Ripe possibly from start to finish to see if that improves the flowering of the plants. I feel that my feed is high in nitrates so I am starting to flush this week.
2) You can see by the plants all showed variation in physical appearance and Trichrome production. The only plant that has gone purple out of the batch and is a high yielding Gorilla Zittles from Barneys. If I grow autoflowers again in this system I want to choose plants that are a little more uniform. I think the Botanicare Turbo Garden and similar systems are best suited for clones as they grow a little more uniform. Autoflowers even from the same strain have a wide variation which is cool because every seed is a surprise.
3) I need an overhead plant support. I am not sure how the plants survived some pretty high winds. One stem broke and I repaired it enough so that the plant actually survived.
4) I'm working on a microcontroller sensor node to allow some automation to the system.
My favorite plants in this batch are the Dinafem Amnesia Auto CBD based only on aesthetics at this point.
The Blue Dream Auto from Humbolt is one of the smaller plants but it has quite a bit of resin on it. The smaller plants may have been stunted as my nute level from the beginning was approaching upper limits for leaf burn (1.7-1.8 EC). I had since backed down but over-fertilization in early stages is not reversible and comes at a cost of plant health and vigor.
I took a video to try and show the overall garden progress. I did not defoliate this grow which makes it hard to see the individual flower structure but I will have defoliated harvest photos coming up soon!


Likes
13
Share


@Konkookush
Follow
Happy with the result when i started with a seed.
Mother : 100gr dried
Clone 1: 70gr dried
Clone 2 + 3: 90gr dried
Likes
9
Share


@AgentOrange
Follow
Think I’m going to have to harvest maybe a little early as I will not be around to water the plant.🤷♂️🤷♂️ bit to sure if it’s ready or not.
What do you think is it to early and how early ?
Likes
1
Share


@FarithAriasFajardo
Follow
Aquí las fotos de esta nueva semana de vegetación para ambas plantas, cumpliendo así la white widow 23 dias de plantada y la zinfandel 16. La fotos corresponden al 21, 24 y 27 de abril. Por ahora no hay nada más que agregar. Ya que esta semana solo agregué algo de sustrato en ambas y el riego fue de agua reposada con una bomba dando oxígeno por 24hr y un ph de 6,1 a 6,5. Lo que no sé es si realizar alguna tipo de poda más adelante o si mejor las dejo crecer como son, ya que no sé mucho. Existe el temor de dañarlas o estresarlas demasiado. Lo pensaré, también recibo cualquier consejo u observación con ellas!


Likes
41
Share


@FrostyGardens
Follow
11/17/18
Beginning of week 4 of flower. Day 21-22 of flower. So far I am pretty happy with my results. O think I identified one sativa leaning phenotype, one indica, and also that grows slower then the rest. Although not entirely sure if its the environment that created these differences. As they further develop I may get some clues to this regard.
Black Magic soil seems to work great with no issues of burning or deficiencies whatsoever. Are far as smell its not very noticeable unless the plants are disturbed or pruned.
Decided to discontinue the Aerated teas. Im sure the ladies have plenty or microbes in the soil. The rest of this grow they will only be feed 3-12-12 bloom fert untill its time to start the flush.
Buds should really start to develop in the coming weeks so stay tuned. Also im already planning my next run which will be 10X different strains including this one. Another 5-6 weeks on this one. Shout out to ilovegrowingmarijuana.com for these beans.
11/24/18
End of week 4 and the buds are looking amazing. Nice and frosty already. Noticed slight yellowing on the tallest girl. I suspect my LED was a little too close. Increased distance.Other then that smooth sailing. The next 2 weeks they should really begin to develop and put on weight. Cant wait to see what these 4 beauties produce!

Processing
Likes
2
Share


@Mr_nugs_lover_David
Follow
Looks super frosty and her resin is super sticky hate when they say you can't get the best quality organically. It's the same way around. Purest aromas,finest flavors,love to grow with nature and love this genetic by original sensible seeds 🤤🔝💎🍪

Likes
46
Share


@Rollex420
Follow
Day 18
Transplanted today the plants into their 11L pots.😊
While instead i will let the Lemon Tree grow for another 4/5 days in the same pot because she only got 13 days, so I prefer to have it strengthened a little before the transplant.
Day 24
Mimosa, Meringue, and Kmintz were Topped, Defoliated and also applied a light LST to the main stems of the plants.
I will do the same for the Lemon Tree in the next 2/3 days..
I hope they have a quick recovery 🤞🏻
Day 27
LST also performed on the side branches of all plants except the Kmintz which is too small to bend its branches.
Also Today we got 21 days for the Lemon Tree which has a great shape! Carried out topping, LST and a little defoliation.. 🙌🏻
In the next few days I will let them grow them without further stress.
Have a great weekend gromies!! ☮️💚