


Likes
Comments
Share


@Slackerbucks
Follow
Since this diary started in the middle of Week 4 of flower, many of the details about how we got to that point have remained a mystery.
In previous updates I mentioned how my last attempt at growing this cut resulted in a plant that outgrew my space. I had a long veg time and used a 5 gallon pot. That information allowed me to exercise caution on this grow because I knew how big this plant can get when given an opportunity. With that in mind, I only gave her 9 days after transplant from the aerocloner before moving her to the flower tent.
My pervious experience dictated that this plant exhibits significant lateral branching. I top most of my plants to encourage this kind of growth, but due to the short veg time and for the sake of experimentation, I decided to not top her this time. You can see that this has resulted in a large main stem cola, but also (thanks to knowing her growth pattern) several rather large secondary colas as well.
As an aside, some may look at this and wonder "yeah, but what about the yield?" I have never weighed a harvest. I grow for myself only, therefore yield is not something I concern myself with. I just don't care. I fill one quart mason jar and the rest is given away or turned into hash. My scheduling is such that I harvest approximately one plant a month; therefore I have enough smoke to last a VERY long time.
While this plant will probably go 12+ weeks, with only 9 days of veg, it’s still comparable to a 10 week variety that would require a longer veg time to produce a similar yield. And, frankly, I have close to a dozen cultivars in my ‘consumable’ collection and this is the only one I reach for prior to 9 pm. She has a very clear and motivational high. Not overpowering, but I never test her ceiling, so she could get one blasted if necessary.
This would also be a great plant for someone having trouble eating, because my appetite is essentially limitless when I’m smoking this. Perhaps it’s no coincidence that I have put on a few lbs since I’ve had her in my collection?

Likes
21
Share


@tutankhamun
Follow
уетьих девачек всио атлично проста супеер ияа васторге атних💚💚😃😃😃🌱🌱🙋♀️🇬🇪 ишо даюу бактериюу речарj називаиптса чорни порошок 👍🌱💚🇬🇪

Likes
12
Share


@JaeMack
Follow
I would definitely grow this again, I didn’t expect for it to come out this good!

Likes
25
Share


@BudHaks
Follow
Apologies for not updating last week, I have just been really busy!
These last couple of weeks have been great - her growth is coming along very well. There are no signs of any deficiencies as of yet, what is your opinion!
In regards to defoliating and lollipopping - what growth would you suggest I get rid off?

Likes
20
Share


@MarighellaGrower21
Follow
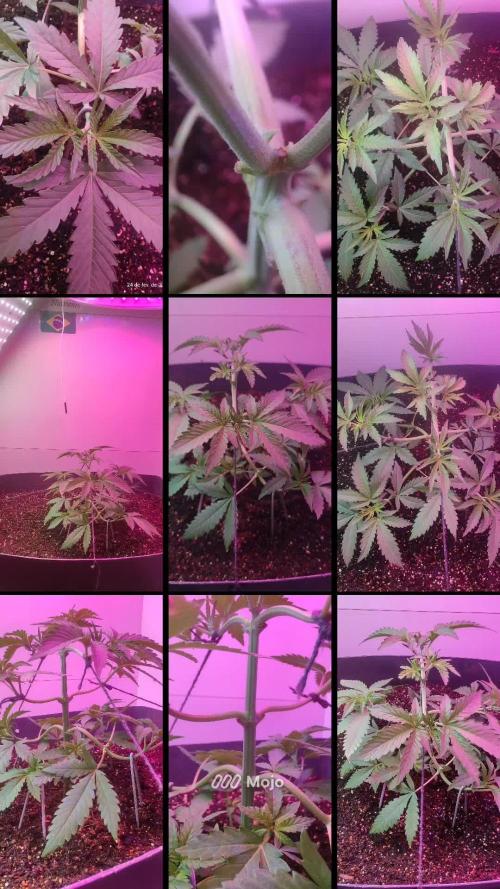
Iniciei o flush pré colheita. Regando todos os dias com 900 ml



Likes
7
Share

@Samsationalseeds
Follow
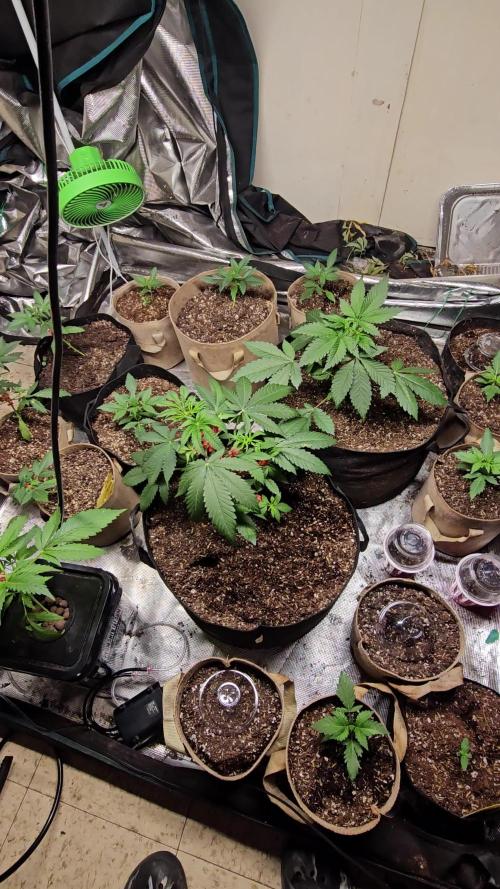
The photos got root bound, but their growth went crazy in less than a week.
If I started the autos february first I started these photos february.Fourth, these approximately have a month to date.
I moved two of the fast bud mix photos out of the remaining three that survived into seven gallon pots to let them grow as big as they can.And I will flip them whenever I get a chance, and once I see how the autos are.
These photos are being grown successfully in reused.Soil, while the autos in the same general area are struggling.A little bit.
Because my audibles are struggling.I think I have focus to turn these photos into a better current grow.And not put these in my backyard, I have another four strains that I will plan for that.
I also plan to start seedlings and give them to my cousin.So he can grow in his backyard, and I think I will create diaries for those

Likes
34
Share


@AsNoriu
Follow
Day 105 approximately since seed touched soil.
OG is purple, how i dont know ;) 2 out of 3 went to colours ... Girl need like 2-3 weeks more, will be checking every week.
Bad weather is coming for next two weeks, so huge bud rot lottery .
AKs is best this summers strain, stacks nicely, genetics stable. 2-3 weeks till finish.
Happy Growing !!!

Likes
2
Share

@DogDoctorOfficial
Follow
🍃 Purple Haze Photo A — Week 4 | Preparing for Gravity-Fed Growth
Every grow has one plant that quietly starts telling you a story before flowering even begins.
Purple Haze A is becoming exactly that.
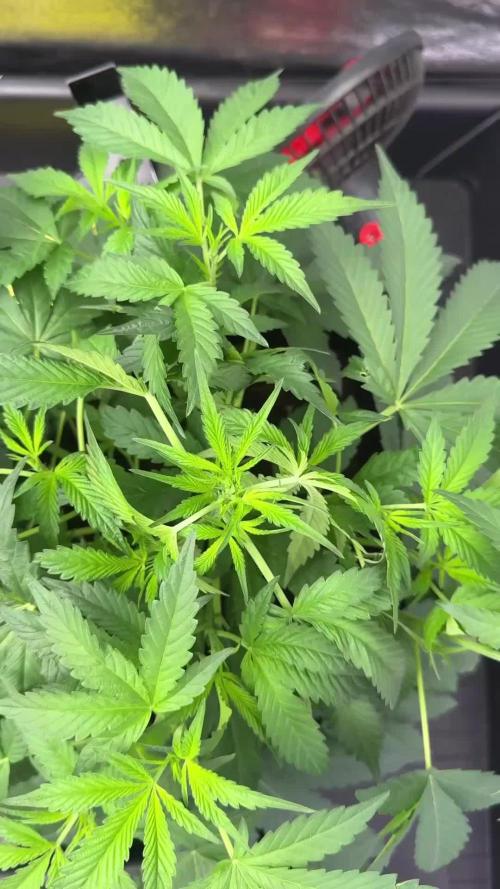
Growing under the same Future of Grow LED, receiving the same PPFD, sharing the exact nutrient recipe, environmental conditions and care as every other plant inside the tent, she has decided to express herself in a completely different way.
Instead of remaining compact, she has embraced her sativa heritage and is already showing the elegant structure Purple Haze is famous for.
Longer internodes.
Large healthy fan leaves.
Fast vertical growth.
Strong side branching.
Exactly the characteristics we hoped to see.
This diary is part of my ongoing 12/12 From Seed Challenge, documenting every step exactly as it happens. No shortcuts, no hidden techniques—just honest observations from a home grower enjoying the journey one day at a time.
⸻
🌱 Week 4 Development
This week was all about preparing for the next big milestone.
Purple Haze continued building an exceptionally strong root system while producing vigorous new shoots across every node.
The leaves are deep green, beautifully flat and reaching toward the light, showing excellent nutrient uptake and a very healthy metabolism.
Stem thickness has increased noticeably, giving plenty of confidence that she’ll easily support future flower production.
The spacing between branches also makes her an excellent candidate for training later, allowing light to penetrate naturally through the canopy.
Sometimes you can already tell a plant has personality long before flowers appear.
This one certainly does.
⸻
🚿 Time for AutoPot
This week also marks another exciting step.
Purple Haze A will soon become one of the plants running on my AutoPot system.
Since every plant in this project receives identical lighting, nutrients and environmental conditions, this creates a great opportunity to observe one important variable:
Top watering versus gravity-fed irrigation.
Rather than trying to prove one method is universally better, I simply enjoy comparing different growing styles under the same conditions and documenting the results honestly.
That is one of the things I love most about this hobby.
Every grow teaches something new.
⸻
💧 What is an AutoPot?
For anyone discovering these diaries for the first time, AutoPots are a completely passive irrigation system.
There are:
❌ No pumps
❌ No electricity
❌ No timers
Instead, everything works using gravity.
A nutrient reservoir sits slightly higher than the pots, allowing the solution to flow naturally through the tubing.
Inside each tray sits the heart of the system:
The AquaValve
The AquaValve is an ingenious little mechanical valve.
When the tray becomes empty, the valve opens and allows fresh nutrient solution to flow in.
Once the tray reaches the correct water level, the valve automatically closes.
The plant then drinks exactly what it wants.
Only after the tray is empty again does the cycle repeat.
Because the substrate experiences a natural wet-dry rhythm while always having nutrients available when needed, roots tend to develop extremely well.
Healthy roots often translate into healthier plants.
At least, that has been my experience.
⸻
🌿 Why I Enjoy Growing with AutoPots
Every grower eventually finds methods that simply fit their style.
For me, AutoPots offer several advantages:
• Consistent moisture around the root zone
• Reduced daily watering workload
• Excellent oxygen availability inside the substrate
• Stable nutrient delivery
• Very vigorous vegetative growth
Perhaps most importantly…
They let me spend more time observing the plants instead of carrying watering cans every day.
And honestly, watching the AquaValve quietly doing its job never gets old.
⸻
📊 Week 4 Environment
• Week 4 — Vegetation
• Height: 25 cm
• EC: 1.35
• pH: 6.1
• Temperature: 33°C Day / 25°C Night
• RH: 63%
• CO₂: 639 ppm
• Light Schedule: 12/12
• Water consumption: approximately 1.1 L per plant every 24 hours
⸻
🌿 Feeding Schedule
This week the nutrition remained simple and balanced using the Plagron Terra line.
• Terra Grow – 1.8 ml/L
• Power Roots – 1 ml/L
• Pure Zym – 1 ml/L
• Sugar Royal – 1 ml/L
• pH Plus – 0.03 ml/L
• Lemon Kick – 0.03 ml/L
The plant responded beautifully with rich green foliage, vigorous growth and absolutely no signs of nutrient stress.
Exactly the kind of consistency every grower hopes for.
⸻
💚 Final Thoughts
Week 4 feels like the beginning of something special for Purple Haze A.
She has developed into a vigorous, healthy young plant with beautiful structure, outstanding leaf health and plenty of energy heading toward the flowering stretch.
Now the AutoPot system enters the picture, adding another interesting chapter to this diary.
Whether gravity feeding produces bigger plants or simply makes life easier, we’ll discover together over the coming weeks.
That’s the beauty of documenting everything honestly.
Every plant becomes its own little experiment.
⸻
🙏 Thank You
A huge thank you to everyone following this journey and supporting home growing around the world.
Special thanks to all the amazing companies helping make this project possible:
🌱 Zamnesia Seeds — for the incredible Purple Haze genetics.
? Plagron — for providing the complete Terra nutrient line and outstanding growing media.
💡 Future of Grow LED — for delivering consistent full-spectrum lighting throughout the entire grow.
🌿 GrowDiaries — for bringing together growers from every corner of the world and giving us a place to learn from one another.
And finally…
Thank you for taking the time to follow this adventure. Your comments, advice, questions and encouragement make these diaries far more enjoyable to create.
Growers Love and see you next week, where Purple Haze A begins her AutoPot journey in earnest. 🌱💜


Likes
9
Share


@BusyBeeFarmer
Follow
Germination and Preparation
The Do-Si-Dos seeds from WeedseedExpress arrived well-packaged in a discreet envelope with bubble wrap and a branded shopping bag. The seeds look promising—large, with beautiful marbling.
I started by soaking the seeds in water with a pH of 5.8. After just a few hours, one seed already sank to the bottom, not a good initial sign. Despite this, I kept all three seeds in the germination process, and all of them developed roots. The seed that initially sank seems to be doing fine, so I’m giving it a fair chance.
The seeds are now placed in Jiffy pellets with a pH of 6.0. The temperature is maintained at around 24°C (75°F). My plan is to monitor these seedlings closely and select the most vigorous one for cultivation.
Grow Plan
I will be using the Sea of Green (SoG) technique in an 80x80 cm space. To maximize the yield and structure, I intend to extend the vegetative stage to about 6 to 8 weeks, possibly up to 10 weeks.
I’m also using organic nutrients, and the motto "Don't Panic, It's Organic" fits my grow style perfectly.
Dosidos End of Seedling Phase Report
Environmental Conditions:
Humidity: 70-80% initially, adjusted to 60-70% during hardening.
Temperature: 19°C (night), 23°C (day).
Lighting: Lamp positioned 40 cm above seedlings.
Observations & Actions:
All three seeds germinated successfully.
One seedling was removed for poor growth and exposed root.
Greenhouse lid removed on day 7 for airflow; seedlings adapted well.
By day 9, roots fully developed, signaling readiness for transplant.
Transplantation:
Transferred to 7L pots with light watering and BioBizz Root Juice to ease stress.
Performance Feedback:
The two selected seedlings show robust growth, forming a solid foundation for the planned Sea of Green setup.
dein-onlineheadshop.de/
Use my referral code 420Shop at checkout to get a discount on your purchase. By using this code, you also support me, as I receive a small reward for each use. Thank you for your support!

Likes
12
Share


@RayTheGrover
Follow
So, by the look of the trichomes I assume its a harvest time!
Weighting and taste review after drying and curing. For now I could that that despite all the mistakes I made the plant managed to live till the end, smell wonderful and looks tempting.
Likes
30
Share


@datrobspeoria
Follow
Buds are growing very fast and are now pink and purple and past a foot now. Thanks for checking my plant out


Likes
11
Share


@Hamsterdam
Follow
17/04:
- Started LST.
- My plan is to wait until the plant outgrows the top tie and start tying the main cola around the pot, counter clockwise.
19/04:
- Adjusted LST and tucked some leaves. I'm trying to give the new growth as much exposure to light as possible.
20/04:
- 420 is here and the plant is looking fantastic. I'm leaving the LST ties as they are for now.
21/04:
- Tensed the main tie a bit more and I might settle for this instead of going with the round shape I had in mind.
- I'm tying some leaves so they won't block the new growth. Learned this reading other people's Q&As
- Keeping leaves to a safe distance from the soil so they are not damaged by fertilizers.
Likes
9
Share


@Drtomb
Follow
We begin week 5.buds will begin to fatten. Nothing to report. Im basically on auto pilot. Focusing only on water changes and then the flush.


Likes
12
Share


@Benssa
Follow
This girl was too bushy, I had to defoliate twice during the veg due to lack of space in my grow room.
believe me, she is big!
Likes
4
Share


@LittleBigTrees
Follow
I've been defoliating slowly trying to keep them small due to a house inspection coming up. Once that's out the way I'll put them in bigger pots then switch to flower.
They all outgrew the mutated start and are looking good.
Processing
Likes
7
Share

@tutankhamun
Follow
Вот накопил фотографии вот как виглидяат 2. Недьеляа идиот,💚🙌🌱🇬🇪

Likes
25
Share

@squalino
Follow
TRAINWRECK AUTOSEEDS
THC-HUNTER VS SQUALINO
❤️❤️❤️❤️❤️❤️❤️❤️❤️❤️❤️❤️❤️❤️❤️❤️❤️❤️
⚠️Informations importantes ::
Le duel en direct est temporairement annulé suite à des petits problèmes chez THC-HUNTER. Pas d'inquiétude, nous comparons nos plantes respectives à la fin de sa session ! N'hésitez pas à lui apporter votre soutien sur son profil.
https://growdiaries.com/grower/THcHunteR23
❤️️❤️️❤️️❤️️❤️️❤️️❤️️❤️️❤️️❤️️❤️️❤️️❤️️❤️️❤️️❤️️ ️️❤️️❤️️❤️️❤️️❤️️❤️️❤️️❤️️❤️️❤️️❤️️❤️️❤️️❤️️
Mise à jour de croissance
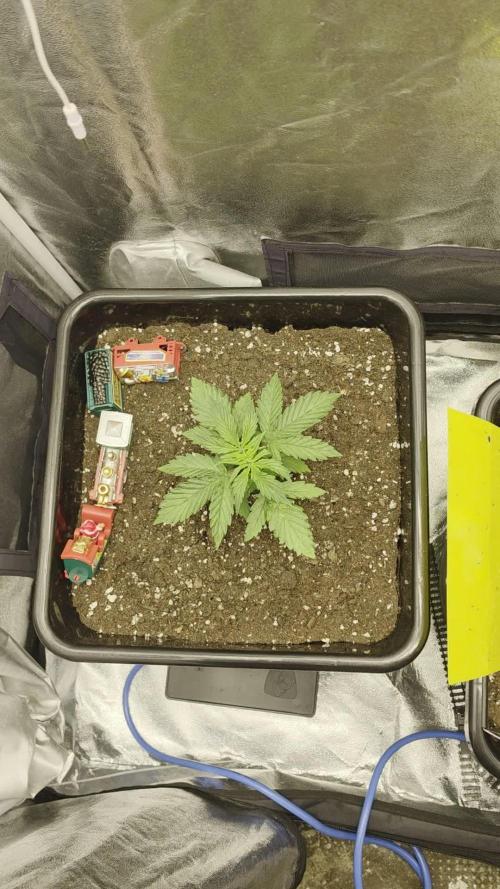
Variété : Trainwreck Auto
Date de germination : 10/09
Âge de la plante : 16 jours (Semaine 3)
Taille actuelle : 12 cm (+7 cm depuis la semaine dernière)
❤️❤️❤️❤️❤️❤️❤️❤️❤️❤️❤️❤️❤️❤️❤️❤️❤️❤️❤️❤️❤️❤️❤️❤️❤️❤️❤️❤️❤️❤️❤️❤️❤️❤️❤️❤️
Arrosage & Nutriments
Jour 8 : Rien donné
Jour 9 : Rien donné
Jour 10 : Rien donné
Jour 11 : Rien donné
Jour 12 : Rien donné
Jour 13 : Rien donné
Jour 14 : Rien donné
Jour 15 : Rien donné
Jour 16 : Rien donné
❤️️❤️️❤️️❤️️❤️️❤️️❤️️❤️️❤️️❤️️❤️️❤️️❤️️❤️️❤️️ ️️❤️️❤️️❤️️❤️️❤️️❤️️❤️️❤️️❤️️❤️️❤️️❤️️❤️️❤️️❤️️❤️️
Description
La plante se développe à une vitesse impressionnante ! En prenant 7 cm cette semaine, la structure reste magnifique avec un feuillage très dense, sain et d'un vert éclatant. Les étages se multiplient bien, les pales de feuilles sont grandes et vigoureuses, et le tronc central s'épaissit fortement. Les départs secondaires commencent déjà à pointer le bout de leur nez. Une croissance très régulière et une plante en pleine forme !
❤️️❤️️❤️️❤️️❤️️❤️️❤️️❤️️❤️️❤️️❤️️❤️️❤️️❤️️❤️️❤️️ ️️❤️️❤️️❤️️❤️️❤️️❤️️❤️️❤️️❤️️❤️️❤️️❤️️❤️️❤️️❤️️❤️️
Un grand merci à AutoSeeds pour leurs magnifiques graines. Vous pouvez les retrouver directement dans leur catalogue sur leur boutique : https://www.autoseeds.com/shop/seeds/
❤️️❤️️❤️️❤️️❤️️❤️️❤️️❤️️❤️️❤️️❤️️❤️️❤️️❤️️❤️️ ️️❤️️❤️️❤️️❤️️❤️️❤️️❤️️❤️️❤️️❤️️❤️️❤️️❤️️❤️️❤️️❤️️
Merci à tous les lecteurs pour votre suivi ! Passez faire un tour sur le profil de THC-HUNTER pour suivre la suite de son aventure : https://growdiaries.com/grower/THcHunteR23
