Likes
5
Share
@MG2009
Follow
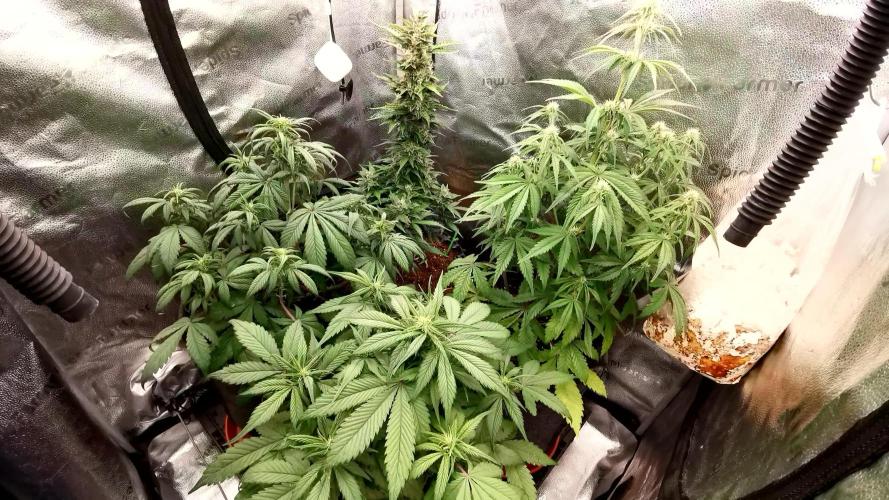
02/28/2021 What a difference in a week! Potted up GSC To 1 gallon pot, Blue Dream next, pics coming soon. (Later tonight) Blue Dream potted up and watering done. Both have nice side shoots for clones. GSC is at 10" tall, Bluedreamatic Dream is at7.5" Also took 5 cuttings of Wreak Havoc hope to have 2 of each clone (GSC,BLUE DREAM,WREAK HAVOC) for outside, I believe I got the lemony kush pheno which is perfect for my climate!
Likes
29
Share
2026-03-30 Well well, the Grow comes slowly but sure to an end. I added a second dehumifidier into the setup and Girls got some PK boost last week ( all of them) an i see that Sonnennerde Hanferde works very well ito the Autopot system and with the application of Biotabs- thats very pleasing to see, how the Girls buld and get sticky i can barely move ito the Room and iam so grateful for the autopots, so i only have to go between them once in the Week and keeping them complete without moving to much on the leaves and buds ( well i dont care to get sticky and stinky in the room) -------------------------------------------------------------Substrate Experiment Currently testing two different substrates: • Terra Preta (local recycled brand) — the usual "go-to" soil • Sonnenerde Bio Hemp Soil — being tested this grow; will also be recycled and refreshed with Biotabs products afterward So far there is no significant difference between the two substrates, which is a positive result. Switching growing mediums is always a risk, so the outcome is reassuring. Feeding & Maintenance Plan • Refreshing mycorrhiza and microbes with Mycotrex and Bactrex • Applying compost tea to all plants • If any deficiencies appear: top-dress with Silicium Flash • Continuing the "just add water" strategy otherwise Setup & Method The plants are growing in an Autopot system using the Biotabs "just add water" strategy. Setup process: 1. Mix in Startrex 2. Add Silicium Flash 3. Add Biotabs tablets 4. Add Mycotrex 5. Water with Bactrex This turns any soil into a living, active growing medium. Combined with Autopot, it acts as a cheat code for effortless growth — resulting in large, healthy plants with an excellent and flavorful end product.
Likes
2
Share
HAZIRLIK Dolabı yapmak bir aydan fazla ileri sürdü; aydınlatma, havalandırması, iç kaplaması, montajı, elektrik kabloları, fişleri, soketleri, prizleri vb. Tüm bunların ardından, sonunda bitirmem ve kotiledonların görünenlerin görünmediğini gördüm. Burada yaşadığım mücadeleyi okuduğunuzda, heyecanımı ve mutluluğumu paylaştığınızı düşünüyorum… =) //LED'LER// Torch LED'leri kullanıyorum ve bu LED'ler fiziksel olarak oldukça büyük olduğu için, dolapta ciddi miktarda dikey alan kaplıyorlar. Toplam 70 cm'lik aralıklardan 50 cm'ye düşüyorlardı ve toprak birleştirmeyle yaklaşık 40 cm'ye düştü, bu da başlangıç ​​büyümesi için neredeyse hiç yer bırakmadı. Bunu çözmek için Torch LED'lerini plastik yuvalarından çıkardım ve bunları ayrı ayrı boyutlandırılmış ahşap plakaya düz bir şekilde monte ettim. Bunu yaparak yaklaşık 15 cm'lik alandan tasarruf sağladınız. Ancak dolap yapısı ve Torch LED'lerinin kendisi nedeniyle ciddi ısınma sorunlarının belirtileri. //KABİN// LED'leri açtığımda, 26,5°C'lik iç havayı alıp 37–38°C'de dışarıya atıyorlardı. Her lamba bana yaklaşık +4°C'lik bir ısı artışı sağlıyordu. Durum böyle dönemde fan kapsamını artırdım; bu sıcaklıkta yardımcı oldu, ancak daha sonra içerideki nem 35–30'a, hatta %25'e düştü. Ne yeteneğimi düşünürken, 12V çift taraflı bir Peltier modül kullanmayı planladım: soğuklukta bakır borular sararak bunu fan destekli bir sıcaklığa dönüştürdüm. Aslında işe yarayabilirdi, ancak sıcak ortamdan ısıyı uzaklaştırmak için ihtiyacım olan sistem çok hantal hale geldi. O yerde, "Büyüme hayali bitti" dedim ve vazgeçtim. Birkaç gün sonra "Neden olmasın?" diye düşündüm ve dolabı balkona taşımaya karar verdim. Sonuçta, gizliydi - kimse içinde ne olduğunu bilmeyecekti - ve balkon uydu yoluyla mükemmeldi. Dolap balkonunda olacağından, iç kısım ısıdan, yağmurdan, bölgelerden ve diğer zararlılardan tamamen yalıtılması gerekiyordu. Tüm delikleri ve ortamları sıcak silikonla kapatırım. Daha sonra ısıl işlem köpüğü yerleştirdim ve her şeyi bölme filmle kapladım. Tüm bunları yaparken termostat, ısıtıcı, nemlendirme ve vantilatör için hiçbir şey görünmemesi için tüm kablo bağlantılarını da gizledim. LED aydınlatma için tek tek veya hepsi birlikte kontrol edilebilen ayrı lamba yuvaları ekledim. Ayrıca dolap kapağı açıldığında tüm ana LED'lerin otomatik olarak söndüğü ve yalnızca küçük bir 5W LED'in açık kaldığı bir sistemim oluştu. Vantilatörü dolabın sağ üst arka köşesine monte ederek egzozu diğer noktalara yönlendirdim. Vantilatörün gücünde, negatif basınç o kadar güçlüydü ki hava yalnızca girişten katılıyordu - başka hiçbir yerde 0,001 m³ bile hava kaçağı yoktu. (Bunu hava verileri için değil, zararlıları uzak tutmak için yaptım.) //SICAKLIK VE NEM// Dolabı balkona taşındıktan sonra bu sefer ciddi bir soğukluk sorunuyla karşılaştım. Geceleri sıcaklık 8-9°C'ye düşüyor, gündüzleri ise 24-27°C'ye kadar çıkıyor. Elektrikli fanlı ısıtıcılar kullanmak istemedim çünkü havayı çok kurutuyorlar ve tehlikeliler. Peltier fikrinden ilham alarak tekrar düşünürken çözümümü bir PTC ısıtıcı kullanarak buldum. Hava bağlantıları olan iki alüminyum bloktan oluşan bir PTC ısıtma elemanı yerleştirdim ve gelen tüm havayı bu kanallardan mülkler. Sistemi 24,5°C'de açılıp 24,6°C'de kapanacak şekilde ayarladım. Bu şekilde sıcaklık sadece 1,5° tolerans içinde -24,5 ile 26,5°C arasında dalgalandı ve LED sayıları azaldıkça daha stabil hale geldi. PTC'yi termostata bağlayarak ısıtma sistemini tamamladım. Gündüz sıcaklık sorunlarının çözülmesi için, elektrikler 11:45'te kapanıp 17:45'te tekrar açılacak şekilde programladım; böylece 6 saatlik bir kesinti süresini elde ettim. Bu süre boyunca kabin yaklaşık 24°C'lik dış havayı çekiyor, maksimum 27°C'ye ulaşıyor ve ardından tekrar soğumaya başlıyor; tam da bu noktada PTC devreye giriyor. Böylece daha önceki büyük yangının sorunu tamamen çözülmüş olmuştu. Ayrıca nemlendirmeyi termostata bağlayıp %70'e ayarlayarak nem sorunu da çözülürm. Tüm bu süreci 1,5 ayımı aldı ama değdi. 1-2-3. güne kadar tek led 3. günde 10. güne kadar 3 ledide açtım ama bitkide büyüme problemi olduğunu gördüğüm için ışıkları söndürüp tek ışık 40cmden devam ettim.
Likes
10
Share
@hexhex
Follow
Love seeing them grow! Tried giving them a little more EC, I've been precision stressing via a low nutrient environment the whole grow. It's going to be interesting to see how distance to lamp will affect bud growth. I keep DLI @ 50 at the highest top.
Likes
7
Share
Eccoci qui… Tutto procede per il meglio ci sono bellissime piante che verranno mostrate singolarmente solo alla fine per non spostarle ogni volta. Grazie a tutti per il supporto 💚🔥🌲
Likes
6
Share
Time to harvest or leave for longer. Maybe a few more days? Should I water on not now or just wait? Soil is dry. Please let me know your thoughts!
Likes
22
Share
@Fatnastyz
Follow
Day 44 10-8 Tea and slight defol. Shes got a tall branch! Look at it go! 😱😁🤘 10-9 Water, leaf removal. 10-11 Water yucca cal/mag. Tea soon. 10-12 Day 48 Well her head was way above the rest, so she got bent down. Personalsmokes talked me into. He said, go for it! So I did! 😂 Hopefully i didn't F her up. No clue how she got away from me, but this is something new for me. 😁🤘 Light is amazing on everything now! .
Likes
30
Share
J'ai lancé la floraison le 24 avril !! J'espère que mes plantes vont faire de belles fleurs 🌱🌴
Likes
15
Share
@Wilstang
Follow
The grow was a lil unique was able to give it very low strength neits the whole veg. Stayed overall short during vegetation, but boomed once it went into flower. Turning out to be a tall pheno. Flower cycle was a total of 67 days, including a flush of 14 days and lights off for 2 days. Finished product was very long fluffy nugs stretching down the plant. Does not do well in heat at all, ideal temperature is between 60°-70°. Towards the end of flower cycle best to get humidity and temperature as low as possible to bring out the purple hues and bulked nugs. A perfect strain for cold climents or LED lights. Recommended for the connoisseur seeking a sweet change 👏💯
Processing
Likes
36
Share
Hey everyone :-). This week they have grown super, but unfortunately they are getting lighter. 3 days ago I added another 1 g per liter of GHSC Powder Feeding Bio Grow substrate, as they still remain a bit in the veggie. Hopefully it doesn't take too long to release the nutrients. Whatever the reason, that still not all trips are elemened 🤬. I've only seen some before, and treated directly with neem oil so that it finally has a rest ☺️. I wish you lots of fun with the update, stay healthy and let it grow 🍀 You can buy this Strain at : https://sweetseeds.es/de/sweet-skunk-f1-fast-version/ Type: Sweet Skunk F1 Fast Version ☝️🏼 Genetics: Sweet Skunk Auto (SWS34) X Early Skunk 👍 Vega lamp: 2 x Todogrow Led Quantum Board 100 W 💡 Bloom Lamp : 2 x Todogrow Led Cxb 3590 COB 3500 K 205W 💡💡☝️🏼 Soil : Canna Coco Professional + ☝️🏼 Fertilizer: Green House Powder Feeding ☝️🏼🌱 Water: Osmosis water mixed with normal water (24 hours stale that the chlorine evaporates) to 0.2 EC. Add Cal / Mag to 0.4 Ec Ph with Organic Ph - to 5.5 - 5.8 .
Likes
14
Share
@MG2009
Follow
12/22/2021 Starting the over night soak in H2O2 water, then onto soil mix to finish germination. Soaking in H2O2 and water, about an ounce h2o2 mixed with .500ml spring water. It aids in breaking down seed shell, and sanitize seeds at the same time. I will sow directly into soil as breeder suggest. 12/25/2021 All I5 seeds sprouted in water little 1-2 mm tap roots, potted into small cups and reppot as necessary, should get 100% germ rate if I don't hurt them tiny tap roots putting them in soil. 12/28/2021 Lemon OG 100% germ rate, Biscotti Skunk 4 of 5, Grape Skunk 4of5,and I will take the blame if others don't take because of miss handling, so very happy with the germination rate I'll give it 100% Thanks @QCS for given me the opportunity to grow your genetics.🙏🏻 Ps. ROJI OGS will go next round I'd like to do them alone I think she will be special. Biscotti Skunk Biscotti Skunk Cannabis Seeds Feminized With a noteworthy lineage, Biscotti Skunk is a mix between the Cookies variant and Kush on one end, acting as the base layer for flavors and effects, while the Skunk addition rounds it off beautifully on the other end, creating Biscotti Skunk a totally unique marijuana strain. This strain works good indoors or outdoors it produces nice big buds. The flowering period for her is 8 to 9 weeks Outdoors this plants will be ready to harvest at the beginning of October, and offer yields of around 700g per plant in ideal conditions. The effects you can expect from Biscotti Skunk strain are relaxation with a good creativity boost, followed by a gradual energizing body feel. A bud with a very complex flavor profile, this indica-leaning hybrid Skunk come from planting 50 Skunk F2 seeds and one of the fenotip came out looking like this. We liked the strain so much that we have finally duplicate the strain. Grape Skunk is one of those tangy, tropical smokes. Her flowers give off the unmistakable scent of tropical citrus, with some accents of grape. THC levels is between 20% and 24%. Grape Skunk is a large producer under optimum conditions. A dense cannabis plant with pink purple colors. Growing Grape Skunk cannabis is easy and great for first time grower. This strain is also great for relieving stress and anxiety, as well as reducing chronic pain, nausea, and insomnia. Lemon Og Kush Cannabis Seeds Feminized This strain joins the OG Kush genetics, with strong Indica and physical effect, cross with a Skunk plant which has a very distinctive and special lemony flavor. The result of this crossing between these two robust genetics a plant with similar structure than the OG, average internodal distance, columnar structure that can branch a little more if the plant has enough space and substrate. Still, it mantains the average height of the OG Kush , producing lots of flowers in relation to its average size. Production can reach 550g/m2 in about 8-9 weeks , which will allow us to harvest our plants before the rainy season arrives, without worrying about molds: it is a mold resistant marijuana strain. Regarding the flavor, it huge amount of resin and terpenes will release a strong fuel and lemon smell, which is noticeable even when we smoke, reaching every corner of our palate. Moreover, its effect is very medicinal , ideal to eliminate nausea and stimulate appetite, deeply relaxing both body and mind. Lemon Og Kush Cannabis Seeds Feminized This strain joins the OG Kush genetics, with strong Indica and physical effect, cross with a Skunk plant which has a very distinctive and special lemony flavor. The result of this crossing between these two robust genetics a plant with similar structure than the OG, average internodal distance, columnar structure that can branch a little more if the plant has enough space and substrate. Still, it mantains the average height of the OG Kush , producing lots of flowers in relation to its average size. Production can reach 550g/m2 in about 8-9 weeks , which will allow us to harvest our plants before the rainy season arrives, without worrying about molds: it is a mold resistant marijuana strain. Regarding the flavor, it huge amount of resin and terpenes will release a strong fuel and lemon smell, which is noticeable even when we smoke, reaching every corner of our palate. Moreover, its effect is very medicinal , ideal to eliminate nausea and stimulate appetite, deeply relaxing both body and mind. It's obvious I get regular seed at this point. But feminized information was all they had on website,assuming it's all the same.
Likes
27
Share
We back with some buckets! Time to fire up the pumps and get this show on the road. Soaked this beautiful little gem of a bean in some water until it cracked then threw it into the bucket with 100% perlite. Started them on a low dose of maxigro on day 3. Doing these diy Dutch Bucket style as always. Going to be running 8 in house genetics strains on the system with constant 24 hour a day irrigation. Not much exciting going on yet, but with a little luck that may change pretty soon. A huge thanks to @wildeweed for this bean.
Likes
8
Share
We’re deep in bloom now, and the buds are fattening up nicely on all three ladies! The scent is getting stronger by the day and interestingly, while they all share a base note of red pepper, each plant has developed its own unique aroma twist. Really curious to see how that translates after the cure. Overall, everything’s going smoothly, no issues to report. They’re happy, healthy, and stacking up beautifully. Let’s keep it rolling! 💪🌿
Likes
8
Share
@rorrobz25
Follow
Mi experiencia fue excelente. Muchos puntos a mejorar. Y es el primer diario qué logro terminar desde que pertenezco a esta comunidad. Es complejo actualizar semanalmente. Tanto como sacar las fotos, videos, fertilizar, regar. Pero a pesar de que me faltaron semanas, pude anotar la cosecha para cerrar el ciclo. Agradecido de los comentarios. Me sirvieron mucho.
Processing
Likes
3
Share