


Likes
Comments
Share


@Mosquito_Haarlem
Follow
Het is week 10
Ik dacht dat ik haar te veel drinken had gegeven omdat de bladeren slap hingen en ze aan het vergelen waren, maar dit komt dus door de fungus gnat.
Ik kwam steeds meer van die vervelende vliegjes tegen in de tent.
Ik heb een laag zand over de bodem gestort zodat die fucking vliegjes er niet meer doorheen kunnen om eitjes te leggen.
Dit had ik al weken eerder moeten doen.
Dit is de tweede keer dat ik dit heb meegemaakt en beide keren was dit met de lightmix van biobizz, dus deze potgrond ga ik nooit meer gebruiken.
Ik heb de vergeelde bladeren weggeknipt.
Ik zal gedurende de week nog verse foto's updaten, hopelijk zal ze haar bloemen flink oppompen.
💪🏽

Likes
3
Share


@Happydays58
Follow
09/06 - DAY 43
- Slight yellowing and spotting on a few of Mo’s older fan leaves, thinking Mag deficiency. Everyday more and more trichomes coming in.
- Forcing Jane to open up by pulling her out.
09/08 - DAY 45
- Top dressed Mo w/ Worm Castings & Kashi Blend. Can see feeder roots everywhere under the cover, worms are active, and she’s sucking dry her reservoir every 1.5 days.
- Lowered light to 500-560PPFD at canopy. Humidity ~58%.
- Jane is starting to share her strawberry aromas. Mo smells like a sweet sugary treat
09/11 - DAY 48
- Switched over to only blooming/fruiting inoculants & top watered w/ compost tea.
Hopefully get ahead of any deficiencies.
- Mo is starting to drink 2 Gal in less than a day, along with the weekly top waterings. Thirsty girl 😃

Likes
6
Share


@HyperactiveHighs
Follow
Watch Here: https://youtu.be/jrmH_SKlssk
First time running Ethos! Going BIG this run with Ventana Plant Science, new AC Infinity ION Beams for supplemental lighting, CO2, all cozy under the Spider Farmer SE7000.
Popping 4 Booberry seeds and selecting 2, popped both freebies and will be growing out both. Seeds were soaked in a Kelp-Grow solution for 10 minutes before being placed in cotton pads, and sprayed with a 1% hydrogen peroxide solution. If you want to learn why a 1% solution is important, check out my channel below!
Next they were put in sanitized rapid rooters, placed in a humidity dome, domeception double dome! Actually my plan is to see if what I'm doing will work to get the bigger box humidified or if I'll have to look into other options (will be useful for my first time running clones in the future!). Small one inside is mostly there incase that doesn't work, I know that'll hold humidity since it's so small.
This grow will be a full cinematic Seed to Harvest on YouTube!
https://www.youtube.com/@hyperactivehighs
Don't forget to use code "hyperactive" for a discount on all Spider Farmer products!
USA: https://spider-farmer.com/?ref=hyperactivehighs
CA: https://spiderfarmer.ca/?ref=hyperactivehighs
EU: https://spiderfarmer.eu/?ref=hyperactivehighs
UK: https://spiderfarmer.co.uk/?ref=hyperactivehighs
AU: https://spiderfarmer.com.au/?ref=hyperactivehighs
TH:https://spiderfarmer-th.com/?ref=hyperactivehighs
Follow Along on Instagram: https://www.instagram.com/hyperactivehighs/

Likes
33
Share


@FlavoursUk
Follow
So the girls are doing welll, water change and nutrient top up. Girls were looking a bit light green. But less is more, you can always add nutrients but can't really take away. Just a rule i like to go by.
For some reason one of the girls overnight just turned bad/and a bit crispy like.. she's still trying to flower so ill see whats up. I'm putting it down to genetics as the other two are fine and I've been giving them all the same treatment.. if anyone knows do drop a comment.
Other than that all is going great, ill be adding a new spider farmer sf2000 to the mix for some bigger buds hopefully.. so i will have some good coverage. Follow the YouTube channel for a more in depth look.
Stay tuned
FlavoursUK

Likes
120
Share


@DogDoctorOfficial
Follow
Welcome back to another thrilling chapter of our Tropical Tangie's journey, now in Week 5 of flowering.
This week, our lovely lady continues to enchant with her graceful growth and mesmerizing beauty. The trichomes have developed into a spectacular sight, glistening like tiny diamonds under the grow lights. These little crystal-like structures hold the essence of her strength and character, and they are, without a doubt, a testament to the diligent care we've provided.
I want to take a moment to apologize for the missing videos. Unfortunately, I'm currently experiencing some technical difficulties with Grow Diaries that are preventing me from uploading them. Rest assured, I'll rectify this as soon as the situation is resolved. The videos are an essential part of this journey, and I'm excited to share them with you.
As always, your support and enthusiasm are deeply appreciated. Our quest for botanical knowledge continues, and we'll explore every facet of this captivating journey together.
Stay tuned for the next chapter in our research, and in the meantime, I wish you all a blessed and beautiful week.
GD Still playing hard on me, ASAP i will upload the videos but for now is not allowing me to do it, and to upload photos it takes me hours i will upload all missing wen possible <3 <3 <3

Likes
7
Share

@viejo
Follow
June 8th
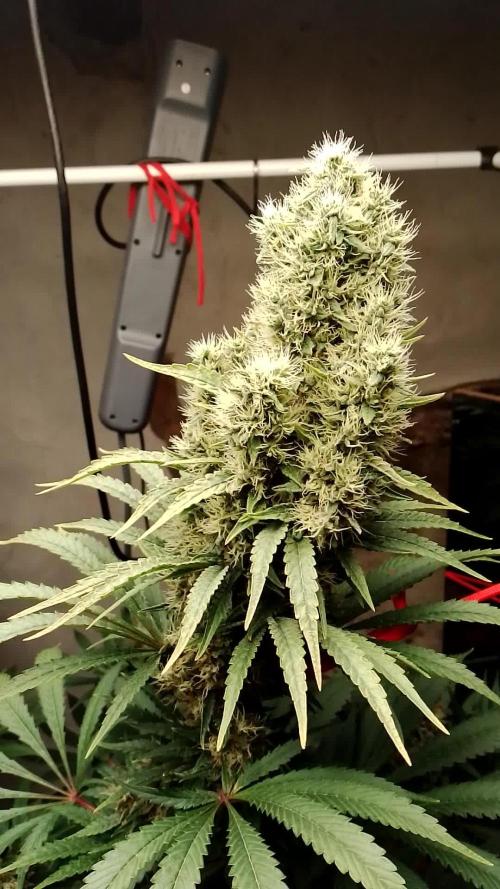
There's little doubt that the light is too close, and has been too close for too long. There's nothing I could do about it two weeks ago, and there's nothing I'll be able to do before harvest either. Lesson learned. The main cola doesn't seem stressed as in burned or bleached, but it's definitely looking a little odd. It's huge, and has no orange pistils, whereas the buds below are a mix of the older orange pistils and newly grown ones.
Weird. There's also a lot of foxtailing going on, which i'm guessing is a direct cause of being far too close to the light. Temps, pH, humidity, and watering are all dialed in, so that's my best guess.
Even though only the top of the plant is light-stressed, the foxtailing seems to spread throughout. Is this a thing?
I'm thinking next time I'll do the same, a single plant in the large pot, but I'll top her once or twice to lessen her height avoid this issue altogether. One huge cola is impressive, but the way things have shaken out has robbed some of the lower flowers of a more optimal distance to the light, so everything is out of balance. We're top heavy, folks :):)
All is well, fingers crossed as always.


Likes
1
Share

@Tropical_Grow
Follow
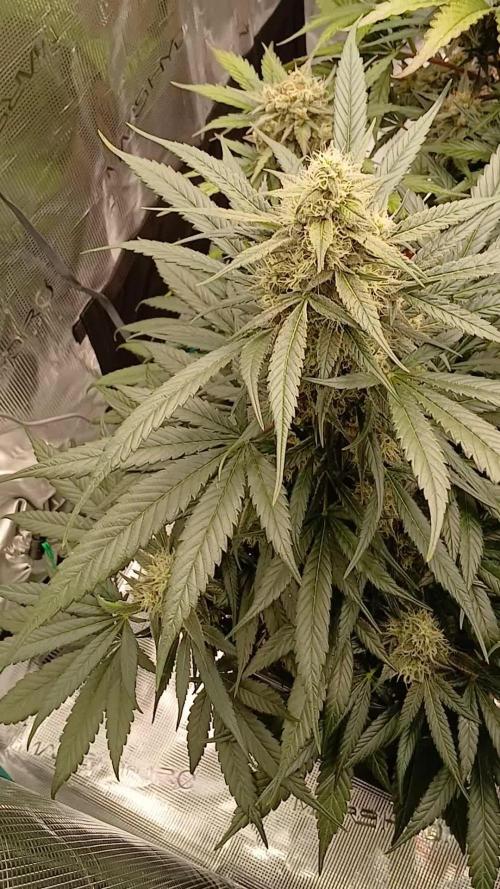
The plants are developing well. You can tell we're nearing the end. They don't smell too strong.
The first two plants from left to right are kiwi x papaya, followed by Super Larry OG, which has a structural problem. The rest of the plants are grown from given seeds that have shown good visual results.

Likes
6
Share

@k0nz1
Follow
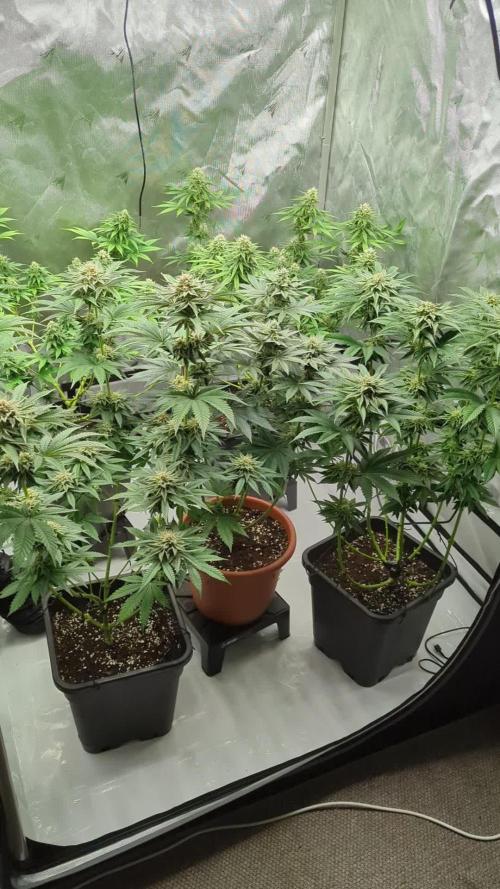
This week all Ladies are getting extra pk13/14. Buds are getting bigger and more dense every day. The smell in the tent is absolutely insane. Fruity, sweet spicey. The LO are full of trichomes. The BBP a lil bit less snowy but also VERY terpy. BBP with a little autumn fade in the leaves. RJ ist the smallest and needs a little extra time i think.
Lights 90%
RH 50-60%
Temp 20-26 Celsius
In the second tent the RJ and SH are developing also very Well. A few weeks to Go. Just letting them grow for now.


Likes
38
Share


@J_diaz420
Follow
Transplantes a macetas finales de 7lts realizados tempranamente para que se acomoden bien para pronto pasar a floración, no más de los 30 días de vegetación 🍀👨🌾🏻

Likes
7
Share


@Luxus15
Follow
I had encountered some problems with my homemade potting soil suddenly my plants suffered.I changed potting soil to go to plagron light mix, it's starting to get back in shape, so I left on the same occasion, changed fertilizer, I went to hesi.
I wanted to try to make my own substrate but I shouldn't have because between the ph and the earth it didn't go at all.Now I'm happy because she's better. Sorry I don't have my photos I will put them in the following days.apex cut on 01/17/23 at the 4 node.

Likes
13
Share


@Eldorado_ed
Follow
Started some LST midweek all 3 ladies coming along great no problems so far

Likes
76
Share


@Burmese
Follow
Hi everyone, here's the update for this week.Please enjoy the video... ✌️🇲🇲

Likes
7
Share

@GoodTimesOrganics
Follow
Hi liebe Community and Welcome Back! 💚
Slush Mint Cake von Dutch Passion
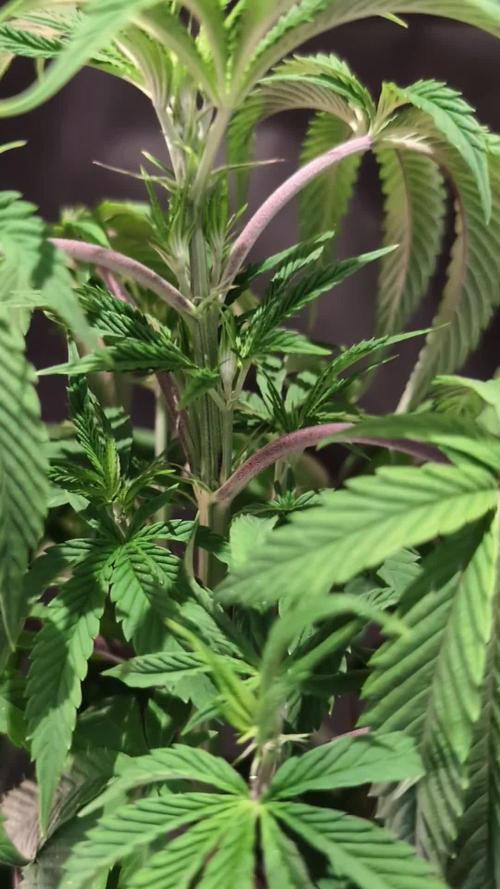
Die Pflanzen gedeihen prächtig und endlich konnte ich ein Weibchen identifizieren!
Diese wurde nun in ihren neun Liter Endtopf gepflanzt.
Erfahrungsgemäß wird die Woche nun noch zwei Wochen im Wachstum bleiben und dann in die Blüte übergeleitet.
Ich habe bereits die untersten Triebe entfernt und auch daß untere Blattwerk rausgenommen.
Die Wuchsform ist kräftig und Energie geladen.
Die Seitentriebe spreizen sich schön ab, was nach der Geschlechtsbestimmung gut für das Topping ist
Die Bedingungen im Growschrank sind für die Wachstumsphase Top!
—————
🌞 Temp: 26
🌚 Temp: 18°C bis 19°C
💨 RH: 64%
VPD: 1,1 kPa
💡ppfd: 330 mpm
—————

Likes
9
Share


@BeanCrop420
Follow
During week 7 I accidentally snapped one of the branches while defoliating. It was a clean break but nearly snapped clean off. I have managed to prop and strap it up so hopefully with a bit of care she can hold on. It's now been 5 days since it snapped and seems to still look healthy so keeping my fingers crossed 🤞 Other than that this girl seems to be coming along really well. She has a lot of bud sites and seems to be taking nicely to my DIY Aero/Hydroponic system. I'm really pleased with how she is turning out for my first ever grow and I'm looking forward to seeing her at harvest!
Happy growing 🌱

Likes
1
Share


Likes
6
Share


@pzwags420
Follow
On day 3 -4 of 5 seeds have germinated!
On day 4 all 4 seedlings were fed 500 ppm veg nutes.
On day 5 seedlings were transplanted into 4" nursery pots with myco. I watered them in with 600 ppm of feed. Ppfd 450-500.

Likes
14
Share


@JamieKnolliver
Follow
Grüßt euch Freunde!
2 Tage vor dem Ende der 7. Woche sieht es doch schon sehr nach Herbst aus. 👌
Habe die ganze Woche keinen Dünger zugeführt und jeden zweiten Tag 6 Liter Wasser auf 6,5 ph‘ed gegeben.
Die Farben die sich hier entwickelt haben flashen mich immernoch jedes mal wenn ich das Zelt aufmache.
Der Geruch ist wirklich intensiv und hat was fruchtig erdiges mit leichter Gas Note.
Mehr dazu natürlich erst nach dem trocknen und cure.
Schätze mal das wir so in 14 Tagen am Ziel sind, bleibt also spannend was da noch passiert.
Bis dahin euch allen eine gute Woche!💚
Likes
11
Share


@AGrowerNotAShower
Follow
Start of Week 10 - Day 64
07/05: We’re at week 10 and the ladies are still going strong! Both Aaliyah and Alexis have overgrown my setup with their height, so I have tied their main colas down. This probably means that if the buds get too big in the future I’m probably gonna have to hold them up. But for big buds it’s worth it. Aaliyah is at 34” with the bend and Alexis is at 32” with the bend. Annie is now at 27”, but she’s getting taller each day. I’ve kept the waterings at a day and a half, but pH levels in runoff were dropping, so I’ve raised the it to 6.00pH. Aaliyah’s runoff had high levels of salt, so I’m planning on also lowering her feedings to 900μS. I still have full light on them for about 20 hours a day and as of the last watering, there are no pests, dead or alive. Let’s hope the ladies have an awesome week.
07/06: I noticed Annie has some leaves with small burnt tips that I thought were caused by nutrient burns, but her last few EC readings in the runoff were good. I just realized that since she is directly under the light she is getting blasted with rays. I think the tips are signs of light burn. Another mistake in my grow, but I’m learning so it’s not for nothing. I made a “solution” to my light distance problem using garden twine and a carabiner. It’ll do for now.
07/10: The ladies are still looking good. Aaliyah’s and Alexis’s buds are getting bigger. All three plants have not grown in height for the last few days, so I think the stretch is coming to an end. I switched off the blue vegetative light and left only the red flowering light. I’m curious to see if this will cause any change in bud growth. I also found a fly in one of the plant trays and also one on the trap. The fight continues.

Likes
132
Share


@BudBoutique
Follow
Welcome to Bud Boutique Grow Diary - really appreciate all your love and support :)
Dont forget to check out my other current grows!
🗓️ THE END:
- After 14 Day of drying with around 15-16°C and 60% rh its finally time - LETS TRIM
- beautiful cheesey smell while trimming
- bud full of Trichs all over (shinning like diamonds)
- 2/3 Phenos the MOST BEAUTIFUL of this whole run!!!
- looking super duper beautiful !!!!
- Curring them in Grove TerpLoc Bags
- Watch out for my upcoming smoke review!
Thank you for staying with me - This wonderful Journey finally come to an end. The next run is waiting already 💚
___________________________________________
--- 🌱 Strain ---
🏷️ SWEET CHEESE by Sweet Seeds
https://sweetseeds.es/en/photoperiod-dependent-seeds/48-sweet-cheese.html
---💡 Lighting ---
💡LUMATEK ZEUS PRO 600
https://lumatek-lighting.com/zeus-600w-pro-29/
--- 🥗 Nutrients and Feeding
* 🍸 PLAGRON Algae Baseline grow/bloom + Additives: Power Roots, Sugar Royal, Pure Enzym, Silic Rock, Power Buds, Green Sensation
* 📅💪 baseline grow/bloow: 4ml/l & additives: 1ml/l each
https://plagron.com/de/hobby/produkte
--- 🏭 Grow Setup ---
* 🏠🌿 Indoor: Homebox 120x120x200cm (4x4)
* 📐🌀 PrimaKlima exhausting Fan 1180m3/h (running on 60-80%) & Can Light Filter 800m3/h & 1x Fanbox 1x Dyson fan for Air circulation
https://primaklima.com/de/shop/ventilatoren-de/ec-ventilatoren/pk160ec-tc/
https://canfilters.com/products/filters/
All Likes and comments are highly appreciated!!!
don't forget to check out my Instagram: budboutiquee
- Bud Boutique
Processing
Likes
59
Share


@Ganjagrandaddy
Follow
Day 16: What a good week for these girls. They initially looked like slow starters but soon have picked their pace up and now appear the biggest group of the strains growing as a whole. They are nice and green looking throughout and it looks like the LOS may be the leader so far.
I am stoked with the strains
I have running now and their speed is phenomenal. Seeing how quickly they have all changed in such a short time gives me a lot of confidence for their finish. Bring it on fast buds. Your impressing the hell out of me