
Likes
Comments
Share


@SooSan
Follow
90x60x140 (Mars Hydro)
FC-E4800 (Mars Hydro)
Easy2go Aquavalve5 (Autopot)
Living Soil (Demetearth)
Bruce Banner (PEV Seed)
Gorilla GG4 (Ganja Farmer)
Cream Caramel (Sweet Seed)
Gorilla Gelato (Ganja Farmer)
Blueberry (00 Seed)
Kalini Asia (Zamnezia)
Biscotti Mintz (Barney's Farm)
Blackberry Cake (Sensi Seed)
Amsterdam Amnesia (Dutch Passion)
Gelato Cookie (Ganja Farmer)
Purple OG Punch (Ganja Farmer)
Sweet ZZ (RQS)
Rainbow Road (Paradise Seed)
Substrat ~50L:
30L Super Light Mix Biotechnologie
18L coco
2L perlite
1,7kg lombricompost
350g guano de chauve-souris
350g Zéolithe
350g Basalte
170g guano vers de farine
170g biochar
0,7g Endomychorise glomus intraradices
0,7g Bacillus Amyloliquefaciens
Paillage de luzerne alfalfa
Arrosage avec 2ml/L de mélasse de canne 1x par semaine
Pulvérisation avec 1% d’huile de neem


Likes
34
Share


@MadeInGermany
Follow
Info:
Unfortunately, I had to find out that my account is used for fake pages in social media.
I am only active here on growdiaries.
I am not on facebook instagram twitter etc All accounts except this one are fake.
Have fun with the Update 😃.
Flowering day 49
since the time
change to 12/12 h.
Hi everyone 😀.
We are about 10 days before the harvest 👍.
The trichomes are 70% milky, 10% amber and 20% clear.
as soon as 30% is amber and 70% is milky it is harvested.
Today I am going to rinse you thoroughly so that you can use up your last nutrients.
Have fun with the update.
Stay healthy 🙏🏻
You can buy this Strain at :
https://www.exoticseed.eu/
Type:
Quick Sherbet
☝️🏼
Genetics:
75% Indica / 25% Sativa
Sunset Sherbet X Black Lemon
👍
Vega lamp:
2 x Todogrow Led
Quantum Board 100 W
💡
Bloom Lamp :
2 x Todogrow Led
Cxb 3590 COB 3500 K 205W
💡💡☝️🏼
Soil :
Canna Coco Professional +
☝️🏼
Fertilizer:
Green House Powder Feeding
☝️🏼🌱
Water:
Osmosis water mixed with normal water (24 hours stale that the chlorine evaporates) to 0.2 EC. Add Cal / Mag to 0.4 Ec Ph with Organic Ph - to 5.5 - 5.8

Likes
31
Share


@Endriu
Follow
Ciao Bros e Sis! CIAO! : D
Ok, let's see how these girls are...
Royal AK - she seems like to be the queen of this grow. Strong, fast, and resistant. I will transplant her in a 11lt Airpot with coco, new thing for me!
Candy Kush - she's fine, for real. Topped
Special Kush #1 - Good, but she's a little "tiny", don't you think?
Speedy Chile - well, she's growing fine, but had some kind of genetics problem, maybe... She's topped herself 😅
Ocean Gangster Kush - Nice, even if the colors are strange, and some leaf have wrinkles, let's see how she will grow. Coco also for her, in the future.
Pink Doctor CBD - the oldest on is growing, but I don't get where she want to go, really! The other bean has popped, so let's hope in no problem for her
UK Cheese auto - guys, she's really strong and fast! Developing preflowers at day 22 from pop! I want to leave all the questions aside and try some HST on this auto, I've never trained an auto before!
That's all, for now. Come back for the next update, meanwhile stop and have a chat with me, mates! Ciao!


Likes
25
Share

@GrowBro1981
Follow
Sooo liebe Growfreunde, wir sind wieder zurück für einen kurzen Wochenbericht.
Heute ist BT 25 am Dienstag endet somit Woche 4. Leider blüht die Gorilla Zkittlez immernoch nicht, keine Ahnung was sie hat. Aber alle anderen 5 machen sich prächtig😎💪👌🤗. Extrem viele Blütenstände. Hab nochmal richtig entlaubt, alle großen Blätter weg. Ich weis das viele von euch dass anders gemacht hätten, für mich war der Hintergrund die Lichtausbeute, deshalb so radikal.
Hab fast nicht gelollipoppt weil überall Licht hinkommt. Was meint ihr dazu? Übrigens danke an alle die meinem Grow folgen,liked und kommentieren👍
Likes
11
Share


@LoccoMotive
Follow
🌿 Woche 8 - Zweite Erntewoche ️🌿
🌱 Wachstum🌱
Lady 2 wurde Ende Woche 9 also nach knapp 10 Wochen auch geerntet.
Bei ihr kam Erwarungsgemäß mehr rum bei rum. 47g bei Pflanze Nr. 2
Die Mängel sind kaum noch zu übersehen.
Ich bin überzeugt das die Pflanze zum Schluss ihr volles Potenzial nicht ausschöpfen konnte.
Trotzdem haben es viele gute Buds geschafft und der Rest sieht auch rauchbar aus 😋
🌱 Living Soil🌱
Ich bin mit der Erde so semi zufrieden.
Aber wenn man die Umstände bedenkt, und das eigentlich zu kleine Beet, für gleich 2 Pflanzen.
Kann ich mich doch noch glücklich schätzen. Nächstes Mal vllt nur eine Pflanze 😜
Vllt hab ich auch hier und da was falsch gemacht.
Der Blumat hat mich mitten im Run auch im Stich gelassen.
Vllt war es hin und wieder doch etwas zu Trocken. Grade in der 2. Hälfte des Runs.
Bevor ich den nächsten Grow starte , werd das wohl überholen müssen.
💡 Licht & Schatten
PPFD 📈 gegen Ende ca. 950 µmol/m²/s.
☀️ Wetter
Die Temperaturen sind und bleiben brutal: 25–31 °C 🌡️🔥
🎶 The Grow must go on! 🌱✨

Likes
22
Share


@RDWCGrowing
Follow
1/11/2024 Vegetation Week 1 Day 1- I have a root almost in the water.. Yay!! Top feeding is almost done. she is looking a little sad as I work the transition Top feeding but once the roots are fully in the water she will start to take off. Ensured my PPFD is set between 250-300 it is set to: 258
1/12/2024 Vegetation Week 1 Day 2- I have a root in the water.... NO TOP FEED TODAY SIR!!! now that a root is touching the water and she looks stable, I am not going to topfeed, I will see how she looks tomorrow and as long as everything looks good I am going to go ahead and do a change and week 1 fill on Nutes.. I know it is a couple of days in but the same Nutes go through Week 2 and get changed at Week 3 So I should be good to go.. I will just ensure I fill to root touching the water when I change tomorrow.
1/13/2024 Vegetation Week 1 Day 3- Water Change Day!!
I added 36 Gallons of Water to the system:
Silica= .5mil/gal= 18mil
CalMag= .75mil/gal = 27mil
FloraMicro=3.0mil/gal = 108mil
FloraGro=2.0mil/gal = 72mil
FloraBloom= 2.0mil/gal = 72mil
PH DOWN= 30mil
Very important thing with this system is to now wait the 24 hours for the system to adjust.. Do not make any further adjustments to your PH up or Down for 24 hours to allow time for the system to balance.
1/14/2024 Vegetation Week 1 Day 4- Today I just adjusted the PH to ensure that it was right at 6.0
1/15/2024 Vegetation Week 1 Day 5- Today I Cleaned up the lower damaged leaves from the transition from top feeding to roots in the water. She looks good today.
1/16/2024 Vegetation Week 1 Day 6- Today I just took a picture of the beautiful lady for Log. Other than that just normal day to day operations, check the pH, check the Humidifiers and fill as necessary, check level of water in the Res. Everything looks great. onto Tomorrow!!
1/17/2024 Vegetation Week 1 Day 7- Today I filled the humidifers, checked the PH and just let her grow.. Grow baby Grow.....

Processing
Likes
4
Share


@Mr_nugs_lover_David
Follow
Strong strong smell, what an amazing smell, I'm enjoying an amazing strong amnesia haze clasic smell right now, cannot believe this lady is gonna be ready in around 65 days, let's see how she keeps developing in the further days of this 4th week of flower 😋😍👨🌾

Likes
13
Share


@Leanback
Follow
Day 21 of flowering did defoil the lady’s. No hermaphrodite showing up. Did a compost tea today. Corn is sprouting for tea. Did covercrop to get some fresh greens for the hcompost after the run.
The buds are stick as fuck. Looking forward for the next and last defoil in week 5.

Likes
3
Share


@I_roll_my_own_420
Follow
Here we go, 4 days before harvest time. Last 2 days, light will be off. Cant wait to cut those ladies down :)


Likes
133
Share


@PapaNugs
Follow
Another week here comes and goes. I continue to adjust the list ties to widen this girl out but that's essentially over now. Gonna let her gain some height now in her last week of stretch. Watering every other day.
Lights at 100% power.
Here are the lights details:
Medic Grow Mini Sun-2 150W LED
Model: MN150-022
Spectrum mode: V1
Efficacy: 2.8 umol/J
Thanks for stopping by!
You can find the light on Grow Diaries:
https://growdiaries.com/grow-lights/medic-grow/mini-sun-2-150-watts
You can find the light on Medic Grow's website:
https://medicgrow.com/


Likes
50
Share


@00110001001001111O
Follow
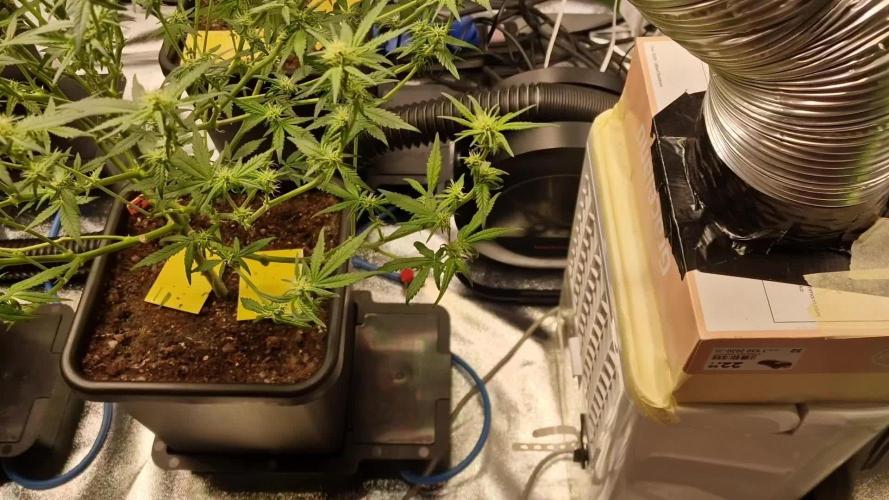
Room setup rundown, examples of bud, et al in pictures...
Seedlings/Clones lights - Viparspectra XS1500.
Vege lights - Mars Hydro FC-4800
Flower Lights - 650w 3400K 1900umol/s PAR, (3) 226w DIY 2900K 630umol/s PAR (678w and 1890umol/s),
Substrate - 50/50 sphagnum peat moss and vermiculite in 5-gallon pots
Climate Control - Luckily, the lights, winter and normal furnace use all equate to a decent temperature, though a bit on colder side in in vege phase, sadly. Humidifier is needed early and later a dehumidifier is needed when canopy develops. I only grow in the winter months.
Irrigation - do not use the emitters in this diary. They suck a big fat dick to skip a line to suck a bigger dick. Use the pressure compensating type. https://growdiaries.com/diaries/232811-strawberry-cookies-og-r1-cherry-diesel-bbgs-ego-epg-ebg-grow-journal-by-001100010010011110/week/1366923 -- use something similar to those. They come in different shapes, too.
Basic process
The little light takes care of seedlings in 2.5" wide seedling pots until first up-pot. The 1-gallon pots fit well under the FC4800 in a 4x4 tent until day 21 after sprout. I plant 150% or more of what i need, so i can kill the weak without concern. The goal is for every plant that makes it to the 5-gallon up-pot being capable of producing a minimum of 160 grams with a maximum of a 35-40 day vegetative phase.
Third up-pot is into 5-gallon nursery pots and now under the 3 DIY lights and the 650W light in the big tent for a couple more weeks of vege. An irrigation system in the big tent saves a lot of time. One scrog for training and another for support, just in case. Reverting back to a more systematic approach to canopy composition moving forward. About 2.3 colas per sq ft and 8 primary colas per plant.
Yields were similar when over-crowding and being less systematic, but the proportion of less dense nugs is greater and trim time is needlessly elevated because of that fact. I was very controlling about this the first couple years but got away from it for far too long at this point.
Drying / Curing - Into mesh racks for 9 days. I wet trim and cut down to similarly sized buds for even drying. Temps are controlled around 68F and RH is set to 60%. Then into some 5-gallon buckets with gamma seal lids and (3) 2-way 67g boveda humidipaks (58% or 62%) in each bucket - 1 at bottom, 2 at top. Temp/RH probe confirms that they hold the RH steady at 60-63%.
Cost - 0.33 cents (USD) per gram produced. This includes an accelerated depreciation expense for all equipment used, fertilizer, water, electricity for all equipment used, new filters and other yearly purchases - bti, ph strips, sticky traps, etc. I'm a finance guy, so these numbers are comprehensively accurate and purposely err slightly on high side of cost. The only facet not included is the cost of my labor.
Likes
25
Share


@TickleToast
Follow
Last (partial) week of veg
Will let the buckets drain fully (few days) - get a good defol and then it's off to flower!
~~~~~~~~~~
Mid-Week
Good defol / lollipop and swapped to 12-12! Nutrient changes will be reflected on Thursdays update.
Roots could not look better ~ lets win this contest!!!!
~~~~~~~~~~
Questions & Feedback are welcomed, feel free to message me!
Thanks for stopping by growmies! 🤙🤙🤙🙏🙏🙏

Likes
31
Share


@TheHighentist
Follow
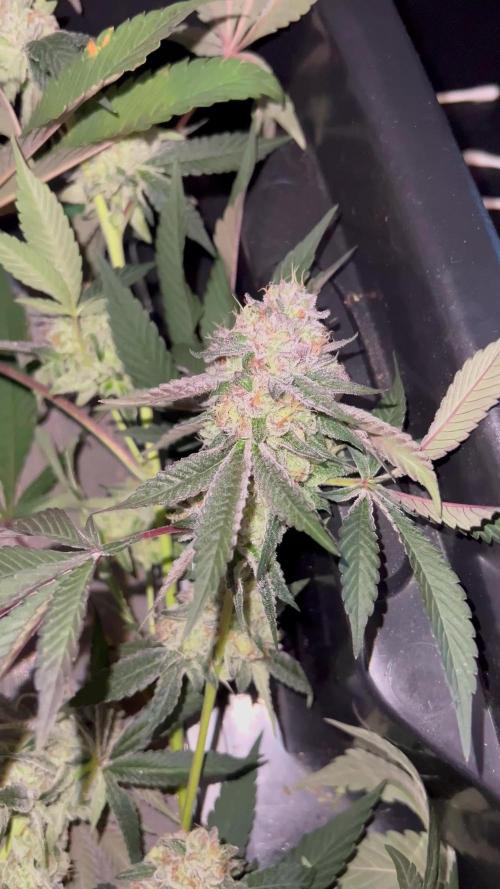
They looking good, but temp is a little too high. It is what it is
One of the plants (In front to the left) is more frosty, with less amber pistils.
But overall the trichomes are starting to go from crystal to cloudy. Which is my timing for start flush.
24/7
-Temp 23-26day/21-24night
-47%RH (2+-)
25/7 Water day* start of flush
Gave them till run through with plain ph balanced water, and topped it off with some light nutrients-mixed water.
-Temp 23-26day/21-24night
-49%RH (2+-)
26/7
-Temp 23-27day/21-24night
-47%RH (2+-)
27/7
-Temp 23-26day/21-24night
-47%RH (2+-)
28/7* Water day / flush
-Temp 23-27day/22-24night
-47%RH (2+-)
29/7
-Temp 24-27day/22-24night
-47%RH (2+-)
Likes
6
Share


@Organic473
Follow
This was her last week of extra light for an extended veg…she should flower by the end of week 10 just around full moon “Flower Moon” May 12th 2025.

Likes
119
Share


@DogDoctorOfficial
Follow
Greetings, fellow cultivators and stewards of the green realm! It's time to embark on the Week 4 Flower Report for the enchanting Jealousy in the Power Buds competition. The grow room has transformed into a sanctuary of blossoming beauty, and our verdant queen continues to captivate with her botanical grace.
As we venture deeper into the fourth week of flowering, Jealousy's prayerful demeanor remains steadfast. It's like a perpetual botanical meditation, where every leaf is a testament to the serene communion between plant and light. The grow room echoes with the hum of chlorophyll, and Jealousy stands as a living embodiment of lush greenery.
The flower formation is a sight to behold. Buds, adorned in trichome-laden splendor, emerge like jewels on a botanical crown. The pace at which they're developing is nothing short of remarkable—almost turbocharged. It's like witnessing a botanical sprint, where each bud races toward maturity with an urgency that adds an extra layer of excitement to our horticultural odyssey.
And now, let's talk root porn! Brace yourselves for a visual feast as we delve into the underground world of the clones. The roots, like intricate threads weaving a subterranean tapestry, tell a story of vitality and success. These clones, offspring of our majestic Jealousy, have not only taken root but have done so with a vigor that speaks volumes about the genetic prowess passed down from their botanical matriarch.
The success of these clones is a testament to the health and vitality of Jealousy herself. It's like witnessing the circle of life in a green kingdom, where each rooted clone is a promise of continuity and a nod to the resilience of the plant lineage.
As we navigate the fourth week of flowering, let's extend our gratitude to Zamnesia and Plagron, the unseen architects of our botanical masterpiece. Their contributions continue to shape the narrative of our green adventure.
A standing ovation to the Grow Diaries community – your shared experiences and boundless enthusiasm are the pillars of our collective knowledge.
To my fellow contestants and growers, may your buds swell with magnificence, and may the vibrancy of your grow rooms reflect the success of your botanical endeavors. Here's to a week of perpetual prayer, turbocharged growth, and the anticipation of a harvest that will leave us all in awe. Stay green, stay inspired, and keep cultivating those dreams!
As always, thank you all for stopping by, for the love and for it all. This journey of mine would just not be the same without you guys. The love and support are very much appreciated, and I feel honored and blessed with you all in my life !!!
With true love comes happiness. Always believe in yourself and always do things expecting nothing in return, with an open heart. Be a giver, and the universe will respond in ways you can’t even dream of .
Friendly reminder: all you see here is pure research and for educational purposes only.
Genetics - Jelousy @Zamnesia
Nutrients @Plagron
Light - @viparspectra P2000
Room size - 3x3 - 0,9x0,9
Likes
3
Share

@Organic_G
Follow
Das obere Drittel wird geerntet, sehen wunderschön aus.
Die Qualität wird von Grow zu Grow immer besser.
Super Juicy, richtig lecker und einfach wunderschön wie aus dem Lehrbuch.
Sind nun am Trocknen danach kommt der Rest ab.


Likes
48
Share


@TheCannaProphet
Follow
~ WEDDING CHEESECAKE FAST FLOWER by FastBuds ~
Well fam, here we go again with another epic strain from FastBuds Fast Flowering stable. After having such tremendous success growing their Gorilla Cookies Fast Flower outdoors last year, I've decided to run another of their fast flowering strains outdoors this year... Wedding Cheesecake Fast Flower!
The best description of this awesome cultivar comes directly from my friends at FastBuds which is as follows:
"A delight for the mind and body: Wedding Cheesecake FF (Fast-Flowering) is a delicious strain that offers XXL yields in a 7-8 weeks flowering cycle. This terpene powerhouse produces loads and loads of mouth-watering vanilla-creamy-cookie-scented terps with hints of citrus and cinnamon. In addition to its delicious aromas, this variety grows very well in both indoor and outdoor setups, yielding up to 650 g/m2 without extra maintenance, making it the ideal strain for beginners as it allows you to maximize yields while minimizing work. This super-fast feminized photoperiod version offers upbeat and energetic yet deeply relaxing effects that are perfect for consumers looking for a heavily focused, motivating, and creative high. It’s the ideal strain for those needing that extra energy boost to start a busy day on the right foot.
Wedding Cheesecake FF boasts chunky, large-sized buds with a thick layer of silvery-white resin and bright orange hairs scattered all over: that just screams ‘quality’. The lime-green flowers sparkle with an array of hues ranging from dark to light green, to magenta and purple, and reek of a delicious aroma that’ll remind you of fresh store-bought cheesecake.
This is an XXL hybrid that grows extremely tall in height, reaching up to 3m with one huge main cola and multiple long side branches that can withstand enormous yields of up to 650 g/m2 with ease. Wedding Cheesecake FF is extremely resilient to the elements and can be grown in almost every climate as long as you’ve got the space and basics covered, making her an excellent choice for those looking for large-scale harvests with a quick turnaround time without much effort."
________________________________________________________________________________________________________________________________________________________________________________________________________________________________________________________________________________________________________________________
The Setup:
This is going to be an outdoor grow, but I have started the Wedding Cheesecake FF indoors as our weather is still too cold to put her outside (nighttime temp's dipping regularly into the 30's℉).
The plan is simple... let her grow inside under a 19/5 light schedule until the nighttime temperatures stay above the mid 40's℉, at which point she'll be moved outside and transplanted into the soil which I have already setup and inoculated with beneficial microbes, and then let the fun begin!🤪💚
________________________________________________________________________________________________________________________________________________________________________________________________________________________________________________________________________________________________________________________
Weekly Updates:
9/6- Well, Week Five of flower is here and the Wedding Cheesecake FF by FastBuds is rockin-n-rollin! Well fam, the 'Beast From The East' is going strong, and so far has not encountered any issues with any bud rot but is showing signs of the beginnings of Septoria. Luckily, this far into flower it shouldn't be too much of a concern at this point. This late in our growing season I always worry about Boytris, especially with cultivars that have really dense and tightly grouped flowers as our weather is now turning cooler and wetter.
9/8- I'm continuing to water the Wedding Cheesecake FF in the mornings on days that we do not get any substantial rain with well water via the garden hose. Today I went through the plant and removed a bunch of old dead leaves, along with any shade leaves that were totally yellow. I did not water today as we had a good amount of rain yesterday and the soil is still really moist.
9/10- My daily routine of watering, removing dead foliage and checking over the flowers continues. The aroma coming off of the Wedding Cheesecake FF is really loud now and you can definitely pick up some subtle hints of her Cheese lineage in it!
9/12- With Five weeks of flowers now behind her, the FastBuds Wedding Cheesecake Fast Flower only has 2-3 more weeks to go (weather permitting) and she's on track to be an enormous yielding plant! I can't wait!!!
Thank you for checking out my diary, your positive comments and support make it all worthwhile! 💚Growers Love!💚😎🙏
Processing
Likes
1
Share


@Funkyskunky1
Follow
They are looking real good. I think I may have gotten some nutrients on one plants leaves and it caused some yellowing and leaf curl, I’m hoping it straightens out.