


Likes
6
Share


@StonedandSteady
Follow
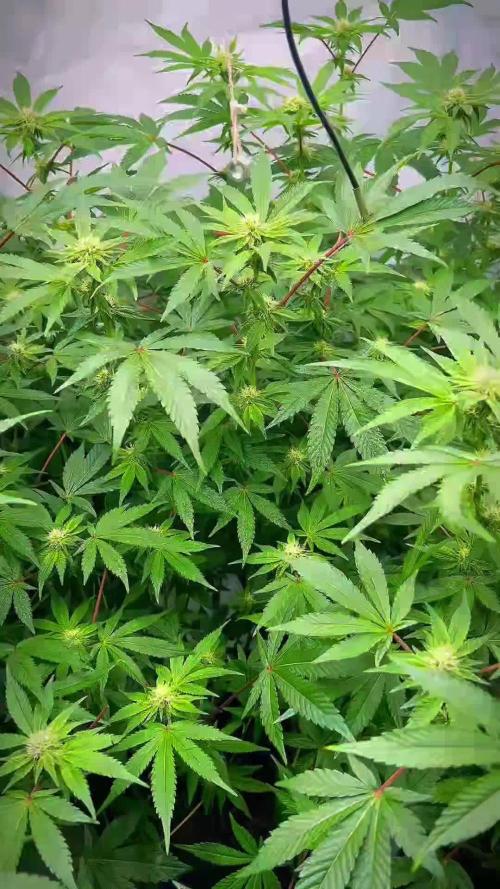
AutoFlower/Outdoor Vine plants, Big Budz at 3 weeks of Bloom and Outdoor Flowers Blooming Update!
Everything looks Gorgeously Great and looking Beautifully Grown at their 7th Week of Flower! Outdoors Update! 3rd Feed of #HumboldtCountysOwn
#AutoWhiteRussian and #AutoMontreal *Fems* breed by Team #DivineSeeds #DivineSeedsSquad #DivineSeedsBreedingCompany Looking Magnificent and Amazingly Great in thier 7th week of Flowers! Thier Growing under the #Growatt600w and in my #TopoLite 24×24×48 Grow Tent! I'm also using #TNBNaturals #TheEnhancer Co2 Despersal Canister and using thier Ph⬆️⬇️ for my Decolinated Tap Water!
#AutoWhiteRussian breed by Outstandingly Awesome Team #DivineSeeds #DivineSeedsSquad #DivineSeedsBreedingCompany
Yo!!! This Lil Beauty popped open in under between 16-18 hours of Germination using this Wet Papertowel Method, this New Heat Mat, Baked potato ToGo Container and Regular Tap Water Helped Tremendously! Heck Yeah Growmies and Growmets!!! Let's Grow!!!
DivineSeeds:
#AutoWhiteRussian
Origin:Afghanistan
Type:Indica/ Sativa/ Ruderalis
Flowering:65 days
THC:24 %
Harvest:400-600 g/m2
Height:100-150 cm
#AutoMontreal breed by Top of The Line Team #DivineSeeds #DivineSeedsSquad #DivineSeedsBreedingCompany
Yo!!! This Lil Beautiful Bean Popped under between 20 hours of Germination using this Wet Papertowel Method, this New Heat Mat, Baked potato ToGo Container and Regular Tap Water Helped Tremendously! Heck Yeah Growmies and Growmets!!! Let's Grow!!!
DivineSeeds:
#AutoMontreal
Origin:Canada
Type:50% Indica/ 40% Sativa/ 10% Ruderalis
Flowering:65 Days
THC:23%
Harvest:550-750 g/m2
Height:120-160 cm
https://divineseeds.net/
https://instagram.com/divine.seeds?igshid=osxe2v7en33v
HumboldtCounty'sOwn:
Email: info@humboldtbottling.com
Phone: (707) 725-4119
Toll free: (866) 872-9434
Humboldt Bottling
Po Box 429 · Fortuna, CA 95540
HumboldtCounty'sOwn Website Link: https://humboldtcountysown.com/
HumboldtCounty'sOwn Instagram Link: https://instagram.com/humboldtcountysown?igshid=1qj809qkkwych
I love and Appreciate Everyone!!! Thanks Again Teams! Cheers Famz!!! Much Props and Much Topz!💯

Likes
100
Share


@AsNoriu
Follow
Day 111. First is ready, second week behind, third maybe even 3 weeks behind ....
Plus they are LEAFY ,!!!!
Trim jail ...
Wet trim for all of them - no doubts !!!
Day 115. Still hanging, slowly drying and result should be decent at the end ... A week more I guess, very humid in UK ...
Day 118. First trimmed - 175 g. Other is chopped ! One still grows ...
Day 136. Chop day for the last one !!! Long run ....
Happy Growing !!!

Processing
Likes
8
Share


@eldruida_lamota
Follow
Buenas noches fumetillas, de nuevo volvemos, y es que estas green ak xL se están poniendo increíbles, son bastante delicadas a los cambios de temperatura y a las variantes en los nutrientes , hay que ser muy estable y cuidar en los cambios climáticos, si se consigue salen unas flores enorme y llenas de tricomas.
Ph controlado, temperatura y humedad dentro de los parámetros correctos, 1 de los 2 ejemplares que quedan recibirá un lavado de raíces pronto, la otra seguiremos abonándola una o 2 semanas más. La próxima semana nos vemos familia.


Likes
19
Share

@MistaOC
Follow
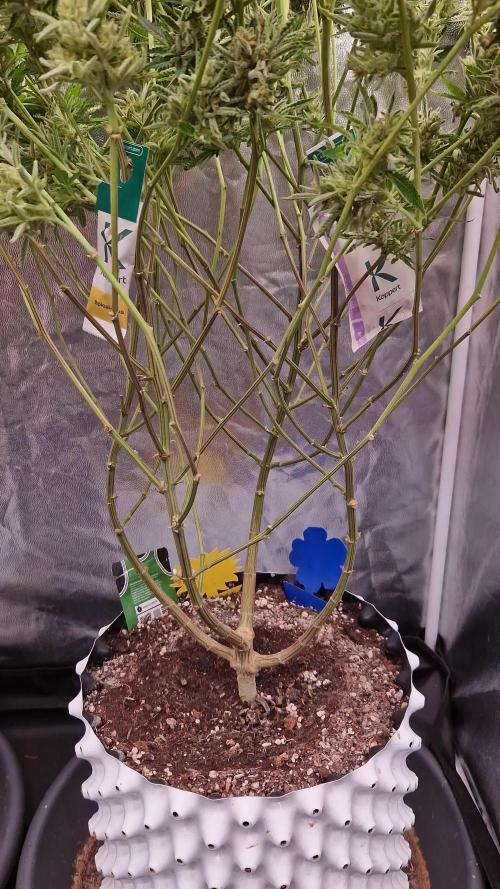
25.01. F23
The stretch is now completely finished, with the plants standing at around 82 cm. Bud development is progressing well, with clear improvements in structure and density.
Unfortunately, powdery mildew remains an issue. Affected leaves are removed daily to limit further spread. In addition, the plants are treated twice per week with Purolyt to keep spore pressure as low as possible.


Likes
10
Share


@valiotoro
Follow
Photoperiod buds 🤩
The smell is absolutely divine very fruity,sweet & tropical🍋🍊🍉🍌
Solid like a diamond 💎
Bay harbor butcher’s trim to show the density
Likes
2
Share


@DrBud420
Follow
The plants were fed 3 days ago for the last time.. after the soil has dried, only flawless finish will go (probably from tomorrow) for the next 10-12 days, how long will it last... Glookies has a strong, exotic smell, it smells a lot like melon, sometimes a little like coffee... the smell is intense and can be felt even at 40-50 meters, especially at night... it is currently in full potency, some 90% trichomes are cloudy-milky and sometimes amber, when it is removed it will be exactly what an indica dominant hybrid should be... Dos Si Dos 33# also smells a bit like melon, but I think it will completely lose that smell by the end, no lime, citrus and mint as it says, it smells mostly like gelato, which makes sense because it's genetics,but I like it...it's like I planted gelato lol...but unfortunately I won't leave it as long as it requires because the weather won't allow it, I'll take it down in 12 days at the latest because after that the temperatures will go up to 3 degrees Celsius at night, the humidity will go over 70 , it's going to rain, there's no point in keeping it longer than that, I'm just increasing the risk of mold, and it's not like I haven't already thrown away a couple of moldy heads...50% of the trichomes are cloudy-milky, the rest are transparent and some amber... I hope that by the end it will be able to achieve at least full potency because time will not allow for more amber
These plants are real viking warriors, they didn't miss a bit of stress, but thank the dear Gods, it was reflected in the potency, and not in the production of seeds... this season is the worst season I've ever experienced, and so are my plants ...throughout the season they were under stress, and I was under even more stress...the weather in May and June was cold, without enough sun, temperatures were low, constant rain, ice and storms...after that came abnormal temperatures that easily exceeded 60 degrees Celsius in the direct sun....drought for almost 3 months, without a drop of rain, on the hottest days some plants drank 100+ liters of water, including food, I couldn't believe it with my own eyes... outdoor this year cost me more than if I did indoor... there were a lot of storms throughout the season... the last storm completely uprooted 3 of my plants and I had to take them down... of course I didn't manage to cut that much grass in time, so I ended up with over 600 g of dry moldy gorilla zkittlez( that's about it, the quarter that I cut gave 150 grams of dry matter, so I realized that there was no reason to continue cutting) it got worse because I didn't have time to cut it, and it was soaked from the rain... I still can't complain even if I I don't like the smell, I'm not a fan, it's potent and the work is relaxing and divine, I managed to save about 20 grams without it being touched at all... I have more strains that have been in jars for some time, but this is not the place for them now, I will certainly include some footage of them in jars as well...all the strains are superb and each is beautiful in its own way...I couldn't stop I decide on just one... dos si dos 33, runtz x layer cake, glookies and mimosa x orange punch I'm definitely planting again in the future..
I'm also interested in what barney's amnesia lemon is like because I really like this one, so next year I'll probably plant it too
Dos si dos is about 120 cm tall, glookies 2 m
These two plants had additional stress unlike the others which also didn't suffer...they were in smart pots, staked and one morning I go for a tour and see the plant broken, and the pot torn all the way, like a beast that was there.. .did some wild animal fly over there and got tangled up and uprooted it all... and it was as if someone had cut it with a knife, after a few days the same with the other plant, the same completely... then I seriously started to i mean someone is casting a spell on me lol then they were transplanted in early bloom into direct soil
Then glookies was transplanted to a place with much less sun than it was in, but at that moment I couldn't choose, what is there is..


Processing
Likes
7
Share


@DigitalJockeyKing
Follow
got bitten by a spider and realized i was always wondering what my spiritual animal was, and realized it was spiders after that awakening of asking mother natures help me and spiders made a blood pack and since then nature has been helping me out by protecting my plants, from thieves and bad rotten people. and nature gave me spiders to protect my children. one of my spiders thats protecting the rooibaard is called GREGGK.


Likes
2
Share

@5fingeredgrower
Follow
18.03.2026 Wednesday: flower time !
20.03.2026 Friday: 6L Rainwater + nutes - 1.25L Run off so will stick to 4L in future. Defoliated to improve airflow.
22.03.2026 Sunday: 4L Rainwater + nutes. drinking about 2L a day. Another big defoliation. LST with adjustable clips - these are great and way better than the fixed ones that only do 90' bends.

Likes
41
Share

@TrickzGrowz
Follow
Die Gorilla Melon stand jetzt 2 Tage in absoluter Dunkelheit und wird heute nun geköpft und im ganzen komplett aufgehangen. Ich bin schon gespannt wie die Buds dann getrocknet aussehen.
Likes
13
Share


@DeepRootsGrowTrees
Follow
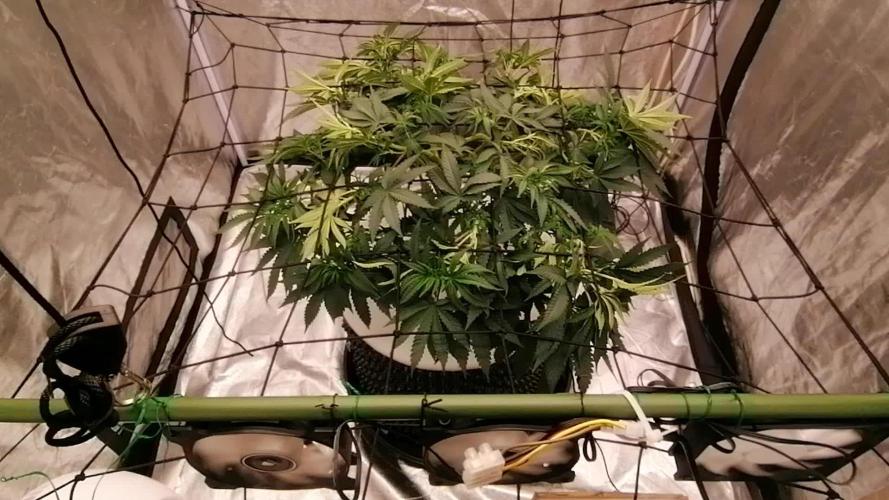
DIVINE OG KUSH / DIVINE SEEDS
WEEK #10 OVERALL
WEEK #9 VEG
This week she's still under LST training with the bud clips and I'm still topping her to control the height of the plant right now. She's doing great no issues with training or topping. Stay Growing!!!
Thank you for stopping by and taking a look it's much appreciated!!!
Thank you DIVINE SEEDS!!!
DIVINE OG KUSH / DIVINE SEEDS
BUDTRAINER.COM BUD CLIPS
Likes
28
Share

@eldruida_lamota
Follow
Que hay familia, vamos con la primera semana de floración de estas Apple Fritter de Zamnesia.
La temperatura está entre los 21/24 grados, la humedad está entorno al 55%, y el ph lo mantengo ahora al principio en 6.2, el foco por supuesto está enchufado 12 horas , tener tienen que crecer fuertes.
Y aparte añadimos nutrientes de Agrobeta, que no puede faltar semejante gama.
Trasplante a 7 litros definitivamente, las puntas amarillas desaparecieron, la carencia de nitrógeno fue solventada.
Todo correcto hasta ahora, ya cara a la floración veremos cómo avanzan las próximas semanas.
Os comento que tengo un descuento y para que compréis en la web de Zamnesia de un 20%, el código es ZAMMIGD2023
The discount 20% and the code is ZAMMIGD2023
https://www.zamnesia.com/
agrobeta: https://www.agrobeta.com/agrobetatiendaonline/36-abonos-canamo
Mars hydro:
Code discount: EL420
https://www.mars-hydro.com/
Hasta aquí es todo, buenos humos 💨💨💨.

Likes
8
Share

@eldruida_lamota
Follow
Familia, estoy de vuelta y actualizo la cuarta semana de estas blue spider dé Zambezaseeds.
Tienen alguna carencia que próximamente a de ser solucionada 💪 espero la próxima semana se solvente.
Por lo demás fenómeno las flores ya están formando tricomas y me encanta.
Aparte de que siguen formándose progresivamente todas sus flores.
Agrobeta:
https://www.agrobeta.com/agrobetatiendaonline/36-abonos-canamo
Mars hydro:
Code discount: EL420
https://www.mars-hydro.com/
Las maximas de temperatura no superan los 26 grados y las mínimas no bajan 20, así que no me puedo quejar.
Los niveles de humedad también son los correctos van entre 50%/65% de humedad relativa.
Por supuesto el Ph lo estamos dejando alrededor de 6.
Hasta aquí es todo, buenos humos 💨💨💨.
Likes
31
Share


@KitaKush
Follow
No more LST...beastie bloomz 1/2 teaspoon and maybe 1 teaspoon each next week....don't see a big difference yet...happy with the growth so far! My biggest plant is finally stretching up towards the light..soon I’ll be able to lollipop her and focus on the top canopy!
Likes
24
Share


@Hawkbo
Follow
Lookin good, no more herms so far as I’ve tightened things up hopefully that’s the last of them for good. I installed a 4Inch AC infinity fan and filter as an intake so I have been able to close all of the vents. At this point the leaf strip has proven to be a solid method, I have nothing to compare bud size at this point but just the extra space it opened up is a plus. I’m sure the lowers will be a little more firm and the plants obviously haven’t had to be fed as often as usual so its saving time, water and nutrients. The added microbes have also allowed me to keep my ppm around 1000 instead of 1080ish without any sign of deficiencies. The Mandarin cookies x Dionysus has a little cal-mag issue but that was a trait from the mother which out of 10+ grows all had a cal-mag deficency.
REMEMBER , IF YOUR SHOPPING FOR GEAR YOU CAN USE THE CODE “BANGDANG” FOR 10% OFF YOUR ENTIRE PURCHASE FROM ANY OF THE FOLLOWING COMPANIES.
@greenbuzzliquids
@rainscience_growbags
@gorilla_grow_tent
@growlightscience.led
*****Gorilla grow tent discounts extend to all companies affiliated with grow strong industries which include..*****
@super.closet
Lotus Nutrients
Kind LED grow lights