
Likes
Comments
Share


@DreamIT
Follow
-Sponsored by:
🌴SPLIFF SEEDS🌴-💡VIPARSPECTRA💡-💐GREEN BUZZ LIQUIDS💐-🛠️WEDRYER🛠️
8/7 After several days of Growdiaries making it difficult for me to write and respond to comments, I found that I can still update the journals. I apologize to everyone for the non-replies but I have replaced the main email and the email to confirm the account never arrives, and Growdiaries' customer service seems to be non-existent.
10/7 everything is going well, nothing special to add🤘🦄
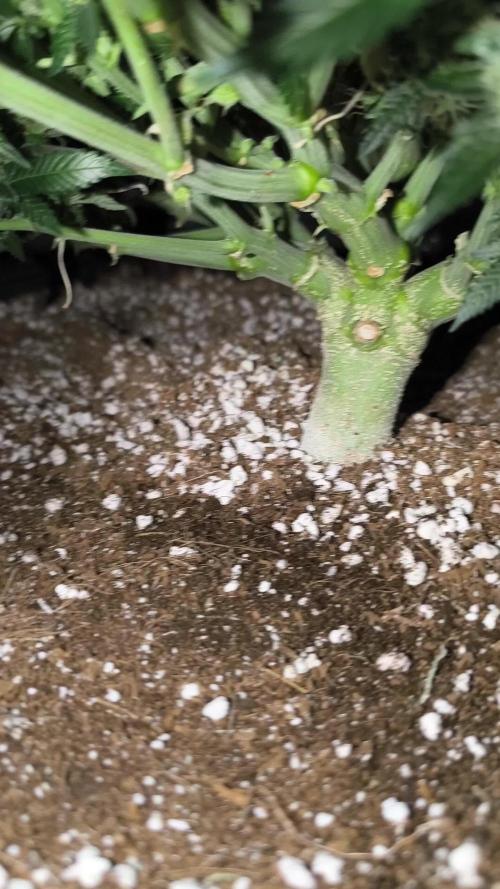
12/7 surprising how humic acid speeds up the growth of these wonders
__________________________________________
Personal advertising (contains affiliate links)
__________________________________________
🦄 Are you new to the world of cultivation and don't know where to safely buy your seeds?
Fast and anonymous shipping. Check out their hilarious graphics. (no affiliate links)
✅https: //bit.ly/spliffseeds_
__________________________________________
Did you know that Green Buzz Liquids fertilizers are 100% vegan? A complete line of products ready to give the best to each of your plants! Visit the site and see my journals to see how they work 🦄
🤯 And with the code "dreamit" you will immediately receive a 15% discount on your purchases
✅https: //bit.ly/GreenBuzzLiquidsPro
__________________________________________
👀 Are you looking for a good lamp to start with? 👀
🌞Viparspectra has something more than the others, take a look at their site.
⏩ Use "GDVIP" for an extra discount or "DREAMIT3" for an extra 5 %% discount
👀 Search for it on Amazon
✅Amazon USA: https://amzn.to/30xSTVq
✅Amazon Canada: https://amzn.to/38udUVe
✅Viparspectra UE: bit.ly/ViparspectraUE
✅Viparspectra USA: bit.ly/ViparspectraUS
______________________________________________
🌈 Tired of blowing on your weed hoping it dries quickly? Check out the Wedryer website! You will find a well-made accessory that will help your weed dry in just 8-10 days without the annoying risk of finding mold or other annoyances! (no affiliate links)
✅https: //bit.ly/Wedryer_
______________________________________________
📷🥇Follow the best photos on Instagram 🥇📷
https://www.instagram.com/dreamit420/
Backup
https://www.instagram.com/dreamit4200/
🔻🔻Leave a comment with your opinion if you pass by here🔻🔻
🤟🦄💚 Thank you and good growth 💚🦄🤟

Likes
15
Share

@pHilosophy420
Follow
Day 91, Power at 95% and lamp distance at 40cm.
She’s looking almost ready now. Most of the trichomes are cloudy, with about 30% still clear, so I’d say another 7–10 days before harvest. Now ust plain water until chop day.

Likes
5
Share


@pzwags420
Follow
I sowed cantaloupe bag seeds directly to flower box drip irrigation.I transplanted my white widow seedling to flower box. So the new line up this run is cantaloupe, blueberry, Girl Scout cookies and white widow. Cantaloupe seeds sprouted and i will keep the most vigorous grower.bb is throwing pistils.GSC is producing first set of true leaves. At the end of week 2 cantaloupe has first leaves so does white widow. My Gsc has first set of true leaves and my blueberry is putting out pistils and trichs.Things are going well


Processing
Likes
4
Share


Likes
31
Share


@Mazgoth
Follow
i did a 48hours of Darkness before harvest and really help A LOT with trichomes and sugars,she produce more trichomes and build up a lot of sugar too,you need to try this technique,VERY STICKY BUDS,i will update soon how many grams are when it dried.


Likes
4
Share


@SmileyIndica
Follow
Day 50 Finally got my phosphorus deficiency under control. I will be checking Trichomes on day 53 and go from there. The Hindu will have another couple weeks.

Likes
17
Share

@masterofsmeagol
Follow
9/20 Man I've been busy. I'm sick too. Looking back at my diaries I get sick this time of year every year it seems. Once I get the important stuff done I'll put some pictures of finished product up. Sunny today and windy as hell. All the plants left seem to be doing good and look like they'll finish. The pink kush might not finish how I WANT but it's stinky and has lots of milky trichs. I'm playing with fire with this mk ultra. It's fucking done. It could get a LITTLE more amber and maybe come together a bit more but I don't know if it's smart to risk it. Frost warning in effect tonight. I'll probably check the forecast and harvest tomorrow. We're having some good weather just cold nights. Then it turns to like a 30% chance of rain for 4 or 5 days. I'll yank it before that. This actually turned out tp be a pretty good year. Haven't tested everything (especially shit in the ground) but what I have sampled I'm incredible happy with.


Likes
6
Share

@PrinceOfHerbs
Follow
The flower grows sluggishly and turns yellow in some places and starts foxtailing, so the light was dimmed a little
Flowering day: 35
Likes
18
Share


@berlinbeginner
Follow
Ladies doing fine.
Worm castings are magic. SD2 is getting greener. I topdressed all the plants with worm castings
Likes
35
Share


@Pot_Portraits
Follow
A week full of events, one of the main branches broke, thank god so late in flower and during flush. It also gave me a rough idea of the harvest, that single branch made quite a good amount of weight but see yourself in the video.
Likes
2
Share


@Ultraviolet_
Follow
Electrical Conductivity refers to how easily a material or solution allows electrons or ions to flow continuously when an electrical potential is applied.
Electrochemical Reactance is the opposition to alternating current (AC) caused specifically by the temporary storage of energy in electric or magnetic fields, rather than energy being lost as heat. Reactance does not directly alter a material's intrinsic electrical conductivity. Instead, it dictates how the system stores and releases energy over time, which creates a temporary barrier to current flow in AC circuits. Together with resistance, reactance makes up total impedance. Electrical impedance (the combination of resistance and reactance) in the rhizosphere dictates how easily ions and water move into plant roots, directly impacting the Electron Transport Rate (ETR). High impedance restricts ion mobility, leading to nutrient deficiencies that decrease ETR and stunt overall plant growth.
Using copper and zinc plates in the plant medium to form a natural earth battery to assist with Electrochemical Reactance. The moist soil acts as an electrolyte, while zinc serves as the anode and copper as the cathode. Zinc is a highly reactive metal and oxidizes, losing electrons into the soil. These electrons travel through an external wire to the copper plate. The moisture and dissolved salts in your plant medium allow charged ions to move freely between the plates, completing the circuit and generating a small direct current (usually between 0.8 and 1.1 volts). This micro-current subtly alters/the Electrical Conductivity (EC), allowing more effective breaking apart of chemical bonds in the soil (electrolysis), making soil nutrients like phosphorus, calcium, and potassium more accessible to roots. Buried the zinc plate on one side of the plant’s root zone and the copper plate on the opposite side. Ran an insulated copper wire above ground to connect the zinc plate to the copper plate, creating a closed loop. Make sure your soil remains moist and contains natural mineral salts; entirely distilled water or bone-dry medium will prevent ion exchange and block the current.
Not all minds think the same; it's a hard concept to grasp for one who has only ego. When someone operates solely from the ego, they tend to view their own perspective as the objective truth. To them, if someone else thinks differently, it is seen as a flaw, a lack of intelligence, or a personal affront, rather than simply a different, valid experience. The ego assumes that others are just extensions of itself. It cannot easily differentiate between "I think this" and "This is the universal truth". This is called the Mirror Fallacy. True understanding of another mind requires stepping out of oneself. The ego, by definition, is obsessed with self-preservation and being "right," which blocks empathy. Different perspectives are interpreted as attacks on the ego's stability. Instead of curiosity, it feels defensive. Acknowledging that others have entirely different internal worlds—with unique motivations, fears, and histories—requires dismantling the illusion that the world revolves around one’s own viewpoint. It’s a shift from "Why are they wrong?" to "How did they get to that perspective?"
Gospel of Thomas #17 "I shall give you what no eye has seen, what no ear has heard, and no hand has touched, and what has not come into the human heart." precedes saying #18, which questions the "beginning" and "end".
First, you need The Eyes to See, The Ears to Hear & The Mind of the Heart.
"Alpha to omega" refers to the first (Α/α) and last (Ω/ω) letters of the Greek alphabet, symbolizing "the beginning and the end". It represents totality, eternity, or the entirety of something.
Revelation 22:13, "I am the Alpha and the Omega, the First and the Last, the Beginning and the End" (NKJV, NIV).
Both originate from Greek. Alpha (Α/α) is the first letter of the Greek alphabet (representing the beginning). Atom comes from atomos, meaning "indivisible," often seen as the foundational "first" particle of matter. In some esoteric and linguistic theories, the biblical name "Adam" (Hebrew for man/earth) is connected to "atom" because both represent the original, foundational unit (the first man vs. the first particle). Alpha Particles are particles emitted during radioactive decay, named "alpha" because they were the first type of nuclear radiation discovered. They are atomic nuclei consisting of two protons and two neutrons.
The study of the atom often deals with the "beginning" (alpha) of chemical reactions and fundamental building blocks. The terms are linked primarily as symbols for "the beginning" (Alpha), the "fundamental unit" (Atom), and the "original man" (Adam).
The uppercase symbol Omega (Ω/ω) is primarily used in electronics and physics to measure electrical resistance in ohms, representing how materials resist electron flow. It is also used in various fields to represent the density parameter in cosmology, solid angles in physics, and special constants or asymptotic growth rates in mathematics.
In quantum mechanics, "Omega" (Ω/ω) can refer to several concepts related to measuring or representing quantum coherence, generally categorized into dynamical, mathematical, or physical parameters:
Dynamical Coherence Measures
Omega Pattern (Superconducting Circuits)
Coupling Strength
Angular Frequency
Quantum Coherence Framework v24.0
Electron flow is not the same as electrical conductivity, but they are intimately related. Electron flow is the physical motion of electrons, while electrical conductivity is the material property that determines how easily that flow can happen.
Electron Flow (The "What"): The physical movement of negatively charged electrons through a conductor (usually from negative to positive). It is the act of carrying a charge.
Electrical Conductivity (The "How Well"): An intrinsic material property that measures how easily a material allows electrons (or other charge carriers) to move through it.
Electron Flow (The Action): The actual physical movement of electrons from one molecule (donor) to another (acceptor) in a pathway, such as the photosynthetic electron transport chain or cellular respiration. The current itself (dynamic electricity).
Electrical Conductivity (The Property): An intrinsic property of a material (like copper,glass,soil) that measures how easily it allows electric current (electron flow) to pass through it. A measure of ease. A high-conductivity material has low resistance and lets electrons move freely.
Electron transport rate (ETR), the rate at which electrons travel through the chain.
You can have Electron Flow occurring (electrons moving through the chain), but a very low Electron Transport Rate if the plant is in the shade. If light increases, the Electron Flow still follows the same path, but the Electron Transport Rate increases because more electrons are moving per second. In summary, ETR is a quantitative measure of electron flow. Think of "Electron Flow" as the movement itself, and "Electron Transport Rate" as the speed or quantity of that movement.
Photosystem II (PSII) is a critical multi-subunit protein complex in thylakoid membranes that initiates photosynthetic light reactions by splitting water and transferring electrons.
"Et lux in tenebris lucet, et tenebrae eam non comprehenderunt," John 1:5

Likes
17
Share


@GreenHouseLab
Follow
A lot more active on Instagram, green_house_lab
If interested in the genetics hit me up
My heart and spirit is with the people in Ukraine 🇺🇦💚
Likes
35
Share


@Ironlungs
Follow
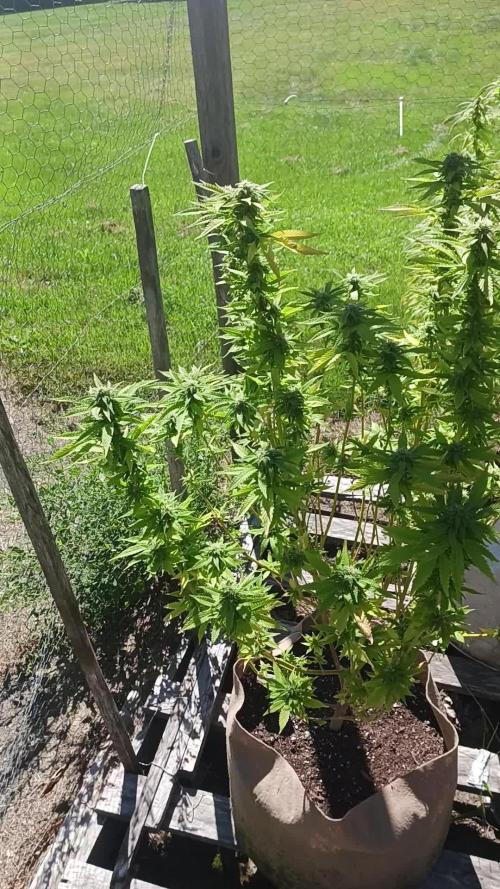
Decided to pull out the scrog and utilize more of the available room I had to let my plants get bigger. I am very happy with this decision and will be flowering within the next couple of days. I hope you join me for the ride these girls should get big. I am using Royal Gold Tupur with some added perilite in 7 gallon pots under 2 600W
Likes
2
Share

@JamrockGrows
Follow
16/07 - Week 6 of veg and the ladies are looking very happy after their last watering yesterday. I added some nutes for flowering and they are about to reach the scrog net. I will flip in a few days when the Lemon skunk grow hits week 6 as well.
18/07 - Watered with just water phd at 6.8. Gave both of them 1L. One of the plants had some burnt/curling tips so I increased the light by 5 cm. Three more days until flip. I’m expecting a lot of vertical growth in the next few weeks.
21/07 - I watered the brown pit with 1L of water. The other pot still felt a little heavy so I’ll water it tomorrow.
Hope you have a great day!
Peace
Processing
Likes
7
Share


@greenflipcali89
Follow
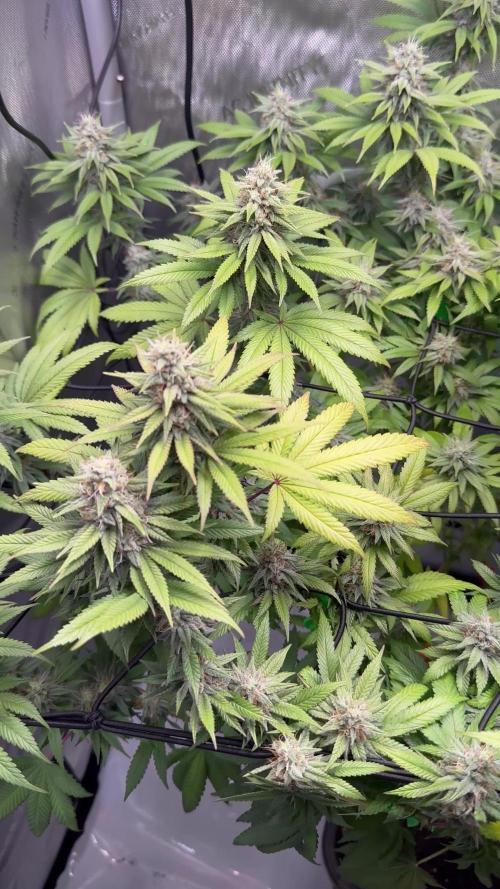
Another week in the books and significant growth as I increase dosage of nutrients, closer to 100% full dosage. I have read mixed messages about feeding every watering, to every other, to once a week...full strength, 1/2 strength, etc etc. I decided to ease into the nutes and work my way up, and feed only weekly. Less is more! Wait for her to get a little bigger and more mature and will feel better feeding at 100% full dosage. Did some more LST, pulling down higher stems and continue to build the table.
Day 37: more growth; did some light defoliation to open up center; raised light to 18" (was at 15" in some spots) as it continues to grow.
Day 41: more growth; transplanted into 5 gal fabric pot; installed ScROG and will continue veg stage until rest of the plant catches up to at least a few inches above the screen
Likes
128
Share


@Tropicannibis_Todd
Follow
So this was my first ever Tiny Pot 👈 wasn't sure if I could even do it 🤔 But instead it was a blast , she grew even better then expected , so much so I may do another 👍
She was a hungry plant the hole cycle, figuring out her feeding became a great learning tool , I gained alot of experience growing this one 😀
I used rain water the hole grow , to which she required feeding daily , some day twice 👈
👉I added 4 straws in week 4 to help with air flow to the roots and it worked 💪 So check week 4 to see what I did 😀
👉 Big thanks to all my Growmies out there in GD land 👈 Much appreciated 🙏
Thanks To MarsHydro for the TS1000
👉I used NutriNPK for nutrients for my grows and welcome anyone to give them a try .👈
👉 www.nutrinpk.com 👈
NutriNPK Cal MAG 14-0-14👉 Every Week
NutriNPK Grow 28-14-14👉 Weeks 2 & 3
NutriNPK Bloom 8-20-30👉 Weeks 4 to 8
NutriNPK Bloom Booster 0-52-34👉 Weeks 4 & 9
Likes
38
Share

@Tropicannibis_Todd
Follow
👉Alrighty Then👈
👉Cherry Punch F1👈
We had some real nice growth this , had to do a little leaf management👈 We be in full flower mode .....
Everything is looking good 👍Having issues due to using my well water , it's hard so I'm having slight issues but I am on it .....
So ive up'd the nutrients to accommodate pre flower .....
Soil by Promix
Nutrients by Cronks
Lights by MarsHydro.ca FC4800 X UR45 X Adlite Deep Red And Blue
Tent 4x4x6.5 & Equipment by MarsHydro.ca
High reflectivity inner mylar
Thick Oxford fabric
Smooth heavy duty zipper
Sturdy metal frame
Zipper blackout cloth
Good anti light leakage performance
The 6in Inline kicks ass moves alot of air
●Blue Light Effect:
Blue light shortens internodes, resulting in shorter, stronger plants, ideal for supporting fruit development later. During vegetative growth, blue light promotes lateral branch development effectively.
Well this should be fun 🙃
Thanks to all my growmies out there for stopping by its much appreciated 👈
👉Happy Growing👈
Likes
48
Share


@MadeInGermany
Follow
Info:
Unfortunately, I had to find out that my account is used for fake pages in social media.
I am only active here on growdiaries.
I am not on facebook instagram twitter etc All accounts except this one are fake.
Have fun with the update.
Hey everyone 😁.
Not much has happened this week :-).
Last week's pump failure delayed the whole thing for a few days 😅.
As the lower leaves are now starting to turn yellow, they should show their first roots in the next few days 😊.
The water was completely exchanged again because the EC value has risen again.
The small cups were sprayed every day so that the air humidity remained in the upper area.
Otherwise everything was cleaned and the pumps, heating rod, etc. checked for their function.
I hope you have a lot of fun with the update.
Stay healthy and let it grow 🍀🙏🏻
You can buy this Strain at
https://www.amsterdamgenetics.com/product/kosher-tangie-kush/
Type:
Kosher Tangie Kush
☝️🏼
Genetics:
Kosher Kush
X
Tangie
👍
Vega lamp: 2 x Todogrow LED CXB3590 COB 55 W
1 x Sanlight S2W 62 W
💡
Flower lamp : 2 x Todogrow LED CXB3590 COB 55 W
1 x Sanlight S2W 62 W
💡 ☝️
Grow Aero System : Growtool 0.8
☝️
Fertilizer:
Canna Aqua Vega A + B , Canna Aqua Flores A + B , Rizotonic, Cannazym, CANNA Boost, Pk 13/14, Canna Cal / Mag, Canna Ph - Grow, Canna Ph-Bloom
☝️🌱
Water:
Osmosis water mixed with normal water (24 hours stale that the chlorine evaporates) to 0.2 EG. Add Cal / Mag to 0.4 Ec Ph with ph- to 5.2 - 5.8
💦 💧

Likes
5
Share


@AlbasDiary
Follow
Pues las banana son lo mas bello que he plantado, con un efecto muy potente y unos sabores deliciosos.
Este es el ultimo diario que escribo de esta tanda de preciosas plantas.
Os mando un abrazo enorme, nos vemos en unos días con una nueva tanda de preciosas plantas💚
Buenos humos jardineros mios!😘😘😘
Likes
31
Share


@Sider79
Follow
Some Faded bottom leaves . Temps are lower . Not sure if my questions are seen but moving forward with my first Auto Blow Dream grow.
